


2-10
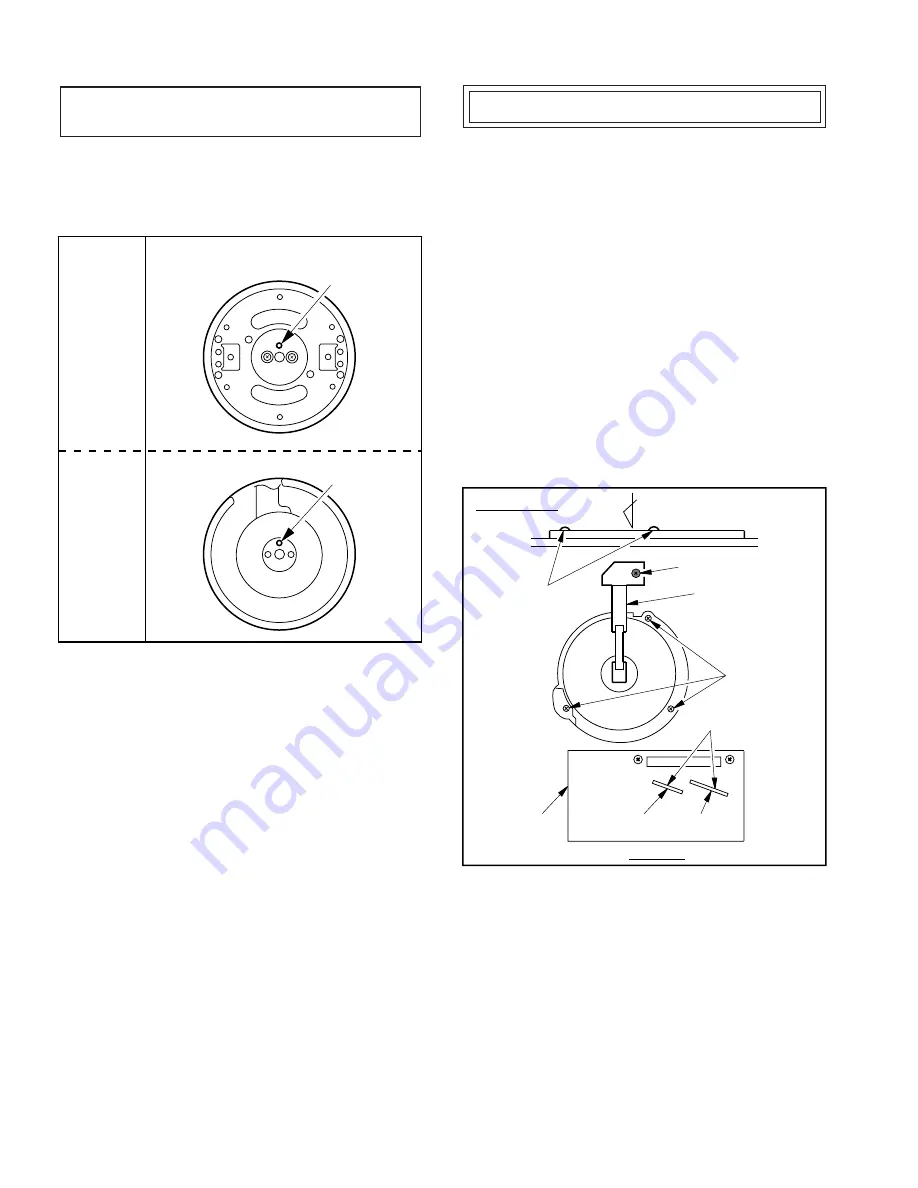
Upper
Cylinder
D.D.
Cylinder
Hole
Indentation
REPLACEMENT OF CYLINDER UNIT
Work with extreme care when removing or replacing the
Cylinder Unit. Do not touch Video Heads during servicing.
1. Remove the VCR Chassis Unit.
2. Remove the VCR Main C.B.A.
3. Place the Mechanism Chassis and Cassette Up Ass'y
upside down.
4. Remove Black Screw (A) and Earth Plate Unit.
5. Remove 3 Screws (B).
6. Place the Mechanism Chassis and Cassette Up Ass'y in a
normal position.
7. Remove 2 Screws (C) and then lift the Cylinder Unit and
Head Amp Ass'y slowly from top side.
Note :
Since there is very little clearance between the
Cylinder Unit and the chassis, remove the Cylinder Unit
gently and carefully.
8. Unsolder P3502 and P3503 on the Head Amp Ass'y and
then remove the Head Amp Ass'y from the Cylinder Unit.
9. Place the Mechanism Chassis and the Cassette Up Ass'y
upside down.
Fig. M5-1
10. Reinstall the Cylinder Unit on to the chassis by reversing
the procedure previously described.
3. REPLACEMENT OF UPPER CYLINDER
UNIT
1. Install the Upper Cylinder Unit carefully so that the hole in
the Upper Cylinder Unit is properly matched to align the hole
on the Upper Cylinder to the center of the indentation on the
D.D. Cylinder. For details on the installation position, refer
to Fig. M4.
Fig. M4
2. Tighten 2 Screws with Washers (A) shown in Fig. M4.
3. Clean the Upper Cylinder with a deerskin swab (Head
Cleaning Stick) saturated with Ethanol.
Note :
Upon completion of replacement, perform “TAPE
INTERCHANGEABILITY ADJUSTMENT,” Page 2-14,
especially “HORIZONTAL POSITION ADJUSTMENT
OF A/C HEAD,” Page 2-16.
View "A"
Unsolder
P3502
P3503
Screws (B)
Earth Plate Unit
Screws (C)
Black Screw (A)
"A"
Bottom View
Head Amp
Ass'y
Summary of Contents for OmniVision PV-M1326
Page 42: ......
Page 43: ......
Page 44: ......
Page 45: ......
Page 46: ......
Page 47: ......
Page 48: ......
Page 49: ......
Page 50: ......
Page 51: ......
Page 52: ......
Page 53: ......
Page 54: ......
Page 55: ......
Page 56: ......
Page 57: ......
Page 58: ......
Page 59: ......
Page 60: ......
Page 61: ......
Page 62: ......
Page 63: ......
Page 64: ......
Page 65: ......
Page 66: ......
Page 67: ......
Page 68: ......
Page 69: ......
Page 70: ......
Page 71: ......
Page 72: ......
Page 73: ......
Page 74: ......
Page 75: ......
Page 76: ......
Page 77: ......
Page 78: ......
Page 79: ......
Page 80: ......
Page 81: ......
Page 82: ......
Page 83: ......
Page 84: ......
Page 85: ......
Page 86: ......
Page 87: ......
Page 88: ......
Page 89: ......
Page 90: ......
Page 91: ......
Page 92: ......
Page 93: ......
Page 94: ......
Page 95: ......
Page 96: ......
Page 97: ......
Page 98: ......
Page 99: ......
Page 100: ......
Page 101: ......
Page 102: ......
Page 103: ......
Page 104: ......
Page 105: ......
Page 106: ......
Page 140: ......
Page 141: ......
Page 142: ......
Page 143: ......
Page 144: ......
Page 145: ......
Page 146: ......
Page 147: ......
Page 148: ......
Page 149: ......
Page 150: ......
Page 151: ......
Page 152: ......
Page 153: ......
Page 154: ......
Page 155: ......
Page 156: ......
Page 157: ......
Page 158: ......
Page 159: ......
Page 160: ......
Page 161: ......
Page 162: ......
Page 163: ......
Page 164: ......
Page 165: ......
Page 166: ......
Page 167: ......
Page 168: ......
Page 169: ......
Page 170: ......
Page 171: ......
Page 172: ......
Page 173: ...Printed in Japan R...