background image

DVD

TV

VCR

EXT LINK

RF IN

RF OUT

AV 1

AV 2

VCR / DVD

Receiver

Aerial

21-pin scart cable

16

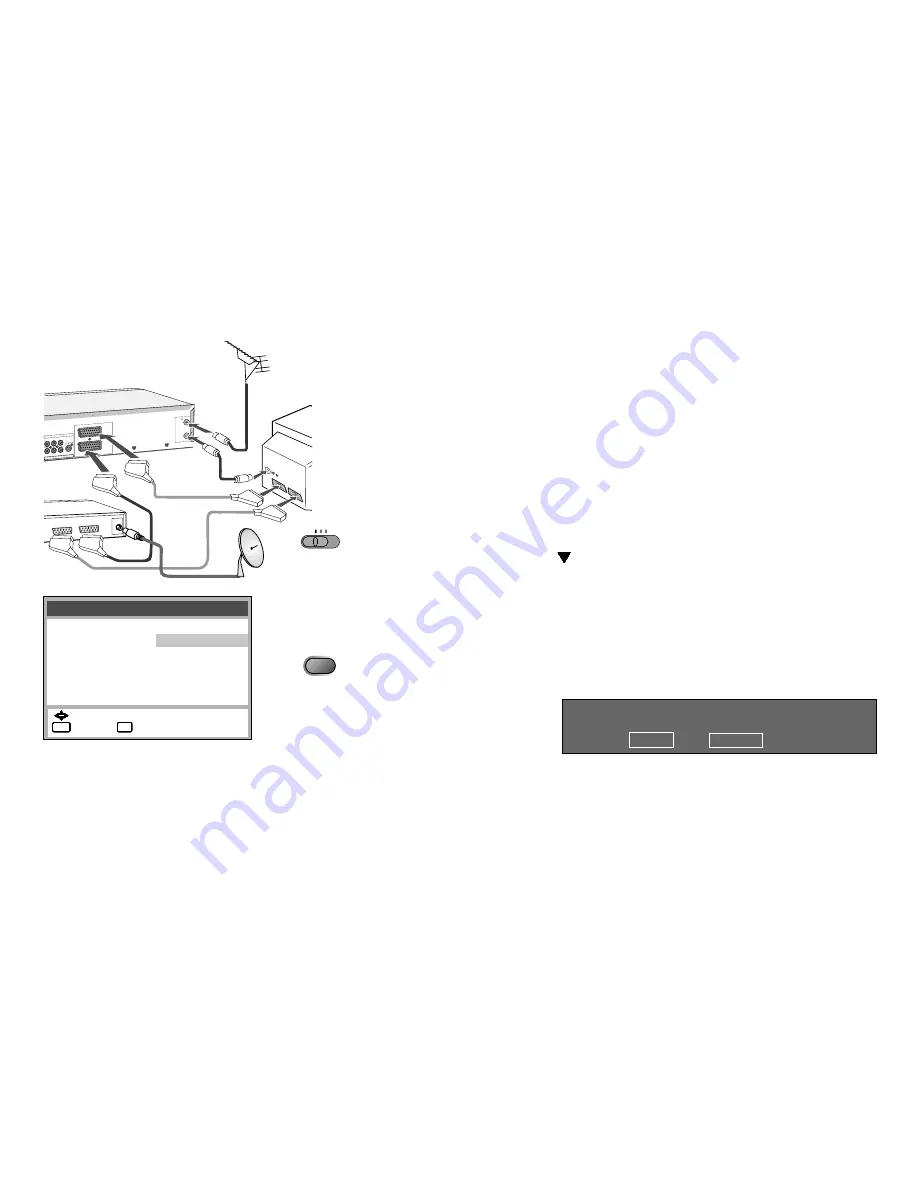
External recording control  

!

Press the 

EXT LINK

 button to activate the VCR's recording standby mode. As long 

as the Video- or Controlsignal is being transmitted by the Satellite or Digital 
Receiver, the VCR will record.

The following screen will be shown 
if you selected EXT LINK 2: 

D

Be sure that the timer programmes stored by your VCR do not overlap the ones of 
the satellite or digital receiver.

D

Some external equipment may not work with this function, refer to the operating 
instructions for the external unit.

!

!

Press 

ENTER

 to hide the message.

Press the 

EXT LINK

 button to stop recording.


ENTER


: yes    EXT LINK  :cancel         

         EXT LINK recording in progress.

The AV2 input of this VCR is equipped for future use with external equipment having 
external timer recording control such as digital satellite receivers. The AV2 input can 
be set to EXT LINK 1 or EXT LINK 2 depending on the equipment to be connected. 
Fully wired 21-pin scart cable is required. Refer also to the manufacturer’s instruction 
for the external unit.

EXT LINK 2:

  The VCR will start recording when AV2 input detects the video 

signal and stop recording when the video signal is switched off by 
the external unit.

EXT LINK 1:

  The VCR recording start and stop time is controlled by a control 

signal sent via the 21-pin scart cable from the external unit, e.g. the 
F.U.N. receiver (TU-DSF31).

External recording control

!

Press 

MENU

 and select Others


!

Press 

ENTER

!

Select EXT LINK 2 or 1

!

Press 

MENU

 to return to the Menu screen.

Others                                        2 / 2


 :


select 


: return


: exit

MENU

MENU

MENU

MENU

MENU

MENU

MENU

MENU

EXIT

EXIT

EXIT

EXIT

EXIT

EXIT

EXIT

EXIT

Remote

: VCR 1

EXT LINK

:  2

Summary of Contents for NV-VP25

Page 1: ...uctions NV VP30 NV VP25 Before you connect or adjust any settings read through the operating instructions OPEN CLOSE EJECT I VCR NV VP30 TIMER CHECK MUSIC WITH PICTURE PROG PLAY REC CHECK QUICK ERASE PAL DVD RAM VIDEO PLAYBACK DVD CD PLAYER PULL OPEN DVD ...

Page 2: ...use fire or electric shock Service Do not attempt to repair this unit by yourself If the sound fails the display is off smoke escapes from the unit or any other problem occurs that is not described in these operating instructions disconnect the power supply and contact your dealer or an authorised aftersales service centre CLASS 1 LASER PRODUCT Inside of product Back of product see page 8 Produkte...

Page 3: ...S AND DO NOT REPAIR YOURSELF REFER SERVICING TO QUALIFIED PERSONNEL CAUTION DO NOT INSTALL OR PLACE THIS UNIT IN A BOOKCASE BUILT IN CABINET OR IN ANOTHER CONFINED SPACE ENSURE THE UNIT IS WELL VENTILATED TO PREVENT RISK OF ELECTRIC SHOCK OR FIRE HAZARD DUE TO OVERHEATING ENSURE THAT CURTAINS ANDANY OTHER MATERIALS DO NOT OBSTRUCT THE VENTILATION VENTS DO NOT OBSTRUCT THE UNIT S VENTILATION OPENIN...

Page 4: ...ears on the VCR or DVD display Use the VCR DVD OUTPUT button to switch over the picture signal To directly change the VCR or DVD output use the VCR TV DVD toggle switch in combination with a function button e g PLAY A video cassette is in Playback Slow Playback Still Playback Forward and backward search A disc is in VCR Fast winding 4 Playback of an audio CD including video output Plays back progr...

Page 5: ... mode the unit is still consuming a small amount of power Selects the TV set s AV port To switch on and out the TV To select the respective TV programme memory location To control TV set volume TV Operations General Operations OSD menu selection buttons ENTER Selects or saves a setting Quits a menu Remote control toggle switch For changing between VCR DVD and TV functions AV input select button To...

Page 6: ...R picture At each press of the button the selected sound output is indicated Stereo Display L R Left channel Display L Right channel Display R Mono Display Displays the main menu VCR Recording Operations CANCEL Clears an entry you made RESET Resets the counter to 0 00 00 Video recording page 11 Toggles between TV reception and video playback channel Displays the menu ShowView page 15 Plays back pr...

Page 7: ...k will be resumed at the point where you stopped it To cancel the Resume function Open the disc tray switch unit to standby mode or press STOP until disappears from the display D The resume function is available only if the disc runtime is displayed during playback Operations DVD Changes the audio track page 37 Enables the on screen display page 34 Displays the main menu of a DVD page 42 Enables t...

Page 8: ... mains AV socket on the rear of the TV set The VCR DVD audio video output or AV1 scart socket are to be used for connection of the unit to the TV set red white Use the RF aerial socket to connect the unit to the TV set To be able to receive TV programmes it is mandatory that you connect the RF coaxial cable even if the appliance is connected via a 21 pin scart cable or the video output Note on all...

Page 9: ...y protected The recorder must be able to process signals with a scanning frequency of 48 kHz 16 bit You cannot make recordings from MP3 WMA originals For optimum surround sound connect a digital amplifier or a digital audio component To play programmes with a 5 1 channel surround sound connect the digital audio output OPTICAL with an external Multi channel Dolby Digital Decoder for example Rear of...

Page 10: ... the MENU button for approx 7 seconds The preset channel appears on the display Tune the TV set until the test pattern appears If there is any interference select another channel for the TV set and VCR DVD player Press the CH button to change the channel e g to channel 39 Tune the TV set until the test pattern appears Press ENTER to confirm If you decide to just use the RF coaxial cable to connect...

Page 11: ...art cable Press to start recording Press the Stop button to stop recording To pause recording To resume recording REC The VCR display shows time counter tape remain Press OSD DISPLAY until REMAIN is displayed Tape Remain counter indicator SP normal recording time optimal picture quality LP double recording time simple picture quality EP triple recording time reduced picture quality D When you play...

Page 12: ... on the video cassette Quitting the timer mode you entered previously Press TIMER the VCR symbol turns off You can now play back a cassette or make a manual recording Press TIMER again to reactivate the timer programme Displays the timer programmes for verifications button on the unit only Repeatedly press the button to view the details of the timer programmes on the VCR display 12 The Timer recor...

Page 13: ... there is not enough tape remain to complete it the SP LP function will automatically run the tape at LP speed This ensures that the entire programme will be recorded If the LP mode is not enough to stretch the remaining tape to fit you will not be able to record all of the TV programmes D It is not possible to automatically activate the EP mode A Checking the timer programme Press PROG CHECK the ...

Page 14: ...mme 14 Editing a programme Press I TIMER Press or I TIMER to select a programme Press ENTER to display the Timer recording screen To change any of the data press Press ENTER to store a change Press TIMER to activate the timer mode Accept already saved recording time Press I TIMER Press or I TIMER to select a programme Press TIMER to activate the timer mode Timer recording 1 3 select store delete e...

Page 15: ... information so that you will not have to enter it again later Editing a programme Press ENTER to alter the timer data Select a station Set the date week or day of week Enter the start time Enter the stop time Set the tape speed A Automatic SP LP EP Press or the VPS PDC button to change the VPS PDC setting Press ENTER to store a change Press TIMER to activate the timer mode The symbol appears on t...

Page 16: ...nput of this VCR is equipped for future use with external equipment having external timer recording control such as digital satellite receivers The AV2 input can be set to EXT LINK 1 or EXT LINK 2 depending on the equipment to be connected Fully wired 21 pin scart cable is required Refer also to the manufacturer s instruction for the external unit EXT LINK 2 The VCR will start recording when AV2 i...

Page 17: ...nnect the decoder to the unit s AV2 socket Video Audio L R 17 Setting the channel to Decoder Press MENU Select Tuning press ENTER to confirm Press ENTER to select Manual Select the coded channel press ENTER to confirm Choose Decoder Set Decoder to ON Interferences of the background picture vanish Press EXIT to quit the menu D AV2 must be preset to DECODER page 21 Connecting to AV3 Connect your ext...

Page 18: ...on has been set Press MENU to return to the station table D If you used the timer function ShowView for timer programming before manually setting a TV station the TV station chosen might be referred to as 99 different programme memory locations are available for TV station reception You can manually set these programme memory locations including the option to rename them For reception of coded cha...

Page 19: ...ete the station Manual SETUP 19 Changing the name of TV stations Press MENU Select Tuning press ENTER to confirm Select Manual press ENTER to confirm Select a TV station press ENTER to confirm Tuning Pos Name Ch Pos Name Ch 6 VOX 8 7 PRO7 95 8 RTL2 85 9 KABE 97 10 S RT 98 1 ARD 7 2 ZDF 4 3 N3 2 4 RTL 12 5 SAT1 13 Pos Name Channel Fine tuning Decoder Video system Mono Audio mode 1 7 AUTO OFF AUTO O...

Page 20: ...lug the AC Mains lead Shipping condition restoring factory defaults 20 Manual SETUP Restart Auto SETUP The Auto Setup menu will be displayed The Automatic Tuning will start The Country menu will be displayed Select a country press ENTER to confirm Tuning Manual Auto Setup Shipping condition yes no ENTER ENTER ENTER ENTER ENTER ENTER ENTER ENTER EXIT EXIT EXIT EXIT EXIT EXIT EXIT EXIT OK Auto Setup...

Page 21: ...em Changes with Press MENU to quit the menu 21 BG DK I Sets the audio standard of RF Converter output Sets the tape length of the cassette you use AUTO E 240 E 195 E 260 E 300 Selects the type of external unit connected to the VCR DVD s outlet AV2 DECODER If a decoder is connected EXT If another video recorder or satellite receiver is connected AUTO Automatically detects PAL or MESECAM PAL If you ...

Page 22: ...en The language set for the Video menu does not depend on the DVD SETUP menu language Press MENU Select Clock set press ENTER to confirm Select MANUAL press ENTER to confirm Set Time Date with or Press ENTER to store Press EXIT to quit the menu screen 1 2 3 0 22 OFF Records stereo sound ON Used during NICAM programmes to record normal mono sound on the Hi Fi audio tracks or if the stereo sound is ...

Page 23: ...uring playback or in Stop mode Fast forward Rewind Every time you press the button max 20 times the video recorder will find the start of the next recording Playback will start automatically Press Stop to exit the Search function Erasing a cassette Press and hold the QUICK ERASE button for a couple of seconds to remove all recordings from a cassette It takes approx 30 minutes to erase an E 180 cas...

Page 24: ...n a PAL type TV set PAL 60 You cannot record on or copy video cassettes to NTSC format cassettes Automatic Playback Insert a cassette whose protection tab has been removed and the VCR will automatically start playback You do not have to press PLAY Auto Start Inserting a video cassette will automatically switch on the VCR Playback in standby mode Insert a cassette and press the PLAY button to switc...

Page 25: ...s you back to the previous on screen menu DVD QUICK SETUP Select the audio subtitle language If the language you want is not on the list go to item Other and type in the appro priate language code last page using the numeric key pad of your remote control unit Select your TV s aspect ratio The format of TV screens is either 4 3 standard or 16 9 wide screen Select the aspect ratio that matches the ...

Page 26: ...these buttons pressed continuously displays the next single frame in the chosen direction You can also use button to move the film forward a single frame at a time D VCDs do not support a backward motion by single frames POSITION MEMORY Using the Position Memory function playback will be resumed at a stored position The position tag is retained when you change discs or when the unit goes into stan...

Page 27: ...a random order PLAY to start random playback PLAY MODE in Stop mode to cancel the random play function Chapter review The first couple of seconds of every chapter of a DVD V are played back STOP during playback PLAY The screen Press PLAY to Chapter Review is displayed PLAY The first couple of seconds of every chapter are played back Normal playback will be resumed at the point where you stopped it...

Page 28: ... restore the original ratio ZOOM until x 1 00 is displayed The original ratio is also restored by opening the disc tray or when the unit goes into standby mode D The zoom functionality may be restricted depending on the disc format REPEAT REPEAT during playback Repeatedly press the button to browse the settings as follows DVD V Chapter Title Off DVD A Track Group Off RAM Program All Off Scene Play...

Page 29: ...ynchronous recording D Playing back music NTSC formatted films or copy protected discs might result in interferences MUSIC with PICTURE It is possible to simultaneously use the DVD player for playing back a music disc and presenting video pictures Set the VCR TV DVD switch to DVD Press PLAY to start music disc playback Press MUSIC w PICTURE The VCR output is displayed You can input a signal from e...

Page 30: ...LAY Playback will start in the programmed order To modify entries To select an entry press ENTER Modify the entry as appropriate ENTER to store the modified entry To quit the programme play mode PLAY MODE in stop mode until the programme play screen disappears The actual programme will be retained D Switching off the player or opening the disc tray will clear the programme Playing back a particula...

Page 31: ...iles must be extended by JPG jpg JPEG or jpeg and compressed in format 4 2 2 or 4 2 0 MENU displays the JPEG ALBUM Use the cursor keys and ENTER to select the pictures Press Prev or Next and ENTER to page through the album Menu item Tree controls the group directory Press and ENTER to take your pick RETURN or MENU quit the menu screen To rotate pictures ANGLE PAGE while the picture is being displa...

Page 32: ...arting with the word you specified are output to the match list If there are no matches Not found press RETURN to change your search entry Prev Next browses the album for the previous or next group Your DVD player can play DVD RAM discs recorded in the video recording format version 1 1 by a DVD video recorder DVD video camera computer etc DIRECT NAVIGATOR to display quit the menu Only programme n...

Page 33: ...T NUMBER 0 0 9 9 No 1 2 3 Playlist title Sorted according to artist Sorted according to sampler Sorted according to category Sorted according to category Playlist Group Content Selecting from the Playlist Press MENU while playing The Playlist appears indicates the item currently playing Press then to switch between the Playlist group and content lists Press then to select an item and press ENTER T...

Page 34: ... to a chapter if the disc hosts several Angle Change between camera angles of films recorded from various camera locations Program Programmes stored on a DVD RAM page32 Group MP3 WMA or DVD A tracks or JPEG pictures defined to make up a group You can also provoke an on screen display by pressing the GROUP button on your remote control unit Title or Track Allows you direct access to a title track i...

Page 35: ...e Cinema 1 Cinema 2 User Normal Refer to page 36 Repeat Mode Repeat function page 28 OSD Brightness User defined brightness of OSD displays Bitrate Display Displays the video image data rate per second Mbps Play Mode Display normal playback RND Random play PGM Programme play Zoom Zoom function page 28 A B Repeat Allows you to keep repeating a defined section between positions A and B of an item Pr...

Page 36: ...s setting for dark scenes User User defined colour contrast and brightness settings Normal Normal Factory default Dialogue Enhancer Available in the Dolby Digital format and DTS with 3 or multiple channels only Repeatedly press the button to browse the settings Dialogue Enhancer ON Dialogue Enhancer OFF Factory default D The function Dialogue Enhancer is not supported by all discs 36 The CINEMA fu...

Page 37: ...s ENTER to confirm RETURN takes you back to the previous screen SETUP quits the menu Audio Select a dialogue language as appropriate The menu lists eight languages for you to choose from Original The primary language on the disc is played If the language you want is not on the list go to item Other and type in the appropriate language code using the numeric key pad of your remote control unit last...

Page 38: ... a rating factory setting is 8 When you select a rating between 0 and 7 you will be automatically prompted for a password Type in a 4 digit code using the numeric key pad of your remote control unit ENTER confirms your entry Press or CANCEL to delete any mistakes The picture of a closed padlock tells you that the system is locked Make sure not to forget your password code To change the setting Typ...

Page 39: ...ally selects the optically better type of image Field Poorer quality than a frame based image however the image is less fuzzy Frame Both fields of a picture alternate on the screen Although the image may be somewhat fuzzy its quality is better than that of a field based still image TV Aspect The format of TV screens is either 4 3 standard or 16 9 wide screen Choose the 16 9 format if your player i...

Page 40: ...hat the equipment cannot process will be output by this unit causing high levels of noise which can damage your hearing and the speakers PCM Down Conversion Pulse Code Modulation PCM is the standard method used to record digital music signals on audio CDs DVD Videos can be produced using the linear PCM method which is based on a sampling frequency of up to 96 kHz For reasons of copyright protectio...

Page 41: ... Screen Messages The TV screen displays the commands you give by pressing the buttons on the remote control unit Select Off to suppress the display of on screen commands Mixed Disc Audio Stills Your DVD player can play back display discs in the MP3 WMA audio and JPEG image formats Select a playback format JPEG or MP3 WMA if the disc provides data in both formats DVD Video Mode Playing back a DVD A...

Page 42: ... outputs to the TV screen The audio tracks of many DVDs contain audio material in up to 8 languages The DVD menu has an option for selecting the language you prefer Many DVDs provide subtitles in several languages They may contain material in up to 32 different languages Some DVD player functions can be controlled by the DVD itself DVD menu Some DVDs have multiple menus Pressing TOP MENU to displa...

Page 43: ...t any harmful substances such as lead cadmium mercury Do not use rechargeable type batteries Remove the batteries if the remote control unit is not used for longer periods of time Do not heat or short circuit the batteries Immediately remove used up batteries and replace with batteries of type AA UM3 or R6 Be sure not to confuse the polarity and Dispose of batteries packaging material and the unit...

Page 44: ...p The VCR display is on but the unit does not respond to any input Error code H or F appears This is indicative of a malfunction The digits following H or F depend on what state your player is in Press to put the player into standby mode then briefly unplug and reconnect the AC mains cable Contact the aftersales service if this does not remove the problem Please state the error code displayed by t...

Page 45: ...e use of E 300 cassettes may cause problems if the recordings were taken at slow tape speeds LP or EP Check the settings for PAL MESECAM page 21 Verify that the aerial and or scart cables are attached and work properly Check the SQPB setting for S VHS cassettes page 21 Faulty recordings taken at slow tape speed EP in MESECAM are not indicative of a malfunction Please contact your service technicia...

Page 46: ...code 2 The disc is dirty The disc is in the wrong way round The label of the disc you wish to play must face up Unable to change audio track or subtitle languages You can only choose from the languages actually recorded on the disc Some discs require you to change languages via the disc menu The subtitles are not shown The disc does not provide any subtitles You deactivated the display of subtitle...

Page 47: ...assette linear audio 4 Hz to 44 kHz sampling frequency 96 kHz VCR fast forward fast rewind time approx 60 sec E 180 cassette CD audio 4 Hz to 20 kHz DVD Optical digital output Optical terminal Video TV system VCR PAL 625 50 DVD PAL 625 50 Laser Pick up Wave length 658 nm 790 nm Laser power PAL 525 60 NTSC Class 2 Class 1 Video input and output level 1 0 Vpp 75 Ohm Norwegian Bølgelengde 658 nm 790 ...

Page 48: ...8 Tatar 8484 Xhosa 8872 Basque 6985 Danish 6865 Gujarati 7185 Korean 7579 Nauru 7865 Serbian 8382 Telugo 8469 Yiddish 7473 Bengali 6678 Dutch 7876 Hausa 7265 Kurdish 7585 Nepali 7869 Serbo Croat 8372 Thai 8472 Yoruba 8979 Bhutani 6890 English 6978 Hebrew 7387 Laotian 7679 Norwegian 7879 Shona 8378 Tibetan 6679 Zulu 9085 DTS Digital Surround 9 40 46 NICAM 22 Scart cable 8 INDEX Page DVD RAM 32 NTSC...

Reviews: