background image

8

Blanking of Unused Programme Positions

Follow steps 

1

 to 

3

 of 

Manual Tuning Procedure

.

4

Press the Cursor buttons (

34

M

 to select [CLEAR] then

press the Cursor buttons (

21

M

 to select [ON].

– Repeat steps 

3

4

 for other unused programme

positions to skip during the selection of programme
positions.

– To cancel the blanking of a programme position select

that programme position then set [CLEAR] to [OFF].

5

Press the MENU button 

K

 twice to exit the On Screen

Display.

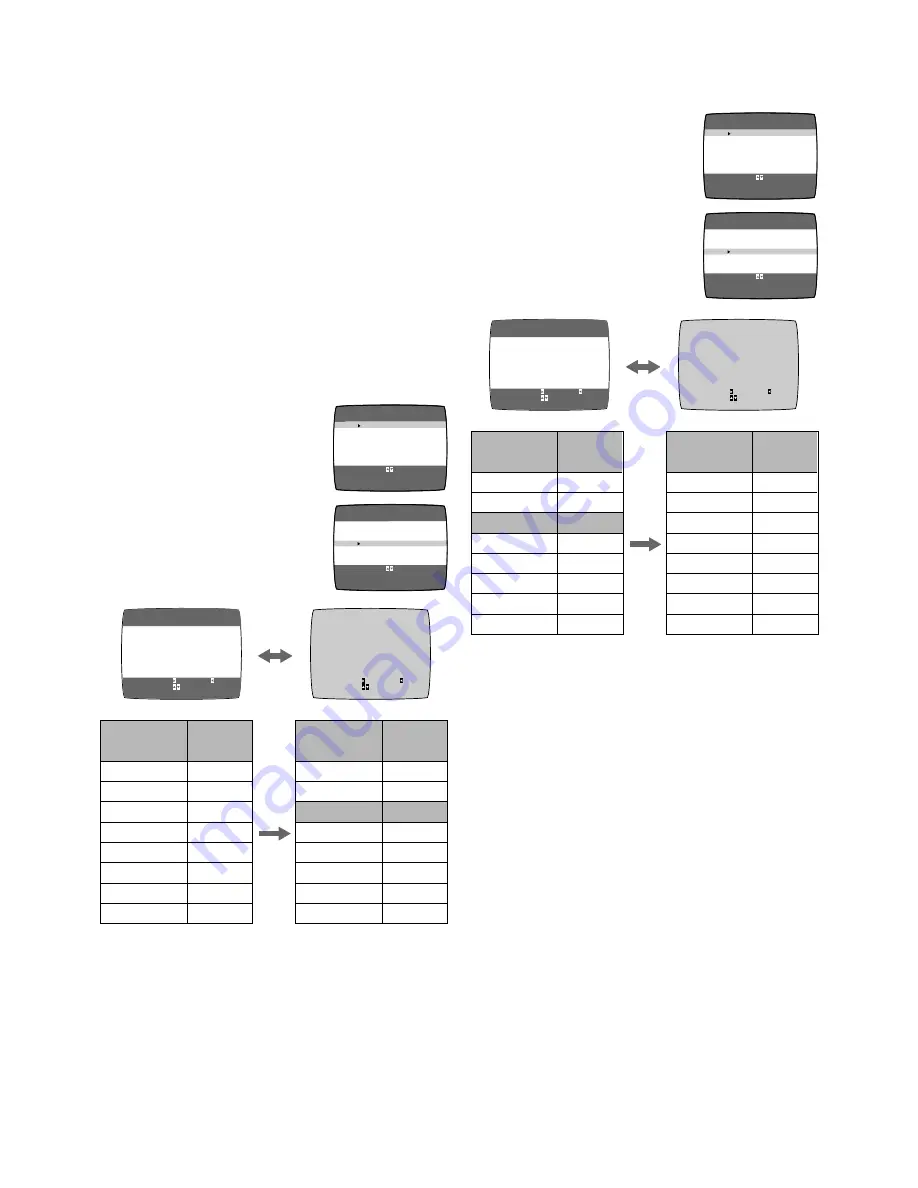
To Add and Delete the Channel

Example:

If you want to add a new channel between Channel 4 and
Channel 6,

1

Press the MENU button 

K

 to display the Main menu on

the TV screen.

Example:

If you want to delete Channel 6,

1

Press the MENU button 

K

 to display the Main menu on

the TV screen.

2

Press the Cursor buttons (

34

M

to select [CH ADD&DELETE] then
press the OK button 

L

.

3

Press the Cursor buttons (

34

M

to select the desired programme
position (example CH3) then press
the Cursor button (

2

M

 to select

[DELETE].

– Deleting a channel shifts the programme positions of

Channel 8 to Channel 12 down, as shown in the list
above.

– The list of the programme positions do not appear on

the On Screen Display.

– Repeat step 

3

 for each of the other programme

positions.

4

Press the MENU button 

K

 twice to exit the On Screen

Display.

END: MENU

CH ADD&DELETE           

CH 3

ADD:

DELETE:

CH SELECT:

END: MENU

CH ADD&DELETE           

CH 3

ADD:

DELETE:

CH SELECT:

LANGUAGE
CLOCK SET
TUNER PRESET
CH ADD&DELETE
SYSTEM
OPTION


MENU

LANGUAGE
CLOCK SET
TUNER PRESET
CH ADD&DELETE
SYSTEM
OPTION


MENU

SELECT
END

:       , OK
:MENU

SELECT
END

:       , OK
:MENU

END: MENU

CH ADD&DELETE           

CH 3

ADD:

DELETE:

CH SELECT:

END: MENU

CH ADD&DELETE           

CH 3

ADD:

DELETE:

CH SELECT:

1

2

3

4

5

6

7

8

2

4

6

8

10

12

1

2

3

4

5

6

7

8

2

4

8

10

12

Programme

Position

Channel

Programme

Position

Channel

LANGUAGE
CLOCK SET
TUNER PRESET
CH ADD&DELETE
SYSTEM
OPTION


MENU

LANGUAGE
CLOCK SET
TUNER PRESET
CH ADD&DELETE
SYSTEM
OPTION


MENU

SELECT
END

:       , OK
:MENU

SELECT
END

:       , OK
:MENU

1

2

3

4

5

6

7

8

2

4

6

8

10

12

1

2

3

4

5

6

7

8

2

4

6

8

10

12

Programme

Position

Channel

Programme

Position

Channel

On Screen Display

2

Press the Cursor buttons (

34

M

to select [CH ADD&DELETE] then
press the OK button 

L

.

3

Press the Cursor buttons (

34

M

to select the desired programme
position (example CH3) then press
the Cursor button (

1

M

 to select

[ADD].

– Adding a channel shifts the programme positions of

Channel 6 to Channel 12 up, as shown in the list above.

– The list of the programme positions do not appear on

the On Screen Display.

4

After adding, tune the added channel. (See steps 

3

in

Manual Tuning 

on page 7.)

– Press the MENU button 

K

 twice and repeat steps 

3

4

for each of the other programme positions.

5

Press the MENU button 

K

 four times to exit the On

Screen Display.

Summary of Contents for NV-SJ230AM

Page 1: ...g TV Broadcasts in Your VCR 6 Language Setting of the On Screen Display 9 Setting the Clock of Your VCR 9 Settings Using the On Screen Display 10 Option Setting 11 Playback 12 Recording 14 Timer Recording 17 Search Functions 19 Before Requesting Service 21 Specifications 23 VQT9640 Before attempting to connect operate or adjust this product please read these instructions completely ...

Page 2: ...oped head cylinder with narrower head windows and tapered cylinder design effectively protects heads from dust and prevents head clogging Plus Alumina Head Cleaner further enhanced cleaning efficiency Based on in house tests with Panasonic video cassettes Actual head life may vary according to conditions of use tape type temperature humidity etc Cautions before you operate this VCR Avoid Humidity ...

Page 3: ... SPEED 4 1 2 3 4 6 CH DATE r s 1 2 3 4 6 5 7 8 9 A F E C B D I H J TV VCR VOLUME AV DISPLAY RESET CANSEL OSD PICTURE MODE SEARCH REC NAVI r W s X W X D INDEX OK INPUT SELECT 1 3 2 1 5 6 9 Í Í JET REW MENU TIMER Á PROG CHECK DIRECT REC ON r s s W X SPEED 4 1 2 3 4 6 CH DATE r s G r OFF K L M N Controls and Components TV VCR VOLUME AV DISPLAY RESET CANSEL OSD PICTURE MODE SEARCH REC NAVI r W s X W X...

Page 4: ... N simultaneously until the hold indication disappears O Cassette compartment P EJECT button Q TAPE REFRESH button R Infra red Remote Control Receiver window S VCR display T CVC indicator The crystal view control function ensure that you always obtain the optimum picture quality so that you get the best picture automatically While the VCR is turned on the CVC indication T is always displayed to sh...

Page 5: ...n Auto Tuning Operations 1 Turn on the TV and the VCR 2 Set the TV to an unused position which you wish to use for your video playback Tune the TV until the display shown below appears on the screen Please refer to the TV manufacturers operating instructions regarding tuning Set RF SELECT by pressing the Cursor buttons 21 M to select the colour TV system used by the TV set to be connected BG PAL B...

Page 6: ...s If Auto Tuning stops halfway by turning the VCR off playback or a power failure 1 Disconnect the mains lead and then reconnect it 2 Turn off the VCR and then turn it on Auto Tuning commences CH 22 SEARCH END MENU 21 AUTO TUNING IN PROGRESS PLEASE WAIT Disappears 1 To Change the RF output Channel In some rare cases after tuning the TV to your VCR interference may be visible on the picture To get ...

Page 7: ... E21 E69 E21 E69 R1 R12 C1 C12 E2 E12 VHF SYSTEM CCIR Standard B G H Hong Kong Special Administrative Region of China UK I East Europe D K K1 China D 44 470MHz C13 C57 Z1 Z35 S01 S05 M1 M10 U1 U10 S21 S41 CATV D K I B G Manual Tuning Procedure 1 Press the MENU button K to display the Main menu on the TV screen 2 Press the Cursor buttons 34 M to select TUNER PRESET then press OK button L 3 Press th...

Page 8: ...the On Screen Display END MENU CH ADD DELETE CH 3 ADD DELETE CH SELECT END MENU CH ADD DELETE CH 3 ADD DELETE CH SELECT LANGUAGE CLOCK SET TUNER PRESET CH ADD DELETE SYSTEM OPTION MENU LANGUAGE CLOCK SET TUNER PRESET CH ADD DELETE SYSTEM OPTION MENU SELECT END OK MENU SELECT END OK MENU END MENU CH ADD DELETE CH 3 ADD DELETE CH SELECT END MENU CH ADD DELETE CH 3 ADD DELETE CH SELECT 1 2 3 4 5 6 7 ...

Page 9: ...s 34 M to select CLOCK SET then press the OK button L 3 Set each item by pressing the Cursor buttons 341 M Press the Cursor button 2 M to return to the previous item At the set time H M point When it is kept pressed the indication changes in 30 minute steps There is no need to press the Cursor button 1 M LANGUAGE CLOCK SET TUNER PRESET CH ADD DELETE SYSTEM OPTION MENU LANGUAGE CLOCK SET TUNER PRES...

Page 10: ...nnel is selected Turn on the VCR To Set the Colour TV System SYSTEM END MENU SELECT AUTO PAL MESECAM NTSC B W CH 1 STANDARD 23 4 5 6 7 0 00 22 SP 1 PAL On Screen Display 1 Press the MENU button K to display the Main menu on the TV screen 2 Press the Cursor buttons 34 M to select SYSTEM then press the OK button L 3 Press the Cursor buttons 34 M to select AUTO The VCR automatically distinguishes bet...

Page 11: ...t can receive PAL signals 4 43 For TVs that can receive NTSC 4 43 signals 3 58 For TVs that can receive NTSC 3 58 signals JET NAVIGATOR To set to the conditions for the Jet Navigator Function Press the Cursor buttons 21 M to select ON or OFF OFF Initially set at this position ON appears on the VCR display and Jet Navigator function works If you select ON OSD REC is set to OFF automatically END MEN...

Page 12: ...s completed To turn the VCR on again press the VCR POWER button 1 Notes The Play Off Timer function works during normal playback When the tape reaches its end during Play Off Timer the tape will be rewound to the start and the VCR will turn itself off To Stop Midway Press the Stop button A 30 min 240 min 180 min 90 min 120 min 60 min Counter display normal playback mode VCR display For Normal Play...

Page 13: ...responding Picture Mode as follows Example Mode Characteristic Example for Purpose STANDARD Normal TV Programme recorded DYNAMIC Clear Vivid Scenery Sports SOFT Mild Rental soft tape CARTOON Delicate Cartoon Pressing the PICTURE MODE button 2 once makes the On Screen Display appear after that pressing it repeatedly changes the indication in the following order DYNAMIC CARTOON SOFT STANDARD Initial...

Page 14: ...ock Counter Remaining Tape Time 2 0 1 5 5 4 1 6 O C T 2 0 0 5 REC Recording Preparations Confirm that the VCR is on Confirm that the TV is on and the VCR viewing channel is selected Operations 1 Insert a video cassette with an intact erasure prevention tab If it has already been inserted press the VCR POWER button 1 to turn the VCR on REC SP VCR display 2 Select the TV station using the VCR Channe...

Page 15: ... the VCR will turn itself off 30 min 240 min 180 min 90 min 120 min 60 min Counter display normal recording mode To Perform Direct TV Recording 1 Insert a video cassette with an intact erasure prevention tab 2 Press the DIRECT REC button Recording of the TV programme that you are viewing on the TV starts In some cases it may not be possible to change the programme position on the TV during Direct ...

Page 16: ... AV Operations 1 Press the Play button 5 to start playback 2 At the point where you want to join a new scene press the Pause Slow button to put it in the still playback mode 3 Press the REC button D to put it in the recording pause mode 4 Start playback on the source unit and search for the point from which you want to record copy onto this VCR 5 When that point is reached press the Pause Slow but...

Page 17: ... select the desired days by pressing the DATE button For example C A Daily recording from Monday to Friday MO FR B Daily recording from Monday to Saturday MO SA C Daily recording from Sunday to Saturday SU SA CATEGORY CH DATE ON OFF SP 1 SU CATEGORY CH DATE ON OFF SP 1 SU SA Timer Recording 4 Key Programming Up to 16 timer programmes including weekly and daily programmes can be recorded up to one ...

Page 18: ...E 2 20 02 21 30 SU SA 25 10 30 11 00 SU 14 15 00 16 00 19TU 5 22 15 23 30 28TH AV 20 02 21 30 30SA 4 19 10 19 55 END MENU 1 2 3 4 5 6 7 8 DATE CH ON OFF 27WE 2 20 02 21 30 SP SU SA 25 10 30 11 00 A SU 14 15 00 16 00 SP 19TU 5 22 15 23 30 EP 28TH AV 20 02 21 30 SP 30SA 4 19 10 19 55 EP END MENU 1 2 3 4 5 6 7 8 Timer Recording from an External Signal Source If timer recording is performed by a unit ...

Page 19: ...is displayed Programmes recorded without deleting data as instructed are not registered in the list END MENU CATEGORY SETTING MOVIE MUSIC DRAMA EDUCA DOCUM SPORT CHILD NEWS OTHER Search Functions Jet Navigator This VCR can display a list of the recorded programmes on the inserted video cassette on the TV screen You can then select the desired programme and the VCR will quickly locate its beginning...

Page 20: ...cording Over the Same Location on a Tape The originally recorded programme is deleted from the list Programme contents starting near the start and end of the newly recorded programme within 10 minutes before the start and after the end of the newly recorded programme are also erased Although old programme contents are also similarly erased in the case of ordinary recording the newly recorded progr...

Page 21: ... See page 22 The TV has not been tuned to the VCR Tune the TV to the VCR See pages 5 6 The video heads are clogged or worn Consult your dealer for further advice The playback picture is distorted when using an E300 type video cassette that was recorded in the LP or EP mode We recommend that you use video cassettes other than type E300 The playback picture is distorted when you record the tape in t...

Page 22: ...cannot be made AV has not been selected Select AV by pressing the INPUT SELECT button J External AV connections are incorrect Check that the connections for external video and audio sources are correct See page 16 AV has not been selected DIRECT REC is set to ON Set DIRECT REC to OFF See page 11 The remote control will not operate correctly The symptom description is indicated in brackets The remo...

Page 23: ...ding Colour signal converted subcarrier phase shift recording Input Level VIDEO IN PHONO 1 0 Vp p 75 ohm terminated Output Level VIDEO OUT PHONO 1 0 Vp p 75 ohm terminated RF Modulated UHF channel E21 E69 75 ohm AUDIO Input Level AUDIO IN PHONO s6 dBV more than 47 kohm Output Level AUDIO OUT PHONO s6 dBV less than 1 kohm Audio Track 1 track Normal mono only Video Horizontal Resolution Colour more ...

Page 24: ...Matsushita Electric Industrial Co Ltd Web Site http www panasonic co jp global ...

Reviews: