background image

Camera Mode

-18-

2

When the image is completely gone, press the 
Recording Start/Stop Button 

(32)

 to stop recording.

3

Release the [FADE] Button 

(7)

.

The still picture cannot fade in or fade out.

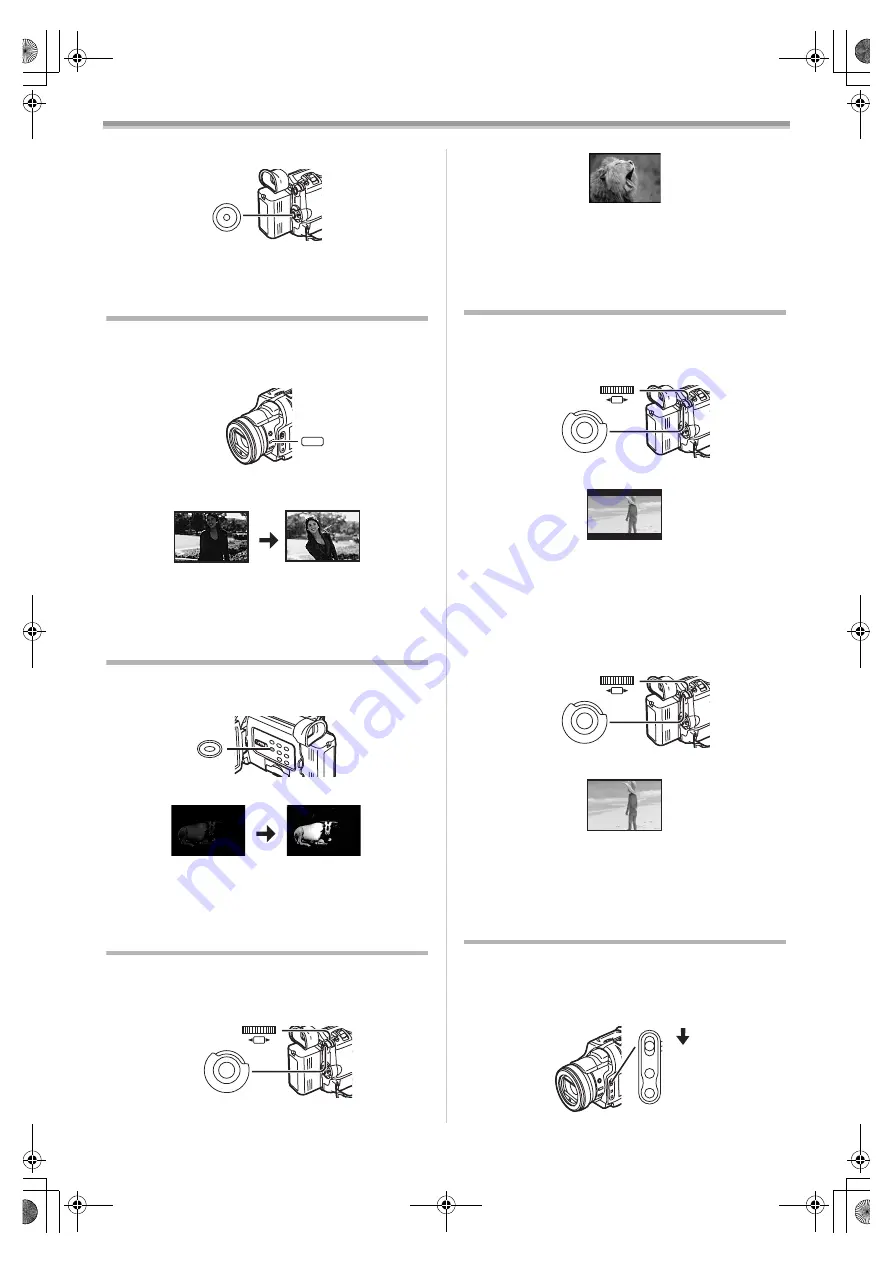
Backlight Compensation Function

This prevents a recording subject from being recorded 
darker in backlight. (Backlight is the light that shines from 
behind a recording subject.)

1

Press the [BLC] Button 

(6)

.

The [

ª

] Indication flashes and then is displayed.

The entire screen becomes brighter.

To Resume Normal Recording

Press the [BLC] Button.

For other notes concerning this item, see 

-44-

.

Colour Night View Function

This function allows you to record colour images brightly in a 
dark place without lighting the Video Flash.

1

Press the [C.NIGHT VIEW] Button 

(20)

.

The [C.NIGHT VIEW] Indication appears.

To Cancel the Colour Night View Function

Press the [C.NIGHT VIEW] Button.

For other notes concerning this item, see 

-44-

.

Wind Noise Reduction Function

This function reduces the sound of a wind hitting the 
microphone when recording.

1

Set [CAMERA FUNCTIONS] >> [RECORDING SETUP] 
>> [WIND CUT] >> [ON].

(32)

BLC

(6)

ª

C.NIGHT VIEW

(20)

C.NIGHT

VIEW

(26)

(51)

M E N U

PUSH

SHUTTER/IRIS/
VOL/JOG

The [WIND CUT] Indication appears.

To Cancel the Wind Noise Reduction Function

Set [CAMERA FUNCTIONS] >> [RECORDING SETUP] >> 
[WIND CUT] >> [OFF].

For other notes concerning this item, see 

-44-

.

Cinema Function and Wide Function

Cinema Function

This function is for recording in a cinema-like screen.

1

Set [CAMERA FUNCTIONS] >> [CAMERA SETUP] >> 
[CINEMA] >> [ON].

Black bars appear at the top and bottom of the screen.

To Cancel the Cinema Mode

Set [CAMERA FUNCTIONS] >> [CAMERA SETUP] >> 
[CINEMA] >> [OFF].

Wide Function

This function is for recording in a wide screen.

1

Set [CAMERA FUNCTIONS] >> [CAMERA SETUP] >> 
[ASPECT] >> [16:9].

The picture stretches vertically.

To Cancel the Wide Mode

Set [CAMERA FUNCTIONS] >> [CAMERA SETUP] >> 
[ASPECT] >> [4:3].

For other notes concerning this item, see 

-44-

Recording in Special Situations

(Programme AE)

You can select optimal automatic exposures under specific 
recording situations.

1

Set the [AUTO/MANUAL/AE LOCK] Switch 

(8)

 to 

[MANUAL].

The [MNL] Indication appears.

WIND CUT

(26)

(51)

M E N U

PUSH

SHUTTER/IRIS/
VOL/JOG

CINEMA

(26)

(51)

M E N U

PUSH

SHUTTER/IRIS/
VOL/JOG

16:9

AUTO
MANUAL
AE LOCK

FOCUS

W.B

(8)

B5-B.book  18 ページ  2002年8月6日 火曜日 午前11時33分

Summary of Contents for NV-MX500

Page 1: ...Digital Video Camera Operating Instructions Before use please read these instructions completely For UK Customers Only Model No NV MX500 VQT0A69 B5 B book 1 ページ 2002年8月6日 火曜日 午前11時33分 ...

Page 2: ...low If in any doubt please consult a qualified electrician ª IMPORTANT The wires in this mains lead are coloured in accordance with the following code Blue Neutral Brown Live As the colours of the wires in the mains lead of this appliance may not correspond with the coloured markings identifying the terminals in your plug proceed as follows The wire which is coloured BLUE must be connected to the ...

Page 3: ... Functions 21 Using the Auto Pop up Flash 22 Digital Effect Functions 22 VCR Mode Playing Back 25 Finding a Scene You Want to Play Back 25 Slow Motion Playback 25 Still Playback Still Advance Playback 26 Finding the End of Recording 26 Index Search Functions 26 Playback Zoom Function 27 Playback Digital Effect Functions 27 Playing Back on Your TV 28 Audio Dubbing 29 Audio Level Adjustment 29 Copyi...

Page 4: ...00011 CR2025 N2QCAD000002 N2QAEC000003 3 4 VFF0161 K2KY8CD00002 28 SD Memory Card RP SD016 RP SD032 RP SD064 RP SD128 RP SDH2 56 RP SDH512 29 PC Card Adaptor for SD Memory Card BN SDABPE 30 USB Reader Writer for SD Memory Card BN SDCAPE 31 Bluetooth Adaptor Kit VW BTC1E Some optional accessories may not be available in some countries ª For United Kingdom and Republic of Ireland www panasonic co uk...

Page 5: ...ABILIZER AUTO MANUAL AE LOCK FOCUS W B 1 2 3 4 5 6 7 8 9 10 C NIGHT VIEW TITLE MULTI P IN P STILL SEARCH SEARCH WEBCAMERA 11 12 13 14 15 16 17 18 19 20 21 22 23 24 14 Card Access Lamp ACCESS 31 15 Card Slot 31 16 Card Slot Cover 31 17 Rewind Review Button 6 25 33 Reverse Search Button SEARCHj 15 Recording Check Button S 15 18 Play Button 1 25 33 19 Fast Forward Cue Button 5 25 33 Forward Search Bu...

Page 6: ...1 Counter Indication Shift Button COUNTER 42 62 Reset Button RESET 52 63 Recording Button REC 30 64 Audio Dubbing Button A DUB 29 65 Cursor Buttons for Variable Speed Search Function π 25 Direction Buttons for Playback Zoom Function π 27 66 Slow Motion Still Advance Buttons E D E reverse D forward 25 67 Index Search Buttons 9 reverse 9 forward 26 68 Selection Button SELECT 27 69 Store Button STORE...

Page 7: ...or under strong light the Movie Camera may not operate properly even within the above ranges Within a 1 metre range you can also use the Remote Controller on the LCD Monitor side of the Movie Camera Selecting Remote Controller Modes When 2 Movie Cameras are used simultaneously they can be operated individually by selecting different Remote Controller Modes If the Remote Controller Mode of the Movi...

Page 8: ...Using the Car Battery Charger If you use the Car Battery Charger VW KBD2E optional you can supply power to the Movie Camera and charge the battery inside your car For further information refer to the instruction manual of the Car Battery Charger Be sure to start the car engine before you connect the Car Battery Charger otherwise the fuse may blow For other notes concerning this item see 42 Chargin...

Page 9: ...ngth of it 54 2 Attach the Grip Belt around your wrist Attaching the Shoulder Strap We recommend that you attach the Shoulder Strap before going out of doors to record so as to avoid dropping the Movie Camera 1 Pull the end of the Shoulder Strap through the Shoulder Strap Holder on the Movie Camera 2 Fold the tip of the Shoulder Strap run it through the Shoulder Strap Length Adjuster and pull it P...

Page 10: ... maximum of 180o 1 from the vertical position to the upward direction and a maximum of 90o 2 to the downward direction Forcefully rotating the LCD Monitor beyond these ranges will damage the Movie Camera Closing the LCD Monitor Push the LCD Monitor until it is securely locked Make sure the Card Slot Cover is closed ª Adjusting Brightness and Colour Level When LCD EVF SET on the DISPLAY SETUP Sub M...

Page 11: ...n of the file After the above File Selection Procedure carry out the various Menu Operations The above procedure will not be repeated in the following instructions List of Menus The figures of the Menus are for explanation purposes only and they are different from the actual Menus MENU PUSH SHUTTER IRIS VOL JOG 26 51 33 O FF ON MODE PICTURE No 25 100 0012 ª CAMERA FUNCTIONS Camera Mode Main Menu 1...

Page 12: ...ON and by exiting the Menu To terminate the Demonstration Mode insert a Cassette or set the DEMO MODE to OFF ª VCR FUNCTIONS VCR Mode Main Menu 1 PLAYBACK FUNCTIONS Playback Functions Sub Menu BLANK SEARCH Blank Search 26 RECORD TO CARD Recording to Card 32 SEARCH Index Search Mode 26 12bit AUDIO Audio Selector 29 AUDIO OUT Audio Output Mode 45 RETURN Returning to the Main Menu 2 DIGITAL EFFECT Pl...

Page 13: ...ave 47 CARD FUNCTIONS PRESS MENU TO EXIT 1 ERASE CARD FILE 2 CARD EDITING 3 DISPLAY SETUP 4 OTHER FUNCTIONS Short Cut Menus of the Card Playback Mode If you use the Short Cut Menu the Card Playback Mode Menu can be called up quickly Press the PUSH Dial to display the Short Cut Menu and turn the PUSH Dial to select the desired Menu FILE SEARCH The FILE SEARCH Menu for finding files by number appear...

Page 14: ...lity of the recorded sound can be selected with AUDIO REC on the RECORDING SETUP Sub Menu High sound quality recording is possible with 16 bit 48 kHz 2 track Mode With the 12 bit 32 kHz 4 track Mode the original sound can be recorded on 2 tracks in stereo while the other 2 tracks can be used for Audio Dubbing ª Opmerking betreffende lithiumbatterijen Bij dit product zijn lithiumbatterijen geleverd...

Page 15: ...sing the S Button 17 briefly in the Recording Pause Mode you can play back the last few seconds of the recorded scene The CHK Indication is displayed After checking the Movie Camera resumes the Recording Pause Mode ª To View the Recorded Scene while the Recording Is Paused Camera Search The recorded scene can be viewed by keep pressing the SEARCHj Button 17 or SEARCHi Button 19 in the Recording Pa...

Page 16: ... Button pressed the Movie Camera will continuously record still pictures in approximately 0 7 seconds intervals until the button is released However this does not operate when using Progressive Photoshot The screen blinks and at the same time a shutter clicking sound is recorded ª Digital Still Picture When the STILL Button 23 is pressed images become still pictures When the button is pressed agai...

Page 17: ...on increases the effect We recommend using MEGA OIS Optical Image Stabilizer Function when performing Card Photoshot Function 26 51 MENU PUSH SHUTTER IRIS VOL JOG 20tW T D ZOOM W T 29 MEGA OPTICAL IMAGE STABILIZER 5 PHOTO SHOT 25 32 3 Press the OPTICAL IMAGE STABILIZER Button 5 repeatedly until the Indication appears To Cancel Image Stabilizer Press the OPTICAL IMAGE STABILIZER Button repeatedly u...

Page 18: ... CAMERA FUNCTIONS RECORDING SETUP WIND CUT ON 32 BLC 6 ª C NIGHT VIEW 20 C NIGHT VIEW 26 51 MENU PUSH SHUTTER IRIS VOL JOG The WIND CUT Indication appears To Cancel the Wind Noise Reduction Function Set CAMERA FUNCTIONS RECORDING SETUP WIND CUT OFF For other notes concerning this item see 44 Cinema Function and Wide Function Cinema Function This function is for recording in a cinema like screen 1 ...

Page 19: ... press the W B Button 10 to select a desired White Balance Mode 1 Automatic White Balance Adjustment 2 Indoor Mode recording under incandescent lamp 3 Outdoor Mode z 4 The white balance setting that was previously set manually 1 To Resume Automatic Adjustment Press the W B Button repeatedly until none of the White Balance Mode Indications z 1 are displayed any more Or set the AUTO MANUAL AE LOCK S...

Page 20: ... 6000K 5000K 4000K 3000K 2000K 1000K 1 AUTO MANUAL AE LOCK FOCUS W B 8 2 Press the PUSH Dial 26 until the Shutter Speed Indication appears 3 Turn the PUSH Dial 26 to adjust the shutter speed Range of Shutter Speed Adjustment 1 50 1 8000 s in Tape Mode 1 25 1 500 s in Card Photoshot Mode 1 50 1 500 s in MPEG4 Mode The standard shutter speed is 1 50 s Selecting a speed closer to 1 8000 causes the sh...

Page 21: ...AL AE LOCK Switch to MANUAL to adjust the brightness manually and then set the AUTO MANUAL AE LOCK Switch to AE LOCK Set the AE Lock again when the TAPE CARD CARD MODE Selector is switched after the AE Lock has been set The brightness setting may be changed Advanced Functions This Movie Camera comes with 4 professional functions Advanced Functions which come in handy for recording ª Zebra Pattern ...

Page 22: ...the ßA Indication is displayed in a dark place and the Video Flash can be lighted AUTO MANUAL AE LOCK FOCUS W B 8 MENU PUSH SHUTTER IRIS VOL JOG 26 51 MENU PUSH SHUTTER IRIS VOL JOG 26 51 26 51 MENU PUSH SHUTTER IRIS VOL JOG 2 Press the STILL Button 23 Video Flash pops up and is lighted automatically and the image becomes still 3 Press the PHOTO SHOT Button 25 or Recording Start Stop Button 32 Vid...

Page 23: ... last recorded scene gradually fades out 1 Set CAMERA FUNCTIONS DIGITAL EFFECT EFFECT1 WIPE or MIX The WIPE or MIX Indication appears 10 NEGA 11 SEPIA 12 B W 13 SOLARI WIPE WIPE WIPE MIX MIX MIX MENU PUSH SHUTTER IRIS VOL JOG 26 51 2 Press the Recording Start Stop Button to start recording 3 Press the Recording Start Stop Button 32 to pause the recording The last scene is stored in memory The WIPE...

Page 24: ...is selected You can select a desired scene one at a time up to 9 small pictures 3 Press the MULTI Button 24 If MANUAL is selected press the MULTI Button at each scene you want to capture 4 Press the Recording Start Stop Button 32 or the PHOTO SHOT Button 25 to record on the Cassette Deleting All the Captured Multi Pictures While 9 multi pictures are displayed press the MULTI Button If MANUAL has b...

Page 25: ...A VCR CARDP B O FF ON MODE 31 33 SEARCH 17 18 21 WEBCAMERA PUSH SHUTTER IRIS VOL JOG 26 Finding a Scene You Want to Play Back ª Cue Review Playback If the 5 Button 19 or 6 Button 17 is pressed during Playback it turns to Cue Playback A or Review Playback B If the Button is held continuously it turns to Cue Playback or Review Playback until you release it ª Variable Speed Search Function The speed ...

Page 26: ...66 PUSH SHUTTER IRIS VOL JOG 26 26 51 MENU PUSH SHUTTER IRIS VOL JOG To Cancel Blank Search Before Completion Press the Button Index Search Functions To facilitate searching of desired scene this Movie Camera automatically records index signals during recording as explained in the following Photoshot Index Signal These signals are automatically recorded whenever still pictures are taken in Photosh...

Page 27: ... same setting can be done using DIGITAL EFFECT Sub Menu on the VCR FUNCTIONS Main Menu To suspend Playback Digital Effect Temporarily Press the OFF ON Button 70 to suspend or restart the digital effect When the digital effect is paused temporarily the selected effect s indication flashes To Cancel the Digital Effect Press the SELECT Button 68 on the Remote Controller and clear the digital effect i...

Page 28: ... pictures captured last is deleted If you continue to press the Button the pictures are deleted consecutively After still pictures are deleted one by one they cannot be displayed again To Cancel Capturing Pictures When Pictures have been captured in Index Mode Press the Button 18 24 MULTI P IN P To Search the tape position of a desired picture among the playback pictures displayed on 9 screens 1 A...

Page 29: ... concerning this item see 46 Audio Level Adjustment You can adjust the Audio Level for audio dubbing by selecting a desired setting for AUDIO LEVEL on the RECORDING SETUP Sub Menu of the VCR FUNCTIONS Main Menu 26 51 MENU PUSH SHUTTER IRIS VOL JOG INDEX INDEX SELECT STOP K L V REW STILL ADV T W s VOL r REC MULTI P IN P A DUB PLAY PAUSE FF W STILL ADV 6 1 5 E D 64 80 When you set MODE of AUDIO LEVE...

Page 30: ... Adaptor MIC AV IN OUT PHONES REMOTE USB EDITD MINI S VIDEO IN OUT 1 2 VIDEO OUT AUDIO OUT S VIDEO OUT 26 51 MENU PUSH SHUTTER IRIS VOL JOG INDEX INDEX SELECT STOP K L V REW STILL ADV T W s VOL r REC MULTI P IN P A DUB PLAY PAUSE FF W STILL ADV 6 1 5 E D 63 83 80 81 Using the DV Cable for Recording Digital Dubbing By connecting this Movie Camera with other digital video equipment that has a DV Inp...

Page 31: ... CARD with a Card inserted the Movie Camera is automatically turned off when you leave it for about 6 minutes without performing any recording When the TAPE CARD CARD MODE Selector 13 is set to CARD you cannot record to the Tape ª Card Photoshot Still pictures can be recorded on the Memory Card from the Movie Camera lens as well as from scenes that have already been recorded on a cassette The size...

Page 32: ...D TO CARD YES CARDMODE TAPE CARD 13 PHOTO SHOT 25 26 51 MENU PUSH SHUTTER IRIS VOL JOG STILL 23 26 51 MENU PUSH SHUTTER IRIS VOL JOG During copying the Indication appears Search starts from the current Tape position and images with Photo Index signals are recorded onto the Card sequentially To Stop Automatic Recording Press the Button 21 For other notes concerning this item see 46 ª Recording a Mo...

Page 33: ...t plays back files recorded on a Card When you set the Movie Camera to Card Playback Mode the Card Contents are displayed to inform you which kind s of data still picture moving picture and or voice data are recorded on the Card 1 Set the Movie Camera to Card Playback Mode The CARD P B Lamp 31 lights up The file that was recorded last on the Card is displayed 2 Slide the TAPE CARD CARD MODE Select...

Page 34: ...DMODE TAPE CARD 13 MULTI P IN P 24 PICTURE 1 2 3 No 25 100 0014 640 640 640 640 640 640 PUSH SHUTTER IRIS VOL JOG 26 The selected file is shown on the entire screen Using File Search Mode 1 Set CARD FUNCTIONS CARD EDITING FILE SEARCH YES 2 Turn the PUSH Dial 26 and select the desired file number and press the PUSH Dial 26 For other notes concerning this item see 47 Recording Pictures on a Card to ...

Page 35: ...e content NOW RECORDING R E C CARDMODE TAPE CARD 13 26 51 MENU PUSH SHUTTER IRIS VOL JOG 18 SLIDE SLIDE To Select Pictures to Play Back in Your Slide Show 1 Set CARD FUNCTIONS CARD EDITING SLIDE SHOW YES EDIT YES 2 Turn the PUSH Dial 26 to select a picture and then press the dial 3 Turn the PUSH Dial 26 to select playback order and then press the dial This step is skipped when there is no picture ...

Page 36: ...25 5 Select COLOUR and press the PUSH Dial 26 turn it to adjust the colour and press it The dark portion of the image is missing 1 and the colours of the bright portion change in order of black blue green cyan red magenta yellow and white after which the bright portion of the image is missing 2 and the colours of the dark portion change in the above order 6 Select RECORD and press the PUSH Dial 26...

Page 37: ...ed from the Card If NO is selected the file selection is cancelled To Select and Delete All Files 1 Slide the TAPE CARD CARD MODE Selector 13 to CARD MODE until the type of data to be erased indication appears 2 Set CARD FUNCTIONS ERASE CARD FILE ERASE ALL FILES A verification message appears 3 Select YES and press the PUSH Dial 26 All the files of the selected Card Mode PICTURE MPEG4 or VOICE are...

Page 38: ...ts set by DPOF 1 is displayed 4 Turn the PUSH Dial 26 and select the number of pictures to be printed and press the PUSH Dial 26 Indication 2 is displayed in the picture set 41 5 Repeat Step 3 and 4 and press the MENU Button 51 when the setup is completed To Verify DPOF Setting Select VERIFY in Step 2 The pictures for which 1 or more print is set in DPOF are played back continuously For other note...

Page 39: ... the Movie Camera to Camera Mode DV DIGITAL STILL PICTURE 40 MIC AV IN OUT PHONES REMOTE USB EDITD MINI 44 3 Connect the supplied USB Cable to USB Socket 44 4 Press the WEB CAMERA Button 21 It enters WEB CAMERA Mode 5 Start the NetMeeting When using as a web camera it is not possible to record on a tape or a card or display a title For more details on the operating environment installation connect...

Page 40: ...l operations In the Card Photoshot Mode the Movie Camera automatically saves file numbers Imga0001 jpg etc along with the images The file numbers are recorded with each image as a consecutive number In the SD_VC100 folder the Voice data Mob001 vm1 etc is recorded It however cannot be played back on Personal Computer The SD_VOICE folder and the Voice files in the folder are set as hidden Depending ...

Page 41: ...Show Playback 35 SLIDE Slide Show Playback Pause 35 M SLIDE Manual Slide Show Playback 35 M SLIDE Manual Slide Show Playback Pause 35 F2 4 When you adjust the F Number manually this indication appears 20 1 White Balance setting Mode 19 z Outdoor Mode 19 Indoor Mode recording under incandescent lamp 19 C NIGHT VIEW Colour Night View Function 18 Z MIC Zoom Microphone 16 WIND CUT Wind Noise Reduction...

Page 42: ...te is open that is set to SAVE You are about to do audio dubbing on the unrecorded blank portion of the tape No Cassette is inserted 9 6 The Battery is low Recharge it 8 0 The built in battery is low 14 The video heads are dirty 49 2END The tape came to end during recording REMOTE Wrong Remote Controller Mode has been selected 7 UNPLAYABLE TAPE OTHER FORMAT You are attempting to play back a tape s...

Page 43: ...d point from where you press the PHOTO SHOT Button When you change to the Still Picture Mode you will hear a click This is the sound of the iris closing and not an indication of malfunction If you record still pictures in Progressive Photoshot Mode when your Movie Camera is set to Programme AE 18 the brightness of the images may change Using the Colour Night View Function cancels the Progressive P...

Page 44: ...Portrait Mode If you record a still picture in Progressive Photoshot Mode the brightness and hue of the recorded still picture may become unstable If this mode is used for indoor recording playback images may flicker When using this mode using the Colour Night View Function cancels this mode Low Light Mode Extremely dark scenes may not be able to be made brighter to a satisfactory degree Spotlight...

Page 45: ...des of EFFECT2 on the DIGITAL EFFECT Sub Menu If you have set EFFECT2 to B W or SEPIA changing the selected White Balance Mode is not possible 19 Setting the Cinema Mode cancels the Picture in Picture Mode and the Multi Picture Mode In the following cases using the EFFECT1 on the DIGITAL EFFECT Sub Menu is not possible When PROGRESSIVE is set to ON 16 When the REC MODE is set to FRAME 16 When the ...

Page 46: ...ckward momentarily but this does not affect the recording If the VOICE Indication is displayed recording to a Card is not possible During the recording with analog input the Card Photoshot and the MPEG4 Recording are not possible Analog Digital Conversion When the Movie Camera is connected with other digital video equipment through its DV Terminal images recorded in analog form from other external...

Page 47: ...e Camera may freeze while a still picture is being displayed Under the condition press the RESET Button When performing Cue or Review Playback of a voice data the Playback elapsed time may not correspond to the actual recording time of the Voice data When playing back a MPEG4 or voice data recorded by another equipment a part of the playback elapsed time may be indicated as ª Voice Power Save Voic...

Page 48: ...n a beach or similar place do not let sand or fine dust get into the Movie Camera Sand or dust may damage the Movie Camera or Cassette Care should be taken when inserting and removing the Cassette Do not spray insecticides or volatile chemicals onto the Movie Camera If the Movie Camera is sprayed with such chemicals the camera body may be deformed and the surface finish may peel off Do not keep ru...

Page 49: ...e is not still clear repeat Steps 1 to 3 Do not use the Head Cleaner for 3 times or more consecutively Notes Do not rewind every time you use the Head Cleaner Rewind only when the tape reaches the end and then use it again from the beginning in the same manner as before If the heads become dirty soon after cleaning the tape may be damaged In this case immediately stop using that Cassette Do not cl...

Page 50: ...r water to enter it ª LCD Monitor Viewfinder Lens Hood LCD Monitor In a place with drastic temperature changes condensation may form on the LCD Monitor Wipe it with soft dry cloth If your Movie Camera is extremely cold when you turn its power on the image on the LCD Monitor is slightly darker than usual at first However as the internal temperature increases it goes back to the normal brightness Vi...

Page 51: ...dication may show remaining tape time that is 2 to 3 minutes shorter than the actual remaining tape time Playback Pictures 1 Pictures cannot be played back even when the 1 Button is pressed 0 Is the VCR Lamp on If the VCR Lamp is not on the playback function cannot be used 25 2 Mosaic pattern noise appears on images during Cue Review or Slow Motion Playback This phenomenon is characteristic of dig...

Page 52: ... that is surrounded by objects with glossy surfaces or by highly reflective objects Because the Movie Camera focuses on the objects with glossy surfaces or on highly reflective objects the recording subject may become blurry 5 Recording a fast moving subject Because the focus lens inside moves mechanically it cannot keep up with the fast moving subject 6 Recording a subject with little contrast Be...

Page 53: ... kohm or more Mic Input Mic sensitivity 50 dB 0 dB 1 V Pa 1 kHz Stereo mini jack Digital Still Picture Digital Still Picture Output Control Signal Input Output Transfer rate max 115 kbps USB Mini SystemD Card reader writer function USB 2 0 compliant max 12 Mbps No copyright protection support Mini System editing terminal Digital Interface DV Input Output Terminal IEEE1394 4 pin Video Flash GN 6 Po...

Page 54: ...NOMY 8MB 45 95 190 2 5 8 16MB 100 200 400 8 13 18 32MB 220 440 880 18 28 39 64MB 440 880 1760 36 56 78 128MB 880 1760 3520 72 112 156 256MB 1760 3520 7040 144 224 312 512MB 3520 7040 14080 288 448 624 Maximum recording time of MPEG4 moving picture on an SD Memory Card optional MPEG4 MODE SUPERFINE FINE NORMAL 8MB 1min30s 2min 6min 16MB 4min 5min 15min 32MB 8min 10min 32min 64MB 17min 21min 1h5min ...

Page 55: ...ory Stop 52 Microphone 16 Microphone Sensitivity Level 21 Mirror Mode 23 Mix Mode 22 Mosaic Mode 23 Moving Picture MPEG4 Recording 32 Multi Picture Mode 24 ª N Negative Mode 23 ª P Photoshot 16 31 Picture Adjustment 22 Picture Size 34 Picture in Picture Mode 23 Playback Digital Effects 27 Playback Zoom 27 Portrait Mode 19 Programme AE 18 ª R Recording Check 15 Recording Pause Mode 15 Recording Spe...

Reviews: