background image

15

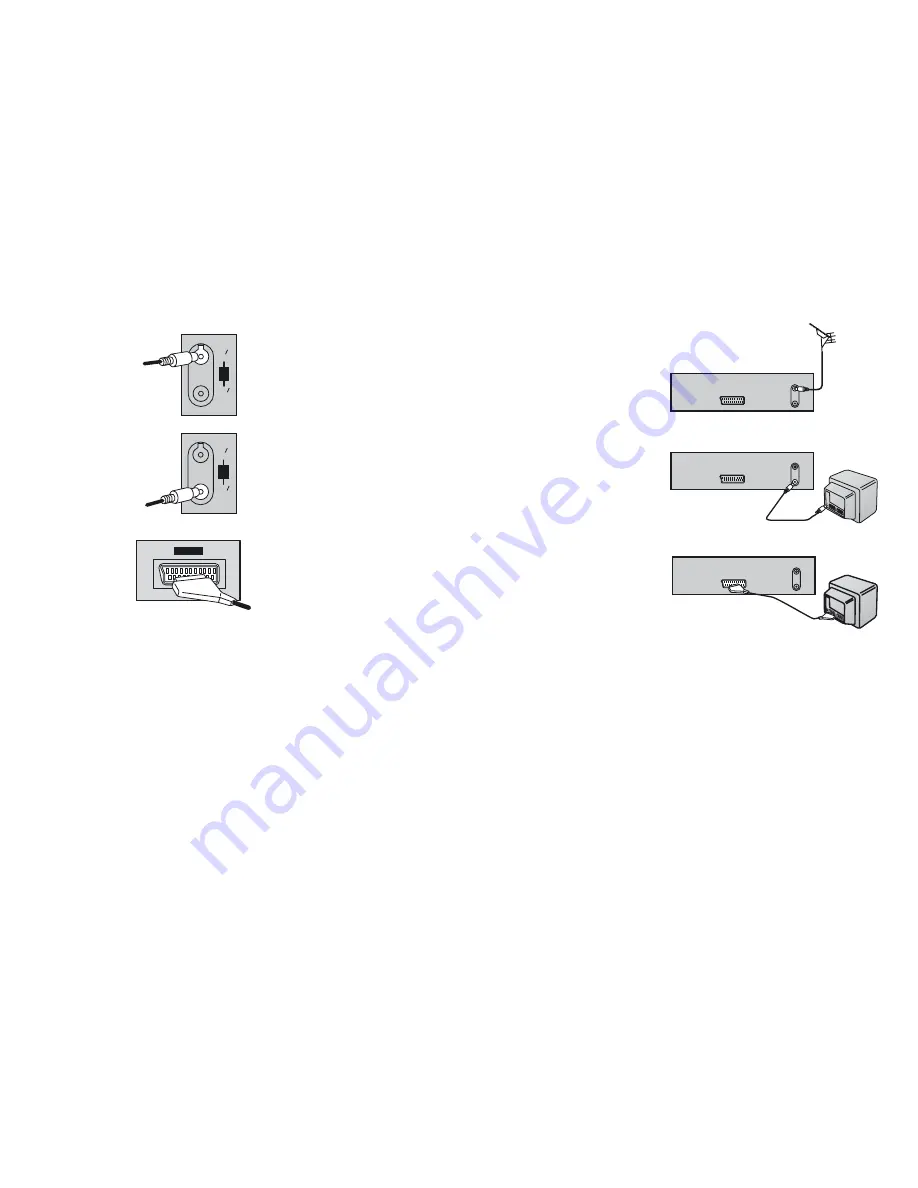
Follow the step-by-step guide below.

Connect the RF cable from the RF Output socket
of the VCR to the TV aerial input socket.

Connect the AV1 21-pin scart socket to the TV scart
socket. If your TV does not have a scart socket or
you do not have a scart cable, skip this step.

Plug the TV, VCR and Satellite Receiver into the mains.

1

Connect the aerial to the RF Input socket of the VCR.

2

3

IN

ENT

RF

ANT

OUT

SORTIE

IN

ENT

RF

ANT

OUT

SORTIE

AV1( TV)

VCR

VCR

VCR

TV

TV

4

Summary of Contents for NV-MV20EB

Page 1: ...34 35 36 37 37 38 39 TVcontrol 40 Advanced functions 41 43 Before requesting service 44 45 Tape Care Cassette erasure protection 46 Specifications 47 Index Last Page withoutScartcable withScartcablesandSatelliteReceiver Externalrecordingcontrol Timerrecording INTELLIGENTTIMER VIDEOPlus ManualTuning ChangingthenameofTVstations ChangingtheorderofTVstations deletingastation RestartAutoSetup Shippingc...

Page 2: ...ds Keep the VCR away from all liquids If water or some other liquid is spilled into the VCR serious damage could occur If this happens disconnect from the mains socket immediately and consult your dealer Caution Video head clogging The picture and sound can be lost or become distorted if video heads become clogged This may happen in certain environmental conditions or if old or damaged or damp tap...

Page 3: ...NG OR SPLASHING AND ENSURE THAT NO OBJECTS FILLED WITH LIQUIDS SUCH AS VASES SHALL BE PLACED ON THE APPARATUS CAUTION DO NOT INSTALL OR PLACE THIS UNIT IN A BOOKCASE BUILT IN CABINET OR IN ANOTHER CONFINED SPACE ENSURE THE UNIT IS WELL VENTILATED TO PREVENT RISK OF ELECTRIC SHOCK OR FIRE HAZARD DUE TO OVERHEATING ENSURE THAT CURTAINS AND ANY OTHER MATERIALS DO NOT OBSTRUCT THE VENTILATION VENTS DO...

Page 4: ... doubt please consult a qualified electrician IMPORTANT The wires in this mains lead are coloured in accordance with the following code Blue Neutral Brown Live As these colours may not correspond with the coloured markings identifying the terminals in your plug proceed as follows The wire which is coloured Blue must be connected to the terminal which is marked with the letter N or coloured Black o...

Page 5: ...mers only www panasonic co uk Order accessory and consumable items for your product with ease and confidence by phoning our Customer Care Centre Mon Friday 9 00am 5 30pm Excluding public holidays Or go on line through our Internet Accessory ordering application Most major credit and debit cards accepted All enquiries transactions and distribution facilities are provided directly by Panasonic UK Lt...

Page 6: ...TIMER REC Defines timer programmes Plays back programmed recordings Activates the recording timer Displays the timer programme for verification Record button Fast winding JET SEARCH Playback button Stop button Selects a channel Ejects the cassette 6 1 2 3 4 5 EXT LINK Activates the recording timer for externally controlled recording 6 7 8 9 10 11 12 Erases a cassette QUICK ERASE 13 1 2 3 4 5 6 7 8...

Page 7: ...type batteries Remove the batteries if the remote control unit will remain unused for longer periods of time Do not heat or short circuit the batteries Immediately remove used up batteries and replace with batteries of type AA UM3 or R6 Be sure to put i n the batteries the right way round and Dispose of packaging material and the unit They must not be thrown into the household refuse batteries acc...

Page 8: ...Playback ENTER VCR VCR VCR VCR VCR VCR VCR EXIT 8 Remote control functions Some Panasonic TV sets accept control signals from the VCR s remote control unit In the table the TV buttons are marked with the VCR buttons with TV VCR TV TEXT Toggles between TV reception and video text reception TV Stand by on switch I Press to switch the unit from on to stand by mode or vice versa In stand by mode the u...

Page 9: ...nction Displays the Timer recording menu Sets the tape speed Activates the recording timer Press the button repeatedly to display the time tape counter or remaining tape RESET CANCEL Resets the counter to 0 00 00 Clears an entry you made Recalls last 5 timer programmes Controls the beginning and end of a recording session by a special signal PDC SP LP EP OFF TIMER OSD DISPLAY RESET CANCEL I TIMER ...

Page 10: ...tellite Receiver using RF cable However using this connection method it may be difficult to obtain a clear picture from the Satellite Receiver For this reason it is not recommended for inexperienced users See preferred connection on page 12 4 4 3 4 Aerial Input socket Aerial Output socket To AC Mains socket To AC Mains socket Aerial Input socket RF Output socket RF Input socket AC Input socket VCR...

Page 11: ...e TV VCR and Satellite Receiver into the mains Notes IN ENT RF ANT OUT SORTIE IN ENT RF ANT OUT SORTIE Satellite Receiver VCR TV VCR Satellite Receiver Switch ON your Satellite Receiver to ensure reliable tuning select either SKY ONE or SKY NEWS Follow the step by step guide below If after Auto Setup is complete the programme position of the satellite receiver is not to your preference or SAT name...

Page 12: ...Scart socket VCR RF cable AC Input socket AV1 21 pin Scart socket RF Output socket RF Input socket Necessary for Connecting a Satellite Receiver Direct Connection Satellite Receiver to TV AV1 socket Connections with Scart cables and Satellite Receiver fully wired socket Mains Satellite Receiver VCR supplied supplied ...

Page 13: ...u are not connecting a Satellite Receiver skip this step Connect the TV scart socket of your Satellite Receiver to the AV1 scart socket of your TV If you are not connecting a Satellite Receiver skip this step Plug the TV VCR and Satellite Receiver into the mains 1 Connect the aerial to the RF Input socket of the VCR 2 3 IN ENT RF ANT OUT SORTIE IN ENT RF ANT OUT SORTIE AV1 TV VCR VCR TV 4 5 VCR Sa...

Page 14: ...o AC AC Mains lead Aerial Input socket RF cable AC Input socket AV1 21 pin Scart socket RF Output socket RF Input socket Necessary for TV AV1 socket Connections with Scart cables fully wired socket Mains VCR supplied supplied ...

Page 15: ...ect the AV1 21 pin scart socket to the TV scart socket If your TV does not have a scart socket or you do not have a scart cable skip this step Plug the TV VCR and Satellite Receiver into the mains 1 Connect the aerial to the RF Input socket of the VCR 2 3 IN ENT RF ANT OUT SORTIE IN ENT RF ANT OUT SORTIE AV1 TV VCR VCR VCR TV TV 4 ...

Page 16: ... you do not need to tune the TV as described above simply select appropriate input mode on TV You can complete the Owner ID now or skip this step and do it later To do it later press the button again Your VCR is now ready to use To set the Owner ID now press the buttons or to enter a four digit PIN number Press to correct the digit Make sure that you will remember the PIN number make a note of it ...

Page 17: ...iously been completed the VCR will not start Auto Setup automaticaliy In this case you can re start Auto Setup again See page 37 If you want to cancel Auto Setup before it has finished press the button You can restart Auto Setup again See page 37 EXIT Note Datum Zeit Clock set Time 12 00 00 Date 11 6 03 MANUAL Press to set the correct time and date Press the button to finish this setting ENTER If ...

Page 18: ...T When the station names and or channel numbers have not been set correctly See page 35 for details When no station has been found confirm all connections of the VCR again and restart the Auto Setup See page 37 for details Notes If station name is The asterisks indicate that a station was found during Auto Setup but has not been named due to weak signal The stations in the list with asterisk will ...

Page 19: ...ER Press the buttons or use the Channel button Numeric CH to select a channel number which differs by 2 or 3 from the present channel number For example if the original channel number was 28 enter 31 Set the RF output channel of the VCR to RF OFF if the VCR is connected to the TV via the 21 pin Scart cable TRACKING V LOCK CH Press the button or Channel button to 0 display if using a 21 pin Scart c...

Page 20: ...hipping condition Owner ID Tape length AUTO E 240 SQPB AUTO OSD 4 3 VCR display DIMMED EXT LINK 1 Others Datum Zeit Clock set Time 12 00 00 Date 11 6 03 AUTO Timer recording 1 3 Pos Date Start Stop PDC Page 27 Page 34 Page 37 Page 37 Page 38 Page 39 Page 33 Menu System 20 ...

Page 21: ...mote control unit allow you to move between menus and to change settings Press to display the Menu screen Select an entry by pressing to access the selected sub menu MENU ENTER Press Select the item you wish to edit Press to access Make the changes as appropriate Follow the on screen instructions Press to return to the previous menu Press to quit the menu ENTER MENU EXIT The selected sub menu is d...

Page 22: ... gives the best picture quality possible by adjusting to the individual tape characteristics Set the TV set to the video channel and insert a cassette into the VCR Normal Playback Cue or Review Playback High Speed Cue or Review Playback JET SEARCH Still Playback Press During playback press and release or To return to normal playback press If you press and hold down the Cue or review playback conti...

Page 23: ...s noise disappear Press or simultaneously If the still picture jitters or jumps perform the following During still playback keep the button or pressed until the picture becomes stable With certain TV models and tapes it may not be possible to adjust the tracking If you play back a cassette that was recorded on another unit of VCR the picture quality may be inferior in the normal playback and still...

Page 24: ... heads To resume recording REC Press to stop recording SP LP EP normal recording time optimal picture quality double recording time simple picture quality triple recording time reduced picture quality The display of the VCR shows time counter tape remain The start of a cassette is indicated as Press until RE is displayed OSD DISPLAY When you play back LP or EP recordings some cassettes e g E 300 t...

Page 25: ...QPB AUTO OSD 4 3 VCR display DIMMED EXT LINK 2 Others 25 The AV input of this VCR is equipped for future use with external equipment having external timer recording control such as digital satellite receivers The AV input can be set to EXT LINK 1 or EXT LINK 2 depending on the equipment to be connected Fully wired 21 pin scart cable is required Refer also to the manufacturer s instruction for the ...

Page 26: ...forget to verify that there is enough tape remain The total recording time must not exceed the length of tape on the video cassette MENU ENTER PROG CHECK ENTER CH DATE ON OFF A SP LP EP PDC ENTER TIMER Timer recording Timer recording menu CH Timer recording Timer recording 1 3 Pos Date Start Stop PDC 1 BBC1 31 12 10 30 11 30 SP ON 2 BBC2 31 12 11 30 12 30 SP ON 3 ITV 31 12 12 30 13 30 SP ON 4 CH4 ...

Page 27: ...the timer programme PROG CHECK ENTER ENTER RESET CANCEL Checking the timer programme Press the Timer Recording menu will appear Press again or to quit the menu PROG CHECK PROG CHECK EXIT Playing back programmed recordings The unit will rewind to the beginning of the programmed recording and automatically start playing it back You can also play back programmed recordings manually Displays the timer...

Page 28: ...the remaining tape to fit you will not be able to record all of the TV programme It is not possible to automatically activate the EP mode Note PDC function Programme Delivery Control adjusts the start and stop time of a timer recording automatically to ensure the recording starts and finishes in line with the programme broadcast This is useful when a programme over runs the published times The sta...

Page 29: ... Press Press or to select a programme Press to display theTimer recording screen Use to change any of the data Press to store a change Press to activate the timer mode I TIMER I TIMER ENTER ENTER TIMER This function makes it easier for you to time the recording of programmes transmitted by the same station at the same time but on different days You can fully modify the programmes once they have be...

Page 30: ...cording screen is displayed Set the tape speed Automatic for automatic setting see page 28 A SP LP EP VIDEO Plus VIDEO Plus To edit Timer recording data press Use to select a station Use to set the date week or day of week or press Use to change the start time or press Use to change the stop time or press See page 28 for PDC recording Press Press to activate the timer mode Ensure that the video re...

Page 31: ...ll be broadcast After you have entered the information of a TV station it remains stored in the VCR s memory and you do not need to enter it again in the future CH Timer recording 1 3 Pos Date Start Stop PDC 10 30 11 30 SP indication VIDEO Plus VIDEO Plus and PlusCode are registered trademarks of Gemstar Development Corporation The system is manufactured under license from Gemstar Development Corp...

Page 32: ...EO Plus Code for the station again Press the button VIDEO Plus Enter a VIDEO Plus Code from a Satellite TV Guide for a satellite channel e g Sky 1 using the buttons P Numeric ress to correct any mistakes Press the button will appear instead of a channel number AV input ENTER Press the button to select the channel or AV input that is to be used for recording from the satellite channel CH Press the ...

Page 33: ...at cassettes in quasi S VHS format Plays back cassettes recorded in VHS format only select return exit MENU EXIT EXT LINK VCR display DIMMED ON The VCR s display is dimmed The VCR s display is on at normal brightness only in stand by mode 1 2 The VCR recording start and stop time is controlled by a control signal sent via the 21 pin cable from the external unit for example Sky Digibox The VCR will...

Page 34: ...er Wait until the desired station has been set Press to return to the Tuning screen MENU ENTER Numeric MENU Tuning Press Select a free line down the list Press ENTER ENTER If you have performed Manual Tuning to find TV stations the indication may appear under Pos Name on the On Screen Display when programming a VIDEO Plus timer recording Note This VCR has 99 programme positions that can be tuned t...

Page 35: ... press Menu Press Select a TV station Press ENTER ENTER ENTER Manual Select the Name entry The cursor will mark the first letter Change that letter Next letter Press The new name will be stored in the station table MENU BBC1 B C1 B 6 30 7 8 9 10 1 BBC1 22 2 BBC2 23 3 ITV 24 4 CH4 25 5 CH5 26 Pos Name Channel 1 7 BBC1 select return exit MENU EXIT Manual setup ...

Page 36: ... Press and select Press Select and press Press button an arrow at the left edge indicates which field has been selected You can now move the station to any other location Press MENU ENTER ENTER Green Date ENTER Tuning Manual Press Red CH button to delete the station 6 30 7 8 9 10 1 BBC1 22 2 BBC2 23 3 ITV 24 4 CH4 25 5 CH5 26 Manual setup CH CH ...

Page 37: ...e buttons on the front of the unit Hold down and on the main unit simultaneously for about 5 seconds Note Tuning Manual Auto Setup Shipping condition Owner ID yes no ENTER EXIT OK Shipping condition restoring factory defaults MENU ENTER ENTER ENTER Press and select Press Select and press Press Tuning Shipping condition To re tune the VCR disconnect and reconnect the AC Mains lead Shipping conditio...

Page 38: ...to select and change the desired information Press to exit the On Screen Display MENU ENTER Numeric Numeric EXIT ENTER ENTER ENTER To display the Owner ID information Keep pressed for more than 5 seconds The PIN number is not displayed After 30 seconds this menu automatically disappears EJECT Owner ID EJECT Owner ID PIN number 846 Name House No Postcode Tuning Manual Auto Setup Shipping condition ...

Page 39: ...deactivated This VCR uses a 24 hour clock In case of a power failure an automatic back up system maintains the clock for approximate 60 minutes When Clock setting is set to AUTO the automatic time correction function checks and if necessary adjusts the time several times every day The automatic time correction function only works when the VCR is in standby it does not work in the timer recording m...

Page 40: ...ECT To select desired AV input on the TV If your TV is equipped for Teletext reception you can use these buttons to change the teletext information displayed on the screen and select desired information For details refer to your TV s operating instructions To adjust the volume of the TV To switch between normal TV mode and teletext mode To switch the screen format between the wide screen and other...

Page 41: ...ing back at any time The end of a recording is marked by noise portion without picture and sound Playback SP R Finding the start of a recording Quickly finds the start of a recording during playback or in Stop mode Fast Forward ewind Every time you press the button max 20 times the video recorder will find the start of the next recording Playback will automatically start for all recordings that ar...

Page 42: ...eginning and end of a recording over an existing one Erasing a cassette QUICK ERASE Note OFF TIMER Switches the unit into stand by mode after the set time of recording playback or in Stop mode Press repeatedly to extend the switch off time from 30 to 60 120 180 or 240 minutes The timer setting appears on the display of the VCR OFF TIMER Limiting the recording and playback time SP To reset the tape...

Page 43: ...sure prevention tab playback starts automatically without pressing the button When the VCR is off and you press the button with a tape inserted the VCR switches on and playback begins When the tape reaches the end the VCR automatically rewinds it to the beginning This function is disabled during timer recording When the VCR is switched off a tape can be ejected by pressing the button The VCR will ...

Page 44: ...ains lead securely The VCR is in timer recording mode Press to cancel the mode Safety devices are operating Disconnect the mains wait for 1 minute and reconnect If problem persists consult service engineer If connected via RF Check RF output channel and adjust if necessary See page 19 for details If connected via SCART Check connections and choose appropriateAV channel onTV Teletext information is...

Page 45: ...tly Re set correctly The start or finish time was not set correctly Re set correctly The VCR was not put into timer recording mode Put VCR into timer recording mode The incorrect AV input was selected Check which AV input is in use and select this on the VCR The cables are not connected properly Check connections and adjust as necessary The remote signal cannot reach the VCR Point the remote at th...

Page 46: ...ideo case when not in use 3 Try to use the whole tape when making recordings and avoid re recording over the same section of the tape repeatedly as this will help prevent premature tape wear 4 Take care to insert a tape correctly into the VCR to avoid damage 1 Expose the tape to high humidity or temperature 2 Expose to liquid 3 Expose to dust particles by storing directly on a carpet for example 4...

Page 47: ...rite Head Controls multifunctional remote control VCR and Panasonic TV VCR direct controls main functions 220 240 V AC 50 60 Hz Specifications 16W TV system PAL 625 lines I Power consumption in operation Audio frequency response 80 Hz to 8 kHz SP normal Signal to noise ratio video colour more than 43 dB SP Horizontal resolution colour more than 240 lines SP Signal to noise ratio audio more than 43...

Page 48: ... INTELLIGENT TIMER 29 Page ET SEARCH 22 anual Tuning 34 TSC 22 FF TIMER 9 42 OSD 33 layback 8 22 uick Erase 6 42 ecording 24 25 Remain 24 Remote 8 9 40 atellite Receiver 10 12 25 Scart Cable 12 14 25 Shipping condition 37 SQPB 22 33 Still playback 22 S VHS 22 33 ape length 33 Tape speed 24 26 Teletext 40 TIMER CHECK 6 27 Timer recording 26 TRACKING V LOCK 9 23 Tuning 34 TV Aspect 8 40 TV control 4...

Reviews: