OPERATING SEQUENCE
The following is a description of component functions
during oven operation.
1. SETTING THE CLOCK
NOTE: You can set 24 hour clock.
2. CANCEL FUNCTION
Touch the Stop/Cancel pad whenever you need to
cancel an entry or a function currently in use.
The display will either return to the last item entered
or to the clock.
This oven has a CHILD LOCK feature
• TO SET CHILD LOCK
• Press start pad three times
L appear in the display.
• TO CANCEL CHILD LOCK
• Press stop/cancel pad three times
L disappears.
4-2
Stop/
Cancel
Clock
Set the time
by pressing
Stop/
Cancel
Desired
defrost
Desired
Start
Stop/
Cancel
Desired
cooking time
Desired
cooking power
Start
3. MICROWAVE COOKING
time pads
program
weight
Stop/
Cancel
Desired
Desired
Start
program
weight
reheat
Clock
4. AUTO WEIGHT DEFROST
5. AUTO WEIGHT REHEAT
6. CHILD LOCK
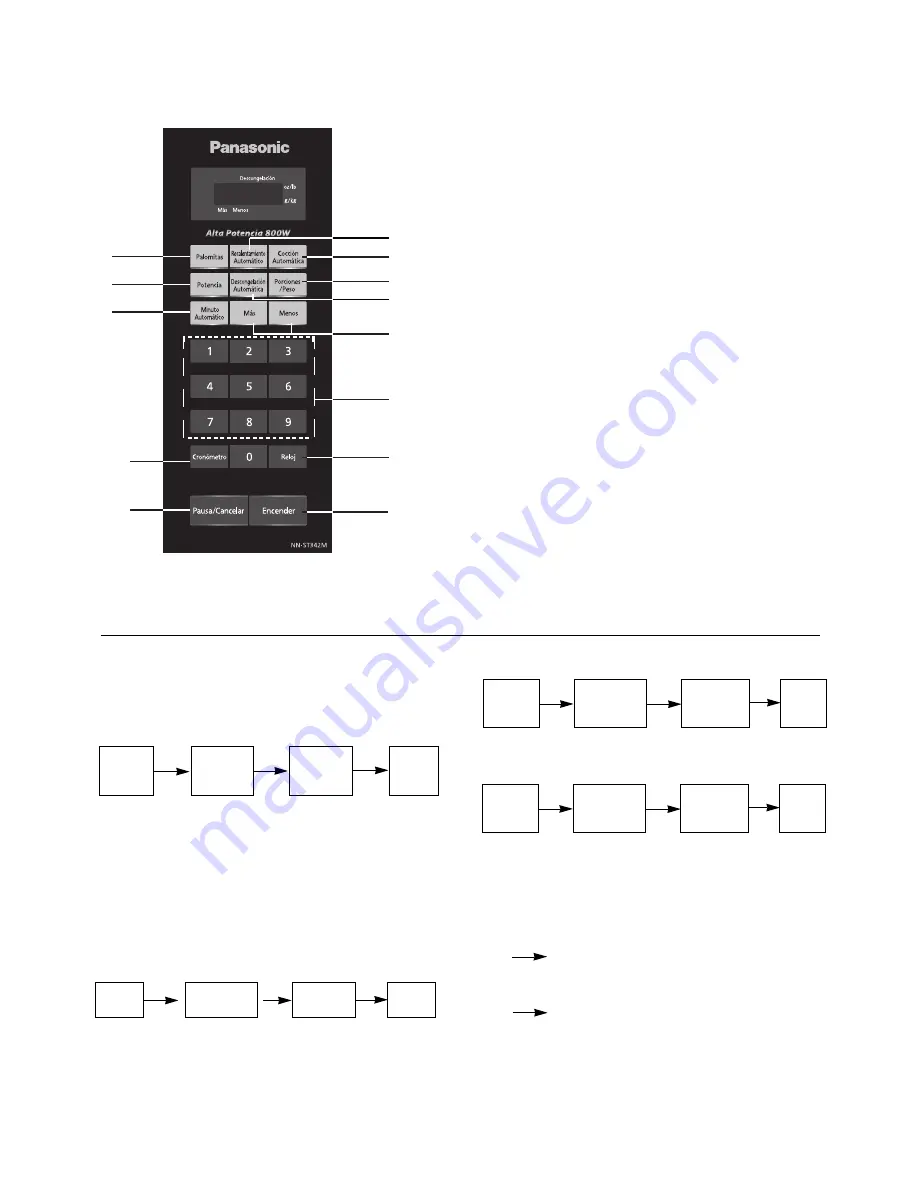
CONTROL PANEL
NN- ST342M
(RPH)
(1)
(2)
(3)
(4)
(9)
(5)
(10)
(6)
(7)
(8)
(11)
(1)
(2)
(3)
(4)
(5)
(6)
(7)
(8)
(9)
(10)
Tecla de Palomitas de maiz
Tecla de Recalentamiento Automático
Tecla de Cocción Automática
(12)
(13)
Tecla de Potencia
Tecla de Descongelación Automática
Tecla de Porciones/Peso
Tecla de Minuto Automático
Tecla de Más/Menos
Teclas numéricas
Tecla de Cronómetro
Tecla de Reloj
(11)
Tecla de
Pausa/Cancelar
(12)
Antes de Cocinar:
Un toque habilita sus instrucciones.
Durante la cocción:
Un toque detiene temporalmente el proceso de
cocción. Otro toque cancela todas sus instrucciones y la hora del día
aparece en la pantalla.
Tecla de Encender
Un toque permite al horno empezar su función. Si la puerta está abierta
tecla
Pausa/Cancelar
se oprime una vez durante la operación del
tecla de
Encender
debe oprimirse otra vez para
horno.
(13)
o
la
horno, la
reanudar el
trabajo del
Bip:
Cuando una tecla es presionada correctamente, se
escucha
un
“bip
”,
significa
que
la
unidad
no
aceptó
o
no
pudo aceptar la instrucción. El horno hará 2 veces
programa completado, el horno hará 5 veces “bip”.
escuchará un “bip”. Si una tecla es presionada y no
“bip” entre las etapas programadas. Al final de cada
Summary of Contents for NN-ST342M
Page 9: ...SCHEMATIC DIAGRAM 4 3...
Page 29: ...6 2 DOOR PARTS D04 05 S03 D06 01 05 08 D03 D 1 2 3 4 5 6 7 8...
Page 30: ...6 3 CONTROL PANEL PARTS C 05 C18 S03 C01 C55 C 11 15 12 9 10...
Page 31: ...6 4 OVEN CAVITY PARTS 21 25 24 27 26 19 22 64...
Page 32: ...6 5 LATCH BOARD PARTS 28 29 29 30 32...
Page 33: ...INTERIOR PARTS 6 6 34 37 38 39 40 41 42 43 44 45 48...
Page 34: ...6 7 BASE PLATE PARTS 49 50 51 52 54 55 63 58 58 58 58...
Page 40: ......


