background image

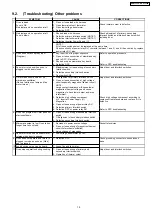
9.2. (Troubleshooting) Other problems

SYMPTOM

CAUSE

CORRECTIONS

1. Oven is dead.

1. Open or loose lead wire harness

Check thermal cutout is defective.

Fuse is OK.

2. Open thermal cutout / thermistor

No display and no operation at all.

3. Open low voltage transformer
4. Defective DPC

2. No display and no operation at all.

Fuse is blown.

1. Shorted lead wire harness

Check adjustment of primary, secondary
Interlock switch and interlock monitor switch
including door.

2. Defective primary Interlock switch (NOTE 1)
3. Defective interlock monitor switch (NOTE 1)
4. Defective Inverter Power Supply (U)

NOTE 1:
All of these switches must be replaced at the same time.
Check continuity of power relay RL1 contacts (between 1 and 2) and if it has continuity, replace
power relay RL1 also.

3. Oven does not accept key input

(Program)

1. Key input is not in proper sequence

Refer to operation procedure.

2. Open or loose connection of membrane key

pad to DPC (Flat cable)

3. Shorted or open membrane key board
4. Defective DPC

Refer to DPC troubleshooting.

4. Fan motor turns on when oven is

plugged in with door closed.

1. Misadjustment or loose wiring of secondary

Interlock switch

Adjust door and Interlock switches.

2. Defective secondary Interlock switch
3. Door switch CN4

5. Timer starts count down but no

microwave oscillation.
(No heat while oven lamp and fan
motor turn on)

1. Off-alignment of primary Interlock switch

Adjust door and Interlock switches.

2. Open or loose connection of high voltage

circuit especially magnetron filament circuit
NOTE:
Large contact resistance will cause lower
magnetron filament voltage and cause
magnetron to have lower output and/or be
intermittent.

3. Defective high voltage component

H.V. Inverter Power Supply (U)
Magnetron

Check high voltage component according to
component test procedure and replace if it is
defective.

4. Open or loose wiring of power relay RL1
5. Defective primary Interlock switch
6. Defective DPC or power relay RL1

Refer to DPC troubleshooting

6. Oven can program but timer does not

start countdown.

1. Open or loose wiring of secondary Interlock

switch

2. Off-alignment of secondary Interlock switch
3. Defective secondary Interlock switch

7. Microwave output is low. Oven takes

longer time to cook food.

1. Decrease in power source voltage

Consult electrician

2. Open or loose wiring of magnetron filament

circuit.(Intermittent oscillation)

3. Aging change of magnetron

8. Fan motor turns on and stirrer motor

rotates when door is opened.

1. Low voltage transformer on DPC.

9. Oven does not operate and return to

plugged in mode as soon as [Start]
pad is pressed.

1. Defective DPC

Check grounding connector on escutcheon
base.

10. Loud buzzing noise can be heard.

1. Loose fan and fan motor

11. Oven stops operation during cooking.

1. Open or loose wiring of primary and

secondary Interlock switch

Adjust door and Interlock switches.

2. Operation of thermal cutout

19

NN-SF564S / NN-SF564M

Summary of Contents for NN-SF564S

Page 1: ...Panasonic Appliances Microwave Oven Shanghai Co Ltd 2014 NN SF564S NN SF564M RPH MEXICO LATIN AMERICA Microwave Oven ORDER NO PAPMOSH1410035CE...

Page 2: ...2 NN SF564S NN SF564M...

Page 3: ...3 NN SF564S NN SF564M...

Page 4: ...Primary Secondary Interlock Switch Power Relay RL1 15 7 2 Interlock monitor Switch 15 7 3 Magnetron 15 7 4 Inverter power supply U 16 7 5 Temperature thermistor 16 8 MEASUREMENTS AND ADJUSTMENTS 17 8...

Page 5: ...1 FEATURE CHART 2 CONTROL PANEL 5 NN SF564S NN SF564M...

Page 6: ...3 SCHEMATIC DIAGRAM 6 NN SF564S NN SF564M...

Page 7: ...PWM pulse width modulation signal from the microcomputer in the DPC 3 This drives the High voltage transformer to increase voltage up to 2 000V AC 4 Then the half wave doubler voltage rectifier circu...

Page 8: ...luminum heat sink may be HOT due to heat energy therefore extreme care should be taken during servicing H V Inverter warning WARNING FOR INVERTER POWER SUPPLY U GROUNDING Check the High Voltage Invert...

Page 9: ...any holes in the unit during operation Never insert a wire nail or any other metal object through the lamp holes on the cavity or any holes or gaps because such objects may work as an antenna and caus...

Page 10: ...Discharge high voltage remaining in high voltage capacitor 2 Disconnect 2 high voltage lead wires from magnetron filament terminals 3 Disconnect connector CN701 CN702 from H V Inverter board 4 Remove...

Page 11: ...n an x pattern making sure there is no gap between the waveguide and the magnetron to prevent microwave leakage CAUTION When replacing the magnetron be sure the antenna gasket is in place 6 3 Digital...

Page 12: ...edge of membrane sheet and peel off escutcheon sheet key board membrane completely from escutcheon base NOTE a The membrane key board is attached to the escutcheon base with double faced adhesive tap...

Page 13: ...NOTE Do not use a soldering iron or desoldering tool of more than 30 watts on D P C contacts B With all the terminal pins cleaned and separated from D P C contacts remove the defective transformer pow...

Page 14: ...portion of the door will touch firmly to the oven cavity front plate without pushing the door If the door assembly is not mounted properly microwave power may leak from the clearance between the door...

Page 15: ...pened Primary Interlock Switch 0 Close Open Secondary Interlock Switch 0 Close Open Power Relay RL1 Open Open 7 2 Interlock monitor Switch 1 Unplug lead wires from Inverter Power Supply U primary term...

Page 16: ...in the oven s AC power supply cord into outlet 4 Program DPC a Press Timer Clock pad twice b Press Start pad once c Press Micro Power pad once 5 Program oven at High power for 1 minute and press Start...

Page 17: ...or circuit and all interlock switches again by following the component test procedures 8 2 Measurement of microwave output The output power of the magnetron can be determined by performing IEC standar...

Page 18: ...trol panel Always touch ground while working on this panel to discharge any static charge in your body 7 120V AC is present on the digital programmer circuit Terminals of power relay s and primary cir...

Page 19: ...alignment of primary Interlock switch Adjust door and Interlock switches 2 Open or loose connection of high voltage circuit especially magnetron filament circuit NOTE Large contact resistance will cau...

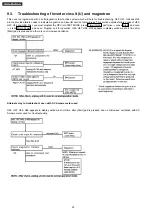
Page 20: ...and H99 First you must program the DPC into TEST MODE press Timer Clock pad twice press Start pad once press Micro Power pad once Program unit for operation H95 H97 H98 H99 appears in display window...

Page 21: ...at high power Abnormal IC1 Normal 5V Step2 2 Collector of Q227 Abnormal Q222 and or Q225 Q227 Normal 0 7V RL1 Dark or unclear display 1 Replace display and check operation Normal Display Abnormal IC1...

Page 22: ...ithout going through this procedure Power will Ammeter reading is To do Remedy Shut off in 23 seconds after Start 1 Between 0 5A and 1 0A Check and repair open magnetron circuit Open magnetron wiring...

Page 23: ...rt Name Description Pcs Set Remarks DB701 B0FBCR000051 BRIDGE DIODE 1 25A 600V L701 F5020W100AP CHOKE COIL 1 Q701 B1JAGV000017 TRANSISTOR SI 1 1100V T701 F609A8X00AP H V TRANSFORMER 1 Including C706 C...

Page 24: ...10 EXPLODED VIEW AND PARTS LIST 10 1 EXPLODED VIEW 24 NN SF564S NN SF564M...

Page 25: ...U 1 LED LAMP INSIDE 22 J61415G10XN MICRO SWITCH 1 PRIMARY INTERLOCK SWITCH 23 F61415U30XN MICRO SWITCH 1 SECONDARY INTERLOCK SWITCH 24 F61459L00XP THERMAL CUTOUT 1 25 F61785U30XN MICRO SWITCH 1 INTER...

Page 26: ...U 1 SF564S E4 F630YBN50BRP MEMBRANE SWITCH U 1 SF564M E5 F8034BN00SHP ESCUTCHEON BASE 1 E6 F891PBN60SRP DOOR OPENING BUTTON U 1 SF564S E6 F8072BN00SHP DOOR OPENING BUTTON 1 SF564M E7 F80375K00AP COOK...

Page 27: ...ion Pcs Set Remarks D1 F30186P40AG DOOR KEY A 1 D2 F302ABN60SRP DOOR A U 1 SF564S D2 F302ABN50SQP DOOR A U 1 SF564M D3 F302K9Q30AP DOOR E U 1 D4 F30216P40AG DOOR KEY SPRING 1 D5 F30859Q30AP DOOR C 1 D...

Page 28: ...10 5 WIRING MATERIALS Ref No Part No Part Name Description Pcs Set Remarks W1 F030ABN50RP LEAD WIRE HARNESS 1 W2 F030E 1R90 H V LEAD WIRE 1 W3 F0353BN50QP THERMISTOR HARNESS 1 28 NN SF564S NN SF564M...

Page 29: ...0003BN50RP INSTRUCTION MANUAL 1 P2 F0102BN60SRP PACKING CASE PAPER 1 SF564S P2 F0102BN50SRP PACKING CASE PAPER 1 SF564M P3 F01049Q30AP UPPER FILLER 1 P4 F01059Q30AP LOWER FILLER 1 P5 F01067C50AP P E B...

Page 30: ...11 DIGITAL PROGRAMMER CIRCUIT 11 1 SCHEMATIC DIAGRAM 30 NN SF564S NN SF564M...

Page 31: ...31 NN SF564S NN SF564M...

Page 32: ...SHEET 1 DISP1 HOLDER F66179L60XP LCD HOLDER 1 VA1 D4EAY271A036 ZENER RESISTOR 1 270V VA2 VA3 D4EAY112A036 ZENER RESISTOR 2 1100V IC1 MN69F009KC1 L S I 1 PC25 B3PAA0000302 IC 1 IC10 C0DBGYY03746 IC 1 I...

Reviews: