background image

CAUTION

Discharge the high voltage capacitors first to prevent electric
shock.

CAUTION

To prevent the water from invading the electric parts that can cause a
short circuit or electric shock:
1. Before repair or replacement of parts, ensure to remove the water

tank from microwave oven.

2. After removing the water tank, select the "drainage" function to

drain the water remaining in the water pipes and tubes into oven
cavity forcibly. (Operating method: Tap [Auto Steam] 9 times until
F1 Drain water program appears in the display). Then wipe up the
oven cavity.

3. In case the Microwave Oven has no power, the technician should

have a dry cloth available in advance before disassembly. When
pulling out the water tube, elevate the front of the Microwave Oven
at least 1.5” to minimize the amount of water that leaks out. Wipe
up excess water throughly with the dry cloth.

CAUTION

After repair or replacement of parts, make sure that all the water pipes
and tubes are properly connected, otherwise the water might invade
the electric parts and will cause a short circuit or electric shock.

4.1. Cabinet body & Rear cover B

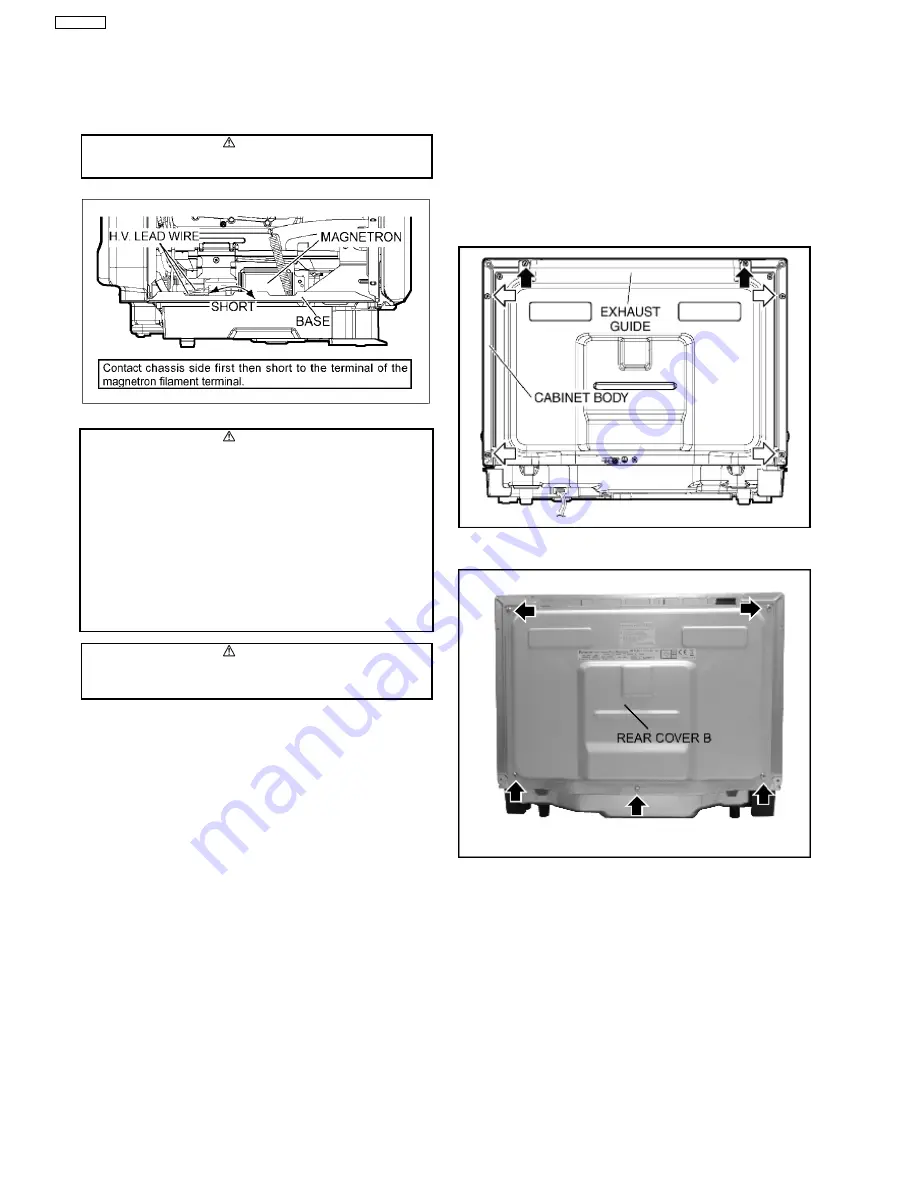
 1. Remove 2 screws holding exhaust guide on the oven cavity,

and then remove exhaust guide.

 2. Remove 4 screws holding cabinet body on the oven cavity,

then remove cabinet body.

 3. Remove 5 screws holding rear cover B.

4 DISASSEMBLY AND PARTS REPLACEMENT

PROCEDURE

10

NN-CS894S

Summary of Contents for NN-CS894S

Page 1: ... Panasonic Appliances Microwave Oven Shanghai Co Ltd 2013 NN CS894S BPQ U K EPG Continental Europe WPG Switzerland SPG Norway Finland Sweden Denmark Microwave Oven ORDER NO PAPMOSH1312045CE ...

Page 2: ...2 NN CS894S ...

Page 3: ...3 NN CS894S ...

Page 4: ... circuit D P C FU D P C BU 17 4 6 Convection motor and convection heater 21 4 7 Pump 23 4 8 Front cover 25 5 COMPONENT TEST PROCEDURE 26 5 1 Primary Secondary Latch Switch interlocks Power Relay RY1 26 5 2 Short Switch 26 5 3 Magnetron 26 5 4 FAN MOTOR 26 5 5 Inverter power supply U 27 5 6 Temperature thermistor 27 6 MEASUREMENTS AND ADJUSTMENTS 28 6 1 Adjustment of Primary latch switch Secondary ...

Page 5: ...he Start pad is tapped 1 The digital programer circuit determines the power level and cooking time to complete cooking and indicates the operating state in the display window 2 When cooking time in the display window has elapsed the oven turns off automatically by a control signal from the digital programmer circuit Turbo Defrost PROGRAM WEIGHT SELECTED COOKING TIME BREAD 900g 8 min 51 sec 2 4 Sen...

Page 6: ...he oven cavity temperature through oven temp sensor thermistor When the oven temperature reaches the set temperature DPC stops supplying high level signal to the power relays and the heaters turn off 4 After the upper heater and lower heater turn off the oven temperature will continue increasing for a while and then decrease as shown in Figure When the oven temperature drops below the set temperat...

Page 7: ...ave a proper chassis ground The inverter grounding plate must be connected to the chassis If the inverter board is not grounded it will expose the user to very high voltages and cause extreme DANGER Be sure that the inverter circuit is properly grounded via the inverter grounding plate WARNING DISCHARGE THE HIGH VOLATGE CAPACITORS For about 30 seconds after the oven is turned off an electric charg...

Page 8: ...her metal object through the lamp holes on the cavity or any holes or gaps because such objects may work as an antenna and cause microwave leakage 3 7 Verification after repair CAUTION After repair or replacement of parts make sure that all the water pipes and tubes are properly connected otherwise the water might invade the electric parts and will cause a short circuit or electric shock 1 After r...

Page 9: ...o power the technician should have a dry cloth available in advance before disassembly When pulling out the water tube elevate the front of the Microwave Oven at least 1 5 to minimize the amount of water that leaks out Wipe up excess water throughly with the dry cloth CAUTION After repair or replacement of parts make sure that all the water pipes and tubes are properly connected otherwise the wate...

Page 10: ...rear plate c Remove 4 screws holding left and right hinges NOTE Do not remove the two screws holding the left and right hinges on the bottom of cavity front plate d Remove 1 screw holding air guide D on base plate 4 Remove left and right door key springs from door arm NOTE Support door before removing door springs 5 Disconnect the connector from convection fan motor terminals 6 Turn over microwave...

Page 11: ...E After replacement of the magnetron tighten mounting screws properly making sure there is no gap between the waveguide and the magnetron to prevent microwave leakage CAUTION When replacing the magnetron be sure the antenna gasket is in place 4 2 2 To replace H V Inverter 1 Release 4 catch hooks then remove inverter cover 2 Remove 2 screws holding H V Inverter 12 NN CS894S ...

Page 12: ... built up in your body before handling the DPC 1 Using solder wick or a desoldering tool and 30W soldering iron carefully remove all solder from the terminal pins of the low voltage transformer and or power relays NOTE Do not use a soldering iron or desoldering tool of more than 30 watts on D P C contacts 2 With all the terminal pins cleaned and separated from D P C contacts remove the defective t...

Page 13: ...4 2 5 To replace fan motor 1 Disconnect connector of fan motor 2 Remove 2 screws holding fan case U 3 Remove 3 screws to seperate fan motor from fan case cover 14 NN CS894S ...

Page 14: ...et 2 Pull out shaft from stirrer motor 3 Disconnect connector from stirrer motor 4 Remove 2 screws holding stirrer motor on the motor bracket To install stirrer motor 5 When you insert the motor shaft make sure to match the convex edge to the concave edge 15 NN CS894S ...

Page 15: ...r tank U from drip tray 2 After removing the water tank select the drainage function to drain the water remaining in the water pipes and tubes into oven cavity forcibly Operating method Tap Auto Steam 9 times until F1 Drain water program appears in the display Then wipe up the oven cavity 3 Disconnect 2 connectors from steam heater terminals 4 Remove 1 screw holding thermistor on steam heater 5 Re...

Page 16: ...conductibility NOTE To prevent pipe from slipping out after repairing make sure that insert the pipe all the way to the end 4 5 Door assembly Digital programmer circuit D P C FU D P C BU 1 Remove left and right door key springs from door arm with plier NOTE Support door before removing door springs 4 5 1 To remove door C and door A Insert flat blade screwdriver to release hinge pin from left hinge...

Page 17: ...ss protector s cover horizontally from the right side of oven cavity 2 Remove 1 screw holding harness protector on right hinge U 3 Disconnect 1 connector from D P C AU board 4 Draw out harness protector slightly in direction of arrows 18 NN CS894S ...

Page 18: ...crowave leakage Adjustment of the door assembly Refer page 28 1 When mounting the door to the oven be sure to adjust the door parallel to the cavity front plate by moving hinges back or forward 2 Adjust so that the upper portion of the door will touch firmly to the oven cavity front plate without pushing the door If the door assembly is not mounted properly microwave power may leak from the cleara...

Page 19: ...ing heat insulation panel 2 Remove 6 screws holding escutcheon base 4 5 3 To replace door screen B U 1 Remove 6 screws holding door handle U on door A U 2 Remove door screen B U from door A U Note a D P C board is paste on the door screen B U 20 NN CS894S ...

Page 20: ...U 1 Release catch hooks and pull out fan motor BU 4 6 Convection motor and convection heater 1 Remove 5 screws holding rear cover B 2 Remove 2 screws from the convectin heater terminals 3 Release the harness from clip 21 NN CS894S ...

Page 21: ...xhaust guide A 6 Remove 14 screws holding convection module on oven cavity 7 Remove 2 screws holding convection module on base plate 4 6 1 To replace convection heater 1 Remove 2 screws holding convection heater from convection fan cover 2 Remove 3 screws holding heater bracket then remove convection heater 22 NN CS894S ...

Page 22: ...t the drainage function to drain the water remaining in the water pipes and tubes into oven cavity forcibly Operating method Tap Auto Steam 9 times until F1 Drain water program appears in the display Then wipe up the oven cavity 3 Disconnect 1 connector from the pump motor 4 Remove 4 screws fixing water tank holder on the bottom of base plate 5 Press the tab by using a flathead screwdriver through...

Page 23: ...e 1 screw fixing the cover of water tank holder 7 Release 2 locking tabs to open the cover 8 The matching relationship between tank U pump motor and water tank holder are as the illustration below 24 NN CS894S ...

Page 24: ...iring make sure the insert depth should be proper when inserting tube B into nozzle A 4 8 Front cover 4 8 1 How to remove the fornt cover 1 Lightly twist the cover until the far side unclips 2 Continue to twist until the near side unclips 4 8 2 How to re fitting the front cover 1 Align the slots on the cover with the holes on the tank 2 Insert and push down until it clicks 25 NN CS894S ...

Page 25: ... Open 5 2 Short Switch 1 Unplug lead wires from Inverter Power Supply U primary terminals 2 Connect test probes of ohm meter to the disconnected leads that were connected to Inverter Power Supply U 3 Test the continuity of short switch with door opened and closed positions using lowest scale of the ohm meter Normal continuity readings should be as follows Door Opened Door Closed 0Ω Close Ω Open 5 ...

Page 26: ...ed 3 Plug in the oven s AC power supply cord into outlet 4 Program DPC a Press Timer pad twice b Press Start pad once c Press Micro Power pad once 5 Program oven at High power for 1 minute and press Start pad a After approximately 3 seconds oven stops operating b During oven operation the input current is approximately 0 4A INPUT CURRENT FAILURE CODE Unplug CN701 0 4A Oven stops in 3 seconds after...

Page 27: ...tion so that the oven door will not have any play in it Check for play in the door by pulling the door assembly Make sure that the latch keys move smoothly after adjustment is completed Completely tighten the screws holding the door hook assembly to the oven assembly 3 Reconnect the short switch and check the continuity of the monitor circuit and all latch switches again by following the component...

Page 28: ...ill lower the magnetron output Take the temperature readings and heating time as accurately as possible 1 Fill the beaker with exactly one litre of tap water Stir the water using the thermometer and record the water s temperature recorded as T1 2 Place the beaker on the center of glass tray Set the oven for High power and heat it for exactly one minute 3 Stir the water again and read the temperatu...

Page 29: ... Digital Programmer Circuit When troubleshooting be cautious of possible electrical shock hazard Before troubleshooting operate the microwave oven following the correct operating procedures in the instruction manual in order to find the exact cause of any trouble since operator error may be mistaken for the oven s malfunction 7 1 Troubleshooting Oven stops operation during cooking SYMPTOM CAUSE CO...

Page 30: ...ron filament circuit NOTE Large contact resistance will cause lower magnetron filament voltage and cause magnetron to have lower output and or be intermittent 3 Defective high voltage component H V Inverter Power Supply U Magnetron Check high voltage component according to component test procedure and replace if it is defective 4 Open or loose wiring of power relay RY1 5 Defective primary latch sw...

Page 31: ...5 H97 H98 and H99 First you must program the DPC into TEST MODE press Timer pad twice press Start pad once press Micro Power pad once Program unit for operation H95 H97 H98 H99 appears in display window a short time after Start pad is pressed and there is no microwave oscillation Alternate way to troubleshoot oven with AC Ampere meter used H95 H97 H98 H99 appears in display window a short time aft...

Page 32: ... this procedure Power will Ammeter reading is To do Remedy Shut off in 23 seconds after Start 1 Between 0 5A and 1 0A Check and repair open magnetron circuit Open magnetron wiring between Inverter and magnetron terminal 2 Between 1 0A and 2 0A Check continuity of D702 in Inverter PCB 1 D702 shorted Replace H V Inverter Z606YBH20GP 2 D702 is OK Replace magnetron Shut off in 3 seconds after Start 1 ...

Page 33: ...1000VDC C702 ZCWF4305N851 FILM CAPACITOR 1 3µF 250VDC DB701 Z0FBBQ000006 RECTIFIER BRIDGE 1 L701 Z5020W100AP CHOKE COIL 1 R702 Z0CM562JA002 SAND BAR RESISTOR 1 5 6KΩ 15W T701 Z609ABA00GP TRANSFORMER 1 INCLUDING D701 D702 C706 C707 D701 D702 Z0FBAZ000006 DIODE 2 C706 Z0C3F562A002 FILM CAPACITOR 1 5600PF 3KV C707 Z0C3F822A002 FILM CAPACITOR 1 8200PF 3KV 34 NN CS894S ...

Reviews: