background image

12

RQT9522

Shuf

fl

 e

(only for music)
Tracks or albums are 
played at random.

Press [PLAY MODE].

Each time you press
Songs 

ˆ

 Albums 

ˆ

 Off

Repeat

Normal/Shuf

fl

 e 

playback can be 
repeated.

Press [REPEAT].

Each time you press
One 

ˆ

 All 

ˆ

 Off

Note

For the album shuf

fl

 e, the tracks in the album are played 

back in the proper order.
If video is played back, the Shuf

fl

 e setting may become 

“OFF”.
When a play mode is switched, the track list display on the 
audio playback screen may be different from the tracks 
played back. If this occurs, select tracks from the track 
selection menu again.

If the iPod with Shuf

fl

 e/Repeat set is attached 

to this unit:

Playback is performed with the same playback method.
Also, even if the iPod is removed after the playback method 
is set on this unit, the iPod still keeps the same playback 
method.

“Made for iPod” means that an electronic accessory 
has been designed to connect speci

fi

 cally to iPod and 

has been certi

fi

 ed by the developer to meet Apple 

performance standards.
Apple is not responsible for the operation of this device or 
its compliance with safety and regulatory standards.
iPod is a trademark of Apple Inc., registered in the U.S. 
and other countries.

„

Listening to an iPod

Listening to the radio

Adjust the frequency to listen (Manual Tuning)

1.  Press [FM] or [AM].

For the main unit, press [AUDIO SELECTOR] to 
select “FM” or “AM”.

2.  Press [PLAY MODE] to select “Manual Tuning”.
3. Press [

u

/

t

y

/

i

] to 

tune in the station you like.
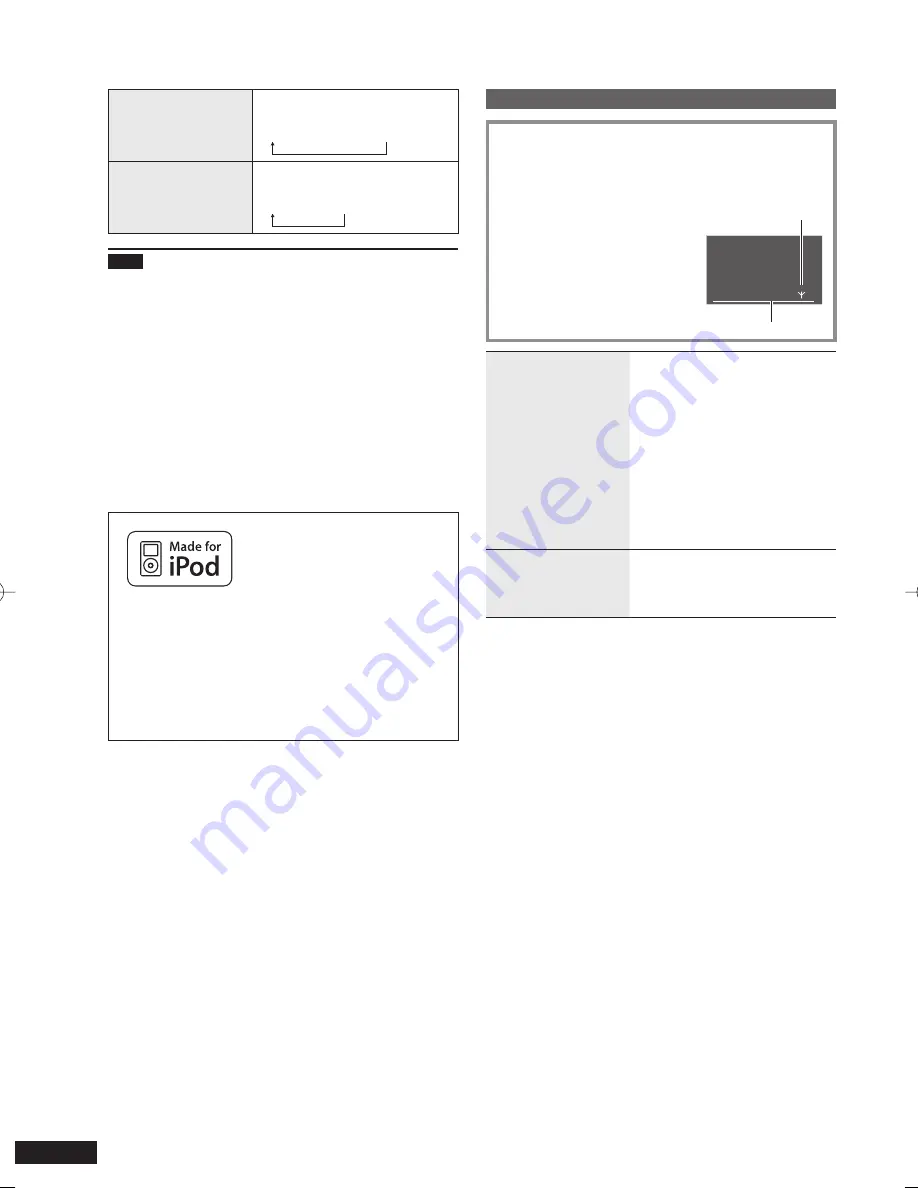
A

 Lights up when signals are 

received.

B

 Lights up when the FM 

stereo broadcast is 
received.

FM 

MHz

Manual     Stereo 

A

B

88.1

Automatic tuning

Press and hold [

u

/

t

y

/

i

until the frequency indicator starts 
to run.

Stops when the broadcast is 
received.
If jamming is present in the 
surroundings during the 
automatic tuning, the broadcast 
may not be received and the 
frequency may stop.
To stop the automatic tuning, 
press [

u

/

t

y

/

i

] again.

Stopping the radio 
sound

[

g

]

To listen to the radio again, press 
[FM] or [AM]. (For the main unit, 
press [AUDIO SELECTOR].)

FM frequency step

The step is factory-set to 200 kHz, but you can change it to 
receive broadcasts allocated to 100 kHz steps.
1. Press [FM].
2. Press [PROGRAM].
3. Press [

e

r

] to select the “Frequency Step” and press 

[OK].

4. Press [

e

r

] to select the “100 kHz” or “200 kHz” and 

press [OK].

„

RQT9522-P̲MW-10̲P.indd   12

RQT9522-P̲MW-10̲P.indd   12

2009/08/28   19:13:08

2009/08/28   19:13:08

Summary of Contents for MW10 - 9.0" - Digital Photo frame

Page 1: ...d these instructions carefully Before connecting operating or adjusting this product please read the instructions completely Please keep this manual for future reference If you have any questions contact 1 800 211 PANA 7262 The warranty can be found on page 23 Supplied Accessories Please check and identify the supplied accessories Use numbers indicated in parentheses when asking for replacement pa...

Page 2: ...set If you see this symbol Information on Disposal in other Countries outside the European Union This symbol is only valid in the European Union If you wish to discard this product please contact your local authorities or dealer and ask for the correct method of disposal 1 Read these instructions 2 Keep these instructions 3 Heed all warnings 4 Follow all instructions 5 Do not use this apparatus ne...

Page 3: ...ence that may cause undesired operation MW 10 User memo DATE OF PURCHASE DEALER NAME DEALER ADDRESS TELEPHONE NUMBER The model number and serial number of this product can be found on either the back or the bottom of the unit Please note them in the space provided below and keep for future reference MODEL NUMBER MW 10 SERIAL NUMBER Listening caution EST 1924 Selecting fine audio equipment such as ...

Page 4: ...er writing instrument Do not use record cleaning sprays benzine thinner or other solvent Do not attach labels or stickers to discs Do not use scratch proof protectors or covers Do not use CDs with the seal or label peeled off or the glue running over Do not use CDs whose disc sides are printed using a commercially available label printer For dirt Wipe with a soft cloth moistened with water and the...

Page 5: ... practically usable SD 1000 folders CD 100 folders Approximate number of files practically usable SD 40000 files 1000 files per folder CD 1000 files 1000 files per folder Files in folders lower than the sixth hierarchy cannot be played back Also files in folder SD_VIDEO and SD_AUDIO cannot be played back Usable SD cards Panasonic SD cards are recommended SD memory card 8 MB to 2 GB Formatted in FA...

Page 6: ...age 1 Press the CD open button to open the display part 2 Insert the CD C Label side Insert the center hole of the CD firmly Do not touch the CD lens 3 Press the upper part of the display by hand and close it To remove the CD stop the playback and then press the CD open button to remove Inserting an SD card 1 Open the SD cover 2 Insert the SD card Face with the corner cut D up and insert straight ...

Page 7: ...roadcast cr Displaying the clock calendar cs Selecting a track broadcasting station P10 11 13 ct Returning to the previous screen Displaying photos with thumbnails dk Displaying the photo setting menu dl Displaying the photo information One touch playback If you press CD q h iPod q h FM or AM while the unit is off the unit is automatically turned on and the audio playback or radio reception starts...

Page 8: ... the AC power supply cord the unit is automatically turned on and the screen shown at right appears Start Demo Disable the Demo function When not using the demo function press e r on the remote control to select the setting to disable it and then press OK With the demo function simple explanations about the unit s functions are displayed on the display part If it is set to Enable or operation is n...

Page 9: ...d among 7 types of audio photo screen or 12 types of clock calendar screen Audio photo screen Press DISPLAY MODE to select the screen Each time you press the button the screen changes as follows A Audio photo factory setting B Photo C Clock photo D Calendar photo E Audio F Audio clock G Audio calendar Sep 30 2009 Wed 1 CD Track 1 22 60 12 CDDA 2 20 Total Time 1 CD Track 1 22 60 12 CDDA 2 20 Total ...

Page 10: ... during the Repeat play To cancel press REPEAT again Program You can select desired tracks up to 24 tracks and listen in your preferred order While stopped 1 Press PROGRAM The program screen appears 2 Press the numbered buttons to select tracks To select the number above 9 e g 16 10 1 6 3 Repeat step 2 and select more tracks If you attempt to select 25 or more tracks the error message appears 4 Pr...

Page 11: ...at iTunes store or audible com Playing music and video on the iPod Turn down the volume of this unit 1 Attach the iPod left 2 Press iPod q h For the main unit press AUDIO SELECTOR to select iPod and press q h Playback will start e g Audio screen A Playlist name Artist name Album name Track name B Playback status C Track number Number of tracks D Elapsed playing time iPod Andes Los Panas Al Partir ...

Page 12: ...peration of this device or its compliance with safety and regulatory standards iPod is a trademark of Apple Inc registered in the U S and other countries Listening to an iPod Listening to the radio Adjust the frequency to listen Manual Tuning 1 Press FM or AM For the main unit press AUDIO SELECTOR to select FM or AM 2 Press PLAY MODE to select Manual Tuning 3 Press u t y i to tune in the station y...

Page 13: ... numbered buttons Also you can press SELECT TRACKS press e r to select the channel and press OK To cancel the memorized broadcast stations 1 Press PROGRAM 2 Press e r to select Register Delete Preset and press OK 3 Press e r to select the channel to delete and press DEL The message for deletion appears If noise is excessive when receiving FM stereo signals 1 Press and hold PLAY MODE approx 2 secon...

Page 14: ...copies of those photos beforehand P16 Playable photos JPEG P5 When inserting the SD card or CD containing photo files The photo playback menu appears Press e r to select the menu and press OK View Most Recent Photos Only for the SD SD Card Menu View Most Recent Photos Select Photo to View Copy Photo Cancel Select Photo to View below P15 Copy Photo P16 If Cancel is selected the standard screen is r...

Page 15: ...the screen is not switched to the next photo When the display part is opened during the slideshow playback the slideshow is paused If the unit is turned off or media are removed the image rotation setting for SD CD is canceled Viewing categorized photos 1 Press PHOTO MEDIA to select Internal Memory SD or CD 2 Press SELECT PHOTOS 3 Press e r to select the photo categories below and press OK The typ...

Page 16: ...n the internal memory Even if photos are set to Favorite or protected the information is not copied Due to the restriction of the file system the displayed internal memory capacity does not accord to the amount of file data that can be copied Backing up the photos in the internal memory to the SD card P18 Copying photos from a computer P20 Registering the photo as Favorite Only for the internal me...

Page 17: ...gs Basic operation 1 Press MENU PHOTO Photo Menu Copy Photo Edit Photo Photo Playback Settings 2 Press e r to select Photo Playback Settings and press OK 3 Press e r to select the item below 4 Press w q to select the setting To return to the standard screen press RETURN a few times Setting items for photo playback Factory settings are indicated with underlines Date Indication On Off Color Effects ...

Page 18: ... step 3 in the basic operation and press OK 2 Select Yes again and press OK The clock setting and photo files in the internal memory remain the same Format Card 1 Select Yes in step 3 in the basic operation and press OK 2 Select Yes again and press OK All the data on the SD card is deleted Back Up Internal Memory Photo data in the internal memory is backed up to the SD card Select Yes in step 3 in...

Page 19: ...ttings and press OK 3 Set the standby setting to Enable 1 Press e r to select Standby and press OK 2 Press e r to select Enable This Timer and press OK Timer 1 Settings Standby Day Time Enable Unset 12 00 A 4 Set the day 1 Press e r to select Day and press OK 2 Press e r to select the day add the check mark with w q and press OK Timer 1 Day Settings Sunday Monday Tuesday Wednesday Thursday 5 Set t...

Page 20: ...ve is displayed on the desktop 4 Open the photo folder on this unit 5 Exchange files between the folders Folders and files can be dragged and dropped Note If you remove and insert the USB connection cable or SD card while Accessing Do not remove the card or cable message is displayed the data on the SD card may be lost or damaged When installing the unit on the table etc make sure the display part...

Page 21: ...soft cloth P4 The display part is not closed properly Check if the CD is set at the correct position P6 SD Data on the SD card cannot be read Use the SD card file format and folder hierarchy compatible with this unit P5 Photos cannot be played or edited Insert the SD card compatible with this unit P5 Insert the SD card correctly P6 Cancel the write protection switch if it is on the LOCK side P4 iP...

Page 22: ...it settings Press the displayed numbered button and OK for more than 2 seconds and switch the remote control mode of the remote control 1 Damage requiring service The unit should be serviced by qualified service personnel if a The AC Adaptor AC power supply cord or the plug has been damaged or b Objects or liquids have gotten into the unit or c The unit has been exposed to rain or d The unit does ...

Page 23: ... are not warranted This warranty only applies to products purchased and serviced in the United States or Puerto Rico This warranty is extended only to the original purchaser of a new product which was not sold as is A purchase receipt or other proof of the original purchase date is required for warranty service Carry In or Mail In Service For Carry In or Mail In Service in the United States and Pu...

Page 24: ...0 RH No condensation Power consumption in standby mode Approx 0 3 W Without iPod charge Specifications are subject to change without notice Some characters are not displayed on this unit due to the restrictions of font data Since the internal memory includes area that contains management information such as file system the actual capacity that can be used is less Also the memory capacity in genera...

Reviews: