8
Note:
• Maximum capacity: 500 mL. Do not operate with an empty Tumbler Unit.
• Fill the Tumbler with solid ingredients first, followed by liquid ingredients. To make a thinner drink, add
more liquid. For smoother operation, dice food into smaller pieces (1~2 cm), and blend with liquid.
• Not recommended to blend hard, high-fiber and viscous ingredients. However, if it is necessary to
blend hard and viscous ingredients, cut the hard ingredients into small pieces (example: cut the carrot
into 1 cm³ cubes) and fill the cut ingredients not exceeding half of the maximum capacity.
• If the Cutting Blade gets stuck, switch OFF the Blender, then unplug. Remove the stuck ingredients by
using a spatula (not provided). Do not use your finger to remove the ingredients.
• Reduce ingredients when appliance makes abnormal sounds or vibrates during operation.
• Replace the Blender Container Base with Tumbler Lid after blending.
• Recommended to pour drink with the Tumbler Lid fitted to the Tumbler. When the Tumbler Lid is fitted
to the Tumbler, always keep the Tumbler upright to avoid leaking.
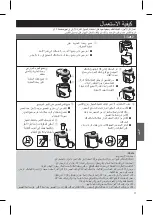
BLENDER
1
Make sure the Gasket is pushed into the groove
of the Tumbler correctly to avoid leaking during
blending. If the Gasket is not placed correctly,
drink may leak out.
2
Fill the Tumbler with ingredients.
3
Place the Blender Container Base onto the
Tumbler and turn it clockwise until it is tight.
4
Place the Tumbler Unit onto the Motor Housing
by lining up the triangle marks on the Container
Base and Motor Housing as shown in A.
5
Turn the Tumbler Unit clockwise until the triangle
mark on the Blender Container Base is lined up
to the rectangle mark on the Motor Housing as
shown in B and a ‘click’ sound is heard.
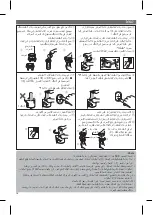
6
Plug in and switch ON the rated power supply
source.
7
Support Tumbler Unit while in use.
Ensure the Clamp (both side) is not
positioned as shown in Figure 1 to prevent
accidental damage on the Clamp (both side).
8
Switch ON the Blender by pressing the ‘I’
marking area.
9
After blending, switch OFF by pressing the
‘O’ marking area.
Support the Tumbler Unit until motor stops
completely.
⑩
Switch OFF and unplug.
⑪
Turn the Tumblerr Unit anticlockwise and
remove it from the Motor Housing.
⑫
Turn the Tumbler Unit upside-down.
⑬
Turn the Blender Container Base anticlockwise
to remove it from the Tumbler. Be careful and
remove it slowly to avoid spillage.
⑭
Make sure the Gasket
is in place correctly.
Turn the Tumbler Lid
slightly anticlockwise
and then clockwise
until it is tight. Your
drink is ready to
consume now.
7
8
Figure1
⑩
⑪
⑫
⑬
⑭
Gasket
Groove
1
2
3
4
5
6
A
B
Gasket
Tumbler
Lid


