background image

VQT1Q48

22

Preparation

Setting the Menu

The camera comes with menus that allow you to set the settings for taking pictures and 
playing them back just as you like and menus that enable you to have more fun with the 
camera and use it more easily.
In particular, the [SETUP] menu contains some important settings relating to the camera’s 
clock and power. Check the settings of this menu before proceeding to use the camera.

Functions that cannot be set or will not work under some conditions

Due to the camera’s specifications, it may not be possible to set some of the functions or 
some functions may not work in some of the conditions under which the camera is used.
For details, refer to P116.
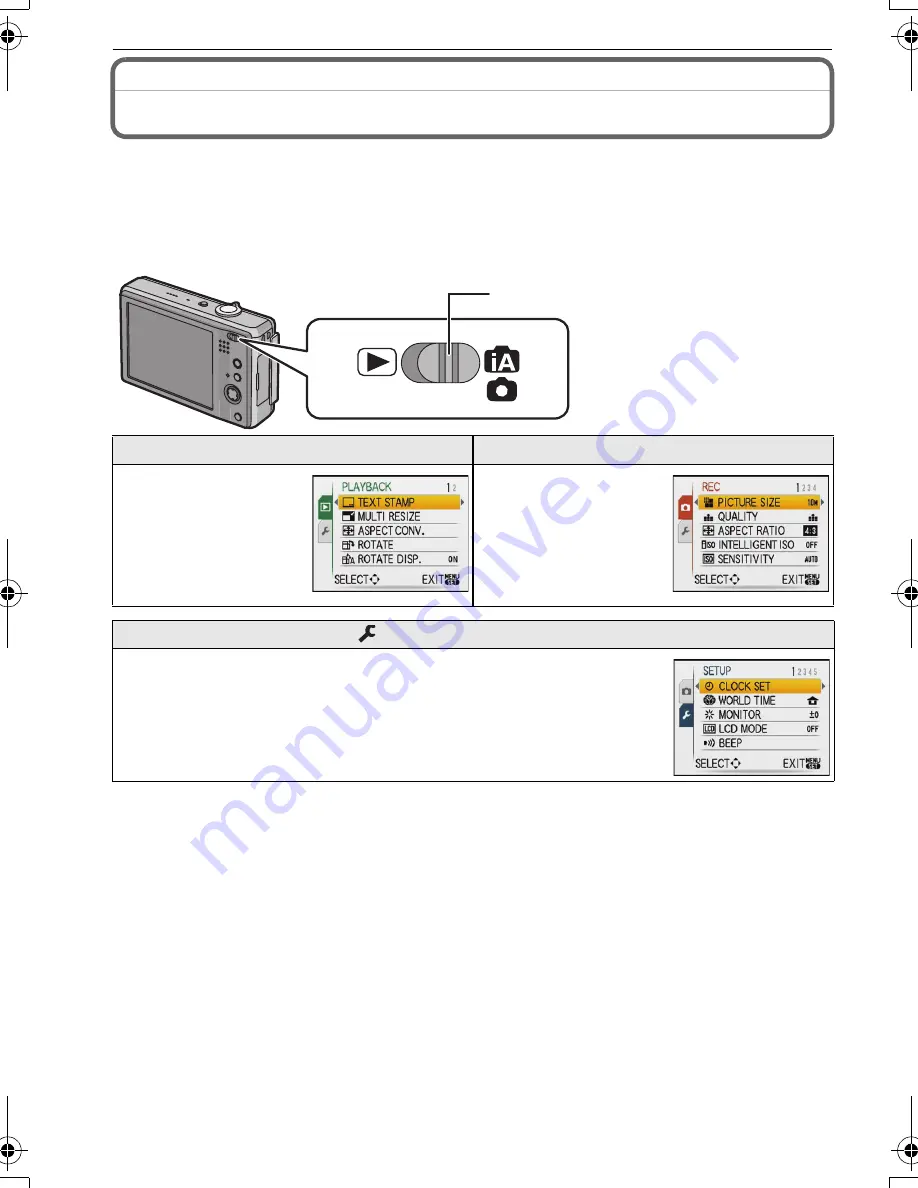
A

[REC]/[PLAYBACK] selector 
switch

(

 [PLAYBACK] mode menu (P93 to 100)

!


[REC] mode menu (P69 to 79)

This menu lets you 
make the rotation, 
protection or DPOF 
settings, etc. of 
recorded pictures.

This menu lets you set 
the colouring, 
sensitivity, aspect 
ratio, number of pixels 
and other aspects of 
the pictures you are 
recording.


[SETUP] menu (P25 to 29)

This menu lets you perform the clock settings, select the operating 
beep tone settings and set other settings which make it easier for you to 
operate the camera.

The [SETUP] menu can be set from either the [REC MODE] or 
[PLAYBACK MODE].

A

DMC-FX500_EB_mst.book  22 ページ  2008年2月25日 月曜日 午後5時37分

Summary of Contents for LUMIX DMC-FX500

Page 1: ...Before use please read these instructions completely EB VQT1Q48 Operating Instructions Digital Camera Model No DMC FX500 Web Site http www panasonic europe com ...

Page 2: ...n from Microsoft Corporation Other names company names and product names printed in these instructions are trademarks or registered trademarks of the companies concerned WARNING TO REDUCE THE RISK OF FIRE ELECTRIC SHOCK OR PRODUCT DAMAGE DO NOT EXPOSE THIS APPARATUS TO RAIN MOISTURE DRIPPING OR SPLASHING AND THAT NO OBJECTS FILLED WITH LIQUIDS SUCH AS VASES SHALL BE PLACED ON THE APPARATUS USE ONL...

Page 3: ...d please observe the wiring code as stated below If in any doubt please consult a qualified electrician IMPORTANT The wires in this mains lead are coloured in accordance with the following code Blue Neutral Brown Live As these colours may not correspond with the coloured markings identifying the terminals in your plug proceed as follows The wire which is coloured Blue must be connected to the term...

Page 4: ...andling For more information about collection and recycling of old products and batteries please contact your local municipality your waste disposal service or the point of sale where you purchased the items Penalties may be applicable for incorrect disposal of this waste in accordance with national legislation For business users in the European Union If you wish to discard electrical and electron...

Page 5: ... Do not touch the lens or the sockets with dirty hands Also be careful not to allow liquids sand and other foreign matter to get into the space around the lens buttons etc If water or seawater splashes on the camera use a dry cloth to wipe the camera body carefully About Condensation When the lens and LCD monitor are fogged up Condensation occurs when the ambient temperature or humidity changes Be...

Page 6: ...ith the Zoom 36 Using the Optical Zoom Using the Extra Optical Zoom EZ Using the Digital Zoom 36 Playing back Pictures NORMAL PLAY 37 Using the Touch Zoom 38 Switching the PLAYBACK mode 39 Deleting Pictures 40 To delete a single picture 40 To delete multiple pictures up to 50 or all the pictures 40 Advanced Recording pictures About the LCD Monitor 42 Taking Pictures using the Built in Flash 44 Swi...

Page 7: ...anizing pictures EASY ORG 86 Ü FAVORITE 87 EDIT 87 DELETE 90 Playing Back Motion Pictures Pictures with Audio 91 Motion pictures 91 Pictures with audio 91 Creating still pictures from a motion picture 92 Using the PLAYBACK mode menu 93 TEXT STAMP 93 Q MULTI RESIZE Reducing the picture size number of pixels 94 ASPECT CONV 95 N ROTATE M ROTATE DISP 96 O DPOF PRINT 97 P PROTECT 98 B AUDIO DUB 99 S CO...

Page 8: ...product with ease and confidence by phoning our Customer Care Centre Monday Thursday 9 00 a m 5 30 p m Friday 9 30 a m 5 30 p m Excluding public holidays Or go on line through our Internet Accessory ordering application at www panasonic co uk Most major credit and debit cards accepted All enquiries transactions and distribution facilities are provided directly by Panasonic UK Ltd It couldn t be si...

Page 9: ...shipped Charge the battery before use Insert the battery and the card P17 When you do not use the card you can record or play back pictures on the built in memory P18 Refer to P18 when you use a card Turn the camera on to take pictures 1 Slide the REC PLAYBACK selector switch to 2 Press the shutter button to take pictures P31 Play back the pictures 1 Slide the REC PLAYBACK selector switch to 2 Sel...

Page 10: ...n the built in memory when you are not using a card Consult the dealer or your nearest Service Centre if you lose the supplied accessories You can purchase the accessories separately Optional Accessories Battery Pack DMW BCE10E Semi Hard Case DMW CHTZ3 AC Adaptor DMW AC5EB Component Cable DMW HDC2 SDHC Memory Card 16 GB RP SDV16GE1K 8 GB RP SDV08GE1K 4 GB RP SDM04GE1K RP SDV04GE1K SD Memory Card 2...

Page 11: ...The Backlight Compensation P32 B 4 Macro mode P47 C 2 Self timer P48 D 1 Flash setting P44 The joystick is operated in two different ways it can be moved in the up down left and right directions to perform an operation or it can be pressed to select In these operating instructions it is pictured as shown in the figure below or described with 3 4 2 1 Example When the joystick is moved toward 2 left...

Page 12: ... 19 COMPONENT OUT socket P108 20 AV OUT DIGITAL socket P101 103 107 21 DC IN socket P101 103 Always use a genuine Panasonic AC adaptor DMW AC5E optional This camera cannot charge the battery even when the AC adaptor DMW AC5E optional is connected to it 22 Tripod receptacle When you use a tripod make sure the tripod is stable when the camera is attached to it 23 Card Battery door P17 24 Release lev...

Page 13: ...ot scratch or press the LCD monitor too hard Only use the supplied stylus pen Do not place it where small children can reach The stylus pen can be attached to a strap supplied as shown Do not place the stylus pen on the LCD monitor when storing LCD monitor may break when the stylus pen is pressed strongly against the LCD monitor Touch To touch and release the touch panel It is used to select icon ...

Page 14: ...Shutter Speed Set P51 52 Exposure Compensation P50 51 Setting for aperture value or shutter speed or exposure compensation can be set by touching the set bars displayed on the screen When playing back Select PLAYBACK mode P39 PLAYBACK mode can be selected by touching Picture Playback Touch Zoom P38 A picture can be forwarded rewound or enlarged in playback by touching the screen EASY ORG P86 Follo...

Page 15: ...or a long period of time after being charged The battery can be recharged even when it still has some charge left but it is not recommended that the battery charge be frequently topped up while the battery is fully charged The battery has characteristics that will reduce its operating duration and cause the battery to swell up When the operating time of the camera becomes extremely short even afte...

Page 16: ... mode Power LCD mode and High angle mode P25 The number of recordable pictures varies depending on the recording interval time If the recording interval time becomes longer the number of recordable pictures decreases e g When recording once every 2 minutes the number of recordable pictures decreases to about 70 The number of recordable pictures and playback time will vary depending on the operatin...

Page 17: ...ch the connection terminals of the card The card may be damaged if it is not fully inserted 1 Close the card battery door 2 Slide the release lever in the direction of the arrow If the card battery door cannot be completely closed remove the card check its direction and then insert it again Note Remove the battery after use Store the removed battery in the battery carrying case supplied Do not rem...

Page 18: ... with 4 GB or more capacity Please confirm the latest information on the following website http panasonic co jp pavc global cs This Site is English only The following operations can be performed using this unit When a card has not been inserted Pictures can be recorded in the built in memory and played back When a card has been inserted Pictures can be recorded on the card and played back When usi...

Page 19: ... to vibration or impact The card or the data on the card may be damaged and this unit may no longer operate normally The data on the built in memory or the card may be damaged or lost due to electromagnetic waves static electricity or breakdown of the camera or the card We recommend storing important data on a PC etc Do not format the card on your PC or other equipment Format it on the camera only...

Page 20: ...ncel without setting the clock Press MENU SET to set After completing the clock settings turn the camera off Then turn the camera back on switch to recording mode and check that the display reflects the settings that were performed When MENU SET has been pressed to complete the settings without the clock having been set set the clock correctly by following the Changing the clock setting In program...

Page 21: ...ed so the clock setting will be stored in the camera for at least 3 months even if the battery is removed If you insert a battery that is not sufficiently charged the length of time that the clock setting is stored may become less You can set the year from 2000 to 2099 The 24 hour system is used If the clock is not set the correct date cannot be printed when you stamp the date on the pictures with...

Page 22: ...t may not be possible to set some of the functions or some functions may not work in some of the conditions under which the camera is used For details refer to P116 A REC PLAYBACK selector switch PLAYBACK mode menu P93 to 100 REC mode menu P69 to 79 This menu lets you make the rotation protection or DPOF settings etc of recorded pictures This menu lets you set the colouring sensitivity aspect rati...

Page 23: ...C MODE button Slide the REC PLAYBACK selector switch to and then press MODE When selecting the PLAYBACK mode menu settings set the REC PLAYBACK selector switch to and proceed to step 4 Touch PROGRAM AE Press MENU SET to display the menu Menu item cannot be set with touch operation Set with the joystick You can switch menu screens from any menu item by rotating the zoom lever Switching to the SETUP...

Page 24: ...d Move 3 4 to select AF MODE Select the item at the very bottom and move 4 to move to the second screen Move 1 Depending on the item its setting may not appear or it may be displayed in a different way Move 3 4 to select š Press MENU SET to set Using the quick menu Press and hold Q MENU when recording Move 3 4 2 1 to select the menu item and the setting and then press MENU SET to close the menu AT...

Page 25: ...D mode Press any button to make the LCD monitor bright again If the screen is difficult to see because of light from the sun etc shining on it use your hand or another object to block the light The number of recordable pictures decreases in Auto Power LCD mode Power LCD mode and High angle mode U CLOCK SET Setting Date Time WORLD TIME Set the time in your home area and travel destination DESTINATI...

Page 26: ...IDE LINE Set the pattern of the guide lines displayed when taking pictures You can also set whether or not to have the recording information displayed when the guide lines are displayed P42 REC INFO OFF ON PATTERN HISTOGRAM This allows you to set either to display or not display the histogram P43 OFF ON TRAVEL DATE Set the departure date and the return date of the vacation OFF SET q ECONOMY The ca...

Page 27: ...ion ROTATE DISP P96 in PLAYBACK mode menu is set to ON The birthday and name settings for BABY1 BABY2 P60 and PET P61 in scene mode The number of days that have passed since the departure date in TRAVEL DATE P66 The WORLD TIME P67 setting The folder number and the clock setting are not changed When PC is selected the camera is connected via the USB Mass Storage communication system When PictBridge...

Page 28: ...NTSC Video output is set to NTSC system PAL Video output is set to PAL system TV ASPECT Set to match the type of TV Playback mode only W When connecting to a 16 9 screen TV X When connecting to a 4 3 screen TV m ft Change the unit displayed for the distance at which pictures can be taken m The distance is displayed in metres ft The distance is displayed in feet TOUCH GUIDE Set the guide screen inc...

Page 29: ...be displayed Press DISPLAY to close JITTER SUBJ MOVE DEMO Press MENU SET to close AUTO DEMO JITTER SUBJ MOVE DEMO is an approximation AUTO DEMO has no TV output capability LANGUAGE Set the language displayed on the screen ENGLISH DEUTSCH FRANÇAIS ESPAÑOL ITALIANO DEMO MODE Select this to display JITTER SUBJ MOVE DEMO or the camera s features JITTER SUBJ MOVE DEMO AUTO DEMO The camera s features ar...

Page 30: ...tor switch B MODE button Slide the REC PLAYBACK selector switch to Press MODE Touch the recording mode to select Intelligent auto mode P31 The subjects are recorded using settings automatically selected by the camera Programme AE mode P34 The subjects are recorded using your own settings Aperture priority AE mode P50 The subjects are recorded with set aperture Shutter priority AE mode P51 The subj...

Page 31: ...icator 3 lights when you turn this unit on 2 It turns off after about 1 second 1 Shutter button Touch INTELLIGENT AUTO Hold this unit gently with both hands keep your arms still at your side and stand with your feet slightly apart AFlash BAF assist lamp Press the shutter button halfway to focus The focus indication 1 green lights when the subject is focused The AF area 2 is displayed around the su...

Page 32: ...rson s face and it will adjust the focus and exposure P75 Under backlight conditions the lighting is automatically corrected so that the brightness of the faces will be optimal Note Due to conditions such as the ones below a different scene may be identified for the same subject Subject conditions When the face is bright or dark The size of the subject The distance to the subject The contrast of t...

Page 33: ...IGITAL ZOOM PICT ADJ MIN SHTR SPEED AUDIO REC HISTOGRAM The other items on the SETUP menu can be set in the mode such as the Programme AE mode What is set will be reflected in the Intelligent auto mode About the flash Settings in Intelligent auto mode Item Settings GUIDE LINE P26 REC INFO OFF ECONOMY POWER SAVE P26 5MIN AUTO REVIEW P27 2SEC Focus range The focus range becomes the same as macro mod...

Page 34: ...REC PLAYBACK selector switch to and then press MODE A MODE button B REC PLAYBACK selector switch Touch PROGRAM AE To change the setting while taking pictures refer to Using the REC Mode Menu P69 Aim the AF area at the point you want to focus on Press the shutter button halfway to focus The focus range is 50 cm Wide 1 m Tele to infinity If pictures are to be taken at an even closer range refer to T...

Page 35: ...hen taking a picture of both distant and near subjects When the jitter alert appears use STABILIZER P78 a tripod or the self timer P48 Shutter speed will be slower particularly in the following cases Keep the camera still from the moment the shutter button is pressed until the picture appears on the screen We recommend using a tripod Slow sync Red eye reduction In NIGHT PORTRAIT NIGHT SCENERY PART...

Page 36: ...n You can enter the digital zoom range by continuously rotating the zoom lever to Tele or releasing the zoom lever once and then rotating it to Tele again Using the Optical Zoom Using the Extra Optical Zoom EZ Using the Digital Zoom To make subjects appear closer use Tele Rotate the zoom lever towards Tele To make subjects appear further away use Wide Rotate the zoom lever towards Wide Feature Opt...

Page 37: ...ipod and the self timer P48 for taking pictures PLAYBACK mode Playing back Pictures NORMAL PLAY Fast forwarding Fast rewinding Touch and hold 2 1 in left and right of the screen during playback The file number and the picture number only change one by one To play back the picture release 2 1 when the number of the desired picture appears If you keep touching the number of pictures forwarded rewoun...

Page 38: ...ecorded by other equipment Using the Touch Zoom Touch the in the bottom right of the screen Touch the part to enlarge 1k 2k 4k 8k 16k Portion that is touched will be enlarged Picture can be enlarged also by rotating the zoom lever toward Z T It will return to normal playback by touching CANCEL Move the position to be displayed by dragging the picture P13 When you move the position to be displayed ...

Page 39: ... Pictures can be edited deleted by the touch panel Ü FAVORITE PLAY P86 Your favourite pictures are played back FAVORITE PLAY cannot be selected if there is no picture set as FAVORITE CALENDAR P83 Pictures are played back by the date recorded L MULTI PLAYBACK P82 Multiple pictures are played back on one screen CATEGORY PLAY P85 The pictures grouped together in categories are played back DUAL PLAY P...

Page 40: ...ton B button Move 2 to select YES and then press MENU SET To delete multiple pictures up to 50 or all the pictures Press Move 3 4 to select DELETE MULTI or DELETE ALL and then press MENU SET DELETE ALL step 5 Move 3 4 2 1 to select the picture and then press DISPLAY to set Repeat this step appears on the selected pictures If DISPLAY is pressed again the setting is cancelled Press MENU SET Move 3 t...

Page 41: ...while is displayed Use a battery with a sufficient power or the AC adaptor DMW AC5E optional If you press MENU SET while deleting pictures using DELETE MULTI DELETE ALL or ALL DELETE EXCEPT Ü the deleting will stop halfway Depending on the number of pictures to be deleted it may take some time to delete them If pictures do not conform to the DCF standard or are protected P98 they will not be delet...

Page 42: ... guide line When you align the subject on the horizontal and vertical guide lines or the cross point of these lines you can take pictures with well designed composition by viewing the size the slope and the balance of the subject C Normal display 1 D No display 3 E No display Recording guide line 1 2 3 F Normal display G Display with recording information 1 H No display 3 A This is used when divid...

Page 43: ...an n0EV during exposure compensation or in the manual exposure mode When the flash is activated In STARRY SKY or FIREWORKS in scene mode P57 When the brightness of the screen is not correctly displayed in dark places When the exposure is not adequately adjusted The histogram is an approximation in recording mode The histogram of a picture may not match in recording mode and playback mode The histo...

Page 44: ...n the recording conditions make it necessary It is activated once before the actual recording to reduce the red eye phenomenon eyes of the subject appearing red in the picture and then activated again for the actual recording Use this when you take pictures of people in low lighting conditions Forced flash ON Forced ON Red eye reduction The flash is activated every time regardless of the recording...

Page 45: ...etting again if necessary The flash setting is memorised even if the camera is turned off However the scene mode flash setting is reset to the initial setting when the scene mode is changed The available flash range to take pictures The available flash range is an approximation In HIGH SENS P61 in scene mode the ISO sensitivity automatically switches to between ISO1600 and ISO6400 and the availabl...

Page 46: ...ximum shutter speed is selected when the amount of jitter is minimal while STABILIZER is set or when STABILIZER is set to OFF Note If you bring the flash too close to an object the object may be distorted or discoloured by the heat or lighting from the flash When you take a picture beyond the available flash range the exposure may not be adjusted properly and the picture may become bright or dark ...

Page 47: ...ance between the camera and the subject is beyond the focus range of the camera the picture may not be properly focused even if the focus indication lights When a subject is close to the camera the effective focus range is significantly narrowed Therefore if the distance between the camera and the subject is changed after focusing on the subject it may become difficult to focus on it again Macro m...

Page 48: ...ra to focus on the subject We recommend using a tripod when recording with the self timer The number of pictures which can be taken in BURST is fixed to 3 Move 2 ë Move 3 4 to select a mode You can also move 2 ë to select Press MENU SET You can also press the shutter button halfway to finish The menu screen disappears after about 5 seconds At this time the selected item is automatically set Press ...

Page 49: ... scene is selected for the touched subject in the Intelligent auto mode Only focus can be adjusted during manual exposure Dynamic tracking function may not work depending on the recording conditions such as the ones below When the subject is too small When the recording location is too dark When the subject is moving too fast When the background has the same or similar colour to the subject When j...

Page 50: ...ease confirm in playback mode If the exposure is not adequate the aperture value and the shutter speed turn in red when the shutter button is pressed halfway Set the aperture value larger if it is too bright and set the aperture value smaller if it is too dark We recommend using a tripod when the shutter speed is slow Slide the REC PLAYBACK selector switch to and then press MODE Touch APERTURE PRI...

Page 51: ...onitor may differ from the actual picture recorded Confirm in playback mode If the exposure is not adequate the aperture value and the shutter speed turn in red when the shutter button is pressed halfway We recommend using a tripod when the shutter speed is slow Slide the REC PLAYBACK selector switch to and then press MODE Touch SHUTTER PRIORITY Touch the shutter speed set bar A Shutter Speed Set ...

Page 52: ...ck mode Slide the REC PLAYBACK selector switch to and then press MODE Touch MANUAL EXPOSURE Touch the aperture set bar A or shutter speed set bar B Press the shutter button halfway The manual exposure assistance C appears for about 10 seconds to indicate the exposure Set the aperture value and the shutter speed again when the exposure is not adequate Take the pictures The exposure is adequate Set ...

Page 53: ...re value and the shutter speed turn red when the shutter button is pressed halfway AUTO of SENSITIVITY cannot be set SENSITIVITY will be ISO100 if you switch the recording mode to manual exposure when SENSITIVITY is set to AUTO and setting of I EXPOSURE will be switched off Slide bar can be hidden by touching Touch the aperture value shutter speed or exposure display to change the settings Slide b...

Page 54: ...c F8 0 8 to 1 2000 F7 1 F6 3 F5 6 8 to 1 1600 F5 0 F4 5 F4 0 8 to 1 1300 F3 5 F3 2 F2 8 8 to 1 1000 Available Shutter Speed Sec Per 1 3 EV Aperture Value 8 6 5 4 F2 8 to F8 0 3 2 2 5 2 1 6 1 3 1 1 1 3 1 1 6 1 2 1 2 5 1 3 2 1 4 1 5 1 6 1 8 1 10 1 13 1 15 1 20 1 25 1 30 1 40 1 50 1 60 1 80 1 100 1 125 1 160 1 200 1 250 1 320 1 400 1 500 1 640 1 800 1 1000 1 1300 F4 0 to F8 0 1 1600 F5 6 to F8 0 1 20...

Page 55: ...ft of the screen The set exposure value is memorised even if the camera is turned off The compensation range of the exposure will be limited depending on the brightness of the subject Exposure can also be compensated by touching the exposure compensation set bar when in aperture priority AE or shutter priority AE Under exposed Properly exposed Overexposed Compensate the exposure towards positive C...

Page 56: ...he auto bracket setting is cancelled if you turn the camera off or POWER SAVE is activated When auto bracket is set the auto review function is activated regardless of the auto review setting The picture is not enlarged You cannot set the auto review function in the SETUP menu The exposure may not be compensated with auto bracket depending on the brightness of the subject In shutter priority AE an...

Page 57: ...ter speed The scene mode flash setting is reset to the initial setting when the scene mode is changed When you take a picture with a scene mode that is not adequate for the purpose the hue of the picture may differ from the actual scene The following items cannot be set in scene mode because the camera automatically adjusts them to the optimal setting INTELLIGENT ISO SENSITIVITY METERING MODE I EX...

Page 58: ...r is blinking Make sure to press the shutter button halfway again to focus The recorded picture automatically appears on the LCD monitor for reviewing If the picture is blurry due to the slow shutter speed we recommend using the 2 second self timer Note The focus range is about 30 cm to 70 cm You can take a picture of yourself with audio P79 If you do this the self timer indicator will light up wh...

Page 59: ... jitter or if STABILIZER is set to OFF shutter speed may slow down up to 8 seconds We recommend using the tripod and the self timer for taking a picture Note The focus range is 5 m to infinity The shutter may remain closed max about 8 sec after taking the picture because of signal processing This is not a malfunction Noise may become visible when you take pictures in dark places This mode allows y...

Page 60: ...EDIT section on P89 When the birthday or name is set AGE or NAME is automatically set to ON If ON is selected when the birthday or name has not been registered the setting screen appears automatically 3 Touch EXIT to finish To cancel AGE and NAME Select the OFF setting in step 1 of the Birthday Name setting procedure Note The age and name can be printed out using the PHOTOfunSTUDIO viewer bundled ...

Page 61: ...or other information about this mode Select this when you want to take pictures of sunset view This allows you to take vivid pictures of the red colour of the sun This mode minimises the jitter of the subjects and enables you to take pictures of these subjects in dimly lit rooms Select this for high sensitivity processing The sensitivity automatically switches to between ISO1600 and ISO6400 Pictur...

Page 62: ...re The ISO sensitivity automatically switches to between ISO500 and ISO800 However the ISO sensitivity is increased to make the shutter speed become high speed This allows you to take vivid pictures of a starry sky or a dark subject Setting the shutter speed Select a shutter speed of 15 SEC 30 SEC or 60 SEC 1 Touch the number of seconds to select It is also possible to change the number of seconds...

Page 63: ...of the sea sky etc It also prevents under exposure of people under strong sunlight Note The initial setting for AF MODE is š Do not touch the camera with wet hands Sand or seawater will cause the camera to malfunction Make sure that sand or seawater does not get into the lens or the terminals This allows you to take pictures that show the snow as white as possible at a ski resort or a snow covered...

Page 64: ... is held down the sound will not be recorded for a few seconds when recording starts When the subject is focused the focus indication lights The focus and zoom are fixed to the setting when recording starts the first frame The audio is also recorded simultaneously from the built in microphone on this unit Motion pictures cannot be recorded without audio Press the shutter button fully to stop recor...

Page 65: ... displayed on the screen may not decrease regularly When you set the picture quality to ý ü or ÿ we recommend using a high speed card with 10MB s or greater displayed on the package Depending on the type of the card the card access indication may appear for a while after recording motion pictures This is not a malfunction When motion pictures recorded with the camera are played back on other equip...

Page 66: ...funSTUDIO viewer bundled software on the CD ROM supplied Recording which Day of the Vacation You Take the Picture Select TRAVEL DATE from the SETUP menu and then move 1 Move 4 to select SET and then press MENU SET Move 3 4 2 1 to set the departure date year month day and then press MENU SET Move 3 4 2 1 to set the return date year month day and then press MENU SET If you do not want to set the ret...

Page 67: ...stination date is for example one day before the departure date If TRAVEL DATE is set to OFF the number of days that have passed since the departure date will not be recorded even if you set the travel date or the return date Even if TRAVEL DATE is set to SET after taking the pictures which day of the vacation you took them is not displayed For details on the SETUP menu settings refer to P23 You c...

Page 68: ...n appears when playing back pictures taken at the travel destination Move 3 to select DESTINATION and then press MENU SET to set C Depending on the setting the time at the travel destination area or the home area is displayed Move 2 1 to select the area the travel destination is in and then press MENU SET to set D Current time of the destination area E Time difference If daylight saving time is us...

Page 69: ...hen it is printed on a large piece of paper or displayed on a PC monitor AMany pixels Fine BFew pixels Rough These pictures are examples to show the effect If you change the aspect ratio set the picture size again The extra optical zoom does not work in HIGH SENS or HI SPEED BURST in scene mode so the picture size for is not displayed Pictures may appear mosaic depending on the subject and the rec...

Page 70: ...he ISO sensitivity the more the jitter is reduced but the greater the amount of picture noise Note Depending on the brightness and how fast the subject is moving jitter may not be avoided Movements may not be detected when a moving subject is small when a moving subject is at the edge of the screen or when a subject has moved at the very moment when the shutter button was pressed fully If picture ...

Page 71: ...pictures after lowering the maximum ISO sensitivity level increasing the setting for NOISE REDUCTION under PICT ADJ or lowering the setting for each of the items other than NOISE REDUCTION P77 For details on REC mode menu settings refer to P23 In sunlight under incandescent lights or in other such conditions where the colour of white takes on a reddish or bluish tinge this item adjusts to the colo...

Page 72: ... setting select Ò Note The white balance setting is memorised even if the camera is turned off However the white balance setting for a scene mode returns to AWB when the scene mode is changed Finely adjusting the white balance Use this to set the white balance manually Set the white balance to V Ð î Ñ Ò 1 Move 3 È several times until WB ADJUST appears and then move 2 1 to adjust the white balance ...

Page 73: ... camera will adjust the exposure to suit the person s face C METERING MODE C Multiple This is the method in which the camera measures the most suitable exposure by judging the allocation of brightness on the whole screen automatically Usually we recommend using this method Centre weighted This is the method used to focus on the subject on the centre of the screen and measure the whole screen evenl...

Page 74: ...5 areas 9 area focusing The camera focuses on any of 9 focus areas This is effective when the subject is not in the centre of the screen 3 area focusing High speed The camera quickly focuses on any of 3 focus areas points left right or centre This is effective when the subject is not in the centre of the screen ƒ 1 area focusing High speed The camera quickly focuses on the subject in the AF area o...

Page 75: ...to focus when you press the shutter button halfway This is not a malfunction Note The camera is focusing on all the AF areas when multiple AF areas max 9 areas light at the same time If you want to determine the focus position to take pictures switch the AF mode to ƒ Ø or Ù If the AF mode is set to or the AF area is not displayed until the picture is brought into focus Switch the AF mode to ƒ or Ø...

Page 76: ...ctures in a place landscape indoors outdoors etc where there is a large difference between the light and shade it may take time until the exposure is stable If burst is used at this time the exposure may not become optimal The burst speed pictures second may become slower depending on the recording environment such as in dark places if the ISO sensitivity is high etc Burst mode is not cancelled wh...

Page 77: ...s refer to P23 Adjusting the picture quality for the recorded pictures Applicable modes DIGITAL ZOOM H COLOR EFFECT OFF This is the standard setting B W The picture becomes black and white SEPIA The picture becomes sepia COOL The picture becomes bluish WARM The picture becomes reddish I PICT ADJ CONTRAST r Increases the difference between the brightness and the darkness in the picture s Decreases ...

Page 78: ...ORTRAIT in scene mode and to OFF in STARRY SKY in scene mode It cannot be set to OFF in the Intelligent auto mode In motion picture mode MODE2 cannot be set For details on REC mode menu settings refer to P23 You can take a picture brightly in dark places by setting MIN SHTR SPEED slower Also you can set it faster to reduce the blur of the subject Applicable modes 1 250 1 125 1 60 1 30 1 15 1 8 1 4...

Page 79: ...es n For details on REC mode menu settings refer to P23 To set the year month day and time It functions in exactly the same way as CLOCK SET in the SETUP menu B AUDIO REC OFF Audio will not be recorded ON B is displayed on the screen Audio will be recorded as soon as the image is recorded It will stop in 5 seconds F AF ASSIST LAMP OFF The AF assist lamp does not turn on ON When taking pictures in ...

Page 80: ...ou have set as favourites as a slide show This playback method is recommended when you have connected the camera to a TV set to view the pictures you have taken Slide the REC PLAYBACK selector switch to and then press MODE Touch SLIDE SHOW Touch the item ALL Every picture is played back as a slide show FAVORITE Pictures with Ü are played back as a slide show It can be selected only if there are pi...

Page 81: ...t be played back as a slide show It is not possible to add new music effects 1 Display control panel by touching screen If no operation is done for 2 seconds it will return to original status 2 Operate control panel by touching A Back to previous picture B Play Pause C Ahead to next picture D Return to slide show set screen E Reduce volume level F Increase volume level G Exit slide show These oper...

Page 82: ... Number of the selected picture and the total number of recorded pictures B Slide bar You can also turn the zoom lever several times toward L W to switch to multiple screen Touch the picture to select The screen can be switched to 12 screens by touching and to 30 screens by touching Screen can be switched by touching 3 4 or dragging the slide bar up or down P13 1 2 3 B A ...

Page 83: ... recording date is set as the 1st January 2008 If you take pictures after setting the travel destination in WORLD TIME the pictures are displayed by the dates at the travel destination in calendar playback Slide the REC PLAYBACK selector switch to and then press MODE Touch CALENDAR You can also turn the zoom lever for several times toward L W to switch to calendar screen Touch the date to play bac...

Page 84: ...icture to select from above or below A picture can be selected also by moving 3 4 2 1 You cannot display the same picture on the dual display at the same time Note PLAYBACK mode menu P93 and SETUP menu cannot be used When ROTATE DISP is set to ON pictures which were recorded with the camera held vertically or pictures which were rotated will be displayed vertically 1 The previous picture is displa...

Page 85: ...he picture files if there are a lot on the card or the built in memory If you touch CANCEL during searching it will stop halfway Pictures are sorted into the categories shown below Still pictures created from a motion picture cannot be played back from the motion pictures category in category playback CATEGORY PLAY CATEGORY Recording information e g scene modes CATEGORY Recording information e g s...

Page 86: ...menu PLAYBACK mode Organizing pictures EASY ORG Favourite setting of the picture touch zoom editing and deleting can be done easily by using the touch panel Slide the REC PLAYBACK selector switch to and then press MODE Touch EASY ORG EASY ORG Screen FAVORITE PLAY A The previous picture is displayed B The next picture is displayed C Items D Thumbnail Picture can be forwarded rewound also by moving ...

Page 87: ...999 pictures as favourites When printing pictures at a photo printing store ALL DELETE EXCEPTÜ P40 is useful so only the pictures you want to be printed remain on the card You may not be able to set pictures taken with other equipment as favourites You can perform check and cancel the settings of images as favourites using the PHOTOfunSTUDIO viewer bundled software on the CD ROM supplied We recomm...

Page 88: ...ze pictures recorded with other equipment You can enlarge and then clip the important part of the recorded picture Touch RESIZE Touch the picture size Only the sizes to which the pictures can be resized is displayed Touch YES TRIMMING Touch a picture from thumbnail at the bottom of the screen Touch Touch TRIMMING 3 4 5 1 2 3 ...

Page 89: ...tures After text has been registered it can be included in prints using TEXT STAMP P93 Only alphabetic characters and symbols can be entered You can use the stylus pen supplied if it is hard to operate with your fingers Select the part to be trimmed Touch Enlarge Touch Reduce Drag P13 or Touch 3 4 2 1 Move The zoom lever and joystick can also be used Reduction Enlargement Move the position Touch S...

Page 90: ...all of the registered text does not fit on the screen The name setting of BABY1 BABY2 or PET in scene mode can also be registered by using the operation in steps 4 and following The name setting of BABY1 BABY2 or PET in scene mode and TITLE EDIT cannot be registered at the same time You can print out texts comments using the PHOTOfunSTUDIO viewer bundled software on the CD ROM supplied You cannot ...

Page 91: ...ra is QuickTime Motion JPEG Please note that the bundled software includes QuickTime to play back motion picture files created with the camera on the PC Some QuickTime Motion JPEG files recorded by a PC or other equipment may not play back on the camera If you play back motion pictures that have been recorded with other equipment the picture quality may deteriorate or the pictures may not play bac...

Page 92: ...to step 2 Press MENU SET to display the 9 screens playback screen A 30 frames Display image every 1 30 second as picture To advance frame by frame 3 4 Advance every 3 frames 2 1 Advance every 1 frame Change the number of frame rate per second Turn the zoom lever toward L W To end 9 screen display Press MENU SET Press the shutter button Move 3 to select YES and then press MENU SET QUALITY is fixed ...

Page 93: ...3 4 to select SINGLE or MULTI and then press MENU SET Move 3 4 2 1 to select SHOOTING DATE AGE TRAVEL DATE or TITLE and then press MENU SET to set each item SHOOTING DATE AGE P60 If this is set to ON AGE is stamped on the pictures TRAVEL DATE If this is set to ON TRAVEL DATE is stamped on the pictures TITLE Text is printed together with the image for pictures that have already been recorded with t...

Page 94: ...o 50 pictures at one time in MULTI Depending on the printer being used some characters may be cut at printing Check before printing When text is stamped onto the pictures it is difficult to read it Text and dates cannot be stamped on the pictures taken with other equipment We recommend resizing to if you want to attach a picture to an e mail or use it on a website Pictures set to the minimum numbe...

Page 95: ...he menu Note After converting the aspect ratio the picture size may become larger than that of the original picture You may not be able to convert pictures taken on other equipment Move 3 to select YES and then press MENU SET Press MENU SET to close the menu ASPECT CONV Move 3 4 to select Y or X and then press MENU SET Move 2 1 to select a picture taken with W aspect ratio and then press MENU SET ...

Page 96: ...es on a PC they cannot be displayed in the rotated direction unless the OS or software is compatible with Exif Exif is a file format for still pictures which allows recording information etc to be added It was established by JEITA Japan Electronics and Information Technology Industries Association It may not be possible to rotate pictures that have been recorded with other equipment N ROTATE M ROT...

Page 97: ...ct CANCEL on the screen shown in step 2 and then press MENU SET 2 Move 3 to select YES and then press MENU SET 3 Press MENU SET to close the menu You cannot select CANCEL if not even one picture has been set for DPOF printing To print the date After setting the number of prints set cancel printing with the recording date by pressing DISPLAY When you go to a photo printing store for digital printin...

Page 98: ... shown in step 2 and then press MENU SET 2 Move 3 to select YES and then press MENU SET 3 Press MENU SET to close the menu If you press MENU SET while cancelling protection the cancelling will stop halfway Note The protect setting may not be effective on other equipment Even if you protect pictures in the built in memory or a card they will be deleted if the built in memory or the card is formatte...

Page 99: ...ing The message OVERWRITE AUDIO DATA screen appears when audio has already been recorded Move 3 to select YES and then press MENU SET to start audio recording The original audio is overwritten Audio is recorded from the built in microphone on the camera If you press the audio dubbing is cancelled Press MENU SET to stop recording It will automatically stop after recording about 10 seconds without p...

Page 100: ...ent free space the picture data will only be copied halfway We recommend using a card which has more free space than the built in memory about 50 MB If a picture exists with the same name folder number file number as the picture to be copied in the copy destination when is selected a new folder is created and the picture is copied If a picture exists with the same name folder number file number as...

Page 101: ...al If the remaining battery power becomes low while the camera and the PC are communicating the status indicator blinks and the alarm beeps Refer to Disconnecting the USB connection cable safely P102 before disconnecting the USB connection cable Otherwise data may be destroyed Move 3 4 to select PC and then press MENU SET If USB MODE P27 is set to PC in the SETUP menu in advance the camera will be...

Page 102: ...an earlier operating system set the Write Protect switch of the SDHC memory card to the LOCK position when importing pictures from an SDHC memory card Viewing the contents of the built in memory or card using the PC folder composition A new folder is created when pictures are taken in the following situations After NO RESET P27 in the SETUP menu has been executed When a card containing a folder wi...

Page 103: ... to the printer Disconnect the USB connection cable insert or remove the card and then connect the USB connection cable to the printer again A USB connection cable supplied Check the directions of the connectors and plug them straight in or unplug them straight out Otherwise the connectors may be bent out of shape which will cause trouble B Align the marks and insert C AC adaptor DMW AC5E optional...

Page 104: ...ISPLAY is pressed é appears on the pictures to be printed When DISPLAY is pressed again the setting is cancelled After the pictures have been selected press MENU SET SELECT ALL Prints all the stored pictures DPOF PICTURE Prints the pictures set in DPOF PRINT only P97 FAVORITE Prints the pictures set as favourites only P87 Move 3 to select PRINT START and then press MENU SET Refer to P105 for the i...

Page 105: ...g check the printer s print with date setting as well Note When asking the photo shop to print the pictures By stamping the date using TEXT STAMP P93 or setting date printing at the time of the DPOF PRINT P97 setting before going to a photo shop the dates can be printed at the photo shop You can set the number of prints up to 999 Paper sizes not supported by the printer will not be displayed Print...

Page 106: ... paper set PAGE LAYOUT to ä and then set NUM OF PRINTS to 1 for each of the 4 pictures Note The camera is receiving an error message from the printer when the indication lights orange during printing After finishing printing make sure there are no problems with the printer If the number of prints is high the pictures may be printed several times In this case the remaining number of prints indicate...

Page 107: ...e pictures Do not use any other AV cables except the supplied one Read the operating instructions for the TV When you play back a picture vertically it may be blurry You can view pictures on TVs in other countries regions which use the NTSC or PAL system when you set VIDEO OUT in the SETUP menu You cannot operate if you touch the Touch icon displayed on the TV screen Still pictures recorded on an ...

Page 108: ...played they may not be displayed properly depending on the type of TV Read the operating instructions for the TV Playing back on the TV with component socket Preparations Turn this unit and the TV off 1 Component Plugs Connect the plugs to the component video input sockets on the TV with same colour Indication on the TV might be different 2 Audio Pin Plugs to the audio input socket 3 TV with compo...

Page 109: ...sitivity level P70 20 Colour effect P77 21 Picture quality P64 22 Available recording time P64 23 Spot AF area P74 24 Name 1 P60 25 Histogram P26 43 26 Travel date P66 27 Elapsed recording time P64 Intelligent ISO P70 28 Current date and time Travel destination setting P67 2 Zoom Extra optical zoom P36 Digital zoom P36 77 Operation for backlight compensation P32 29 Minimum shutter speed P78 30 Age...

Page 110: ...er P102 Built in memory P18 Elapsed playback time P91 9 Picture number Total pictures 10 Motion picture recording time P91 11 Histogram P26 43 12 Exposure compensation P55 13 Recording information P42 14 Touch zoom P38 86 15 Playback Motion picture Still picture with audio P91 16 Recorded date and time Travel destination setting P67 Name P60 Title P89 17 Age P60 18 Number of days that have passed ...

Page 111: ...the camera is adversely affected by electromagnetic equipment and stops functioning properly turn the camera off and remove the battery or disconnect AC adaptor DMW AC5E optional Then reinsert the battery or reconnect AC adaptor and turn the camera on Do not use the camera near radio transmitters or high voltage lines If you record near radio transmitters or high voltage lines the recorded picture...

Page 112: ...ry accidentally check to see if the body of the battery and the terminals are damaged Inserting a damaged battery in the camera will damage the camera Bring charged spare batteries when going out Be aware that the operating time of the battery becomes shorter in low temperature conditions such as at a ski resort When you travel do not forget to bring the battery charger supplied so that you can ch...

Page 113: ... from the camera If the battery is left inserted in the camera it will discharge even if the camera is turned off If the battery continues to be left in the camera it will discharge excessively and may become unusable even if charged When storing the battery for a long period of time we recommend charging it once a year Remove the battery from the camera and store it again after it has completely ...

Page 114: ...eat the operation More than 999 favourites have been set CANNOT BE SET ON THIS PICTURE TITLE EDIT TEXT STAMP or DPOF PRINT cannot be set for pictures not based on the DCF standard NOT ENOUGH SPACE ON BUILT IN MEMORY NOT ENOUGH MEMORY ON THE CARD There is no space left on the built in memory or the card When you copy pictures from the built in memory to the card batch copy the pictures are copied u...

Page 115: ...LIMITATION OF THE WRITING SPEED OF THE CARD When you set the picture quality to ý ü or ÿ we recommend using a high speed card with 10MB s or greater displayed on the package Depending on the type of SD Memory Card or SDHC Memory Card motion picture recording may stop in the middle A FOLDER CANNOT BE CREATED A folder cannot be created because there are no remaining folder numbers that can be used P...

Page 116: ...hen connecting to a PC or a printer When recording or playing back motion pictures During a slide show AUTO DEMO AUTO LCD OFF P26 When using the AC adaptor While the menu screen is displayed While the self timer is set While recording motion pictures When connecting to a PC or a printer AUTO REVIEW P27 mode Extra Optical Zoom P36 9 and ô in SCENE MODE mode DIGITAL ZOOM P36 í 9 and ô in SCENE MODE ...

Page 117: ... MODE QUICK AF P75 5 and 4 in SCENE MODE mode BURST P76 ô and 5 in SCENE MODE mode AUDIO REC I EXPOSURE P76 SCENE MODE mode COLOR EFFECT P77 SCENE MODE PICT ADJ P77 SCENE MODE mode MIN SHTR SPEED P78 mode mode º mode SCENE MODE mode When Intelligent ISO is set AUDIO REC P79 AUTO BRACKET BURST ô and 5 in SCENE MODE mode AF ASSIST LAMP P79 0 ï 4 and 7 in SCENE MODE RESIZE P87 MULTI RESIZE P94 Motion...

Page 118: ...ictures EASY ORG DUAL PLAY TEXT STAMP P93 Pictures recorded without setting the clock Motion pictures Still pictures with audio Pictures stamped with TEXT STAMP ASPECT CONV P95 Pictures taken with Y or X Motion pictures Still pictures with audio Pictures stamped with TEXT STAMP ROTATE P96 Motion pictures Protected pictures ROTATE DISP P96 Multi playback CALENDAR PRINT WITH DATE P97 Pictures stampe...

Page 119: ...any memory remaining on the built in memory or the card Delete the pictures which are not necessary to increase the available memory P40 90 The picture can become whitish if there is dirt e g fingerprints on the lens If the lens is dirty turn on the camera eject the lens barrel P12 and gently wipe the lens surface with a soft dry cloth Was this picture taken with the flash at the close range when ...

Page 120: ...e camera is shipped Therefore when taking pictures indoors etc noise will appear Decrease the ISO sensitivity P71 Increase the setting for NOISE REDUCTION in PICT ADJ or lower the setting for each of the items other than NOISE REDUCTION P77 Take pictures in bright places Has HIGH SENS or HI SPEED BURST in the scene mode been set If so the resolution of the recorded picture decreases slightly becau...

Page 121: ...hen you press the shutter button halfway to set the aperture value and does not affect the recorded pictures This phenomenon also appears when the brightness changes when the camera is zoomed or when the camera is moved This is because of operation of the automatic aperture of the camera and it is not a malfunction The LCD monitor may flicker for a few seconds after turning the camera on indoors u...

Page 122: ...unction P96 Is the REC PLAYBACK selector switch set to P37 Is there a picture on the built in memory or the card The pictures on the built in memory appear when a card is not inserted The picture data on the card appears when a card is inserted Is this a picture whose file name has been changed in the PC If it is it cannot be played back by this unit Has CALENDAR CATEGORY PLAY or FAVORITE PLAY bee...

Page 123: ...e motion pictures This is not a malfunction Is the camera connected to the TV correctly Set the TV input to external input mode Output from the COMPONENT OUT socket is not possible when it is connected to the PC or the printer Connect it only to the TV Depending on the TV model the pictures may be extra horizontally or vertically or they may be displayed with their edges cut off The folder number ...

Page 124: ...studios to print pictures ask the photo studio if the pictures can be printed with both ends Press MENU SET select the SETUP menu icon and then select the icon to set the desired language P29 In dark places the AF assist lamp P79 lights red to make it easier to focus on a subject Is AF ASSIST LAMP on the REC mode menu set to ON P79 The AF assist lamp does not turn on in bright places The surface o...

Page 125: ...ction the pictures may be recorded in folders with different numbers from the ones used prior to the operation P102 If the battery was inserted or removed without first turning the camera s power off the folder and file numbers for the pictures taken will not be stored in the memory When the power is then turned back on and pictures are taken they may be stored under file numbers which should have...

Page 126: ...B 5 11 7 16 11 23 18 36 64 MB 11 24 16 34 24 48 38 75 128 MB 24 49 35 69 50 99 78 150 256 MB 48 97 68 135 98 190 150 290 512 MB 97 190 135 270 195 380 300 590 1 GB 195 380 270 540 390 770 600 1180 2 GB 390 770 550 1090 790 1530 1220 2360 4 GB 770 1520 1090 2150 1560 3010 2410 4640 8 GB 1580 3100 2230 4380 3180 6130 4910 9440 16 GB 3180 6250 4490 8820 6410 12350 9880 19000 Aspect ratio X Picture si...

Page 127: ...2680 5020 8 GB 1770 3500 2500 4910 3550 6820 5450 10230 16 GB 3580 7050 5040 9880 7160 13720 10980 20590 Aspect ratio W Picture size 7 5M 3648k2056 5 5M 3072k1728 3 5M 2560k1440 2M 1920k1080 Quality A A A A Built in Memory Approx 50 MB 13 26 18 37 27 53 47 92 Card 16 MB 3 6 4 10 7 14 12 25 32 MB 7 15 10 21 15 30 27 53 64 MB 15 32 22 45 32 63 57 105 128 MB 33 65 46 92 66 125 115 220 256 MB 65 125 9...

Page 128: ...45 s 128 MB 1 min 23 s 4 min 10 s 4 min 10 s 12 min 20 s 29 s 1 min 1 s 1 min 11 s 3 min 35 s 256 MB 2 min 45 s 8 min 10 s 8 min 10 s 24 min 1 min 2 min 2 min 20 s 7 min 512 MB 5 min 30 s 16 min 20 s 16 min 20 s 47 min 50 s 2 min 4 min 4 min 40 s 14 min 1 GB 11 min 32 min 50 s 32 min 50 s 1 h 35 min 4 min 8 min 10 s 9 min 20 s 28 min 10 s 2 GB 22 min 30 s 1 h 7 min 1 h 7 min 3 h 15 min 8 min 20 s ...

Page 129: ...t auto 5 cm Wide 1 m Tele to infinity Scene mode There may be differences in the above settings Shutter system Electronic shutteriMechanical shutter Motion picture recording When the aspect ratio setting is X 640k480 pixels 30 frames second 10 frames second only when using a Card 320k240 pixels 30 frames second 10 frame second When the aspect ratio setting is W 848k480 pixels 30 frames second 10 f...

Page 130: ...emperature polycrystalline TFT LCD Approx 230 000 dots field of view ratio about 100 Flash Flash range ISO AUTO Approx 60 cm to 6 0 m Wide AUTO AUTO Red eye reduction Forced flash ON Forced ON Red eye reduction Slow sync Red eye reduction Forced flash OFF Microphone Monaural Speaker Monaural Recording media Built in Memory Approx 50 MB SD Memory Card SDHC Memory Card MultiMediaCard Still pictures ...

Page 131: ... PAL Composite Switched by menu Component Audio line output monaural Terminal COMPONENT OUT Dedicated jack 10 pin AV OUT DIGITAL Dedicated jack 8 pin DC IN Dedicated jack 2 pin Dimensions Approx 94 9 mm W k57 1 mm H k22 9 mm D excluding the projecting parts Mass Approx 155 g excluding card and battery Approx 175 g with card and battery Operating temperature 0 oC to 40 oC Operating humidity 10 to 8...

Page 132: ...stered trademarks of Apple Inc used under license therefrom Matsushita Electric Industrial Co Ltd Web Site http panasonic net Pursuant to at the directive 2004 108 EC article 9 2 Panasonic Testing Centre Panasonic Marketing Europe GmbH Winsbergring 15 22525 Hamburg Germany C B EU ...

Reviews: