background image

- 29 -

Basic

Recording Mode: 

Taking pictures using the automatic function 

(Intelligent Auto Mode)

The camera will set the most appropriate settings to match the subject and the recording 
conditions so we recommend this mode for beginners or those who want to leave the 
settings to the camera and take pictures easily.

The following functions are activated automatically.

Scene Detection/Backlight Compensation/Intelligent ISO sensitivity control/Auto White 

Balance/Face Detection/[i.Exposure]/[i.Resolution]/[i.ZOOM]/[AF Assist Lamp]/

[Red-Eye Removal]/[Stabilizer]/[Continuous AF]

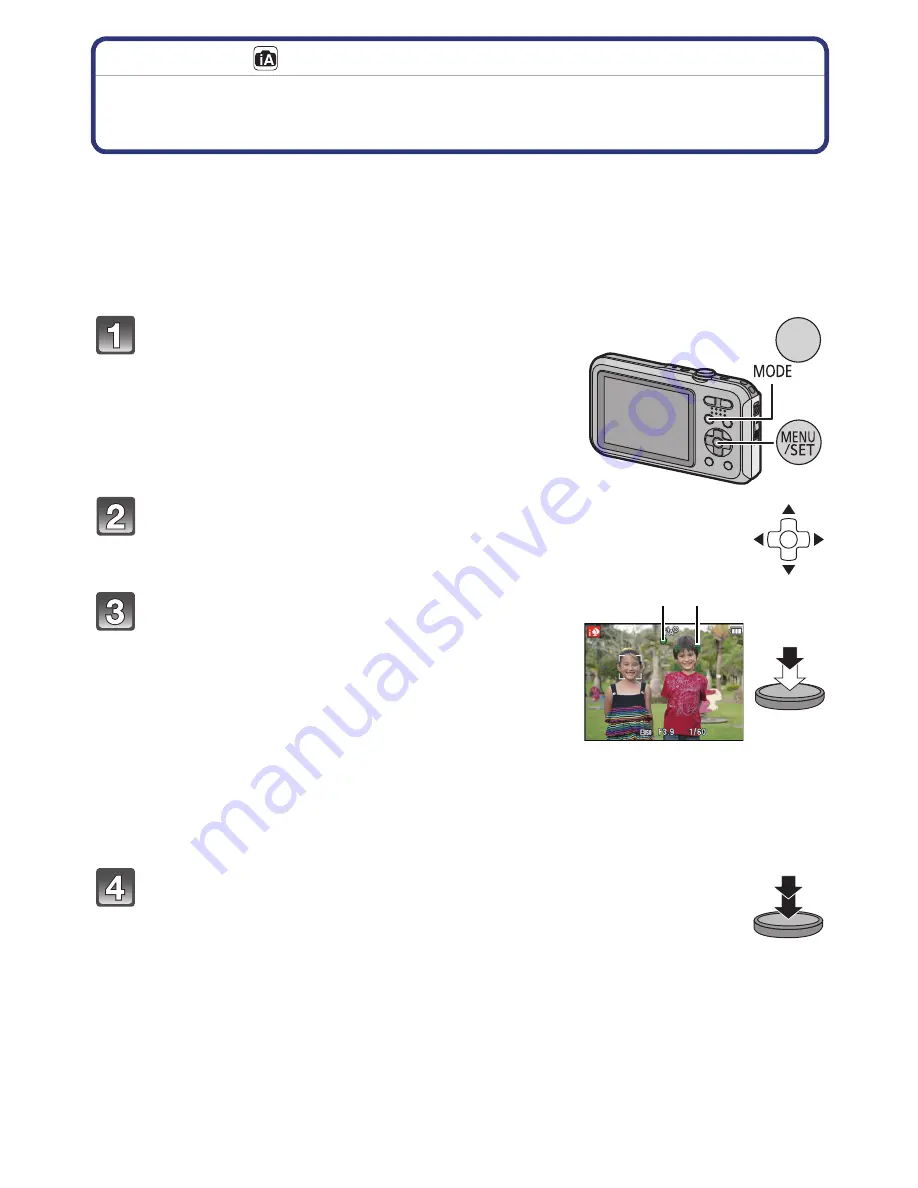
Press [MODE].

Press 

3

/

4

/

2

/

1

 to select [Intelligent Auto], 

and then press [MENU/SET].

Press the shutter button halfway to focus.

The focus indication 

A

 (green) lights when the subject 

is focused.

The AF area 

B

 is displayed around the subject’s face 

by the Face Detection function. In other cases, it is 

displayed at the point on the subject which is in focus.

• The minimal distance (how close you can be to the 

subject) will change depending on the zoom factor. 

Please check with the recordable range display on 

the screen.


(P33)

You can set the AF tracking by pressing 

3

. For details, 

refer to 

P87

. (AF tracking is cancelled by pressing 

3


again)

Press the shutter button fully (push it in 

further), and take the picture.

A B

Summary of Contents for Lumix DMC-FT20

Page 1: ...Operating Instructions for advanced features Digital Camera Model No DMC FT20 DMC TS20 Before use please read these instructions completely VQT4B20 F0112HY0...

Page 2: ...res Normal Play 37 Selecting a picture 37 Displaying Multiple Screens Multi Playback 38 Using the Playback Zoom 38 Playing Back Motion Pictures 39 Deleting Pictures 40 To delete a single picture 40 To...

Page 3: ...ck Menu 101 Upload Set 101 Text Stamp 103 Video Divide 105 Resize 106 Cropping 107 Favorite 108 Print Set 109 Protect 111 Face Rec Edit 112 Copy 113 Connecting to other equipment Playing Back Pictures...

Page 4: ...dry cloth Do not open or close the side door near the water when underwater using wet hands or when the camera is wet It may cause water leakage Do not apply strong shock or vibration by dropping or...

Page 5: ...door open when the temperature of the camera gets close to the ambient temperature Contact Panasonic s Service Centre if the fogging does not disappear Conditions in which inner side of the lens may b...

Page 6: ...Panasonic s test method is based on the above MIL STD 810F Method 516 5 Shock However the drop height was changed from 122 cm 4 feet to 150 cm 5 feet dropping onto 3 cm 0 1 feet thick plyboard This d...

Page 7: ...emperature is very low at ski resorts or at high altitude etc or very high above 40 oC 104 F inside a car under strong sunlight close to a heater on the beach etc Waterproof performance may be degrade...

Page 8: ...the shorter harder side of the brush 2 Check for cracks and deformation of the rubber seal on the side door The integrity of the rubber seals may decrease after about 1 year with use and age To avoid...

Page 9: ...d After use at the seaside or underwater soak the unit in fresh water pooled in a shallow container for 10 minutes or less If the zoom button or camera ON OFF button do not move smoothly it may be cau...

Page 10: ...ter in gaps in the camera ON OFF button and zoom button etc Do not dry the camera with hot air from dryer or similar Waterproof performance will deteriorate due to deformation Do not use chemicals suc...

Page 11: ...For details on the accessories refer to Basic Operating Instructions Battery Pack is indicated as battery pack or battery in the text Battery Charger is indicated as battery charger or charger in the...

Page 12: ...ens P5 134 143 8 LCD monitor P53 128 133 9 MODE button P27 95 10 Zoom button P54 11 Strap eyelet P14 Be sure to attach the strap when using the camera to ensure that you will not drop it 12 Release le...

Page 13: ...careful not to cover the speaker with your finger Doing so may make sound difficult to hear 21 Tripod receptacle 22 AV OUT DIGITAL socket P114 117 120 123 23 Card slot P19 24 Battery slot P19 In these...

Page 14: ...ay result be sure to attach the cord firmly checking that it is not snagged in the side door Pass your hand through the strap and adjust its length Note Attach the strap correctly following the proced...

Page 15: ...are made available for purchase in some markets Some of these battery packs are not adequately protected with internal protection to meet the requirements of appropriate safety standards There is a po...

Page 16: ...s displayed on the LCD monitor The indication turns red and blinks if the remaining battery power is low Recharge the battery or replace it with a fully charged battery Note Do not leave any metal ite...

Page 17: ...dable pictures decreases For example if you were to take one picture every two minutes then the number of pictures would be reduced to approximately one quarter of the number of pictures given above b...

Page 18: ...w on the LCD display when in use The battery performance will decrease so keep the camera and spare batteries warm by placing them in a warm place such as inside your cold protection gear or clothing...

Page 19: ...ing careful about the battery orientation insert all the way until you hear a locking sound and then check that it is locked by lever C Pull the lever C in the direction of the arrow to remove the bat...

Page 20: ...aintain the waterproof performance of this unit a message prompting to check for any foreign material inside the side door or to perform maintenance is displayed along with a warning sound when the fo...

Page 21: ...ons can be performed using this unit When a card has not been inserted Pictures can be recorded on the built in memory and played back When a card has been inserted Pictures can be recorded on the car...

Page 22: ...further data writing deletion or formatting is possible The ability to write delete and format data is restored when the switch is returned to its original position The data on the built in memory or...

Page 23: ...ble recording time when recording motion pictures h is an abbreviation for hour m for minute and s for second Note Number of recordable pictures available recording time for the card may decrease when...

Page 24: ...en is not displayed proceed to Requirements for Underwater use below Press MENU SET Press 3 4 to select the language and press MENU SET Press MENU SET Requirements for Underwater use Be sure to check...

Page 25: ...k can be reset as shown in steps 5 and 6 The clock setting is maintained for 3 months using the built in clock battery even without the battery Leave the charged battery in the unit for 24 hours to ch...

Page 26: ...a held vertically are played back vertically rotated Only when Rotate Disp P51 is set When the camera is held vertically and tilted up and down to record pictures the Direction Detection function may...

Page 27: ...27 Basic Basic Selecting the Recording Mode Press MODE Press 3 4 2 1 to select the Recording Mode Press MENU SET...

Page 28: ...orting events etc Snow Mode P65 This allows you to take pictures that show the snow as white as possible at a ski resort or a snow covered mountain Beach Surf Mode P66 This mode is optimal for taking...

Page 29: ...Removal Stabilizer Continuous AF Press MODE Press 3 4 2 1 to select Intelligent Auto and then press MENU SET Press the shutter button halfway to focus The focus indication A green lights when the subj...

Page 30: ...ark the size of the subject the colour of the subject the distance to the subject the contrast of the subject when the subject is moving Recording conditions Sunset sunrise under low brightness condit...

Page 31: ...automatically take a picture with a higher level of brilliance for the colour brightness and vividness When is selected or is set depending on the type of subject and brightness When is set Digital Re...

Page 32: ...freedom by changing various settings in the Rec menu Press MODE Press 3 4 2 1 to select Normal Picture and then press MENU SET Aim the AF area at the point you want to focus on Press the shutter butto...

Page 33: ...ting the zoom The focus range is displayed in red when it is not focused after pressing the shutter button halfway The focus range may change gradually depending on the zoom position e g Range of focu...

Page 34: ...le moving the camera as you compose the picture You can repeatedly retry the actions in step 1 before pressing the shutter button fully Subject and recording conditions which are difficult to focus in...

Page 35: ...y pressing the motion picture button again About the recording format for recording motion pictures This unit can record motion pictures in MP4 format MP4 This is a simpler video format best used when...

Page 36: ...of the operation may be recorded The zoom speed will be slower than usual when recording motion pictures Operating the zoom while recording motion pictures can take time for the image to come into fo...

Page 37: ...logy Industries Association and with Exif Exchangeable Image File Format Files that do not comply with the DCF standard cannot be played back Pictures recorded with other camera may not be able to pla...

Page 38: ...Press 3 4 2 1 to select a picture and then press MENU SET Displaying Multiple Screens Multi Playback Using the Playback Zoom Press T of the zoom button 1k 2k 4k 8k 16k When you press W of the zoom bu...

Page 39: ...he same as 3 4 2 1 The fast forward rewind speed increases if you press 1 2 again Note When using a high capacity card it is possible that fast rewinding may be slower than usual To play back the moti...

Page 40: ...ory or the card that are being played back will be deleted Pictures that are not in the DCF standard or those that are protected cannot be deleted Press To delete a single picture Select the picture t...

Page 41: ...All Confirmation screen is displayed Pictures are deleted by selecting Yes It is possible to delete all pictures except the ones set as favourite when All Delete Except Favorite is selected with the D...

Page 42: ...e Detection Press MENU SET Setting menu items Press 2 1 to select menu and then press MENU SET Menu Description of settings Rec P81 to 93 Recording Mode only The menu lets you set the Colouring Sensit...

Page 43: ...sed on the camera due to the specifications Press 3 4 to select the menu item and then press MENU SET A Menu screen page It will switch to the next page when you reach the bottom It will also switch b...

Page 44: ...ily found The features that can be adjusted using Quick Menu are determined by the mode or a display style the camera is in Using the Quick Menu Press Q MENU when recording Press 3 4 2 1 to select the...

Page 45: ...m the home area Precautions To maintain waterproof performance display the things you need to check before use U Clock Set Setting Date Time World Time Set the time in your home area and travel destin...

Page 46: ...n pictures Travel Date cannot be set in the Intelligent Auto Mode Setting of other Recording Mode will be reflected Travel Date Departure date and return date of the travel as well as the name of the...

Page 47: ...annot be adjusted r Beep This allows you to set the beep and shutter sound r Beep Level Shutter Vol t u s Low High OFF Low High OFF Beep Tone Shutter Tone u Volume Adjust the volume of the speaker to...

Page 48: ...ng the size the slope and the balance of the subject The Pattern setting is fixed to in the Intelligent Auto Mode In Panorama Shot in Scene Mode the guideline is not displayed LCD Mode These menu sett...

Page 49: ...Auto Mode Multi Playback Recording motion pictures Playback Zoom Calendar Motion picture recording area display is only an approximation Recording area display may disappear when zooming to Tele depen...

Page 50: ...etween 100 and 999 can be assigned When the folder number reaches 999 the number cannot be reset We recommend formatting the card P52 after saving the data on a PC or elsewhere To reset the folder num...

Page 51: ...direction unless the OS or software is compatible with Exif Exif is a file format for still pictures which allows recording information etc to be added It was established by JEITA Japan Electronics an...

Page 52: ...desired language The Stabiliser function is switched between On and Off every time MENU SET is pressed during the Stabilizer Demo Stabilizer Demo is an approximation Auto Demo is not output to the te...

Page 53: ...select E or G 1 If the Histogram in Setup menu is set to ON Histogram will be displayed 2 Name of the registered person in Face Recog is displayed when DISPLAY is pressed In Recording Mode A Normal d...

Page 54: ...umber of pixels to 10M or less will operate the Extra Optical Zoom to take zoomed pictures without affecting quality Using the Optical Zoom Using the Extra Optical Zoom EZ Using the Intelligent Zoom U...

Page 55: ...isplay bar Example 0 5 m 1 6 ft Feature Optical Zoom Extra Optical Zoom EZ Maximum magnification 4k 9k 1 Picture quality No deterioration No deterioration Conditions None Picture Size with P81 is sele...

Page 56: ...rding motion pictures refer to P36 The Extra Optical Zoom cannot be used in the following cases In Macro Zoom Mode In High Sens in Scene Mode When Burst in the Rec menu is set to or When recording mot...

Page 57: ...ictures Using the Built in Flash Set the flash to match the recording Press 1 Press 3 4 to select the item and then press MENU SET A Photo flash Do not cover it with your fingers or other objects Swit...

Page 58: ...d eye phenomenon eyes of the subject appearing red in the picture and then activated again for the actual recording Use this when you take pictures of people in low lighting conditions Forced Flash On...

Page 59: ...ial setting is displayed The flash setting may change if the Recording Mode is changed Set the flash setting again if necessary The flash setting is memorised even if the camera is turned off However...

Page 60: ...l not provide the appropriate level of exposure and may result in a picture that is too white or dark When the Flash is being charged the Flash icon blinks red and you cannot take a picture even when...

Page 61: ...n it again Macro Mode gives priority to a subject close to the camera Therefore if the distance between the camera and the subject is far it takes longer to focus on it When you take pictures at close...

Page 62: ...he subject We recommend using a tripod when recording with the Self timer The self timer cannot be set when recording motion pictures Item Description of settings 10 sec Picture is taken 10 seconds af...

Page 63: ...e value or the shutter speed The set exposure value is memorised even if the camera is turned off The compensation range of the exposure will be limited depending on the brightness of the subject Unde...

Page 64: ...re compensation range When the exposure is compensated the exposure compensation value appears on the lower left of the screen The exposure may not be compensated with Auto Bracket depending on the br...

Page 65: ...when you want to take pictures of sports scenes or other fast moving events Note Shutter speed may slow down up to 1 second This mode is suitable for taking pictures of subjects at distances of 5 m 1...

Page 66: ...AF Lock You can fix the focus before taking a picture with AF lock This is useful if you want to take pictures of a fast moving subject etc 1 Aim the AF area at the subject 2 Press 2 to fix the focus...

Page 67: ...isplay of the recording screen will be delayed more than usual and the screen will look as if frames are dropping No sound is recorded in motion pictures Approximately 1 8 of the time period is record...

Page 68: ...re and hue to obtain the desired picture Press MODE Press 3 4 2 1 to select Scene Mode and then press MENU SET Press 3 4 2 1 to select the Scene Mode and then press MENU SET Note To change the Scene M...

Page 69: ...the daytime this mode enables the texture of their skin to appear even softer than with Portrait It is effective when taking pictures of people from the chest up Technique for Soft Skin Mode To make t...

Page 70: ...Press the shutter button once again to end the still picture recording Recording can also be ended by keeping the camera still while recording Panorama Shot Recording from left to right Trace a half...

Page 71: ...be combined properly when recording the following subjects or under the recording conditions below Subjects with a single uniform colour or repetitive pattern such as the sky or a beach Moving subject...

Page 72: ...l processing This is not a malfunction Noise may become visible when you take pictures in dark places This allows you to take vivid pictures of the nightscape Note We recommend using a tripod and the...

Page 73: ...thday or name is set Age or Name is automatically set to ON If ON is selected when the birthday or name has not been registered the setting screen appears automatically 4 Press 4 to select Exit and th...

Page 74: ...imises the jitter of the subjects and enables you to take pictures of these subjects in dimly lit rooms Picture Size Select the picture size of 3M 4 3 2 5M 3 2 2M 16 9 or 2 5M 1 1 This mode is ideal f...

Page 75: ...n Note During the Burst Mode Face Recog picture information can be attached to only the first picture Face Recog does not guarantee secure recognition of a person Face Recognition may take more time t...

Page 76: ...ered with the hair when registering Make sure there is no extreme shading on the face when registering Flash will not flash during registration Good example for registering When it is not recognising...

Page 77: ...o select the Face Recognition frame that is not registered and then press MENU SET Take the picture adjusting the face with the guide The faces of subjects other than people pets etc cannot be registe...

Page 78: ...4 to select SET and then press MENU SET 2 Press 2 1 to select the items Year Month Day and then press 3 4 to set and then press MENU SET Focus Icon Change the displayed focus icon when the subject is...

Page 79: ...edit or delete and then press MENU SET 4 Press 3 4 to select the item and then press MENU SET Exit the menu after it is set Change or delete the information for a registered person Item Description of...

Page 80: ...ve the cursor by pressing T on the zoom button The following operations can be performed by moving the cursor to the item and pressing MENU SET Enter a blank Delete Delete a character Move the entry p...

Page 81: ...te In specific modes Extra Optical Zoom cannot be used and the picture size for is not displayed For details regarding modes in which Extra Optical Zoom cannot be used refer to P56 Pictures may appear...

Page 82: ...button is pressed halfway It is continuously changing to match the movement of the subject until the shutter button is pressed fully Note For the focus range of flash when is set refer to P60 The ISO...

Page 83: ...tting is memorised even if the camera is turned off However the White Balance setting for a Scene Mode returns to AWB when the Scene Mode is changed White Balance is fixed to AWB in following conditio...

Page 84: ...Blue sky 3 Cloudy sky Rain 4 Shade 5 Sunlight 6 White fluorescent light 7 Incandescent light bulb 8 Sunrise and sunset 9 Candlelight KlKelvin Colour Temperature Set the White Balance value Use to matc...

Page 85: ...Color Mode AF Mode Settings Description of settings Face Detection The camera automatically detects the person s face max 15 areas The focus and exposure can then be adjusted to fit that face no matte...

Page 86: ...s the face detection function may fail to work making it impossible to detect faces AF Mode is switched to while motion pictures are taken When the face is not facing the camera When the face is at an...

Page 87: ...sed again Note Dynamic tracking function may not work in the following cases When the subject is too small When the recording location is too dark or bright When the subject is moving too fast When th...

Page 88: ...may be set higher than 100 if the picture is taken with i Exposure Compensation effect may not be achieved depending on the conditions Applicable modes Pictures with sharp profile and resolution can...

Page 89: ...ion of settings Burst On Burst speed approx 1 3 pictures second You can take pictures until the capacity of the built in memory or the card is full The burst speed becomes slower halfway The exact tim...

Page 90: ...d the type and or status of the card used The number of Burst recording pictures may increase when you use a card with fast writing speed or card is formatted The focus zoom exposure White Balance shu...

Page 91: ...g conditions Settings ON OFF Note The effective distance of the AF Assist Lamp is a maximum of approximately 1 5 m 4 9 feet When you do not want to use the AF Assist Lamp A e g when taking pictures of...

Page 92: ...tically function This decreases the jitter of the image when recording motion pictures while walking etc Settings ON OFF Note Stabiliser is fixed to OFF in Panorama Shot in Scene Mode During motion pi...

Page 93: ...ation The setting is fixed to OFF in the following cases When using Auto Bracket In Panorama Shot in Scene Mode When using Burst When recording motion pictures Text Stamp Resize and Cropping cannot be...

Page 94: ...an abbreviation of Variable Bit Rate and the bit rate volume of data for definite period of time is changed automatically depending on the subject to record Therefore the recording time is shortened w...

Page 95: ...methods of playback You can play back the recorded pictures in various methods Press Press MODE Press 3 4 2 1 to select item and then press MENU SET Following items can be selected Normal Play P37 Sl...

Page 96: ...ctures you have taken Press 3 to select Start and then press MENU SET Press 4 to finish the slide show Normal Playback resumes after the slide show finishes Operations performed during slide show The...

Page 97: ...e played back with the recommended effects in each category Some Effect will not operate when playing back pictures displayed vertically Setup Duration or Repeat can be set Duration can be set only wh...

Page 98: ...sort the pictures into each of the categories You can then play back the pictures in each category Press 3 4 2 1 to select the category and then press MENU SET to set Only the category for which pictu...

Page 99: ...ar between January 2000 and December 2099 If the date is not set in the camera the recording date is set as the 1st January 2012 If you take pictures after setting the travel destination in World Time...

Page 100: ...ct Press 2 1 to select a picture and then press 3 Press MENU SET Confirmation screen is displayed It is executed when Yes is selected Note Depending on the picture noise may be emphasised by Auto Reto...

Page 101: ...otion pictures to YouTube while you may upload both motion pictures and still pictures to Facebook This cannot be done to the images in the built in memory Copy the images to a card P113 and then perf...

Page 102: ...ecting the camera to a PC P120 For details refer to P122 Cancelling all the Upload Set settings 1 Select Upload Set on the Playback menu 2 Press 3 4 to select CANCEL and then press MENU SET Confirmati...

Page 103: ...to select Set and then press MENU SET Press 3 4 to select text stamp items and then press MENU SET Text Stamp Select the picture and then press MENU SET to set is displayed on pictures already with da...

Page 104: ...at printing Check before printing When text is stamped onto the 0 3M pictures it is difficult to read it Text and dates cannot be stamped on the pictures in the following cases Motion pictures Pictur...

Page 105: ...n pictures by using Calendar or Category Selection in the Filtering Play Motion pictures with a short recording time cannot be divided Video Divide Select Video Divide on the Playback menu P42 Press 2...

Page 106: ...n pictures Pictures taken in Panorama Shot in Scene Mode Pictures with date or text stamped Resize Select the picture and size SINGLE setting 1 Press 2 1 to select the picture and then press MENU SET...

Page 107: ...ve Press MENU SET Confirmation screen is displayed It is executed when Yes is selected Exit the menu after it is executed Note The picture quality of the cropped picture will deteriorate It may not be...

Page 108: ...and then press MENU SET Cancelling all the Favorite settings 1 Select Favorite on the Playback menu 2 Press 3 4 to select CANCEL and then press MENU SET Confirmation screen is displayed It is execute...

Page 109: ...print pictures recorded on the built in memory copy them to a card P113 and then set the print setting Select Print Set on the Playback menu P42 Press 3 4 to select SINGLE or MULTI and then press MEN...

Page 110: ...ot be printed even if you set to print the date For further information ask at your photo printing store or refer to the operating instructions for the printer The date cannot be printed on pictures w...

Page 111: ...s selected Exit the menu after it is executed Note The protect setting may not be effective on other equipment Even if you protect pictures in the built in memory or a card they will be deleted if the...

Page 112: ...egorised using Face Recognition in Category Selection in Filtering Play You cannot edit the Face Recognition information of protected pictures Face Rec Edit Press 3 4 to select REPLACE or DELETE and t...

Page 113: ...umber file number as the picture to be copied in the copy destination when is selected a new folder is created and the picture is copied If a picture exists with the same name folder number file numbe...

Page 114: ...t the camera and a TV Check the directions of the connectors and plug them straight in or unplug them straight out Otherwise the connectors may be bend of shape which will cause a malfunction Do not u...

Page 115: ...ystem when you set Video Out in the Setup menu No sound is output from the camera speakers Read the operating instructions for the TV Before removing a battery turn the camera off and disconnect the A...

Page 116: ...nstructions for the recorder about the details about copying and playing back Copy by inserting the SD card into the recorder Panasonic devices compatible with the respective file format such as a Blu...

Page 117: ...the playback on this unit after stopping the recording of the recording equipment Note When you play back motion pictures on 4 3 aspect ratio TV you must set TV Aspect P51 on this unit to 4 3 before...

Page 118: ...motion pictures P120 3 Copy the images to a PC using PHOTOfunSTUDIO For details refer to the operating instructions of PHOTOfunSTUDIO PDF Note Do not delete or move imported files or folders in Window...

Page 119: ...ose to format If the card is not recognised please refer to the below support site http panasonic net avc sdcard information SDXC html You can easily print out or mail the pictures you have imported U...

Page 120: ...mera and the PC are communicating the alarm beeps Refer to Disconnecting the USB connection cable safely P121 before disconnecting the USB connection cable Otherwise data may be destroyed Before inser...

Page 121: ...is not displayed check that Access is not displayed on the LCD monitor of the digital camera before removing the hardware Connection in the PTP Mode WindowsR XP Windows VistaR WindowsR 7 and Mac OS X...

Page 122: ...EXE by double clicking it P121 An upload tool LUMIX Image Uploader may startup automatically if the PHOTOfunSTUDIO software on the CD ROM supplied is installed 2 Select the destination to upload Oper...

Page 123: ...ry with sufficient battery power If the remaining battery power becomes low while the camera and the printer are connected the alarm beeps If this happens during printing stop printing at once If not...

Page 124: ...he pictures Disconnect the USB connection cable after printing Selecting multiple pictures and printing them Item Description of settings Multi Select Multiple pictures are printed at one time Press 3...

Page 125: ...ot displayed If the printer does not support date printing the date cannot be printed on the picture Depending on the printer the date print settings of the printer may take precedence so check if thi...

Page 126: ...tem Description of settings Settings on the printer are prioritised L 3 5qk5q 89 mmk127 mm 2L 5qk7q 127 mmk178 mm POSTCARD 100 mmk148 mm 16 9 101 6 mmk180 6 mm A4 210 mmk297 mm A3 297 mmk420 mm 10k15c...

Page 127: ...paper set Page Layout to and then set Num of prints to 1 for each of the 4 pictures Note The camera is receiving an error message from the printer when the indication lights orange during printing Af...

Page 128: ...tter speed P32 16 Aperture value P32 17 ISO sensitivity P82 18 Number of days that have passed since the departure date P46 Location P46 Name P73 Age P73 Current date and time World Time P45 Zoom P54...

Page 129: ...information Name P73 Age P73 13 Auto Retouch P100 Motion picture playback P39 Play panorama P71 14 Number of days that have passed since the departure date P46 Recorded date and time World Time P45 1...

Page 130: ...d if the unit is subject to an impact as a result of being hit or dropped etc If an impact to the camera occurs it should be inspected subject to a fee by a Panasonic s Service Centre to verify that t...

Page 131: ...e camera gets very cold in cold places such as ski resorts or places at high altitude performance of the LCD monitor may temporarily drop immediately after turning the power on e g the picture on the...

Page 132: ...s and or sound may be adversely affected Always use the supplied cords and cables If you use optional accessories use the cords and the cables supplied with them Do not extend the cords or the cables...

Page 133: ...he LCD monitor with excessive force Uneven colours may appear on the LCD monitor and it may malfunction If the camera gets very cold in cold places such as ski resorts or places at high altitude perfo...

Page 134: ...e and humidity If the temperature is too high or too low the operating time of the battery will become shorter Always remove the battery after use Place the removed battery in a plastic bag and store...

Page 135: ...card may be damaged or the recorded content may be damaged or deleted Put the card in the card case or the storage bag after use and when storing or carrying the card Do not allow dirt dust or water t...

Page 136: ...transferring to another party or disposing Reset the settings to protect the personal information P51 If there are pictures stored in the built in memory copy them onto the memory card P113 before for...

Page 137: ...t Recorded data may be damaged or lost if the camera breaks down due to inappropriate handling Panasonic will not be liable for any damage suffered due to loss of recorded data When you use a tripod m...

Page 138: ...pictures cannot be copied Copy could not be completed The following pictures cannot be copied When a picture with the same name as the picture to be copied exists in the copy destination Only when co...

Page 139: ...type of the card motion picture recording may stop in the middle Cannot record due to incompatible format NTSC PAL data on this card Format the card after saving necessary data on a PC etc P52 Insert...

Page 140: ...memory P40 You may not be able to record for a short while after turning the power on when using a large capacity card The picture can become whitish if there is dirt e g fingerprints on the lens When...

Page 141: ...e the Self timer P62 Is there any memory remaining on the built in memory or the card Is the ISO sensitivity high or the shutter speed slow ISO sensitivity is set to when the camera is shipped Therefo...

Page 142: ...ard in this unit Set the AF area to the distinctive colour of the subject if there is a part that is different from the surrounding colour P87 The brightness or the hue of the recorded picture is diff...

Page 143: ...r the borders get coloured depending on the zoom magnification due to the characteristics of the lens Also the peripherals of the image might look warped because the perspective is enhanced when the w...

Page 144: ...turned on This is an operation to correct flicker caused by lighting such as fluorescent lights LED lights etc and is not a malfunction Is LCD Mode active P48 Perform LCD Display P47 This is not a ma...

Page 145: ...memory or the card The pictures on the built in memory appear when a card is not inserted The picture data on the card appears when a card is inserted Is this a folder or picture which was processed...

Page 146: ...peration if you take a picture of a subject with red colour surrounded by a skin tone colour that red part may be corrected to black by the Digital Red Eye Correction function It is recommended to tak...

Page 147: ...de Depending on the TV model the pictures may be elongated horizontally or vertically or they may be displayed with their edges cut off Are you trying to play back the motion pictures by directly inse...

Page 148: ...be printed using a printer that does not support PictBridge Select PictBridge PTP when connecting P123 When using a printer with a Cropping or borderless printing function cancel this function before...

Page 149: ...o zoom or camera movement etc the lens may click and the picture on the screen may drastically change However the picture is not affected The sound is caused by the automatic adjustment of the apertur...

Page 150: ...mera is shaken while the power is off or during Playback Mode this is the sound of the lens moving When power is turned on or off or when switching from recording to Playback Mode there is a rattling...

Page 151: ...the camera s power off the folder and file numbers for the pictures taken will not be stored in the memory When the power is then turned back on and pictures are taken they may be stored under file n...

Page 152: ...DynaComware Taiwan Inc Other names of systems and products mentioned in these instructions are usually the registered trademarks or trademarks of the manufacturers who developed the system or product...

Reviews: