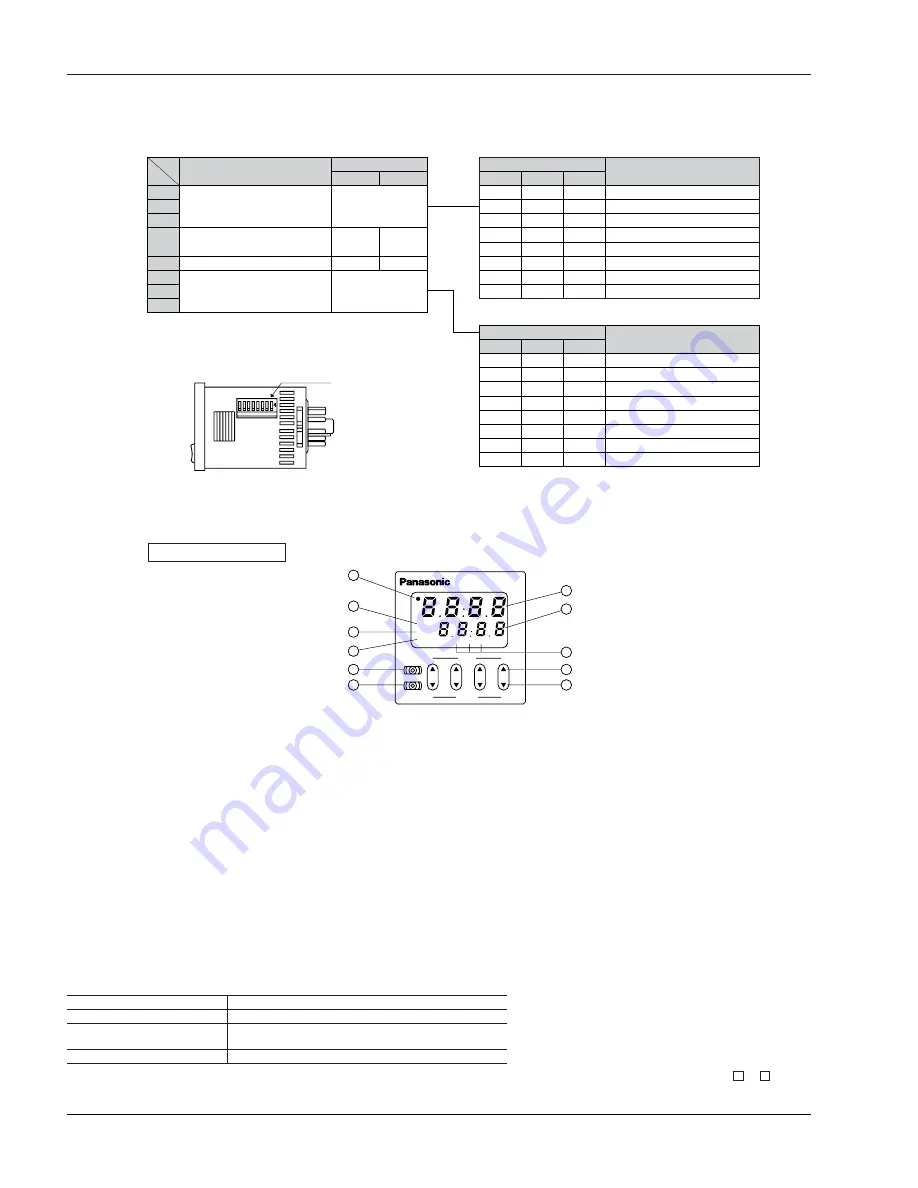
Setting the operation mode, time range, and time
Setting procedure 1) Setting the operation mode and time range
Set the operation mode and time range with the DIP switches on the side of the LT4H timer.
DIP switches
Setting procedure 2) Setting the time
Set the set time with the keys (UP and DOWN keys) on the front of the LT4H timer.
DIP switch
Item
DIP switch No.
1
2
3
ON
ON
ON
A: Power on delay 1
OFF
OFF
OFF
A2: Power on delay 2
ON
OFF
OFF
B: Signal on delay
OFF
ON
OFF
C: Signal off delay
ON
ON
OFF
D: Pulse One shot
OFF
OFF
ON
E: Pulse On delay
ON
OFF
ON
F: Signal Flicker
OFF
ON
ON
G: Totalizing On delay
Table 1: Setting the operation mode
Table 2: Setting the time range
Operation mode
Operation mode
Refer to table 1
1
2
3
Minimum input reset, start, and
stop signal width
20 ms
1 ms
*4
Time delay direction
Addition Subtraction
5
Time range
Refer to table 2
6
7
8
ON
OFF
DIP switch No.
6
7
8
ON
ON
ON
0.001 s to 9.999 s
OFF
OFF
OFF
0.01 s to 99.99 s
ON
OFF
OFF
0.1 s to 999.9 s
OFF
ON
OFF
1 s to 9999 s
ON
ON
OFF
0 min 01 s to 99 min 59 s
OFF
OFF
ON
0.1 min to 999.9 min
ON
OFF
ON
0 h 01 min to 99 h 59 min
OFF
ON
ON
0.1 h to 999.9 h
Time range
Notes: 1) Set the DIP switches before installing the timer.
2) When the DIP SW setting is changed, turn off the power once.
3) The DIP switches are set as ON before shipping.
ON
1
2
3
4
5
6
7
8
DIP switches
(Same for screw terminal type)
Q
Elapsed time display
W
Set time display
E
Time delay indicator
R
Controlled output indicator
T
Reset indicator
Y
Lock indicator
U
Time units display
I
UP keys
Changes the corresponding digit of the
set time in the addition direction
(upwards)
O
DOWN keys
Changes the corresponding digit of the
set time in the subtraction direction
(downwards)
P
RESET switch
Resets the elapsed time and the output
{
LOCK switch
Locks the operation of all keys on the unit
9
8
7
2
3
4
5
6
11
10
DOWN
UP
LOCK
RESET
s
m
1
h
L O C K
R S T
O P .
TIMER
LT4H
• Changing the set time
1. It is possible to change the set time
with the up and down keys even dur-
ing time delay with the timer.
However, be aware of the following
points.
1) If the set time is changed to less than
the elapsed time with the time delay set
to the addition direction, time delay will
continue until the elapsed time reaches
full scale, returns to zero, and then
reaches the new set time. If the set time
is changed to a time above the elapsed
time, the time delay will continue until the
elapsed time reaches the new set time.
2) If the time delay is set to the subtrac-
tion direction, time delay will continue
until “0” regardless of the new set time.
2. If the set time is changed to “0,” the
unit will operate differently depending
on the operation mode.
1) If the operation mode is set to A
(power on delay 1) or A2 (power on
delay 2), the output will turn on when the
power supply is turned on. However, the
output will be off while reset is being
input.
2) In the other modes, the output turns
on when the start is input. When the
operation mode is C (signal off delay), D
(Pulse one shot), or F (Signal flicker),
only when the start input is on does the
output turn on. Also, when the reset is
being input, the output is off.
Front display section
* The 8-pin type does not have the stop input, so that the dip
switch can be changed over between reset and start inputs.
The signal range of the lock input is fixed (minimum 20 ms).
LT4H/-L
• Power failure memory
The EEPROM is used for power failure memory. It has a life of Min. 10
5
over-writings.
The EEPROM is overwriting with the following timing.
* Be aware that the contents of EEPROM for all modes will be overwritten when power is turned OFF during input to external lock terminals
R
to
E
and to .
Such an action does not exist by doing lock operation from the front.
6
7
Output mode
Overwrite timing
Power ON delay (2) A2
When power is OFF
Addition G
Change of preset value or start, reset input
When power is OFF after being ON
Other modes
When power is OFF after changing preset value
All Rights Reserved © C
OPYRIGHT
Matsushita Electric Works, Ltd.


