Panasonic KX-TS4200 Operating Instructions Manual Download Page 14

Preparation

14

For assistance, please visit http://www.panasonic.com/phonehelp

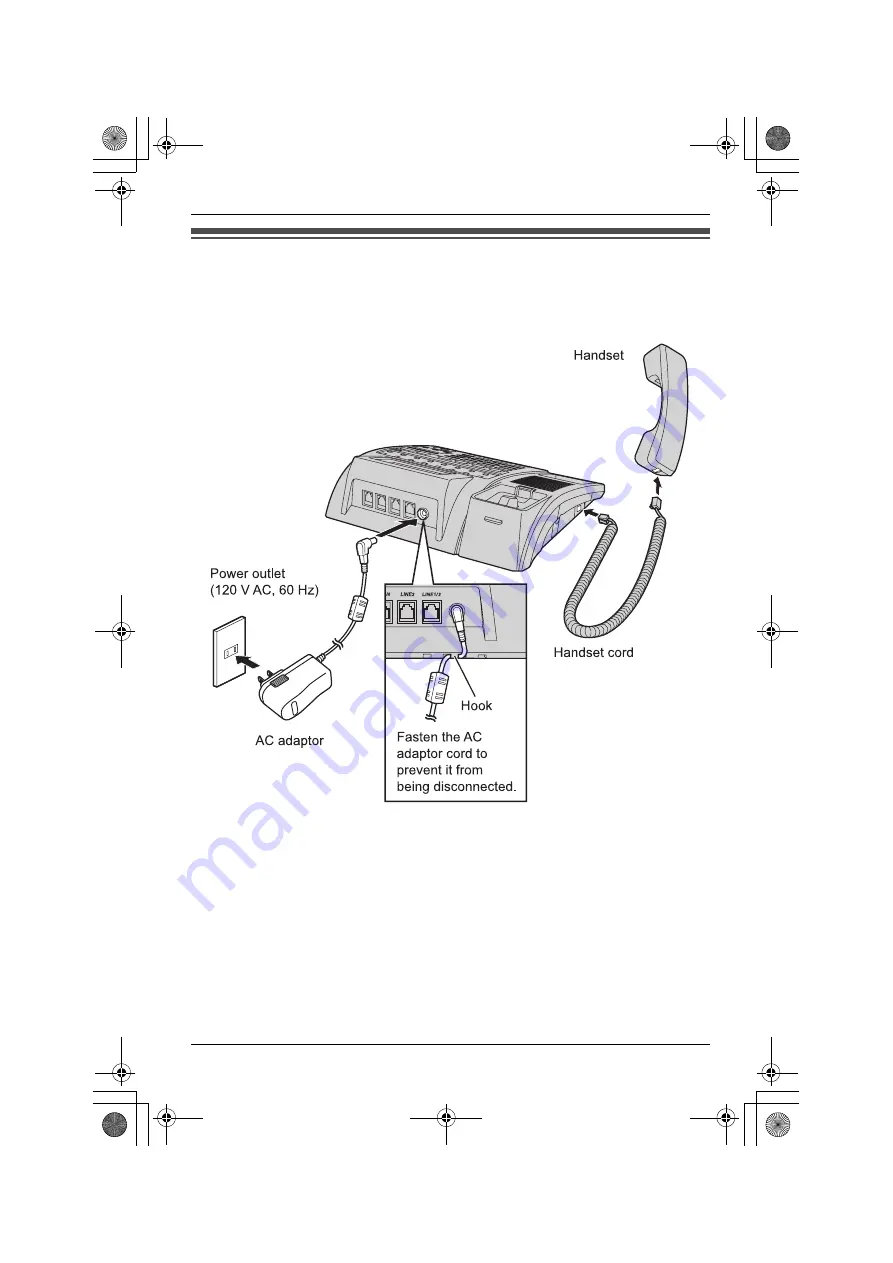
Connecting the handset and AC adaptor

Important:

L

Use only the included Panasonic handset PQJXC0401Z.

L

Use only the included Panasonic AC adaptor PQLV210Z.

Note:

L

The AC adaptor must remain connected at all times. (It is normal for the adaptor to 
feel warm during use.)

L

The AC adaptor should be connected to a vertically oriented or floor-mounted AC 
outlet. Do not connect the AC adaptor to a ceiling-mounted AC outlet, as the weight 
of the adaptor may cause it to become disconnected.

L

The unit will not work during a power failure. We recommend connecting a standard 
telephone to the same telephone line or to the same telephone jack using a 
Panasonic T-adaptor KX-J66 (see “Connecting a standard telephone” on page 56). 
Emergency power can be supplied to the unit by installing a 9 V Alkaline (6LR61) 
back-up battery (see “Additional/replacement accessories” on page 5).

KXT4200̲OI.book  Page 14  Friday, September 1, 2006  8:53 AM

Summary of Contents for KX-TS4200

Page 1: ...t subscribe to the appropriate service offered by your telephone service provider Please read these Operating Instructions before using the unit and save for future reference For assistance visit our website http www panasonic com phonehelp for customers in the U S A or Puerto Rico KXT4200 OI book Page 1 Friday September 1 2006 8 53 AM ...

Page 2: ...turb DND on off 27 Making answering another outside call during a conversation 28 Useful features during a call 28 Call privacy 28 HOLD button 28 Hold reminder 29 MUTE button 29 FLASH button 29 Flash time 30 Temporary tone dialing for rotary pulse service users 30 Phonebook Phonebook 31 Adding items to the phonebook 31 Storing items from the phonebook into the speed dialer 32 Storing items from th...

Page 3: ... Programming Programmable settings 48 Programming the phone setup features 50 Prime line 50 Handsfree mode 50 Programming the advanced setup features 51 Line group 51 Reset all 51 Voice Mail Service Using Voice Mail service 52 Message waiting 52 Useful Information Headset optional 53 Sales and support information 53 Connecting the optional headset to the unit 53 Wall mounting 54 Connecting a stand...

Page 4: ...k you for purchasing a Panasonic integrated telephone We recommend keeping a record of the following information for future reference Serial No Date of purchase found on the bottom of the unit Name and address of dealer Attach your purchase receipt here KXT4200 OI book Page 4 Friday September 1 2006 8 53 AM ...

Page 5: ...er No PQLV210Z one Handset Order No PQJXC0401Z Black one Handset cord Order No PQJA212N Gray one 4 wire telephone line cord Order No PQJA10088Z two Wall mounting adaptor Order No PQYL10021Z one Accessory item Order number Headset KX TCA86 KX TCA88HA KX TCA91 KX TCA92 KX TCA93 KX TCA94 or KX TCA95 2 line adaptor KX J24 2 line splitter KX J42 T adaptor KX J66 2 wire telephone line cord PQJA10075Z 9 ...

Page 6: ...he risk of fire or electric shock Never spill any liquid on the product 11 To reduce the risk of electric shock do not disassemble the product Take the product to an authorized service center when service is required Opening or removing covers may expose you to dangerous voltages or other risks Incorrect reassembly can cause electric shock when the product is subsequently used 12 Unplug the produc...

Page 7: ...sive electrolyte or explode L Do not attempt to rejuvenate the battery provided with or identified for use with the product by heating Sudden release of battery electrolyte may occur causing burns or irritation to the eyes or skin L Remove the battery from the product if the product will not be used for a long period of time several months or more During this time the battery could leak in the pro...

Page 8: ...o not place heavy objects on top of the product L When you leave the product unused for a long period of time unplug the product from the power outlet L The product should be kept away from heat sources such as heaters kitchen stoves etc It should not be placed in rooms where the temperature is less than 5 C 41 F or greater than 40 C 104 F Damp basements should also be avoided Routine care L Wipe ...

Page 9: ...bol Meaning button name Example MENU SET SP PHONE The words in the brackets indicate button names on the unit Example Ringer Type The words in quotations indicate the menu on the display Example Select Phone Setup Press V or to select Phone Setup V Press down up left or right on the navigator key KXT4200 OI book Page 9 Friday September 1 2006 8 53 AM ...

Page 10: ...nd indicators C Speed dial extension buttons D Display E TONE F FLASH G REDIAL PAUSE H MUTE MUTE indicator I SP PHONE Speakerphone SP PHONE indicator J HEADSET HEADSET indicator K DND Do Not Disturb DND indicator L MENU SET M Navigator key V N CONFERENCE O HOLD P LOWER KXT4200 OI book Page 10 Friday September 1 2006 8 53 AM ...

Page 11: ...lp 11 Q Headset jack R Volume key S INTERCOM INTERCOM indicator T TRANSFER U CALLER ID V ERASE W PHONEBOOK X MIC Microphone Memory card Remove the memory card and use it as a name index for speed dialer or extensions KXT4200 OI book Page 11 Friday September 1 2006 8 53 AM ...

Page 12: ...ill be dramatically shortened L It is recommended that the battery is replaced annually L It is recommended that the battery is replaced after a power outage L The battery operating time may depend on usage conditions ambient temperature and battery quality L During a power failure the battery will retain the clock memory see Date and time on page 24 and the redial memory see Making a call using t...

Page 13: ...ormal without the wall mounting adaptor With the wall mounting adaptor You can attach the wall mounting adaptor to slope this unit On the wall See Wall mounting on page 54 for details L To attach the wall mounting adaptor push it in the direction of the arrows 1 and 2 as shown KXT4200 OI book Page 13 Friday September 1 2006 8 53 AM ...

Page 14: ... oriented or floor mounted AC outlet Do not connect the AC adaptor to a ceiling mounted AC outlet as the weight of the adaptor may cause it to become disconnected L The unit will not work during a power failure We recommend connecting a standard telephone to the same telephone line or to the same telephone jack using a Panasonic T adaptor KX J66 see Connecting a standard telephone on page 56 Emerg...

Page 15: ...ame phone number Connecting the units to individual two line telephone jacks Note L If a non system phone is connected to the system phone KX TS4100 KX TS4200 KX TS4300 the line indicators of this unit will not function for that telephone DSL Internet connection and KX TS4100 KX TS4200 KX TS4300 Intercom work at similar frequencies Please contact Panasonic at 1 800 211 PANA 1 800 211 7262 for spec...

Page 16: ...onnecting 2 two line telephone jacks DSL Internet connection and KX TS4100 KX TS4200 KX TS4300 Intercom work at similar frequencies Please contact Panasonic at 1 800 211 PANA 1 800 211 7262 for special wiring configurations KXT4200 OI book Page 16 Friday September 1 2006 8 53 AM ...

Page 17: ... see Additional replacement accessories on page 5 1 2 line adaptor merges a 2 wire single line telephone outlet with another 2 wire single line telephone line onto a single 4 wire 2 line telephone line cord DSL Internet connection and KX TS4100 KX TS4200 KX TS4300 Intercom work at similar frequencies Please contact Panasonic at 1 800 211 PANA 1 800 211 7262 for special wiring configurations KXT420...

Page 18: ...er ID service on page 43 do not function properly Connecting 2 two line telephone jacks For this connection please purchase a Panasonic 2 line splitter KX J42 and two 2 wire telephone line cords Order No PQJA10075Z see Additional replacement accessories on page 5 Example DSL line is LINE2 DSL Internet connection and KX TS4100 KX TS4200 KX TS4300 Intercom work at similar frequencies Please contact ...

Page 19: ...al replacement accessories on page 5 Example DSL line is LINE2 1 2 line adaptor merges a 2 wire single line telephone outlet with another 2 wire single line telephone line onto a single 4 wire 2 line telephone line cord DSL Internet connection and KX TS4100 KX TS4200 KX TS4300 Intercom work at similar frequencies Please contact Panasonic at 1 800 211 PANA 1 800 211 7262 for special wiring configur...

Page 20: ...program the line group see Line group on page 51 Important L You can set up the line group only for LINE4 Note L You can set up the line group unconnected from other extensions private line To program the private line see Line group on page 51 DSL Internet connection and KX TS4100 KX TS4200 KX TS4300 Intercom work at similar frequencies Please contact Panasonic at 1 800 211 PANA 1 800 211 7262 for...

Page 21: ...ks 2 This unit uses the LINE1 2 with 4 wire telephone line cord LINE3 4 with 2 wire telephone line cord and LINE4 with 2 wire telephone line cord jacks DSL Internet connection and KX TS4100 KX TS4200 KX TS4300 Intercom work at similar frequencies Please contact Panasonic at 1 800 211 PANA 1 800 211 7262 for special wiring configurations KXT4200 OI book Page 21 Friday September 1 2006 8 53 AM ...

Page 22: ...hrough this unit using the LINE2 or LINE4 jacks Note L If the communication device is in use use LINE1 or LINE3 to make or answer other calls Otherwise the communication device may not operate properly DSL Internet connection and KX TS4100 KX TS4200 KX TS4300 Intercom work at similar frequencies Please contact Panasonic at 1 800 211 PANA 1 800 211 7262 for special wiring configurations KXT4200 OI ...

Page 23: ...to the unit to use the intercom feature The default setting is 11 Important L Make sure that the unit is in standby mode 1 Press MENU SET 2 Select Phone Setup then press MENU SET 3 Select Extension No then press MENU SET 4 Select the desired number then press MENU SET If you try to assign an extension number which is already used The display shows In Use Press V or to select a different extension ...

Page 24: ...SET 8 Press and hold MENU SET to return to standby mode Note L To return to the previous menu press L If you make a mistake when entering the date and time press or to move the cursor then make the correction Dialing mode If you cannot make calls change this setting depending on your telephone line service The default setting is Tone Tone For tone dial service Pulse For rotary pulse dial service I...

Page 25: ...be shifted to the left side L If you misdial press SP PHONE and start again from step 1 3 When you finish talking press SP PHONE L The SP PHONE and the line indicators go out L The length of the call will remain on the display for a few seconds Note L The line indicator flashes while another phone is using the line L Use the speakerphone in a quiet environment L In step 1 you can select a line by ...

Page 26: ... press SP PHONE or a line button 2 Press 9 then press REDIAL PAUSE 3 Dial the phone number Note L A 3 5 second pause is inserted each time REDIAL PAUSE is pressed Press repeatedly to insert longer pauses Answering calls When a call is being received the unit rings and the called line indicator flashes rapidly Using the handset 1 Lift the handset 2 When you finish talking place the handset on the c...

Page 27: ...o return to the previous menu press L Incoming intercom calls use Type 1 and cannot be changed Turning Do Not Disturb DND on off You will not hear call rings or paging when this feature is activated The line indicator flashes for outside calls and the INTERCOM indicator flashes for intercom calls Press DND to turn on off the Do Not Disturb DND feature L When the Do Not Disturb DND feature is turne...

Page 28: ... call see Conference calls on page 41 Useful features during a call Call privacy Call privacy allows you to prevent other extensions from joining your conversations with outside callers The phone always keeps call privacy on unless you manually turn this feature off Call privacy release During the call press the line button for the call You will hear a double beep L Any system phones can join the ...

Page 29: ...s MUTE button While mute is turned on you can hear the other party but the other party cannot hear you To mute your voice press MUTE L The MUTE indicator lights L To return to the conversation press MUTE again The MUTE indicator goes out L When you switch between the handset and the speakerphone or press FLASH mute will be released FLASH button Pressing FLASH allows you to use special features of ...

Page 30: ... SET 5 Press and hold MENU SET to return to standby mode Note L To return to the previous menu press L If you are connected via a PBX a longer flash time may be necessary to use PBX functions transferring a call etc Consult your PBX installer for the correct setting Temporary tone dialing for rotary pulse service users You can temporarily switch the dialing mode to tone when you need to access tou...

Page 31: ...x 24 digits L If required you can insert FLASH REDIAL PAUSE or TONE in a phone number L To add the last number dialed you can press REDIAL PAUSE instead of entering the phone number 6 Select Done then press MENU SET L To cancel select Cancel then press MENU SET L To add other items repeat from step 2 7 Press PHONEBOOK to return to standby mode Note L To return to the previous menu press Character ...

Page 32: ...ect whether it should be replaced or not To replace current content select Yes then press MENU SET To keep original content select No then press MENU SET Storing items from the redial list into the phonebook Important L Make sure that the unit is in standby mode 1 Press REDIAL PAUSE 2 Press V or to select the desired number then press MENU SET 3 Select Copy To PhBook then press MENU SET 4 Enter th...

Page 33: ... item corresponding to the letter you selected No Entries is displayed 3 Press V or to select the desired item 4 Lift the handset or press SP PHONE or a line button to dial the phone number Editing items in the phonebook Important L Make sure that the unit is in standby mode 1 Press PHONEBOOK 2 Select View Records then press MENU SET 3 Press V or to select the desired item then press MENU SET L To...

Page 34: ...EBOOK to return to standby mode Note L To return to the previous menu press Chain dial This feature allows you to dial phone numbers in the phonebook while you are on a call This feature can be used for example to dial a calling card access number or bank account PIN that you have stored in the phonebook without having to dial manually 1 During an outside call press PHONEBOOK 2 Select View Records...

Page 35: ... 4 Select SPD Preference then press MENU SET 5 Select the desired setting then press MENU SET 6 Press and hold MENU SET to return to standby mode Note L To return to the previous menu press Adding editing names and phone numbers Important L Make sure that the unit is in standby mode 1 Press MENU SET 2 Select Phone Setup then press MENU SET 3 Select Speed Dial then press MENU SET 4 Select Edit View...

Page 36: ...r the appropriate character or number Storing items from the redial list into the speed dialer Important L Make sure that the unit is in standby mode 1 Press REDIAL PAUSE 2 Press V or to select the desired number then press MENU SET 3 Select Copy To SPD then press MENU SET 4 Press the speed dial button 1 to 16 OR Press LOWER then press the speed dial button 1 to 16 5 Enter the name max 16 characte...

Page 37: ... the speed dialer If speed dial preference is set to CO Call Press the desired speed dial button 1 to 16 OR Press LOWER then press the desired speed dial button 1 to 16 If speed dial preference is set to Intercom DSS 1 Lift the handset or press SP PHONE or a line button 2 Press the desired speed dial button 1 to 16 OR Press LOWER then press the desired speed dial button 1 to 16 If speed dial prefe...

Page 38: ...on number 4 To end the intercom call place the handset on the cradle L The INTERCOM indicator goes out Using the speakerphone 1 Press INTERCOM L The INTERCOM indicator lights L The SP PHONE indicator lights and the speakerphone turns on 2 Press the speed dial extension button or enter the extension number 3 To end the intercom call press SP PHONE or INTERCOM L The INTERCOM and the SP PHONE indicat...

Page 39: ...f sounds at the paged extension is heard automatically Important L Make sure that the unit is in standby mode 1 Press MENU SET 2 Select Phone Setup then press MENU SET 3 Select Auto Mute then press MENU SET 4 Select the desired setting then press MENU SET 5 Press and hold MENU SET to return to standby mode Note L To return to the previous menu press Paging all extensions Important L Turn Do Not Di...

Page 40: ...on user can stop being monitored by pressing SP PHONE or INTERCOM Transferring calls You can transfer an outside call to another extension The speed dial extension buttons 1 2 3 15 16 mean the extension numbers 11 12 13 25 26 Blind transfer 1 During an outside call press TRANSFER to put the call on hold 2 Press the speed dial extension button or enter the extension number then place the handset on...

Page 41: ...s the relevant line button Conference calls Conference call with two outside calls While you are talking with an outside caller you can make or answer a 2nd call on the other line and then combine the calls to establish a conference call 1 During an outside call press HOLD 2 To answer a 2nd call press the relevant line button To make a 2nd call press the other line button or SP PHONE then dial the...

Page 42: ...extension button or enter the extension number 3 When the paged party answers press CONFERENCE to make a conference call L To hang up both the outside and intercom calls place the handset on the cradle or press SP PHONE The other remaining parties on the line can still talk Note L If a call is kept on hold for more than 60 or 120 seconds an alarm tone starts to sound hold reminder To turn off the ...

Page 43: ...treats the call as a missed call The number of missed calls is shown on the display This lets you know if you should view the caller list to see who called while you were out Call Waiting Caller ID display If you subscribe to both Caller ID and Call Waiting with Caller ID services the 2nd caller s information is displayed after you hear a Call Waiting tone see For Call Waiting service users on pag...

Page 44: ... number see Editing a caller s phone number before calling back on page 45 Automatically setting date and time This phone automatically resets the date and time each time new information is received You can set the date and time yourself if you wish see Date and time on page 24 Caller list Viewing the caller list Important L Make sure that the unit is in standby mode 1 Press CALLER ID 2 Press V to...

Page 45: ...ode the display shows the 7 digits of the phone number when you receive a call from your home area code L If you set the local area code you can dial 10 digits without dialing 1 to make a call outside your home area code and the display shows the 10 digits without 1 of the phone number when you receive a call from one of your local area codes Important L Make sure that the unit is in standby mode ...

Page 46: ... MENU SET 7 Press and hold MENU SET to return to standby mode Note L To return to the previous menu press Storing caller information into the phonebook Important L Make sure that the unit is in standby mode 1 Press CALLER ID 2 Select the desired item then press MENU SET 3 Select Copy To PhBook L To edit the phone number press repeatedly until the phone number is shown in the desired format does no...

Page 47: ...you can select whether it should be replaced or not To replace current content select Yes then press MENU SET To keep original content select No then press MENU SET Erasing selected caller information Important L Make sure that the unit is in standby mode 1 Press CALLER ID 2 Select the desired item then press ERASE 3 Select Yes then press ERASE or MENU SET L To cancel select No then press MENU SET...

Page 48: ...the idle status any time by pressing and holding MENU SET Phone Setup Sub menu 1 Sub menu 2 Setting Page Speed Dial SPD Preference CO Call Intercom DSS Preview Memory 35 Edit View SPD 35 Language English Español 23 Extension No 11 26 23 Date Time 2006 12 31 12 00A 24 Auto Mute On Off 39 Tone Pulse Tone Pulse 24 Flash Time 80 ms 100 ms 200 ms 300 ms 400 ms 500 ms 600 ms 700 ms 30 Hold Reminder 60 S...

Page 49: ...27 Line2 Ring Type Type 1 Type 2 Type 3 Type 4 Line3 Ring Type Type 1 Type 2 Type 3 Type 4 Line4 Ring Type Type 1 Type 2 Type 3 Type 4 Line Group Line 04 15 Private Line 51 Display MSGW On Off 52 Clear MSGW Yes No 52 Area Codes Home Area Code 3 digits Empty 45 Local Area C1 3 digits Empty Local Area C2 3 digits Empty Local Area C3 3 digits Empty Local Area C4 3 digits Empty Local Area C5 3 digits ...

Page 50: ... mode by using the speakerphone on the unit or a headset optional This feature specifies a mode to be automatically selected each time you press a line key with the handset on the cradle Important L Make sure that the unit is in standby mode 1 Press MENU SET 2 Select Phone Setup then press MENU SET 3 Select Handsfree Mode then press MENU SET 4 Select the desired setting then press MENU SET 5 Press...

Page 51: ... Note L To return to the previous menu press L Transferring a call to a different line group through line 4 is not allowed Reset all Return all features to default settings and all numbers set to speed dial are erased You cannot undo the Reset All command Important L Make sure that the unit is in standby mode 1 Press MENU SET 2 Select Advanced Setup then press MENU SET 3 Select Reset All then pres...

Page 52: ...s on the display Important L Make sure that the unit is in standby mode 1 Press MENU SET 2 Select Advanced Setup then press MENU SET 3 Select Display MSGW then press MENU SET 4 Select the desired setting then press MENU SET 5 Press and hold MENU SET to return to standby mode Note L To return to the previous menu press Clear message waiting Important L Make sure that the unit is in standby mode 1 P...

Page 53: ...ial when making a call press HEADSET and start again from step 1 2 To hang up press HEADSET To adjust the headset receiver volume 5 levels While using the headset press or Switching between headset handset and speakerphone Switching from handset to headset Press HEADSET then place the handset on the cradle Switching from headset to handset When the handset is on the cradle lift the handset When th...

Page 54: ... Pull down the handset hook until it locks so the tab holds the handset 2 Connect the AC adaptor and dress the AC adaptor cord as shown 3 Dress the telephone line cord as shown Tuck the telephone line cord inside the wall mounting adaptor then push it in the direction of the arrows 1 and 2 KXT4200 OI book Page 54 Friday September 1 2006 8 53 AM ...

Page 55: ...visit http www panasonic com phonehelp 55 4 Connect the telephone line cord Mount the unit then slide down To temporarily set the handset down during a conversation place it as shown here KXT4200 OI book Page 55 Friday September 1 2006 8 53 AM ...

Page 56: ...an connect a standard telephone on LINE 2 or LINE 4 of this unit using the Panasonic T adaptor KX J66 To order call the accessories telephone number on page 5 Example Connecting a standard telephone on LINE 4 1 2 line adaptor merges a 2 wire single line telephone outlet with another 2 wire single line telephone line onto a single 4 wire 2 line telephone line cord KXT4200 OI book Page 56 Friday Sep...

Page 57: ...werFail L When the phone is disconnected from a power outlet or there is a power failure the battery works as emergency power When power is restored PowerFail will disappear on the display Problem Cause solution The unit does not work L Check the connections page 14 15 16 17 L Unplug the AC adaptor to reset the unit Reconnect the adaptor and try again The line indicators do not work properly L Che...

Page 58: ...ease remove the battery when you cut the power supply as the battery will discharge automatically once the power is cut according to the time shown on page 12 How do I return to standby mode quickly L Lift the handset then place it back on the cradle L Press SP PHONE 2 times Problem Cause solution You cannot program function items such as the dialing mode L Programming is not possible while in the...

Page 59: ...omdoesnot work L DSL Internet connection and KX TS4100 KX TS4200 KX TS4300 Intercom work at similar frequencies Please contact Panasonic at 1 800 211 PANA 1 800 211 7262 for special wiring configurations You cannot page other extension L The unit is in use Try again later Youcannotanswerthe transferred call even if the display shows Transfer From xx L The transferred call was disconnected before y...

Page 60: ...ment and try again L The caller requested not to send caller information see Incoming Caller ID display on page 43 L If a call is being transferred to you the caller information is not displayed L Generally caller information is displayed from the 2nd ring The display returns to standby mode while viewing the caller list L Do not pause for over 30 seconds while searching When a 2nd call is receive...

Page 61: ...oduct identifier that has the format US AAAEQ TXXXX The digits represented by are the REN without a decimal point e g 03 is a REN of 0 3 If this equipment causes harm to the telephone network the telephone company will notify you in advance that temporary discontinuance of service may be required But if advance notice isn t practical the telephone company will notify the customer as soon as possib...

Page 62: ...sted and found to comply with the limits for a Class B digital device pursuant to Part 15 of the FCC Rules These limits are designed to provide reasonable protection against harmful interference in a residential installation This equipment generates uses and can radiate radio frequency energy and if not installed and used in accordance with the instructions may cause harmful interference to radio ...

Page 63: ...om the actual product Operating environment 5 C 40 C 41 F 104 F Dimensions without wall mounting adaptor Approx height 105 mm x width 245 mm x depth 225 mm 41 8 inches x 921 32 inches x 87 8 inches Mass Weight without wall mounting adaptor Approx 1 080 g 2 38 lb Power consumption Standby Approx 5 W PQLV210Z Maximum Approx 8 W PQLV210Z Power supply AC adaptor 120 V AC 60 Hz KXT4200 OI book Page 63 ...

Page 64: ...Useful Information 64 For assistance please visit http www panasonic com phonehelp Customer services KXT4200 OI book Page 64 Friday September 1 2006 8 53 AM ...

Page 65: ...charge for parts You must mail in your product prepaid during the Limited Warranty period This Limited Warranty excludes both parts and labor for batteries antennas and cosmetic parts cabinet This Limited Warranty only applies to products purchased and serviced in the United States or Puerto Rico This Limited Warranty is extended only to the original purchaser and only covers products purchased as...

Page 66: ...ENTIAL DAMAGES RESULTING FROM THE USE OF THIS PRODUCT OR ARISING OUT OF ANY BREACH OF THIS LIMITED WARRANTY As examples this excludes damages for lost time lost calls or messages cost of having someone remove or re install an installed unit if applicable travel to and from the servicer The items listed are not exclusive but are for illustration only ALL EXPRESS AND IMPLIED WARRANTIES INCLUDING THE...

Page 67: ...4 Display language 23 Do Not Disturb DND 27 E Error messages 57 Extension No 23 F Flash 29 Flash time 30 H Headset optional 53 Hold 28 Hold reminder 29 I Intercom 38 L Line group 20 51 M Making calls 25 Memory card 11 Message waiting 52 Missed calls 43 Mute 29 N Navigator key 10 P Page 39 Pause 26 Phonebook 31 Power failure 14 Prime line 50 Pulse service 30 R Redial list 25 Reset all 51 Ringer on ...

Page 68: ... Electronics Company listed below or to executive or regional sales offices These locations do not repair consumer products Panasonic Consumer Electronics Company Division of Panasonic Corporation of North America One Panasonic Way Secaucus New Jersey 07094 Panasonic Puerto Rico Inc San Gabriel Industrial Park Ave 65 de Infantería Km 9 5 Carolina Puerto Rico 00985 Copyright This material is copyri...

Reviews: