background image

Getting Started

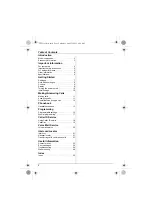
9

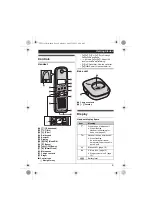
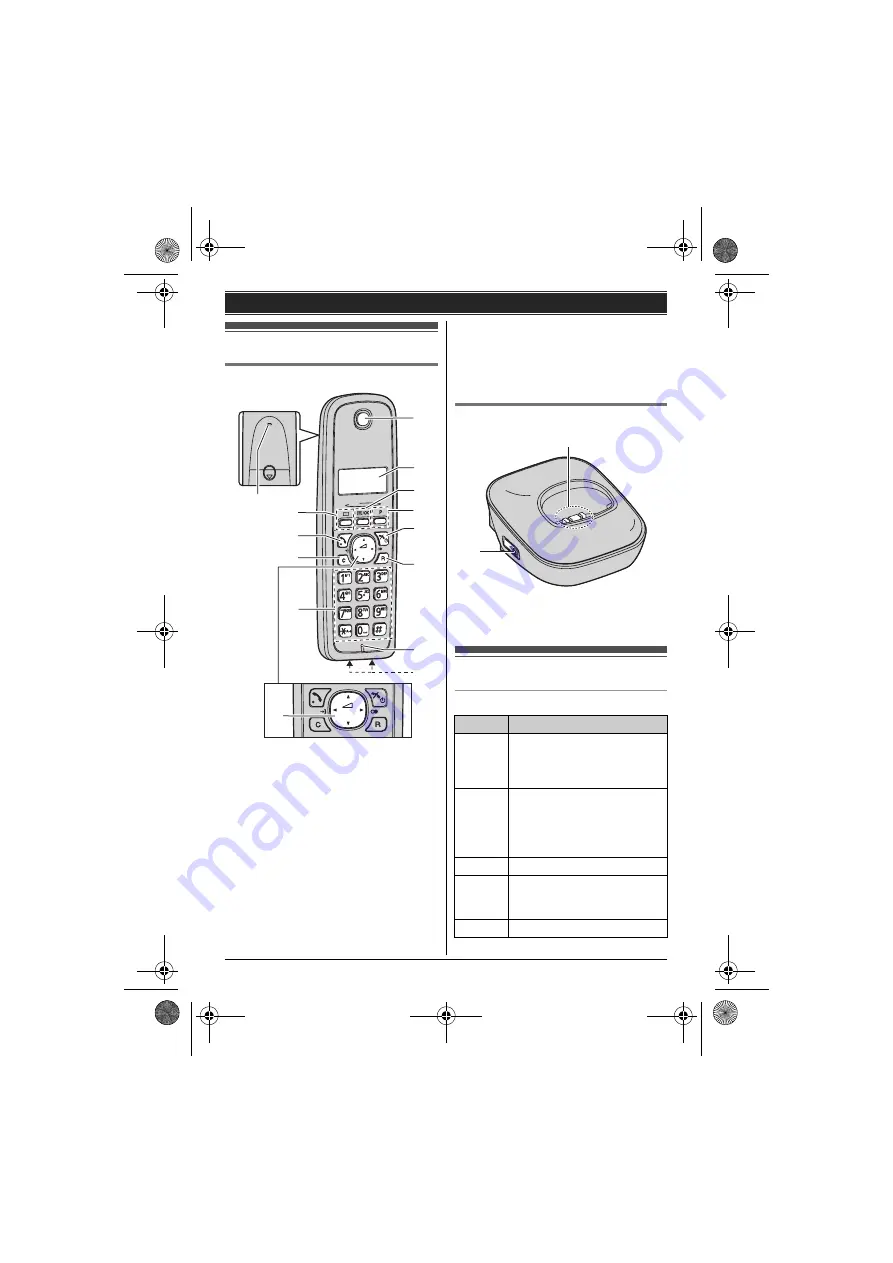
Controls

Handset

A

{k}

 (Phonebook)

B

{C}

 (Talk)

C

{

C

}

 (Clear)

D

Dial keypad

E

Receiver

F

Display

G

{j

/OK

}

 (Menu/OK)

H

{

P

}

 (Pause)

I

{i

c

}

 (Off/Power)

J

{

R

}

 (Recall/Flash)

K

Microphone

L

Charge contacts

M

Ringer

Control type

A


Navigator key

{^}

{V}

{

3

}

, or 

{

4

}

: Scroll through 

various lists and items.

?

 (Volume: 

{^}

 or 

{V}

): Adjust the 

receiver volume while talking.

{

3

}

 (

y

: Caller list): View the caller list.

{

4

}

 (

R

: Redial): View the redial list.

Base unit

A

Charge contacts

B

{x}

 (Locator)

Display

Handset display items

L

B

A

C

D

I

G

J

F

H

E

K

A

M

Item

Meaning

w

Within range of a base unit

L

When flashing:
Handset is searching for 
base unit. (page 25)

C

Handset is on an outside call.

L

When flashing:
An incoming call is now 
being received or the call is 
put on hold.

y

Missed call

*1

 (page 18)

T

L

Mute is on. (page 12)

L

Ringer volume is off. (page 
15)

5

Battery level

B

A

TG161xCX(e).book  Page 9  Monday, April 25, 2011  8:50 AM

Summary of Contents for KX-TG1611

Page 1: ...This unit is compatible with Caller ID You must subscribe to the appropriate service offered by your service provider telephone company Before initial use see Getting Started on page 7 Operating Inst...

Page 2: ...Making Answering Calls Making calls 11 Answering calls 11 Useful features during a call 12 Phonebook Handset phonebook 13 Programming Programmable settings 15 Special programming 17 Caller ID Service...

Page 3: ...sales information 1 Replacement batteries may have a different capacity from that of the supplied batteries Series Model No Base unit Handset Part No Part No Quantity KX TG1611 series KX TG1611 KX TG1...

Page 4: ...to malfunction resulting in an accident L Do not allow the AC adaptor or telephone line cord to be excessively pulled bent or placed under heavy objects Operating safeguards L Unplug the product from...

Page 5: ...dless type during an electrical storm There may be a remote risk of electric shock from lightning 3 Do not use the telephone to report a gas leak in the vicinity of the leak 4 Use only the power cord...

Page 6: ...rivacy confidentiality we recommend that you erase information such as phonebook or caller list entries from the memory before you dispose of transfer or return the product Information on Disposal in...

Page 7: ...lter not supplied is required if you have DSL ADSL service Charger Battery installation L USE ONLY Ni MH batteries AAA R03 size L Do NOT use Alkaline Manganese Ni Cd batteries L Confirm correct polari...

Page 8: ...rmal for the handset to feel warm during charging L Clean the charge contacts of the handset base unit and charger with a soft and dry cloth once a month Before cleaning the unit disconnect from power...

Page 9: ...y Caller list View the caller list 4 R Redial View the redial list Base unit A Charge contacts B x Locator Display Handset display items L B A C D I G J F H E K A M Item Meaning w Within range of a b...

Page 10: ...z7 11 5 Enter the current hour and minute s j OK Example 15 30 15 3z L If you enter the wrong date and or time press C and perform again from step 3 6 ic Note L The date and time may be incorrect aft...

Page 11: ...es page 13 Note L When editing To erase a number place the cursor to the right of where you want to erase the number then press C To insert a number place the cursor to the right of where you want to...

Page 12: ...his feature allows you to receive calls while you are already talking on the phone If you receive a call while on the phone you will hear a call waiting tone If you subscribe to both Caller ID and Cal...

Page 13: ...necessary 12 characters max page 22 s j OK 4 Edit the phone number if necessary 24 digits max page 11 s j OK 2 times 5 ic Editing an entry and making a call 1 Find the desired entry page 13 s j OK 2 r...

Page 14: ...o press before pressing k in step 1 to change the dialling mode temporarily to tone When adding entries to the phonebook we recommend adding to the beginning of phone numbers you wish to chain dial pa...

Page 15: ...or to select the desired setting s j OK L This step may vary depending on the feature being programmed L To exit the operation press ic Note L In the following table indicates the default settings Mai...

Page 16: ...is set to off the handset number is displayed 6 If you subscribe to a Caller ID service and want to view the caller s information after lifting up the handset to answer a call turn off this feature 7...

Page 17: ...8 r Select the desired setting s j OK L If you only want the alarm to sound 1 time select Off and go to step 11 9 r Repeat Cycle s j OK 10 r Select the desired setting s j OK 11 r Ringtone s j OK 12 r...

Page 18: ...the caller list is viewed page 18 y disappears from the display When you receive another new call y is displayed again Phonebook name display When caller information is received and it matches a phone...

Page 19: ...try s j OK 3 r Erase or Erase All s j OK 4 j OK s ic Storing caller information to the phonebook 1 3 y 2 r Select the desired entry s j OK 3 r Save TEL No s j OK 4 To store the name continue from step...

Page 20: ...phone or when your line is busy Messages are recorded by your service provider telephone company not your telephone When you have new messages 0 is displayed on the handset if message indication servi...

Page 21: ...th an outside party can be made between 2 handsets 1 During an outside call press j OK 2 r Intercom s j OK L C flashes to indicate the outside call is on hold 3 Enter the desired handset number you wa...

Page 22: ...ress 4 to move the cursor to the next space then press the appropriate dial key If you do not press any dial key within 5 seconds after entering a character the character is fixed and the cursor moves...

Page 23: ...cter table p L The following are used for both uppercase and lowercase Extended 2 character table O L The following are used for both uppercase and lowercase Cyrillic character table P TG161xCX e book...

Page 24: ...dset and try again L Remove the batteries from the handset and install again L The handset has not been registered to the base unit Register the handset page 27 The handset display is blank L The hand...

Page 25: ...he handset is not registered to the base unit Register it page 27 Noise is heard sound cuts in and out L You are using the handset or base unit in an area with high electrical interference Re position...

Page 26: ...r equipment and try again Caller information is slow to display L Depending on your service provider telephone company the unit may display the caller s information at the 2nd ring or later L Move clo...

Page 27: ...n from step 1 Deregistering a handset A handset can cancel its own registration to the base unit or other handsets registered to the same base unit This allows the handset to end its wireless connecti...

Page 28: ...ote L Make sure that the wall and the fixing method are strong enough to support the weight of the unit Base unit Charger Screws Not supplied 30 mm Hook 25 mm Screws Not supplied Hooks TG161xCX e book...

Page 29: ...ast 16 Language 10 E Error messages 24 H Handset Deregistration 27 Locator 21 Registration 27 I Intercom 21 K Keytones 16 M Making calls 11 Missed calls 18 Mute 12 P Pause 11 Phonebook 13 PIN 27 Power...

Page 30: ...Notes 30 TG161xCX e book Page 30 Monday April 25 2011 8 50 AM...

Page 31: ...Notes 31 TG161xCX e book Page 31 Monday April 25 2011 8 50 AM...

Page 32: ...repair under warranty Panasonic System Networks Co Ltd 2011 Serial No Date of purchase found on the bottom of the base unit Name and address of dealer Attach your purchase receipt here 1 62 4 chome M...

Reviews: