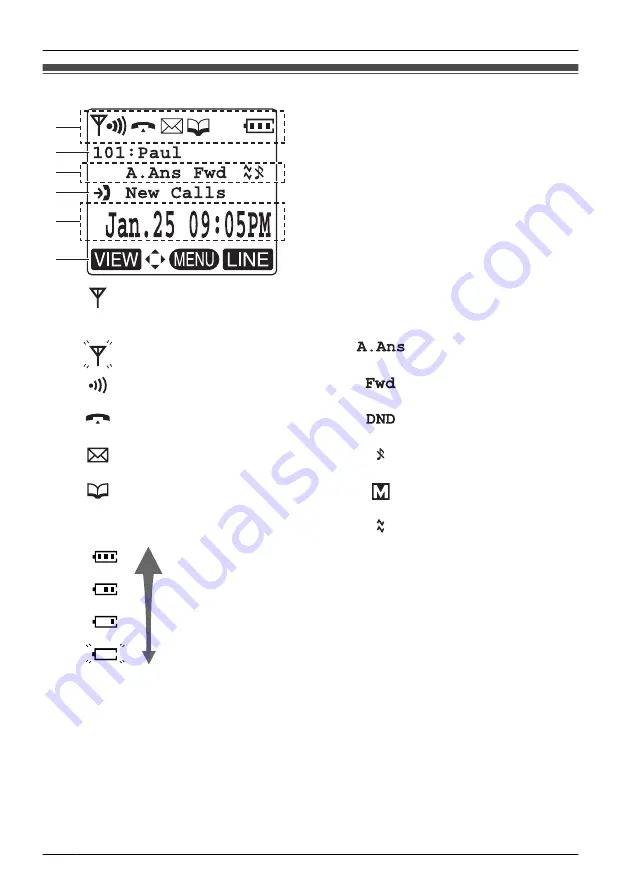
background image

Display

B
C
D

E

F

A

A

Within range of a Cell Station
(CS)

B

Extension Number and Name
To edit the standby display name, see
page 11.

Out of range

C

Auto Answer

Intercom Indicator

Call Forwarding (See
page 35.)

Off-hook Status

Do Not Disturb (See
page 35.)

Message Waiting

Ringer Volume OFF
(See page 13.)

Phonebook

Meeting Mode (See
page 10.)

Battery Indicator

*1

Vibrate (See page 14.)

Full

Low

Needs to be charged.

D

Incoming Call Log Status

E

Date and Time Display

F

Soft Keys (See page 17.)

*1 Refer to “Battery Information” on page 67.

16

Before Operating the Handset

Summary of Contents for KX-TD7695 - Wireless Digital Phone

Page 1: ...or purchasing a Panasonic DECT 6 0 Portable Station Please read this manual carefully before using this product and save this manual for future use Please use only the battery provided and charge the battery for about 7 hours before using the handset for the first time See page 74 for System Requirements ...

Page 2: ... Vibrate Setting 14 Adjusting the Receiver Speaker Headset Volume 14 Changing the Usage Mode Residential Mode Office Mode 15 Display 16 Soft Keys 17 Operation Outline for Residential Mode 19 Operation Outline for Office Mode 20 Function Menus 21 Function Keys 22 Flexible CO Keys 23 Operation 24 Making Calls 24 Searching for an item stored in the Phonebook 28 Receiving Calls 31 Caller ID 32 During ...

Page 3: ...arily 51 Deleting Stored Items 52 Deleting Stored Items in Handset Phonebook Hot Key Dial Outgoing Call Log Incoming Call Log 52 Handset Phonebook 52 Hot Key Dial 52 Outgoing Call Log 53 Incoming Call Log 53 Configuring Handset Settings 54 Changing the Initial Settings 54 Handset Setting Menu Layout 55 Memo Alarm Setting 62 Troubleshooting and Error Messages 64 Troubleshooting 64 Error Messages 66...

Page 4: ...or One Charger One Battery One Part No Part No Part No PQLV207 PSWETD7695M N4HHGMB00005 or HHR P103 Belt Clip One Battery Cover One Screws and Washers Two Part No Part No Part No PSKE1093Z1 PSYNTD7694MR Screws PQHE5004Y Washers XWG35FJ To order accessories call toll free 1 800 332 5368 4 Before Initial Use Before Initial Use ...

Page 5: ...ht of the adaptor may cause it to become disconnected Fasten the AC adaptor cord to the cord holder Use only the Panasonic AC adaptor PQLV207 To AC Outlet WARNING To reduce the risk of fire or electric shock do not overload AC outlets and extension cords Do not bundle the charger s AC adaptor cord with the power cords of machines located nearby Completely insert the AC adaptor power plug into the ...

Page 6: ...ices sensitive to magnetic fields away from the charger Use only the included charger To AC Outlet Charger Wall Mounting 24 5 mm 1 in for charger 1 Install the two included screws in the wall spacing them 24 5 mm 1 in apart Washer Drive the screw to this point Screws 24 5 mm 1 in 2 Mount the charger securely on the wall Make sure that the wall that the charger will be attached to is strong enough ...

Page 7: ...tach the handset to your belt by following the steps below To attach To remove Allows phone straps and similar objects to be connected Insert the clip into the designated notches in the handset Remove the belt clip 7 Before Initial Use ...

Page 8: ...t below KX TCA86 KX TCA91 KX TCA92 Open the cover LPress POWER for more than 2 seconds Power On Standby mode Power Off Blank display M Up Down Left Right You can use the Joystick to move the cursor in the desired direction Press the center button to confirm a selection 8 Before Operating the Handset Before Operating the Handset ...

Page 9: ... page 10 M Joystick Used to adjust the ringer receiver volume select Function menus and the function displayed directly above it and to move the cursor to select a desired item F Message Key N TRANSFER CLEAR Key Used to leave a message waiting indication or to call back the party who left a message waiting indication Used to transfer a call to another party or to clear digits or characters G Charg...

Page 10: ...l vibration will stop Once the vibration stops the handset will not vibrate again for that call even if the handset is lifted up again If Quick Answer is set lifting up the handset will answer the call Residential Mode and Office Mode You can choose one of the following modes depending on how you intend to use the handset Residential Mode This mode is designed for residential use Office Mode This ...

Page 11: ...used The display language of both the handset and PBX can be selected and both should be set to the same language For more information refer to the user documentation for your PBX Editing the Standby Display Name You can edit the name of the standby mode display of the handset Press the Joystick Select Setting Handset Press the Joystick Select Display Option Press the Joystick Select Standby Displ...

Page 12: ...Setting Handset Press the Joystick Select Key Option Press the Joystick Select F CO Key Name Press the Joystick Select the desired base Base 1 4 Press the Joystick Select the desired flexible CO key Enter name max 12 characters Press the Joystick Press the Joystick To enter characters see page 48 12 Before Operating the Handset ...

Page 13: ...e Joystick UP or DOWN to adjust the volume 1 To turn the ringer off OR Press the Joystick Press CANCEL 1 The adjusted volume level will also be used for subsequent calls If you attach the headset while receiving an incoming call the ring from the handset does not switch to the headset If you attach the headset before receiving an incoming call and headset tone is set to on a tone will be heard fro...

Page 14: ...ng Vib Ring Vib Ring Off Press the Joystick To set Vibrate only without ringing select Vib Ring and set the Ringer Volume to off or turn Meeting Mode on See page 10 13 Adjusting the Receiver Speaker Headset Volume During a conversation Move the Joystick UP or DOWN to adjust the volume Receiver Volume Level 1 4 Speaker Volume Level 1 6 Headset Volume Level 1 4 14 Before Operating the Handset ...

Page 15: ... Press the Joystick Press the Joystick Press the Joystick Press the Joystick Press the Joystick Select ResidentialMode Select Setting Handset Select the desired mode On Residential mode Off Office mode Select Other Option 15 Before Operating the Handset ...

Page 16: ...tor Call Forwarding See page 35 Off hook Status Do Not Disturb See page 35 Message Waiting Ringer Volume OFF See page 13 Phonebook Meeting Mode See page 10 Battery Indicator 1 Vibrate See page 14 Full Low Needs to be charged D Incoming Call Log Status E Date and Time Display F Soft Keys See page 17 1 Refer to Battery Information on page 67 16 Before Operating the Handset ...

Page 17: ... or off during a conversation Flashes when Mic Mute is on 2 Opens the PBX Extension Phonebook Turns the ringer off Displays the caller information stored in the Handset Phonebook while receiving a call Opens the main menu Pressing this key for more than 2 seconds locks all keys 2 Displays the caller information stored in the system while receiving a call Returns to the previous display 2 2 Establi...

Page 18: ...Group Used to register the handset with the PBX simply Used to select an item when in setting mode Displayed when it is possible to use an arrow key to make a selection Used to select AM or PM when setting the Memo Alarm feature Displayed when the corresponding soft key has no function Displays a list of flexible CO keys Displays a list of Phonebooks and call logs 1 This function is only available...

Page 19: ...ain Menu H S Phonebook Incoming Log 1 Outgoing Log PBX Phonebook EXT Phonebook Group Log Function Keys In standby mode Flexible CO Keys OR Select the desired item then press 1 Moving the Joystick displays the phone number To enter characters see page 48 To search for an item stored in the Phonebook see page 28 19 Before Operating the Handset ...

Page 20: ...operation Main Menu Function Keys In standby mode 1 Flexible CO Keys H S Phonebook Incoming Log 2 Outgoing Log PBX Phonebook EXT Phonebook Group Log 1 You can select whether the guidance display is shown or not See page 59 2 Moving the Joystick displays the phone number To enter characters see page 48 To search for an item stored in the Phonebook see page 28 20 Before Operating the Handset ...

Page 21: ...Accesses the Setting Handset settings PBX Program Enters PBX Personal Programming mode For PBX Personal Programming refer to the user documentation for your PBX Press to exit from PBX Personal Programming mode Sub Menu While Off hook During a Conversation Phonebook Opens the Phonebook New Phonebook Stores a new item in the Phonebook Outgoing Call Log Enters the Outgoing Call Log Incoming Call Log ...

Page 22: ...n hands free mode A Ans is displayed in standby mode 5 Conference Establishes a multiple party conversation 6 Pause Inserts a dialing pause 7 Auto Dial Makes a call through PBX Personal System Speed Dialing 0 PBX Program Enters PBX Personal Programming mode Press to exit from PBX Personal Programming mode For PBX Personal Programming refer to the user documentation for your PBX Shortcut Combinatio...

Page 23: ...ng rapidly You have an incoming call on this line An outside call is coming in on a single extension flashing slowly You have a call on hold on this line on This line is in use by someone else flashing rapidly You have an incoming call on this line An outside call is coming in on multiple extensions simultaneously flashing slowly Someone has a call on hold on this line no icon This line is idle 1 ...

Page 24: ...e No OR CO Line Group No To use Flexible CO Keys idle CO key no 0 9 Outside Phone No OR OR idle CO key To use Hot Key Dial 1 Press the dialing key assigned as a Hot Key for more than 1 second To use the Outgoing Call Log 2 Select Outgoing Log To use the Incoming Call Log Select Incoming Log 24 Operation Operation ...

Page 25: ...p No Select Group Log To use the Handset Phonebook 3 Name 4 OR if required Select H S Phonebook To use the PBX System Phonebook 2 3 Name 4 OR if required Select PBX Phonebook To use the PBX Extension Phonebook 3 Name 4 OR if required Select EXT Phonebook 25 Operation ...

Page 26: ... CO Key OR Desired No To dial One touch Dialing key Hot Line To store Desired Phone No To set cancel Set Cancel To dial Operator Call System Speed Dialing To dial System Speed Dial No 3 digits Doorphone Call Doorphone No 2 digits 26 Operation ...

Page 27: ... it See page 45 3 To store an item in the Phonebook see page 41 To search for an item stored in the Phonebook see page 28 4 This step can be omitted To enter characters see page 48 You can confirm that the number was dialed correctly before calling Predialing by entering the number then pressing To clear an entire number while predialing press for more than 1 second If an outside call is received ...

Page 28: ...Enter name or first character of the desired name OR Press the Joystick Move the Joystick UP or DOWN Select the desired item if required Press the Left Soft Key Select H S Phonebook Press the Joystick Searching by category Press Select the desired Category Number Press the Joystick Enter name 1 OR Press the Joystick Move the Joystick UP or DOWN Select the desired item if required Press the Joystic...

Page 29: ...t Soft Key Select PBX Phonebook Searching by name or first character s of name Enter name or first character of the desired name OR Press the Joystick Move the Joystick UP or DOWN Select the desired item if required Press the Joystick Press the Left Soft Key Select PBX Phonebook To enter characters see page 48 While an item is displayed you can Return to the Enter Name display by pressing then sea...

Page 30: ...ve the Joystick UP or DOWN Select the desired item if required Press the Joystick Press the Left Soft Key Select EXT Phonebook To enter characters see page 48 While an item is displayed you can Return to the Enter Name display by pressing then search for another item Search for another item by pressing the dial key that corresponds to the letter you are searching for If there is no entry that corr...

Page 31: ...hing F CO key Call Pickup Directed Extension No Group Group No 2 digits You can also answer a call with the following features Any Key Answer See page 58 Quick Answer See page 58 Auto Answer See page 58 You can select the ringer LED and vibrate pattern for each type of incoming call See page 56 For more information refer to the user documentation for your PBX 31 Operation ...

Page 32: ...et for the same caller you can choose which information will be displayed on the handset Caller information stored in the PBX is displayed by default See Caller ID Disp on page 59 If you set the handset to display the caller information stored in the handset caller information stored in the PBX will be displayed if the caller is not stored in the handset When receiving a call you can display the i...

Page 33: ...ion Extension No To an outside party Outside Phone No OR CO Line Group No Holding To hold Regular Hold To hold Exclusive Call Hold To retrieve a call An Intercom Call An Outside Call slowly flashing F CO key 0 9 OR slowly flashing F CO key OR 33 Operation ...

Page 34: ... Conference Press the Joystick To return to the call before the transfer destination answers press The method used to hold a call depends on the Call Hold mode Regular Hold Exclusive Call Hold Ask your manager what the current mode is When you hold several outside calls you need to assign F CO Keys Single Line Loop Line Trunk Group as necessary beforehand For more information refer to the user doc...

Page 35: ...O Line Access No Outside Phone No Cancel Follow Me Follow Me Cancel Your Extension No Do Not Disturb Both Calls Outside Calls Intercom Calls Set Cancel Sending a Call Waiting Tone 1 While hearing a busy tone Wait for an answer Call Waiting To set cancel for intercom calls No call Tone To set cancel for outside calls No tone Tone 35 Operation ...

Page 36: ...o terminate a current status To hold and then talk to the new party rapidly flashing F CO Key 0 9 OR OR rapidly flashing F CO Key OR Disregard this step if both parties are extensions OR Paging To page Paging Group No 2 digits Announce Wait for an answer To answer 36 Operation ...

Page 37: ... Day In a Meeting 2 Enter required no To cancel Log in Log out For Log in For Log out Specified ICD Group Extension No All ICD Group Incoming Call Distribution Group Extension Feature Clear Extension Dial Lock 3 To lock To unlock Extension PIN max 10 digits PIN Personal Identification Number 37 Operation ...

Page 38: ...2 Enter the desired value in the positions You must enter the correct number of characters as represented by the using 0 to 9 or To change the default messages and create your personal messages Message no 9 refer to the documentation for your PBX 3 If you do not set an extension PIN you cannot lock and unlock your extension 4 You can register a flexible CO key to the clear message waiting indicati...

Page 39: ...s VPS Extension No Mailbox No Mailbox Password 1 If you have no password you can skip the last step Listen to Message Deliver Message Check Mailbox Distribution Automated Attendant Mailbox Management Other Features End Call Leaving a Message VPS Extension No From your own extension Mailbox Password 1 From someone else s extension Mailbox No Mailbox Password 1 If you have no password you can skip t...

Page 40: ...uidance Exit Menu 1 For more information on the Mailbox Password refer to the user documentation for the VPS Some feature access numbers may vary depending on the market Please consult your local dealer for the details 40 Operation ...

Page 41: ...ossible to set a different ringer LED vibrate pattern 1 for each category When the displayed Caller ID 2 matches a phone number or name stored in the Phonebook the handset rings according to the Private Ring Category settings 1 For Ringer LED Vibrate patterns see page 56 2 For Caller ID information see Caller ID on page 32 Storing an Item in the Handset Phonebook Storing a New Item Enter name max ...

Page 42: ...ystick Edit phone number max 32 digits Press the Joystick Select the desired category number 1 9 or Off Select the desired item if required Press the Joystick 1 This step can be omitted To enter characters see page 48 To search for an item in the Phonebook see page 28 The valid digits are 0 through 9 P To change a character or digit move the Joystick to highlight it press to delete it then enter t...

Page 43: ...all Log Select the desired item Press the Joystick Select Save Phonebook Enter a name phone number and select the category number 1 9 or Off 1 Press the Joystick Press the Joystick for Save Press the Left Soft Key Select Outgoing Log Press the Joystick 1 Press to confirm each entry name max 16 characters phone number 32 digits When storing an outside phone number the line access number will be sto...

Page 44: ...honebook Press the Joystick Press the Joystick Press the Joystick for Save Select Incoming Log 1 Press to confirm each entry name max 16 characters phone number 32 digits When storing an outside phone number the line access number will be stored automatically The line access number must be identical to the handset s Line Access CD setting Other Option See page 61 44 Using the Handset Phonebook ...

Page 45: ...e Phonebook Press the Joystick Enter a name phone number and select the category number 1 9 or Off 2 Press the Joystick for Save Press the Left Soft Key Select PBX Phonebook Press the Joystick 1 This step can be omitted 2 Press to confirm each entry name max 16 characters phone number 32 digits To search for an item in the Phonebook see page 28 45 Using the Handset Phonebook ...

Page 46: ...nebook Press the Joystick 1 This step can be omitted 2 Press to confirm each entry name max 16 characters phone number 32 digits To search for an item in the Phonebook see page 28 Editing Category Names You can edit the names of the categories in the Handset Phonebook Press the Joystick Select Setting Handset Press the Joystick Select Display Option Press the Joystick Select Category Name Press th...

Page 47: ...uired Press the Joystick Select Regist Hot Key Press the Joystick Select a blank hot key number 0 9 Press the Joystick Press the Joystick for Save Press the Left Soft Key Select H S Phonebook Press the Joystick 1 This step can be omitted To search for an item in the Phonebook see page 28 A will be displayed next to hot key numbers that have a Phonebook item registered to them 47 Using the Handset ...

Page 48: ...in the Phonebook press the Right Soft Key Alphabet Numeric Extended Example To enter Anne in Alphabet Mode To switch between uppercase and lowercase press To enter a character located on the same dialing key as the previous character move the cursor by moving the Joystick then enter the desired character If you enter a different character by mistake move the Joystick to highlight the character pre...

Page 49: ...3 4 5 6 7 8 9 0 Press before or after entering a character to change between uppercase and lowercase Pressing a key repeatedly will cycle through the characters associated with that key For example to enter the letter C press three times 49 Using the Handset Phonebook ...

Page 50: ...ess the Joystick Press the Joystick Press the Joystick Select Setting Handset Select Other Option Press the Joystick Unlocking the Handset Phonebook Press the Joystick Select Off Enter your Password 1 default 1234 Press the Joystick Press the Joystick Press the Joystick Select Setting Handset Select Other Option Select Phonebook Lock Press the Joystick 50 Using the Handset Phonebook ...

Page 51: ... Select H S Phonebook Press the Joystick Press the Left Soft Key Press CANCEL Still locked Enter your Password 1 default 1234 You can view the Phonebook and use it to make calls 1 To change the password see page 61 51 Using the Handset Phonebook ...

Page 52: ...Press the Joystick Press the Left Soft Key Select H S Phonebook Press the Joystick 1 This step can be omitted 2 Select Delete All if you want to delete all items To search for an item in the Phonebook see page 28 Hot Key Dial Press the dialing key for more than 1 second Select the desired item Press the Joystick Select Delete 1 Press the Joystick Select Yes Press the Joystick 1 Select Delete All i...

Page 53: ...Select Delete Press the Joystick Select Yes Press the Left Soft Key Select Outgoing Log Press the Joystick Press the Joystick Press the Joystick Incoming Call Log Select the desired item Select Delete Press the Joystick Select Yes Press the Left Soft Key Select Incoming Log Press the Joystick Press the Joystick Press the Joystick 53 Deleting Stored Items ...

Page 54: ... Setting Handset Press the Joystick Select the desired main item Press the Joystick Follow the setting Select the desired sub item Press the Joystick Press the Joystick To return to the previous menu press To cancel press at any time The handset will beep to indicate that the new settings have been saved 54 Configuring Handset Settings Configuring Handset Settings ...

Page 55: ...Quick Answer Auto Answer Auto Ans Delay Language Backlight LCD Contrast Standby Display Category Name Guidance Date Time Form Caller ID Disp F CO Key Name Function Key Key Tone Range Alarm Register H S Cancel Base Select Base System Lock Change PIN Change Password Line Access CD Reset Handset Phonebook Lock ResidentialMode Talk Option Answer Option Key Option Display Option Tone Option System Opti...

Page 56: ...h type of call Red CO Ring Red Intercom Ring Private Ring Green Group Ring Orange Group Ring Green Private Ring Category 1 9 Orange R G O Vib Pattern Selects the vibrate pattern for each type of call Single Single Double Triple Short Double Short Triple Short Term Continuous Vibrate Selects whether the handset vibrates while receiving a call Vib Ring Off Vib Ring Off Ring On Charger Selects the ri...

Page 57: ...adset while receiving a call On Off Off 1 When Ring On Charger is set to on but Ringer Volume is set to off the handset rings at level 1 Talk Option Sub Item Description Setting Default Speaker Volume Adjusts the rear speaker volume Level 1 6 Level 3 Receiver Volume Adjusts the receiver volume Level 1 4 Level 2 Headset Volume Adjusts the headset speaker volume Level 1 4 Level 2 Headset Mic Vol Adj...

Page 58: ...er of seconds before a call is automatically answered when Auto Answer is turned on 0 s 20 s 6 s Key Option Sub Item Description Setting Default F CO Key Name Edits the names of the flexible CO keys Max 12 characters x 12 flexible CO keys x 4 bases Not stored Function Key Edits Function Key list Redial 1 Redial Fwd DND 2 Fwd DND Flash Recall 3 Flash Recall Auto Answer 4 Auto Answer Conference 5 Co...

Page 59: ...nce display is shown or not in standby mode On On Off Date Time Form Selects the format for the date shown on the display in standby mode DD MM 12H MM DD 12H DD MM 24H MM DD 12H MM DD 24H DD MM YY MM DD YY Caller ID Disp Selects which caller information is displayed when a call is received Either the information stored in the Handset Phonebook or the PBX can be displayed H S Phonebook PBX Setting ...

Page 60: ...set Base 1 4 2 Select Base 1 Selects a base Auto Auto Base 1 4 System Lock Selects whether to lock the System Option set or not On 3 Off Off Change PIN Before registering your handset with a PBX enter the PBX s PIN here Once you have registered the handset with a PBX this PIN can be changed so that the handset can be registered to an additional PBX Enter the PIN number max 8 digits 1234 1 Only reg...

Page 61: ...et Returns the handset settings to its default settings Enter Password 4 digits Not stored Select the desired item s Press OK Phonebook Lock Locks unlocks the Phonebook while the handset is in standby mode On Off Off ResidentialMode Selects the operating mode On Residential mode Off Office mode On On Off 1 To avoid unauthorized access to this product Change the default password Set a password that...

Page 62: ... Select the Alarm mode Weekly 2 Enter time Select the desired day of the week Press the Right Soft Key Press the Joystick Press the Joystick Enter memo Press the Joystick Press the Joystick for Save Select the Alarm mode Off Press the Joystick Press the Joystick for Save 1 You can select the format for the date and time See page 59 2 A will be displayed next to a day of the week that have been set...

Page 63: ...tting Press the Joystick Select Memo Alarm Press the Joystick Select the alarm number 1 3 Press the Right Soft Key Select Yes Press the Joystick To stop the alarm Press any key other than soft keys 63 Configuring Handset Settings ...

Page 64: ...hannel is busy or a radio communication error occurred Try again later You cannot dial The number that you dialed is restricted by the PBX Consult your dealer Key lock mode is ON To cancel the mode press the Joystick for about 2 seconds See Key Lock on page 9 The radio channel is busy or a radio communication error occurred Try again later The handset stops working during operation Turn the handse...

Page 65: ...appliances Move closer to the CS Two short beeps are heard during a conversation The radio signal is weak Move closer to the CS The charge indicator flashes red rapidly The charger is not connected properly Make sure the battery is inserted properly Set the handset in the charger properly You charged the battery for 7 hours but the beep tones sound and needs to be charged flashes after a few telep...

Page 66: ... CS or PBX Wait for a moment Charge Battery The handset battery has little charge remaining Charge the battery fully See Charging the Battery on page 6 No Entries When trying to view the Phonebook No items have been stored See Storing an Item in the Handset Phonebook on page 41 When trying to view the Incoming or Outgoing Call Log No logs have been stored Memory Full The Phonebook is full and cann...

Page 67: ...en fully charged the battery should be replaced Before replacing the battery make sure the low battery warning is displayed then turn off the power to prevent memory loss Replace the battery and charge the new battery for about 7 hours If you replace the battery before the low battery warnings appears the battery strength icon may display an incorrect reading In this case use the handset as normal...

Page 68: ... not insert objects of any kind into this product through openings as they may touch dangerous voltage points or short out parts that could result in a risk of fire or electric shock Never spill liquid of any kind on the product 11 To reduce the risk of electric shock do not disassemble this product Only qualified personnel should service this product Opening or removing covers may expose you to d...

Page 69: ... battery is incorrectly replaced Any changes or modifications not expressly approved by the party responsible for compliance could void the user s authority to operate this product WARNING FOR SAFETY REASONS DO NOT PHYSICALLY MODIFY THE PRODUCT OR ANY OPTIONAL EQUIPMENT TO PREVENT POSSIBLE FIRE OR ELECTRIC SHOCK DO NOT EXPOSE THIS PRODUCT TO RAIN OR MOISTURE THE USE OF EXCESSIVE SOUND VOLUME THROU...

Page 70: ...reception which can be determined by turning the equipment off and on the user is encouraged to try to correct the interference by one or more of the following measures Reorient or relocate the receiving antenna Increase the separation between the equipment and receiver Connect the equipment to an outlet on a circuit different from that to which the receiver is connected Consult the dealer or an e...

Page 71: ...ly shielded from external RF radio frequency energy If noise occurs use an optional headset accessory or the speakerphone option if applicable when using this phone Consult your audiologist or Hearing Aid manufacturer about the availability of Hearing Aids which provide adequate shielding to RF energy commonly emitted by digital devices Compliance with TIA 1083 standard T Compatible with Hearing A...

Page 72: ...dically When you leave the product unused for a long period of time unplug the AC adaptor from the outlet Notice for product disposal transfer or return this product can store your private confidential information To protect your privacy confidentiality we recommend that you erase the information such as phonebook or call log from the memory before you dispose transfer or return the product For Pr...

Page 73: ...s In particular high metal shelves or reinforced concrete walls will restrict your operating range 3 A handset may not work when it is too far from the CS depending on the structure of the building Noise Occasional noise or interference may occur due to electromagnetic radiation from objects such as refrigerators microwave ovens faxes TVs radios or personal computers If noise disturbs your telepho...

Page 74: ...0 PLMPR Software File Version 3 1006 or later KX TDE100 KX TDE200 PMMPR Software File Version 1 0000 or later KX TDE600 PGMPR Software File Version 2 0000 or later KX NCP500 KX NCP1000 PBMPR Software File Version 1 0000 or later KX T0158 KX TDA600 PLMPR Software File Version 5 0000 or later KX TDE100 KX TDE200 PMMPR Software File Version 1 0000 or later KX TDE600 PGMPR Software File Version 2 0000...

Page 75: ...75 Notes ...

Page 76: ...Corporation of North America One Panasonic Way Secaucus New Jersey 07094 http www panasonic com csd Copyright This material is copyrighted by Panasonic Communications Co Ltd and may be reproduced for internal use only All other reproduction in whole or in part is prohibited without the written consent of Panasonic Communications Co Ltd Panasonic Communications Co Ltd 2008 PSQX4645YA UU KK0108SY303...

Reviews: