background image

• • • 9 • • •

¢

¢ 


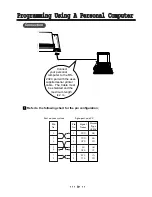
Refer to the following chart for the pin configuration;

HING SYSTEM

EXTN.

EXTN.

EXTN.

EXTN.

EXTN.

EXTN.

EXTN.

EXTN.

8

7

6

5

4

3

2

1

Connect

your personal

computer to the RS-

232C port with the user-

supplied serial printer

cable.  The Cable must

be shielded and the

maximum length

is 2 m.

Connection

Circuit

Type

(EIA)

BB

BA
CD

AB
CC

CA
CB

Pin
No.

2

3
4

5
6

7
8

Signal

Name

RXD

TXD
DTR

SG

DSR

RTS

CTS

Pin
No. 

2

3
4

5
6

7
8

Port on your system

9-pin port on a PC

P

Pr

ro

og

gr

ra

am

mm

mi

in

ng

 U

Us

si

in

ng

 A

 P

Pe

er

rs

so

on

na

al

 C

Co

om

mp

pu

ut

te

er

r

Summary of Contents for KX-TD208

Page 1: ...d System KX TD208E This booklet tells you how to install your KX TD208 quickly and easily and gives you initial operating instructions For further information see the enclosed Operating lnstructions g n i t t e G Started ...

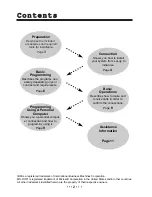
Page 2: ...ogramming Using A Personal Computer Shows you a personal comput er connection and how to program by using it Page 9 Basic Operations Describes how to make and receive calls in order to confirm the connections Page 8 Assistance Information Page 11 IBM is a registered trademark of International Business Machines Corporation MS DOS is registered trademark of Microsoft Corporation in the United States...

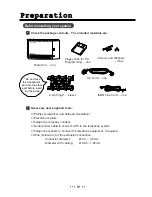
Page 3: ...ephone system Telephone sockets to connect the telephone equipment if required Wire solid wire for the extension connection Conductor diameter Ø 0 4 0 6mm Diameter with coating Ø 0 66 1 05mm DIGITAL SUPER HYBRID SYSTEM P O W E R Main Unit one AC Cord one ISDN Line Cord one 4 pin Plugs eleven Screws and Washers three Floppy Disk for PC Programming one Before installing your system Do not close the ...

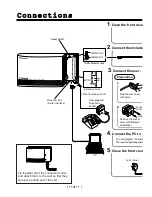
Page 4: ...ers To the Extension Jack User supplied Telephone Socket ISDN Modular Jack 5 Close the front cove 1 Extension Jack 4 Remove the socket cover with flathead screwdriver You can program the syste The required operating syste ISDN Port 2 ISDN Port 1 scre Preparation EXTN 1 A B PC socke cover POWER DIGITAAL SUPER HYBRIDE SYSTEEM Tie together all of the connected cords and attach them to the wall so tha...

Page 5: ...the AC inlet and AC outlet 3 2 5 Insert the user supplied telephone wires completely into the holes of the included plugs A B 2 5 DIGITAL SUPER HYBRID SYSTEM P O W E R screw 1 Loosen the screw 2 Slide the cover toward the right while pressing the mark data using TD208 EXE file in the included floppy disk on the IBM PC AT or compatible personal computer PC OS is Version 5 0 or later versions of MS ...

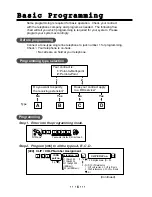
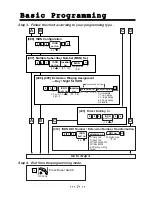
Page 6: ...Programming type selection A 1 2 No Yes No Yes Connect a tone type single line telephone to jack number 1 for programming Check Your telephone is on hook No calls are on hold at your telephone Programming 5 1 2 3 4 Password Default Off hook Dial tone 3 extension no CLIP COLP no 20 digits max 0 9 404 CLIP COLP Number Assignment 21 through 28 31 through 34 301 through 308 ISDN ext 300 all ISDN ext 4...

Page 7: ...able delayed ring time Y Day 8 Night 9 Consecutive entries 1 2 ISDN port no 1 2 ISDN port no 1 2 ISDN port no 1 2 4 0 7 4 0 Y A B C D 412 ISDN DDI Number Extension Number Transformation 20 digits max 0 9 DDI no 4 1 2 Press Reset Switch On hook 405 Direct Dialling In Step 3 Follow the chart according to your programming type Step 4 Exit from the programming mode 1 0 5 2 4 ISDN port no 1 2 ISDN port...

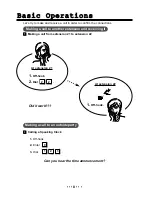
Page 8: ...nnections Making a call from extension 21 to extension 22 Did it work Calling a Speaking Clock 1 Off hook 2 Enter 3 Dial Can you hear the time announcement 9 Making a call to another extension and receiving it Making a call to an outside party At extension 21 1 Off hook 2 Dial 2 2 At extension 22 1 Off hook 1 2 3 ...

Page 9: ...rt with the user supplied serial printer cable The Cable must be shielded and the maximum length is 2 m Connection Circuit Type EIA BB BA CD AB CC CA CB Pin No 2 3 4 5 6 7 8 Signal Name RXD TXD DTR SG DSR RTS CTS Pin No 2 3 4 5 6 7 8 Port on your system 9 pin port on a PC P Pr ro og gr ra am mm mi in ng g U Us si in ng g A A P Pe er rs so on na al l C Co om mp pu ut te er r ...

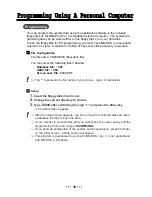
Page 10: ...ing files if desired Database file DBF ASCII file DBA Screen save file P208 PRT The represents the file name of your choice up to 8 characters Setup 1 Insert the floppy disk into drive A 2 Change the current directory to drive A 3 Type TD208 after confirming the sign and press the Enter key The initial screen appears After the initial screen appears you can remove the included disk and insert a da...

Page 11: ... 11 A As ss si is st ta an nc ce e I In nf fo or rm ma at ti io on n If you have any trouble see the Trouble Shooting Section in the Operating Instructions or consult your dealer ...

Page 12: ...Printed in Japan PSQX1258YA KK0497KM1068 ...

Reviews: