background image

— 8 —

Location of Controls

HOLD:

 Used to place a call on hold.

SP-PHONE (Speakerphone):

 Used for 

the hands-free operation.

Navigator Key (KX-7630/7633/7636): 

Used to adjust the volume and the 
display contrast or select desired items.
To adjust 

Speaker/Handset/Headset/

Ringer Volume

, press 

Up 

or 

Down.

Volume Key (KX-T7625): 

Used to adjust 

the volume. The Ringer Switch must be 
set to     .  
To adjust 

Speaker/Handset/Headset/

Ringer Volume

, press 

Up 

or 

Down.

CANCEL (KX-T7630/7633/7636):

 Used 

to cancel the selected item.

PROGRAM (KX-T7625):

 Used to enter 

and exit the personal programming 
mode.

ENTER (KX-T7630/7633/7636):

 Used to 

confirm the selected item.

Flexible Outside (CO) Line Buttons:


Used to make or receive an outside call.  
Pressing this button seizes an idle 
outside line automatically. (Button 
assignment is required.)
Also used as feature buttons. (Button 
assignment is required.)

Message/Ringer Lamp: 

When you 

receive an intercom call, the lamp 
flashes green, and on an outside call, the 
lamp flashes red. When someone has 
left you a message, the lamp stays on 
red.

Soft Buttons (KX-T7630/7633/7636): 

Used to select the item displayed on the 
bottom line on the display.

AUTO DIAL/STORE:

 Used for 

System/Personal Speed Dialling or 
storing  programme changes.

TRANSFER:

 Used to transfer a call to 

another party.

REDIAL:

 Used to redial the last dialled 

number.

MESSAGE:

 Used to leave a message 

waiting indication or call back the party 
who left the message waiting indication.

FLASH/RECALL:

 Used to disconnect 

the current call and make another call 
without hanging up.

6

7

8

9

10

10

11

11

12

12

13

13

15

15

16

16

17

17

18

18

19

19

20

20

14

14

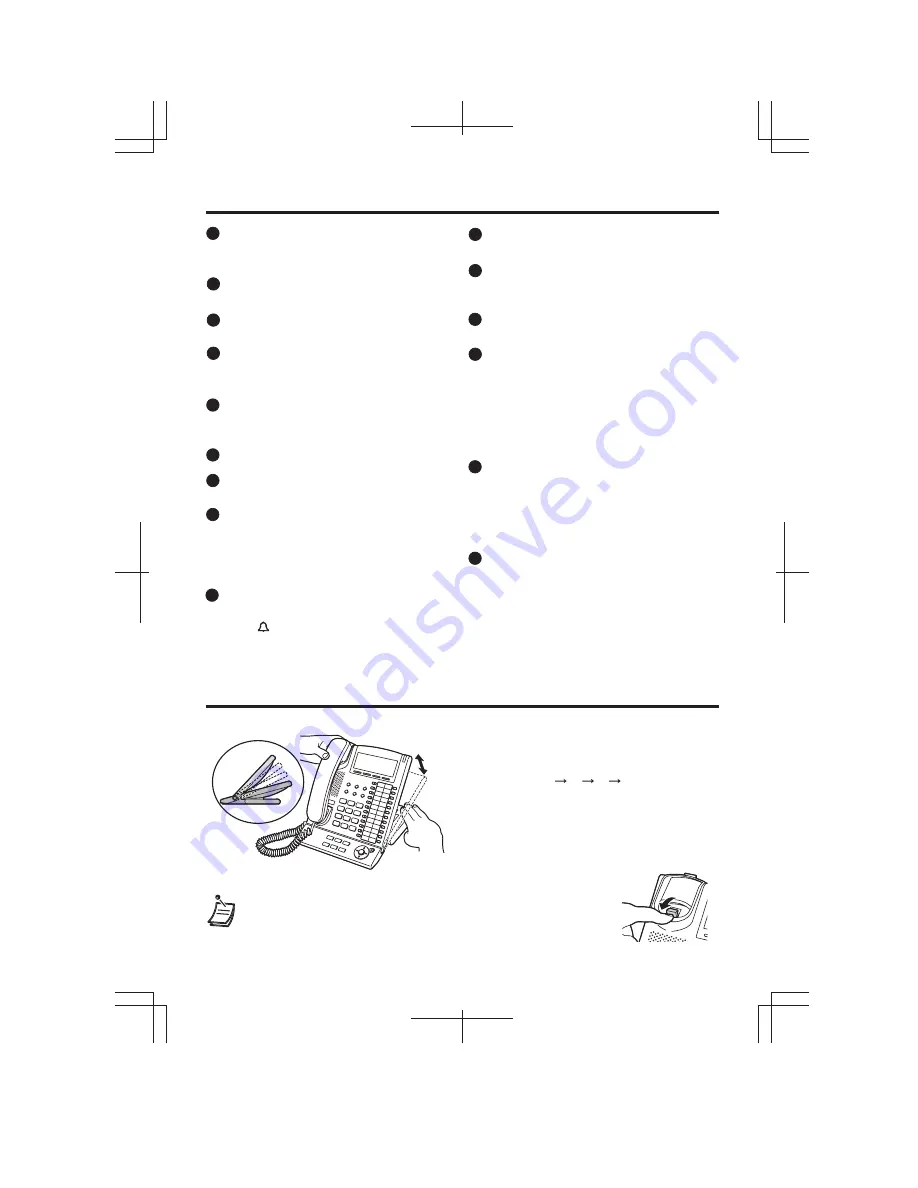
The tilt angle of the operation board can be 
adjusted to four steps-angles.

To lift:

 Lift up the operation board to the desired 

step-angle (1     2      3     4).

To set down:

 Lift up the operation board to the 

highest angle and then press down to 
step-angle 1. 

Please do not get your 

fingers caught between the base unit 
and the operation board.

• Pull down the handset hook until it locks to prevent the handset from

slipping down from the operation board when at the step-angle 4.

Tilt Angle Adjustment

4

3

2

1

Summary of Contents for KX-T7625E

Page 1: ...e powder to clean the cabinet Wipe it with a soft cloth Do not use any handset other than a Panasonic handset Do not disassemble this product Dangerous electrical shock could result The unit must only be disassembled and repaired by qualified service technicians When a failure occurs which exposes any internal parts disconnect the telephone line cord immediately and return this unit to the service...

Page 2: ...uick dial no Calling extension no To an outside party doorphone no 2 digits 0 9 To set To cancel 4 6 6 While hearing a busy tone To answer if set after dialling While hearing a callback ringing To answer if set when seizing an outside line While hearing a callback ringing outside phone no system speed dial no 3 digits To dial personal speed dial no 2 digits 3 1 Call Hold Call Transfer To Hold To r...

Page 3: ...sation To leave a conference To add other parties during a conversation desired phone no paging group no 2 digits Off Hook Monitor To set cancel During a conversation using the handset Call Park To set During a conversation 5 2 Specified Auto parking zone no 2 digits To retrieve 5 2 stored parking zone no 2 digits Features List Consult your dealer for more details about the feature numbers You can...

Page 4: ...cess menu Automatic Callback Busy Cancel Group Call Pickup Directed Call Pickup Doorphone Call Press ENTER Input a parameter CANCEL PAUSE AUTO DIAL STORE INTERCOM PAUSE PAUSE PAUSE System Speed Dialling Directory Personal Speed Dialling Directory Clearing the log information When the desired party is displayed CLEAR Press CLEAR Door Open External Background Music Paging Press Right four times Pres...

Page 5: ... D G J M P T W space 1 B C a b c 2 E F d e f 3 H I g h i 4 K L j k l 5 N O m n 6 o Q R S p q r s 7 U V t 8 u v X Y Z w x y z 9 0 0 Times Buttons Times Buttons 1 2 3 4 5 6 7 8 9 A D G J M P T W ä B C a b c À E F d e f Ð H I g h i Ì K L j k l 5 N O m n Ñ o Q R S p q r s U V t u v X Y Z w x y z ý 9 0 ö 1 ü 10 11 12 13 14 15 Á Â Ã Ä Å Æ Ç 2 È É Ê Ë 3 Í Î Ï 4 Ò Ó Ô Õ Ö Ø Œ 6 ß 7 Ù Ú Û Ü 8 space 1 2 3 4...

Page 6: ...e the mode returns to the normal status To exit the mode at any time lift the handset For further information on Setting on the Programming Mode refer to the Business Telephone System User Manual Call Forwarding FDW Do Not Disturb DND desired no max 32 digits Extension PIN Personal Identification Number PIN max 10 digits Directory and Call Log Lock PIN max 10 digits OR OR ENTER OR OR ENTER OR PROG...

Page 7: ... party conversation INTERCOM Used to make or receive intercom calls AUTO ANSWER MUTE Used to receive an incoming call in the hands free mode or mute the microphone handset during a conversation On the bottom of the unit Headset Jack Microphone KX T7625 Headset not included Ringer Switch KX T7625 LCD Liquid Crystal Display 1 2 3 4 4 5 6 7 8 9 10 10 11 11 12 12 13 13 15 15 17 17 18 18 20 20 19 19 14...

Page 8: ...ide call the lamp flashes red When someone has left you a message the lamp stays on red Soft Buttons KX T7630 7633 7636 Used to select the item displayed on the bottom line on the display AUTO DIAL STORE Used for System Personal Speed Dialling or storing programme changes TRANSFER Used to transfer a call to another party REDIAL Used to redial the last dialled number MESSAGE Used to leave a message...

Page 9: ...the flat cable into the connector 4 Close the cover 1 Open the cover 2 Attach the KX T7603 to your telephone with screws with a KX T7636 1 Remove the connector cover using a screwdriver The USB Module can be connected between the digital proprietary telephone and the personal computer through USB interface to implement personal CTI Computer Telephony Integration PULL L Connect to PC KX T7601 For K...

Page 10: ...he phone as shown The illustrations used in this page are a KX T7636 10 Connect to a single line telephone for XDP or parallel connections TO TEL The telephone line cord included Back view CAUTION Ensure the cord is inserted in the hook to prevent damage to the connector Connect to a KX TDA Series Business Telephone System Connect to a digital proprietary telephone for D XDP connection TO MAIN UNI...

Page 11: ... 11 ...

Page 12: ... the following web address http doc panasonic tc de Copyright This manual is copyrighted by Kyushu Matsushita Electric U K Ltd KMEUK Under the applicable copyright laws this manual may not be reproduced in any form in whole or in part without the prior written consent of KMEUK Other Information This unit is capable of being used in conjunction with hearing aids fitted with inductive coil pick ups ...

Reviews: