background image

5

Installations and connections

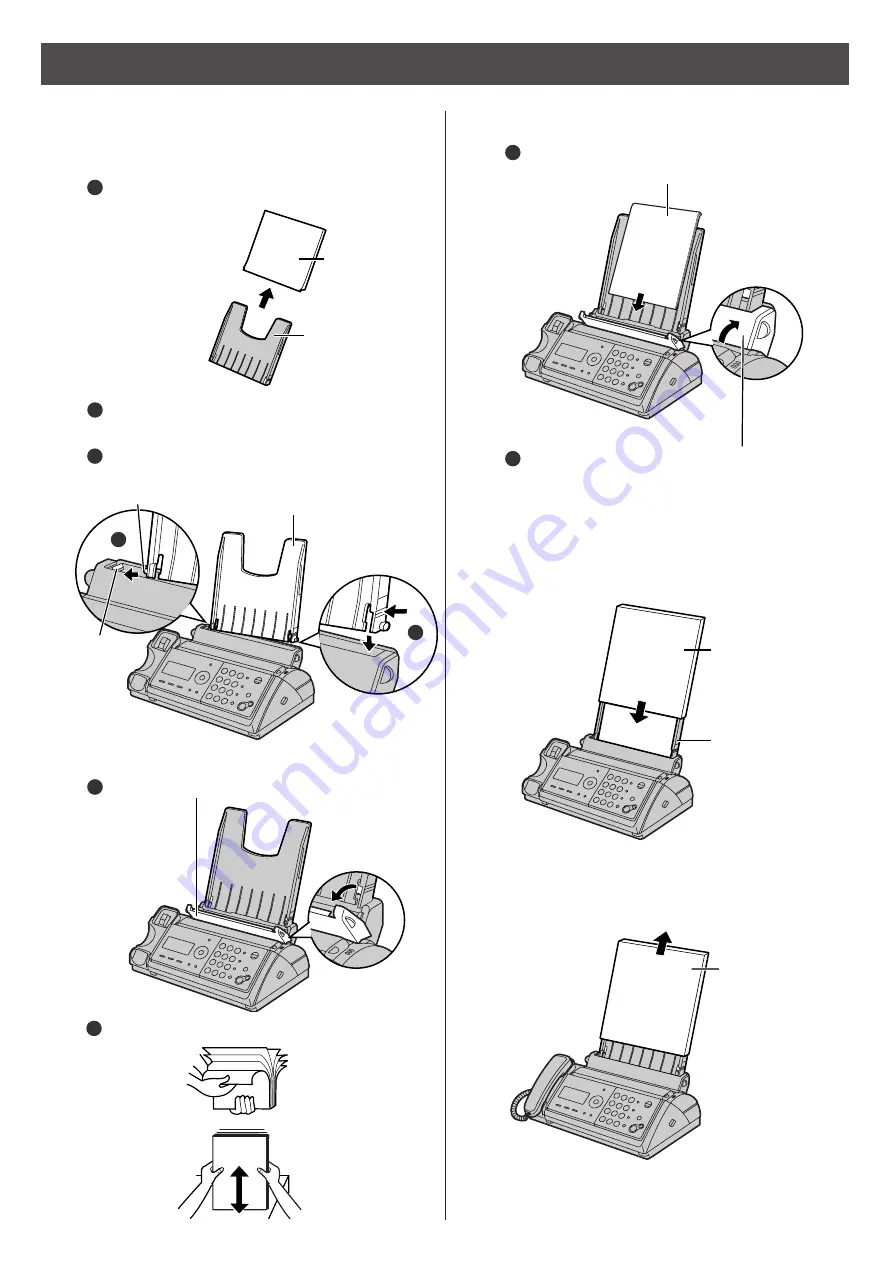
Installing recording paper (A4 size)

3

Install the recording paper cover on the recording

paper tray by sliding it down from the top.

Recording 
paper cover

Recording 
paper tray

Printing

side is on

the back


Fan the stack of recording paper (A4 size).

2

Insert the recording paper into the recording
paper tray. (Up to 30 sheets)

3

Close the paper entrance cover by leaning it
back.

4

2

Insert the recording paper into the recording paper tray.

Open the paper entrance cover until it locks.

1

1

Install the recording paper tray.

Separate the recording paper cover from the

recording paper tray.

1

Insert the left tab on the recording paper tray into

the left slot of the main unit.

Insert the right tab into the right slot of the main unit.

3

2

2

3

Recording

paper tray

Tab

Slot

Recording

paper cover

Recording

paper tray

To add paper

Remove the

recording paper

cover, then follow

steps 2 to 3.

Summary of Contents for KX-PW501DL

Page 1: ...etween the main unit and portable handset 14 Sending faxes 15 Receiving faxes 16 Operating the built in answering device 17 Specifications 19 Thank you for purchasing a Panasonic facsimile This guide explains some basic features and operations but not all of them For further details see the Japanese operating instructions This product is designed for use in Japan Panasonic cannot provide service f...

Page 2: ...ts a search in the Number Display log For caller ID display service users Auto Answer button indicator light on answering device activated light off used as a regular telephone Pause button Replay button plays back recorded messages Record button records telephone calls Stop button Copy button starts copying Start Fax button starts faxing Monitor button Intercom Character Input Mode button Tone bu...

Page 3: ... be tilted up and down left 3 Out of range Walk closer to the main unit Note If you use the portable handset near a microwave oven which is being used noise may be heard from the earpiece or the speaker Move away from the microwave oven and closer to the main unit How to use buttons and buttons refer to the function displayed on the bottom of the display They function differently depending on the ...

Page 4: ...sage will be displayed Install a new ink film As of December 2003 Tax not included Replacement ink film KX FAN142 35 m 1250 Open the back cover until it locks 3 Press here 2 Find the T shaped gear blue Ink film Blue core Insert the T shaped gear blue into the left slot of the main unit 2 Insert the white core into the slots 3 Insert the blue core into the right slot of the main unit 1 Click To clo...

Page 5: ... Close the paper entrance cover by leaning it back 4 2Insert the recording paper into the recording paper tray Open the paper entrance cover until it locks 1 1Install the recording paper tray Separate the recording paper cover from the recording paper tray 1 Insert the left tab on the recording paper tray into the left slot of the main unit Insert the right tab into the right slot of the main unit...

Page 6: ...sonic battery is fully charged it will last up to about 7 hours of conversation Power cord Telephone line cord Wall jack Power outlet AC 100V 3 Connect the power cord 2 Connect the telephone line cord Supplied accessory 1 Connect the cord and place the handset on the main unit Click 停電用 電話機 回線 電話回線へ Click Handset Click After the Power On This unit will automatically select the dialing mode Tone Pu...

Page 7: ...Set 5Press Set 6Press Stop 5Press Stop Setting your facsimile telephone number Example 1Press Function Edit 2Press キノウアトウロクアモード カイセシシシシシシ オス 2004年01月01日 20 10 2 Cursor 2004年10月01日 00 10 2 2004年10月01日 15 45 2 2004年10月01日 15 45 トウロクアシマシタ 2 10月01日0015 45 ヨウケン0ロクオン0000ケン Example キノウアトウロクアモード カイセシシシシシシ オス アナタノデンワバンゴウ TEL Cursor アナタノデンワバンゴウ TEL 80765043 The Space button replaces the digit with a...

Page 8: ...ct 英 English and sign input mode For details see the table on page 9 for instructions 5Press Stop Setting your logo 2 Press six times 3 Press six times 5 Press five times Example Micah 1 Press once 4Press Set 1Press Function Edit キノウアトウロクアモード アアアアアアアシシ オス アナタノナマエ Cursor アナタノナマエ アナタノナマエ M アナタノナマエ M i アナタノナマエ M i c アナタノナマエ M i c a M i c h a アナタノナマエ M i c a h トウロクアシマシタ Cursor M 10月01日0015 45 ヨウケン0ロク...

Page 9: ...メモ ヤユヨャュョ ラリルレロ 1 2 3 4 5 6 7 8 9 0 A B C a b c Character Dial key Used to change the character input mode Used to move the cursor to the left and right Used to delete a character Used to insert a space Command keys Main unit Portable handset Main unit Portable handset Main unit Portable handset Main unit Portable handset The characters on the display are somewhat different from those shown in the...

Page 10: ...er 2Press the desired one touch dial button to Example One touch dial 1 1Press the desired one touch dial button to The unit will start dialing 2When the other party answers lift the handset 1Press Function Edit 2Press the desired one touch dial button to 4Press Set Erasing a stored number in the one touch dial 3Press and hold Erase until the telephone number has been erased 1Press Function Edit 2...

Page 11: ...9Press Stop to exit the program 2Press Search button repeatedly until the desired name is displayed 3Lift the handset Editing a stored name or number in the phonebook 3Press Function Edit 4Edit the name see the table on page 9 for instructions If you do not need to edit the name skip to step 5 5Press Set 8Enter the correct group number If you do not need to edit the group number skip to step 9 9Pr...

Page 12: ...ct a mistake press Clear Editing a stored number in the one touch dial 1Press one touch The unit will start dialing 2Press one touch 1Press Function 機能 4Press Register 登録 3Edit the telephone number Erasing a stored number in the one touch dial 2Press one touch 1Press Function 機能 3Press and hold Erase until the telephone number has been erased 4Press Register 登録 4Press Register 登録 ワ ン タ ッ チ 登 録 000...

Page 13: ...stations including 4 pre programmed stations 登録 Automatic dialing on the portable handset 検 索 は アア を 押 す アアアアアアアアア 名 前 空 き AAA 件 6Press Register 登録 7If necessary enter the group number 1 9 Editing a stored name or number in the phonebook 3Press Edit 修正 4Edit the name see the table on page 9 for instructions If you do not need to edit the name skip to step 5 5Press Register 登録 8Edit the telephone n...

Page 14: ...multiple portable handset users 1 Lift the handset 2 Press Intercom 3 Press the portable handset number to which you want to call 3Replace the handset to end the intercom call 2Start talking You can switch to the speakerphone by pressing Speakerphone 1 For single portable handset users Press Intercom For multiple portable handset users Press Intercom then press 3Press Off to end the intercom call ...

Page 15: ...g 1Insert the document up to 5 pages FACE DOWN until a single beep is heard To select the resolution Select the desired resolution according to the type of document by pressing Resolution Standard for printed or typewritten originals with normal sized characters Fine for originals with minute printing Photo for originals containing photographs ガシツ シャシン ガシツ チイサイ ガシツ フツウ Using the one touch dial ...

Page 16: ...the main unit 1When you hear a ring lift the handset to answer the call Using the portable handset 1When you hear a ring lift the portable handset from the charger to answer the call If the portable handset is not set on the charger press Talk 2When document reception is required a fax calling tone slow beep is heard or no sound is heard press Fax reception until a single beep is heard The main un...

Page 17: ...ill be played to callers instead of the pre recorded Japanese greeting message 3Press Set 5Press Set and speak your greeting message up to 16 seconds to the handset 6Press Stop and replace the handset Your greeting message will be played back automatically 1Press Function Edit 2Press 4Lift the handset Erasing your own greeting message 2Press 1Press Function Edit 3Press Set 4Press The pre recorded ...

Page 18: ...c message Press Erase while listening to the message you want to erase then press Erasing all of the recorded messages 1Press Erase Operating the answering device from a remote location Preparation Programming the remote operation ID 1 Press Function Edit 2 Press 3 Enter any 4 digit number remote operation ID and cannot be used 4 Press Set 5 Press Stop to exit the program Operation Listening to a ...

Page 19: ...ocument 2 If you can not make a call due to DC resistance consult your dealer 3 Transmission speed is based on an A4 size document of 700 characters sent in standard resolution at 9 600 bps The actual transmission speed depends upon the contents of the page resolution telephone line conditions and capability of the other party s machine 4 If there is a silent pause the total recording time will be...

Page 20: ...PFQX2105ZA FK0104GK0 2004 Panasonic Communications Co Ltd All Rights Reserved C ...

Reviews: