background image

83 mm    

100 mm  

100 mm  

83 mm 

for 

KX-NT51

1/KX-NT551/KX-NT553/KX-NT556

for KX-NT505  

222 mm 

One screw here

One screw at either point

One screw at either point

One screw here

WALL MOUNTING TEMPLATE

1. Drive the screws into the wall as indicated.

Note:


• 

If the KX-NT505 is mounted beside a  

   KX-NT553/KX-NT556, leave 222 mm 
   of space between the 2 screws
   for the IP-PT and the 2 screws for the
   KX-NT505, as indicated above. 
   This space is abbreviated in this 
   template and must be measured. 

2. Hook the unit onto the screw heads.

© Panasonic System Networks Co., Ltd. 2013


PNQX6352YA  

PP0913MK1113

Summary of Contents for KX-NT511

Page 1: ...PCMPR Software File Version 3 0000 or later 1 R KX NCP500 KX NCP1000 PBMPR Software File Version 8 0000 or later R KX TDE100 KX TDE200 PMMPR Software File Version 8 0000 or later R KX TDE600 PGMPR Sof...

Page 2: ...d recycling of old products and batteries please contact your local municipality your waste disposal service or the point of sale where you purchased the items Penalties may be applicable for incorrec...

Page 3: ...uch as bathrooms or swimming pools R 999 and 112 can be dialed on the product after accessing the outside line for the purpose of making outgoing calls to the BT emergency 999 and 112 services For use...

Page 4: ...their networks The overall aim is to minimize delay distortion and other transmission impairments particularly for those calls involving cellular and international networks which already suffer extens...

Page 5: ...set 1 Handset Cord 1 AC adaptor 1 1 Screws for wall mounting 2 2 Stand 1 KX NT511 KX NT551 KX NT553 KX NT556 1 KX NT511Axx only Part No PNLV226 PNLV226AG PNLV226CE PNLV226E PNLV226LB PNLV226SX 2 KX NT...

Page 6: ...ptional AC adaptor please order using the KX A239xx KX A420BR model number not PQLV206xx PSLP1662 Can also be used with the KX NT505X For users in Argentina power can only be supplied by PoE 2 KX NT50...

Page 7: ...Location of Controls KX NT511 KX NT551 7 Location of Controls...

Page 8: ...age the lamp stays on red C Flexible CO Buttons Used to seize an outside line or perform a feature that has been assigned to the key D Handset Hook Keeps the handset stable when the unit is mounted on...

Page 9: ...nother party M AUTO DIAL STORE 2 Used for System Personal Speed Dialing or storing programme changes N HOLD Used to place a call on hold O INTERCOM Used to make or receive intercom calls P SP PHONE Sp...

Page 10: ...m X NEXT PAGE 3 Used to switch the page for the Self Labeling feature Y Sub LCD 3 12 lines 1 For KX NT511 the lamp flashes red when receiving an intercom call 2 KX NT551 KX NT553 KX NT556 only 3 KX NT...

Page 11: ...1 3 2 Enter 3 Press ENTER 4 4 Press or to adjust the LCD contrast 5 Press ENTER 4 6 Press CANCEL 5 1 If you hear your own voice through the handset or headset decrease the volume 2 To change the sub L...

Page 12: ...2 Enter 3 Press ENTER 2 4 Press a dial key to select the LCD backlight mode Automatic Always ON Always OFF 5 Press ENTER 2 6 Press CANCEL 3 1 For KX NT511 press and hold one of the flexible CO buttons...

Page 13: ...ne number Redial 1 Go off hook 2 Press REDIAL Quick Dialing 1 Go off hook 2 Dial a quick dialing number Doorphone Call 1 Go off hook 2 Enter 3 Enter a doorphone number 2 digits 4 After the confirmatio...

Page 14: ...Enter the number to store max 32 digits 1 5 Press ENTER 4 6 Enter the text to store max 12 digits 5 7 Press ENTER 5 8 Press CANCEL 6 MTo dialN 1 Go off hook 2 Press the flexible CO button assigned as...

Page 15: ...6 For KX NT511 go off hook and then go on hook For KX NT551 press PAUSE PROGRAM 15 Feature Operations...

Page 16: ...COM MTo retrieve an outside call from another extensionN 1 Go off hook 2 Press a flexible CO button Call Transfer MTo an extensionN 1 Press TRANSFER 2 After the confirmation tone dial an extension num...

Page 17: ...o cancel Do Not Disturb enter 5 After the confirmation tone go on hook Timed Reminder MTo setN 1 Go off hook 2 Enter 3 Enter the hour and minute 4 digits 4 If 12 hour time display is set enter AM or P...

Page 18: ...1 For KX NT511 press CONF STORE Before Leaving Your Desk Call Forwarding 1 Go off hook 2 Enter 3 Press a dial key to select the types of calls to apply this feature to Both outside and intercom calls...

Page 19: ...ges by pressing NEXT PAGE as follows Bank Home London offc NY offc Sales Chris Walace Andre Romel Sean Carter Keith Murray Log in out LCS CO 13 CO 12 CO 11 CO 10 CO 09 CO 08 CO 07 CO 06 CO 05 CO 04 CO...

Page 20: ...T505 allows 48 additional flexible CO buttons to be added to this unit These buttons are used to seize an outside line make a call using One touch Dialing or perform a feature that has been assigned t...

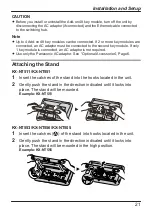
Page 21: ...tor is not required R Use only the Panasonic AC adaptor See Optional Accessories Page 6 Attaching the Stand KX NT511 KX NT551 1 Insert the catches of the stand into the hooks located in the unit 2 Gen...

Page 22: ...on indicated while pushing the catches of the stand with both hands as shown Example KX NT551 KX NT553 KX NT556 KX NT505 1 Hold the stand with both hands 2 Gently rotate the stand in the direction ind...

Page 23: ...daptor LAN PC To a Switching Hub To a PC Optional AC adaptor Ethernet cables Clamp To a Switching Hub To a PC To a handset jack handset Optional AC adaptor AC adaptor Handset PC LAN Ethernet cables He...

Page 24: ...RP TCA400 RP TCA430 KX TCA400 or KX TCA430 EHS headsets KX NT553 KX NT556 only Selected Plantronics brand headsets For up to date information about headsets that have been tested with this unit refer...

Page 25: ...e an AC adaptor is not needed 1 R KX NT511PSX KX NT511PX complies with the PoE Class 2 standard R KX NT551 KX NT553 KX NT556 complies with the PoE Class 3 standard 1 KX NT511PSX KX NT511PX KX NT551 KX...

Page 26: ...556 Page 20 R When mounting the KX NT553 KX NT556 with a KX NT505 on a wall only ONE KX NT505 can be attached R The KX NT511 does not need a wall mounting adaptor So when mounting it on the wall proce...

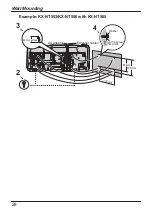
Page 27: ...to 0 6 N m 6 12 kgf cm 3 Connect the cables to the unit as shown in the illustration below 4 Drive the screws into the wall either 83 mm or 100 mm apart and mount the unit on the wall KX NT511 83 mm 1...

Page 28: ...Example KX NT553 KX NT556 with KX NT505 83 mm 100 mm 4 Washer Drive the screw to this point 222 mm 3 AC adaptor Ethernet cables 40 mm or less 2 28 Wall Mounting...

Page 29: ...29 Notes...

Page 30: ...30 Notes...

Page 31: ...31 Notes...

Page 32: ...MPLATE 1 Drive the screws into the wall as indicated Note If the KX NT505 is mounted beside a KX NT553 KX NT556 leave 222 mm of space between the 2 screws for the IP PT and the 2 screws for the KX NT5...

Reviews: