•
The Two-way Record button light, Two-way Transfer button light or One-touch Two-way
Transfer button light shows the current status as follows:
Off:
Not recording.
On:
Recording the conversation.
Note
When you record your Two-way telephone conversations, you should inform the other
party that the conversation is being recorded.
•
If all Unified Messaging system ports are busy when you try to use one of these features,
you will hear a warning tone, dial tone, or busy tone, depending on the feature you are
trying to use.
•
Recording time when using these features may be limited. For more information, consult
your System Administrator.
Customising Your Phone
•
3.1.3 Customising the Buttons
Create or edit a Two-way Record button, a Two-way Transfer button and a One-touch Two-
way Transfer button.
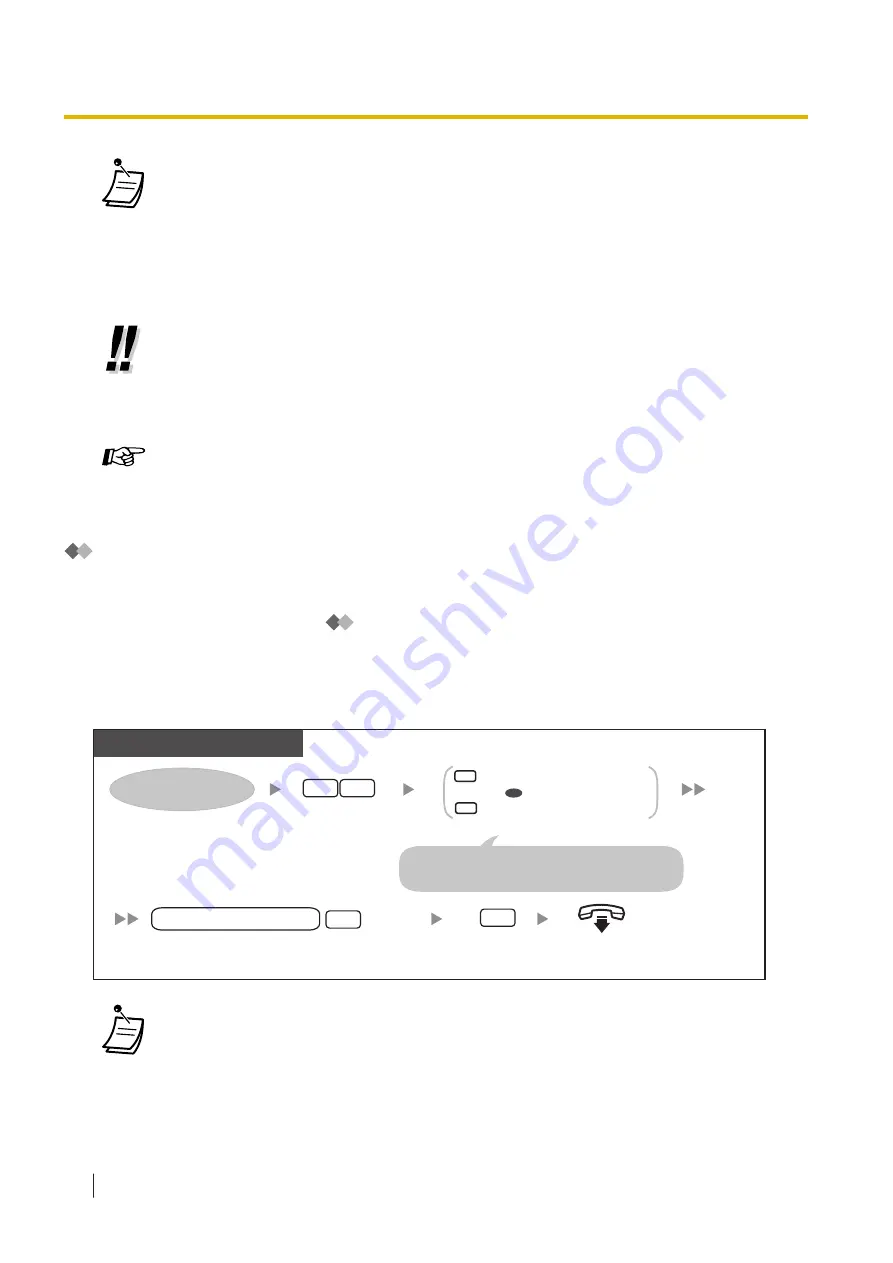
Assigning Your Telephone Numbers for Remote Automatic Log-in and Toll
Saver
When logging in to your mailbox remotely (i.e., from an outside telephone) to listen to your messages, the
Remote Automatic Log-in (refer to "
Remote Access") and Toll Saver features identify you by
recognising your telephone number (caller ID). In order to use these features, you must first store the
telephone numbers that you will use to access your mailbox remotely.
Automatic Log-in and Toll Saver may be disabled by the System Administrator for your mailbox.
To assign
PT/SLT/PS/SIP Extn.
Enter
49
.
On-hook.
Log in to your mailbox.
9
4
1
Change telephone number 1
Change telephone number 2
Enter
1
or
2
.
2
Enter
2
to accept.
2
Enter your
outside telephone number
(max. 20 digits including area code if needed) and
#
.
outside telephone no.
If you have already set a telephone number and
wish to change it, press
1
after selecting telephone
number
1
or
2
.
OR
#
•
The System Administrator must enable Automatic Log-in and Toll Saver for your mailbox
before it can be used.
1.8.6 Other Features
154
Operating Manual
Summary of Contents for KX-NSX2000
Page 10: ...Table of Contents 10 Operating Manual ...
Page 203: ...Table 1 Standard mode 1 14 2 Using the Directories Operating Manual 203 ...
Page 204: ...Table 1 Standard mode for RU model 1 14 2 Using the Directories 204 Operating Manual ...
Page 205: ...Table 2 Option mode 1 14 2 Using the Directories Operating Manual 205 ...
Page 206: ...Table 2 Option mode for CE model 1 14 2 Using the Directories 206 Operating Manual ...
Page 207: ...Table 2 Option mode for GR model 1 14 2 Using the Directories Operating Manual 207 ...
Page 250: ...2 2 2 Message Manager Features 250 Operating Manual ...
Page 288: ...4 1 3 Supervisory Monitor ACD Control 288 Operating Manual ...
Page 314: ...Note 314 Operating Manual ...


