background image

4. Telephone

32

L

To erase other items, repeat steps 2 to 4.

5.

Press 

{

OFF

}

.

4.10.2 With the base unit

Erasing all caller information

1.

Press 

{

MENU

}

 repeatedly to display 

CALLER SETUP

.

2.

Press 

{

SET

}

.

L

CALL LIST ERASE

 will be displayed.

3.

Press 

{

SET

}

.

L

To cancel erasing, press 

{

STOP

}

 3 times.

4.

Press 

{

SET

}

.

5.

Press 

{

STOP

}

.

Erasing specific caller information

1.

Press 

{

CALLER ID

}

.

2.

Press 

{A}

 or 

{B}

 repeatedly to display the 

desired item.

3.

Press 

{

<

}

.

L

To cancel erasing, press 

{

STOP

}

 2 times.

4.

Press 

{

SET

}

.

L

To erase other items, repeat steps 2 to 4.

5.

Press 

{

STOP

}

.

Another method to erase a specific caller 
information

1.

Press 

{

CALLER ID

}

.

2.

Press 

{A}

 or 

{B}

 repeatedly to display the 

desired item.

3.

Press 

{

ERASE

}

.

L

To erase other items repeat steps 2 to 3.

4.

Press 

{

STOP

}

.

4.11 Storing caller 
information into the 
phonebook / one-touch 
dial

Important:

L

This feature is not available if the caller 
information does not include a telephone 
number.

4.11.1 Into the cordless handset 
phonebook

1

Press 

{

CALLER ID

}

.

2

Press 

{e}

 or 

{v}

 repeatedly to display the 

desired item.

3

Press 

{

MENU/SET

}

.

L

If you do not need to edit the name, skip 
to step 5.

4

If a name is required, enter up to 12 
characters for the name (page 24).

5

Press 

{

MENU/SET

}

.

L

If the number requires editing, see page 
30.

6

Press 

{

MENU/SET

}

.

7

Press 

{

OFF

}

.

Note:

L

To edit a name, see page 25.

L

If there is no space to store new items, 

Memory full

 will be displayed at step 3. 

Erase unnecessary items (page 25).

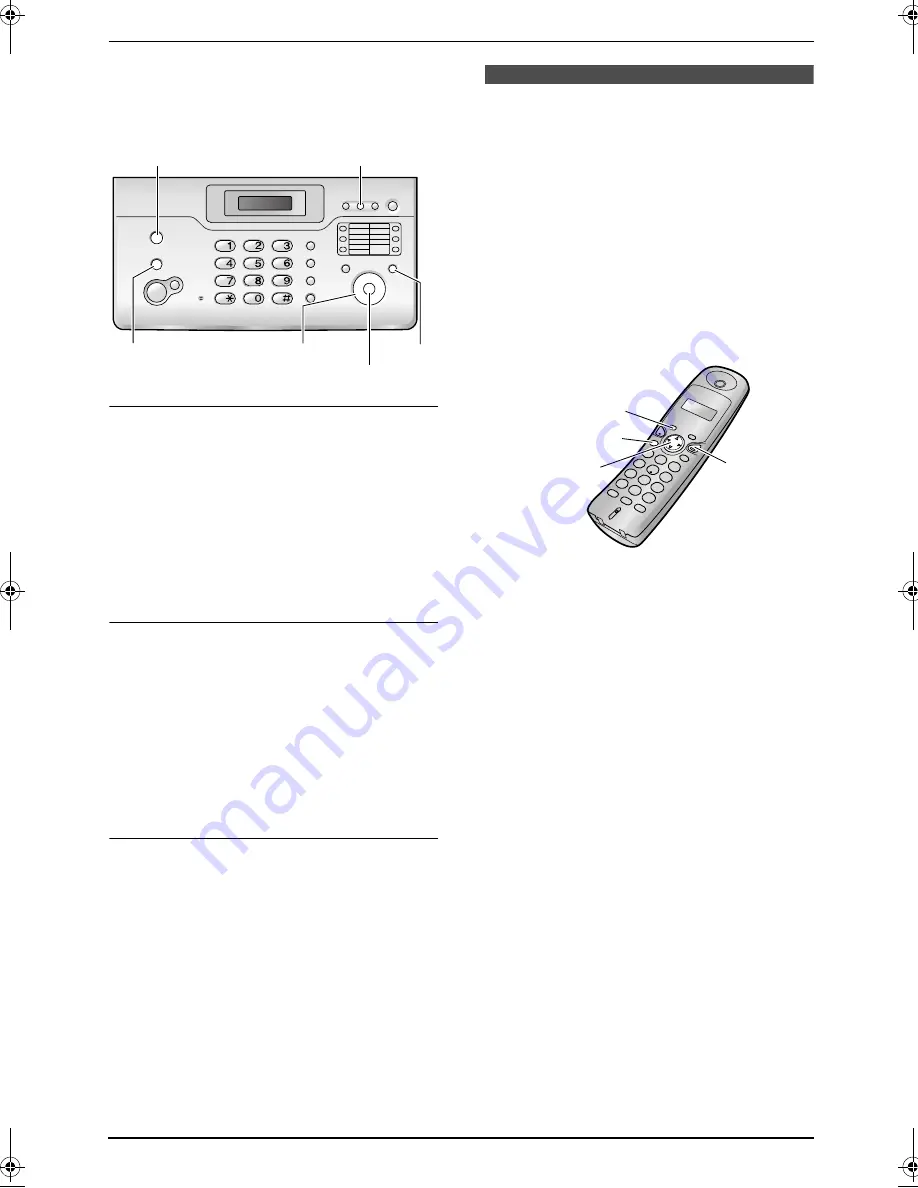
{

STOP

}

{

CALLER ID

}

{A}{B}{

<

}

{

SET

}

{

MENU

}

{

ERASE

}

{e}{v}

{

OFF

}

{

MENU/SET

}

{

CALLER ID

}

FC971CX-PFQX2269ZA-en.book  Page 32  Friday, August 5, 2005  8:29 AM

Summary of Contents for KX-FC971CX

Page 1: ...g the unit and save for future reference This unit is compatible with Caller ID To use this feature you must subscribe to the appropriate service of your service provider Operating Instructions Model No KX FC971CX Thermal FAX with Digital Cordless Phone ...

Page 2: ...nformation 29 4 9 Editing a caller s telephone number before calling back 30 4 10 Erasing caller information 31 4 11 Storing caller information into the phonebook one touch dial 32 5 Fax Sending Faxes 5 1 Sending a fax manually 34 5 2 Documents you can send 35 5 3 Sending a fax using the base unit phonebook one touch dial 36 5 4 Broadcast transmission 37 Receiving Faxes 5 5 Selecting the way to us...

Page 3: ...Information 11 1 Wall mounting the charger 63 12 Help Error Messages 12 1 Error messages Reports 64 12 2 Error messages Base unit display 64 Troubleshooting 12 3 When a function does not work check here 66 Jams 12 4 Recording paper jams 71 12 5 Document jams sending 72 Cleaning 12 6 Document feeder scanner glass cleaning 72 12 7 Thermal head cleaning 73 13 General Information Printed Reports 13 1 ...

Page 4: ...urchase L Save the original carton and packing materials for future shipping and transportation of the unit No Item Quantity 1 Telephone line cord 1 2 Handset 1 3 Handset cord 1 4 Paper stacker 1 5 Recording paper 1 6 Cordless handset 1 7 Rechargeable battery 1 8 Battery cover 1 9 AC adaptor 1 j Charger 1 k Operating instructions 1 1 2 3 4 5 6 7 8 9 j k ...

Page 5: ...fied recording paper Using other recording paper may affect print quality and or cause excessive wear to the thermal head Model No Item Specifications Usage KX A106 Standard thermal recording paper 1 216 mm 30 m roll with 25 mm core HHR P106 Rechargeable battery Nickel metal hydride Ni MH battery KX FGA521CX Additional cordless handset ...

Page 6: ...ed Please use only Panasonic battery See page 5 for accessory information Important L Charge the new battery for about 10 hours before initial use L Use only a rechargeable battery If you install a non rechargeable battery and start charging the battery may leak electrolyte 1 Press the notch on the cover firmly and slide it in the direction of the arrow 2 Unplug the connector then remove the old b...

Page 7: ...ncluded Panasonic AC adaptor L The AC adaptor must remain connected at all times It is normal for the adaptor to feel warm during use L The AC adaptor should be connected to a vertically oriented or floor mounted AC outlet Do not connect the AC adaptor to a ceiling mounted AC outlet as the weight of the adaptor may cause it to become disconnected 1 Paper stacker L The paper stacker will drop to a ...

Page 8: ... Note L Times indicated are for peak performance L Battery operating time may be shortened depending on usage conditions and ambient temperature L Battery power is consumed whenever the cordless handset is off the charger even when the cordless handset is not in use The longer you leave the cordless handset off the charger the less time you can actually talk on the cordless handset L The battery c...

Page 9: ...r roll E Close the top cover securely by pushing down on both sides F Press FAX START to cut the paper Correct Incorrect 1 1 Note L If the paper is secured with glue or tape cut approximately 15 cm from the beginning of the roll before installing it L When the power cord is connected a message is printed each time the top cover is opened then closed If the recording paper is installed upside down ...

Page 10: ... number and press FAX START To make a copy Press COPY L For further details to send a fax see page 34 For further details to make a copy see page 45 1 8 Fax receiving A Lift the handset to answer the call B To receive a fax document press FAX START L For further details see page 40 L You can select how you want the unit to receive calls according to your needs page 39 1 COPY FAX START FAX START ...

Page 11: ...a long beep F To stop recording press STOP G Replace the handset L For further details see page 46 1 9 2 Listening to recorded messages The display will show the total number of recorded messages When the AUTO ANSWER indicator flashes Press PLAYBACK New messages will be played When the AUTO ANSWER indicator is ON Press PLAYBACK All messages will be played L For further details see page 47 A B STOP...

Page 12: ... when the unit is subsequently used 13 Unplug this unit from power outlets and refer servicing to an authorized service center when the following conditions occur A When the power cord is damaged or frayed B If liquid has been spilled into the unit C If the unit has been exposed to rain or water D If the unit does not work normally by following the operating instructions Adjust only controls cover...

Page 13: ...tlets if it emits smoke an abnormal smell or make unusual noise These conditions can cause fire or electric shock Confirm that smoke has stopped and contact an authorized service center NOTICE L Operating near 2 4GHz electrical appliances may cause interference Move away from the electrical appliances L Consult the manufacturer of any personal medical devices such as pacemakers to determine if the...

Page 14: ...L The unit should be kept away from heat sources such as heaters kitchen stoves etc It should not be placed in rooms where the temperature is less than 5 C or greater than 35 C Damp basements should also be avoided Connection L If any other device is connected on the same line this unit may disturb the network condition of the device L If you use the unit with a computer and your internet provider...

Page 15: ...s page 47 L To erase a stored item page 28 H PLAY MESSAGES L To play messages page 47 I AUTO ANSWER L To turn the auto answer setting ON OFF page 39 J Station keys L To use one touch dial feature page 27 K FAX START L To start sending or receiving a fax L COPY L To copy a document page 45 M TONE L To change from pulse to tone temporarily during dialing when your line has rotary pulse services N PA...

Page 16: ...ls L To erase a character number page 24 Press and hold to erase all characters numbers G Microphone L The built in microphone H AUTO ANSWER EDIT L To turn the auto answer setting ON OFF page 40 41 42 L To edit the caller s phone number page 25 H I J C B F G A D E MENU SE MENU SET AU AUTO A TO ANSWER NSWER EDI EDIT VOL VOL TALK FL FLASH ASH MUTE MUTE OFF REDI REDIAL AL SP PHONE SP PHONE ON ON OFF ...

Page 17: ...er stacker may not be shown in all illustrations in these operating instructions 4 Document feeder tray 5 Antenna 6 Top cover 7 Document exit 8 Document entrance 9 Top cover release button 1 2 3 4 7 8 9 5 6 1 Speaker 2 Antenna 3 Charge contacts 4 Battery cover 5 Voice select button L To select the tone quality of the receiver page 23 5 4 3 2 1 ...

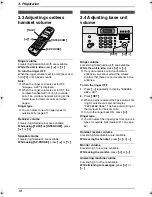
Page 18: ... Adjusting base unit volume Ringer volume 4 levels high medium low off are available While the unit is idle press A or B L If any documents are in the document entrance you cannot adjust the volume Confirm that there are no documents in the entrance To turn the ringer OFF 1 Press B repeatedly to display RINGER OFF OK 2 Press SET L When a call is received the base unit will not ring for outside cal...

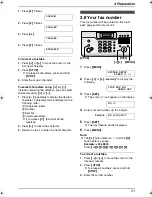
Page 19: ...er failure occurs the date and time setting may be lost If the correct date and time is not displayed after the power has been restored set the date and time again 1 Press MENU SYSTEM SETUP PRESS 2 Press or repeatedly to display the following SET DATE TIME PRESS SET 3 Press SET L The cursor will appear on the display M 01 D 01 Y 05 TIME 00 00 4 Enter the current month date year by selecting 2 digi...

Page 20: ...r another character that is located on the same dial key press to move the cursor to the next space To enter your logo Example BILL 1 Press 2 2 times LOGO B 2 Press 4 3 times LOGO B I 3 Press 5 3 times LOGO BI L 4 Press to move the cursor to the next space and press 5 3 times LOGO BIL L To change uppercase or lowercase letters Pressing the button will change to uppercase or lowercase letters alter...

Page 21: ... you press A the order will be reversed 2 Press to insert the character 3 Return to step 1 to enter the next character 3 8 Your fax number Your fax number will be printed on the top of each page sent from your unit 1 Press MENU SYSTEM SETUP PRESS 2 Press or repeatedly to display the following YOUR FAX NO PRESS SET 3 Press SET L The cursor will appear on the display NO 4 Enter your fax number up to...

Page 22: ...st 1 Press L The last number dialed will be displayed 2 Press e or v repeatedly to select the desired number L To exit the list press OFF 3 Press TALK or SP PHONE To erase numbers in the redial list 1 Press 2 Press e or v repeatedly to select the desired number then press FLASH CLEAR 3 Press to erase the number L To cancel erasing press 4 Press OFF To store a number from the redial list into the c...

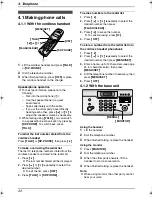
Page 23: ...n While mute is turned on you will be able to hear the other party but the other party will not be able to hear you 1 To mute your voice press MUTE 2 To return to the conversation press MUTE again 4 2 Answering phone calls 4 2 1 With the cordless handset 1 Lift the cordless handset and press TALK or SP PHONE L You can also answer a call by pressing any dial key 0 to 9 or INTERCOM Any key talk feat...

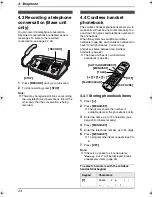
Page 24: ...ook When the system has additional cordless handsets page 58 each cordless handset can have its own phonebook You can copy phonebook items between two cordless handsets page 62 L The base unit has its own individual phonebook page 26 4 4 1 Storing phonebook items 1 Press 2 Press MENU SET L The display shows the number of available items in the phonebook briefly 3 Enter the name up to 12 characters...

Page 25: ...arch for symbols not letters or numbers press 1 3 Press v repeatedly to display LISA L To stop the search press OFF L To dial the displayed party press TALK or SP PHONE 4 4 3 Editing a stored item 1 Press 2 Press e or v repeatedly to display the desired item 3 Press AUTO ANSWER EDIT L If you do not need to edit the name skip to step 5 4 Edit the name For further details see the storing procedure o...

Page 26: ...using the phonebook Before using this feature store the desired names and telephone numbers in the base unit phonebook page 26 1 Press 2 Press A or B repeatedly to display the desired item 3 Lift the handset or press MONITOR L The base unit will start dialing automatically To search for a name by initial Example LISA 1 Press 2 Press A or B to enter the phonebook 3 Press 5 repeatedly to display any...

Page 27: ...tems repeat steps 2 to 6 7 Press STOP To correct a mistake 1 Press or to move the cursor to the incorrect character number 2 Press STOP L To erase all characters numbers press and hold STOP 3 Enter the correct character number 4 6 2 Making phone calls using the one touch dial Before using this feature store the desired names and telephone numbers for the one touch dial feature page 27 1 Lift the h...

Page 28: ... 2 or more rings beforehand FAX ring setting feature 06 on page 52 4 7 1 How Caller ID is displayed When an outside call is received the calling party s telephone number or name will be displayed You then have the option of whether or not to answer the call The unit will automatically store caller information telephone number name date and time of the call of the last 30 different callers Caller i...

Page 29: ... Calling back will not be possible if the caller information does not include a telephone number L If the area code of the received telephone number is the same as yours the area code may need to be deleted before calling back This may only apply to some areas To edit the number see page 30 4 8 1 With the cordless handset 1 Press CALLER ID L Caller list is displayed 2 Press v repeatedly to search ...

Page 30: ...0 L A Q on the display means the item has already been viewed or answered even if it was viewed or answered using a cordless handset Display while viewing L When the unit could not receive a name the display will show NO NAME RCVD L When no calls have been received the display will show MEMORY EMPTY To stop viewing Press STOP 4 9 Editing a caller s telephone number before calling back 4 9 1 With t...

Page 31: ... the edited number L The unit will start dialing automatically L To send a fax insert the document FACE DOWN and press FAX START Note L The edited telephone number will not be saved as caller information To store it into the base unit phonebook see page 33 To correct a mistake 1 Press or to move the cursor to the incorrect number 2 Press STOP to delete the number 3 Enter the correct number To dele...

Page 32: ...o display the desired item 3 Press ERASE L To erase other items repeat steps 2 to 3 4 Press STOP 4 11 Storing caller information into the phonebook one touch dial Important L This feature is not available if the caller information does not include a telephone number 4 11 1 Into the cordless handset phonebook 1 Press CALLER ID 2 Press e or v repeatedly to display the desired item 3 Press MENU SET L...

Page 33: ...ial 1 Press CALLER ID 2 Press A or B repeatedly to display the desired item 3 Press MENU 4 Select a station key For station 1 Press station 1 press A or B repeatedly to select DIAL MODE then press SET For stations 2 5 Press the desired station key For stations 6 10 Press LOWER then press the desired station key L If you do not need to edit the name skip to step 6 5 If a name is required enter up t...

Page 34: ... Using the FINE SUPER FINE and PHOTO settings will increase transmission time L If the resolution setting is changed during feeding it will be effective from the next page To redial the last number 1 Press REDIAL 2 Press FAX START L If the line is busy the unit will automatically redial the number up to 5 times L To cancel redialing press STOP To send more than 10 pages at a time Insert the first ...

Page 35: ... copy Chemically treated paper such as carbon or carbonless duplicating paper Electrostatically charged paper Badly curled creased or torn paper Paper with a coated surface Paper with a faint image Paper with printing on the opposite side that can be seen through the other side such as newsprint L Check that ink paste or correction fluid has dried completely L To send a document with a width of le...

Page 36: ...edly to select the desired resolution page 34 4 Enter the fax number Using one touch dial For stations 1 5 Press the desired station key For stations 6 10 Press LOWER then press the desired station key Using base unit phonebook Press then A or B repeatedly to display the desired item and press FAX START Fax auto redial If the line is busy or if there is no answer the unit will automatically redial...

Page 37: ...ep up to 20 items L If you program the wrong item press STOP to erase the item 6 Press SET 7 Press STOP Note L Confirm the stored items by printing a broadcast programming list page 75 5 4 2 Adding a new item into the broadcast memory After initial programming you can add new items up to a combined total of 20 1 Press 2 Press A or B repeatedly to display BROADCAST 3 Press MENU 4 Press 5 Press A or...

Page 38: ... parties to send the same document to After transmission this group will be deleted 1 Insert the document 2 Press 3 Press A or B repeatedly to display ONE TIME BROAD 4 Press SET to start programming the parties you want to send the document to 5 Program items Using stations 2 5 Press the desired station key Using stations 6 10 Press LOWER then press the desired station key Using base unit phoneboo...

Page 39: ...e calls and faxes are received If the call is a phone call the fax machine will record the caller s message automatically If a fax calling tone is detected the fax machine will receive the fax automatically 5 5 2 Use only as a fax FAX ONLY mode Your situation You have a separate telephone line just for faxes Setup Set the fax machine to FAX ONLY mode page 42 by pressing AUTO ANSWER repeatedly L Th...

Page 40: ...ndset and press TALK or SP PHONE to answer the call 2 When document reception is required a fax calling tone slow beep is heard or no sound is heard press MENU SET then L You can also press FAX START on the base unit How to receive phone calls and faxes with an extension telephone If you have another telephone connected to the same line extension telephone you can use the extension telephone to re...

Page 41: ...w phone calls and faxes are received When receiving calls the unit works as an answering machine and or fax L If the call is a phone call the unit will record the caller s message automatically L If a fax calling tone is detected the unit will receive the fax automatically Receiving a voice message and fax document in one call The caller can leave a voice message and send a fax document during the...

Page 42: ...uments Note L The number of rings before a call is answered in FAX ONLY mode can be changed feature 06 on page 52 5 8 Receive polling This feature allows you to retrieve a document by calling an available polling service Therefore you pay for the call Make sure that no documents are fed into your unit 1 Press MENU repeatedly to display POLLING 2 Press SET 3 Dial the fax number Using dial keys 0 to...

Page 43: ... Press MENU 2 Press then 3 1 3 Press A or B to select ON 4 Press SET 5 Press MENU How to receive calls If the incoming call is for the fax number the fax machine will ring with the assigned ring pattern and automatically start fax reception If the incoming call is for the phone number the fax machine will keep on ringing 6 3 Using three or more phone numbers in a single telephone line You may wish...

Page 44: ...N page 43 2 Press MENU 3 Press then 3 2 4 Press A or B repeatedly to select the ring pattern assigned for fax A Standard ring one long ring B Double ring two short rings C Triple ring short long short rings D Other triple ring short short long rings B D default setting For the ring pattern of B C and D 5 Press SET 6 Press MENU to exit the program ...

Page 45: ...copying Note L When you copy a multiple page document which is longer than A4 size paper approx 300 mm we recommend you insert one page at a time L Any document which can be sent as a fax can also be copied page 35 L The copied recording paper comes out somewhat longer than the document size To select the resolution Select the desired resolution according to the type of document FINE For printed o...

Page 46: ...e will be deleted The pre recorded greeting message will be played when a call is received To check the greeting message 1 Press MENU 2 Press then 5 5 3 Press A or B to select CHECK 4 Press SET L The unit will play the greeting message 5 Press MENU 8 1 1 Erasing your recorded greeting message 1 Press MENU 2 Press then 5 5 3 Press A or B to select ERASE 4 Press SET 5 Press MENU Note L If you erase ...

Page 47: ...recorded messages will be played Note L The total recording time of all messages greeting incoming and recorded conversation is about 15 minutes A maximum of 50 messages can be recorded If messages are recorded in noisy environment the actual recording time may be less To repeat a message Press while listening to the message L If you press within 5 seconds of the beginning of the message the previ...

Page 48: ...ou press this key within 5 seconds of the beginning of a message the previous message will be played To skip a message Press or 2 to play the next message To stop playback Press 9 To erase a specific message Press 4 while listening to the message you want to erase L The unit will then play back the next message To erase all messages Press 5 to erase all messages To turn OFF the AUTO ANSWER mode Pr...

Page 49: ... a remote command page 49 5 To end remote operation hang up 8 4 2 Remote commands 0 Turn OFF the answering machine L The unit hangs up and will switch to TEL mode 1 Repeat During playback L The current message is repeated L If pressed within 5 seconds of playback the previous message will be played 2 Skip During playback L The current message is skipped The next message is played 4 New message pla...

Page 50: ...The receiving mode will be set to TAM FAX or FAX ONLY mode depending on the setting of feature 77 page 55 3 Hang up the handset 8 5 Pager call This feature allows your unit to call your pager when your unit receives an incoming voice message a call can also be made to a mobile phone 1 Press MENU 2 Press then 7 0 3 Press A or B repeatedly to select ON 4 Press SET 5 Enter your pager number and or pa...

Page 51: ...elect the feature you wish to program Press or repeatedly to display the desired feature L The current setting of the feature will be displayed 5 Press A or B repeatedly to display the desired setting L This step may be slightly different depending on the feature 6 Press SET L The setting you selected is set and the next feature will be displayed 7 To exit programming press MENU at any time To pro...

Page 52: ...AUTO See page 41 for details Note L Set feature 77 to TAM FAX page 55 beforehand Code 10 Changing the maximum recording time for incoming messages RECORDING TIME NO LIMIT 1 MINUTE Up to 1 minute NO LIMIT default Unlimited within the voice memory capacity page 76 GREET ONLY The unit plays the greeting message but does not record caller messages Code 11 Setting the remote operation ID REMOTE TAM ID ...

Page 53: ...s A or B repeatedly to select the desired resolution page 34 3 Press MENU 4 Press then 2 5 5 Press A or B repeatedly to select ON 6 Press SET 7 Enter the fax number 8 Press SET 9 Enter the transmission start time L If you select 12 hour time entry when you set the date and time page 19 press repeatedly to select AM or PM L If you selected 24 hour time entry when you set the date and time page 19 t...

Page 54: ...tically when you answer a call and hear a fax calling tone slow beep ON default You do not have to press FAX START for fax reception OFF You have to press FAX START for fax reception Code 54 Changing the recording time for your TAM FAX greeting message GREETING TIME 16s 16s default Maximum recording time is 16 seconds 60s Maximum recording time is 60 seconds See page 46 for details Code 55 Setting...

Page 55: ...e advanced features 1 Press MENU 2 Press then 8 0 3 Press A or B repeatedly to select YES 4 Press SET 5 Press SET again 6 Press MENU 9 4 Direct commands for programming features You can also select the desired setting by directly entering the program code and a 2 digit number and direct command For more details on the features see page 52 to page 55 1 Press MENU 2 Press and the 2 digit code number...

Page 56: ...ls 2 6 Automatic Caller ID list 1 ON 2 OFF default 3 1 Distinctive ring 1 ON 2 OFF default 3 2 Ring pattern 1 A 2 B 3 C 4 D 5 B D default 3 6 Receiving reduction 1 ON default 2 OFF 3 9 Display contrast 1 NORMAL default 2 DARKER 4 1 Fax activation code 1 ON default 2 OFF L If you select ON next enter your 2 to 4 digit code using 0 9 and 4 4 Memory reception alert 1 ON default 2 OFF 4 6 Friendly rec...

Page 57: ...are 5 types of bell patterns and 4 types of melodies The default setting is Bell 1 1 Press MENU SET L Program will be displayed 2 Press e or v repeatedly to display Ringer L The current setting will be displayed 3 Press MENU SET 4 Press or to select Bell or Melody 5 Press MENU SET 6 Press or repeatedly to select the desired ringer type L The selected ringer type will sound 7 Press MENU SET 8 Press...

Page 58: ... Press e or v repeatedly to display Register handset 4 Press MENU SET Note L When the cordless handset has been registered successfully a confirmation tone will be heard and handset number will be displayed 10 2 1 Canceling a cordless handset If you no longer need to use the handset or if you want to use the handset with a different base unit it is necessary to cancel the handset s registration fr...

Page 59: ...phone call while talking on the intercom you will hear 2 tones Press OFF to end the intercom then press TALK to answer the call 10 3 2 Between a cordless handset and the base unit Example When cordless handset 1 calls the base unit 1 Cordless handset 1 Press INTERCOM then press 0 L The base unit will ring 2 Base unit Lift the handset to answer 3 Cordless handset 1 When finished talking press OFF B...

Page 60: ...ss handset ask the base unit user to hang up then press TALK or SP PHONE after the cordless handset starts to ring 10 4 Transferring calls Outside calls can be transferred to the base unit or to a cordless handset 10 4 1 From a cordless handset to the base unit Example When cordless handset 1 transfers a call to the base unit 1 Cordless handset 1 During an outside call press INTERCOM and 0 to page...

Page 61: ...g to the cordless handset 1 user After step 1 replace the handset If the transferred call is not answered within 60 seconds the base unit will ring again Lift the handset to return to the outside call 10 4 3 Between cordless handsets Example When cordless handset 1 transfers a call to cordless handset 2 Cordless handset 1 Cordless handset 2 1 Cordless handset 1 During an outside call press INTERCO...

Page 62: ...ENU SET 6 Enter the desired handset number L Copying will be displayed L The copied item will be displayed when the copying is completed 7 Press OFF Note L If the copying is not completed Copy failure will be displayed 10 5 2 Copying all the phonebook items 1 Press MENU SET L Program will be displayed 2 Press e or v repeatedly to display Copy phonebook 3 Press MENU SET 4 Press or to select All the...

Page 63: ...tor 2 Drive the screws 1 into the wall using the wall template as a guide then mount the charger securely on the screws L Fasten the AC adaptor cord around the hooks 2 to prevent it from being disconnected Note L Make sure the screws are securely fastened to the wall Wall template for charger 2 2 5 3 mm 2 3 cm 1 2 3 cm ...

Page 64: ... recording paper Try again L The other party s fax machine rings too many times Send the fax manually page 34 L The other party s machine is not a fax machine Check with the other party L The number you dialed is not in service PRESSED THE STOP KEY L STOP was pressed and fax transmission or reception was canceled OK L Fax transmission or reception was successful 12 2 Error messages Base unit displ...

Page 65: ...el NO FAX REPLY L The other party s fax machine is busy or has run out of recording paper Try again PAPER JAMMED L A recording paper jam occurred Clear the jammed paper page 71 PLEASE WAIT L The unit is checking and initializing the paper cutter Wait for a moment while the check is completed POLLING ERROR L The other party s fax machine does not support polling Check with the other party REDIAL TI...

Page 66: ... a telephone line jack I cannot make calls L The dialing mode setting may be wrong Change the setting page 19 The unit does not ring L The ringer volume is turned OFF Adjust it page 18 Problem Cause Solution The other party complains they only hear a fax tone and cannot talk L FAX ONLY mode is set Tell the other party the number is only used for faxes L Change the receiving mode to TAM FAX mode pa...

Page 67: ...handset stops working while being used L Reset the unit and try again To reset the base unit disconnect the power cord then reconnect it To reset the cordless handset disconnect the battery page 6 for 10 seconds then reconnect it While storing an item in the phonebook the cordless handset starts to ring L To answer a call press TALK or SP PHONE Storing will be canceled Store the name and number ag...

Page 68: ...ne L Adjust the scan contrast using feature 58 page 54 The other party complains that black lines white lines or smudges appear on their received document L The scanner glass white plate or rollers are dirty with correction fluid etc Clean them page 72 Please do not insert a document before correction fluid has dried completely Problem Cause Solution I cannot receive documents L The telephone line...

Page 69: ...e 55 and press AUTO ANSWER repeatedly to select the desired mode L If you want to set TEL mode press AUTO ANSWER repeatedly to select TEL mode L The Distinctive Ring of feature 31 is activated page 43 When an extension telephone is connected I cannot receive documents by pressing 9 L You must set remote fax activation to ON feature 41 on page 54 beforehand L Press 9 firmly L The memory is full of ...

Page 70: ...ne is turned ON but caller messages are not recorded L The recording time is set to GREET ONLY Select 1 MINUTE or NO LIMIT feature 10 on page 52 L The message memory is full Erase unnecessary messages page 47 I cannot operate the answering machine with the cordless handset L Another user is using the answering machine accessing the Caller ID list or on an outside call Wait for the other user to fi...

Page 71: ...p cover release button 1 2 Pull the cutter release lever 1 forward L The paper cutter will be released 3 Remove the recording paper 4 Cut off the wrinkled portion 5 Install the recording paper and close the top cover securely by pushing down on both sides see page 9 for details 1 1 ...

Page 72: ...uments frequently misfeed Smudges or black white lines appear on the document when sending or copying 1 Disconnect the power cord and the telephone line cord 2 Open the top cover by pressing the top cover release button 1 3 Clean the document feeder rollers 1 and rubber flap 2 with a cloth moistened with isopropyl rubbing alcohol and let all parts dry thoroughly Clean the white plate 3 and scanner...

Page 73: ... Disconnect the power cord and the telephone line cord 2 Open the top cover by pressing the top cover release button 1 and remove the recording paper 3 Clean the thermal head 1 with a cloth moistened with isopropyl rubbing alcohol and let all parts dry thoroughly Caution L To prevent a malfunction due to static electricity do not use a dry cloth and do not touch the thermal head directly 4 Connect...

Page 74: ...12 Help 74 5 Install the recording paper and close the top cover securely by pushing down on both sides see page 9 for details ...

Page 75: ...ted automatically after every 30 fax communications feature 22 on page 53 PRINTER TEST allows you to check the print quality of your unit If the test print has a smudge or blurred points or lines clean the thermal head page 73 BROADCAST LIST provides you with names and numbers which are stored in the broadcast memory page 37 CALLER ID LIST keeps records of the last 30 different callers after subsc...

Page 76: ... 8 kg Power consumption Standby Approx 2 0 W Transmission Approx 13 W Reception Approx 30 W When receiving a 20 black document Copy Approx 35 W When copying a 20 black document Maximum Approx 110 W When copying a 100 black document Power supply 220 V 240 V AC 50 60 Hz Fax memory capacity 3 Approx 28 pages of memory transmission reception Based on the ITU T No 1 Test Chart in standard resolution wi...

Page 77: ...ual product Frequency range 2 402 MHz 2 480 MHz Operating environment 5 C 35 C 20 80 RH Relative Humidity Dimensions Approx height 161 mm width 47 mm depth 39 mm Mass Weight Approx 140 g Operating environment 5 C 35 C 20 80 RH Relative Humidity Dimensions Approx height 64 mm width 80 mm depth 90 mm Mass Weight Approx 80 g Power consumption Standby Approx 1 W Maximum Approx 2 W Power supply AC adap...

Page 78: ...Information 78 User record 13 3 User record For your future reference Attach your sales receipt here Date of purchase Serial number found on the rear of the unit Dealer s name and address Dealer s telephone number ...

Page 79: ...Editing 26 Erasing 26 Making a phone call 26 Sending faxes 36 Storing 26 Basic features 52 Battery Charge 8 Installation 6 Life 8 Replacement 6 Broadcast transmission 37 C Caller ID 28 Calling back 29 Storing 32 Caller ID list 29 53 75 Canceling a cordless handset 58 Character entry Base unit 20 Cordless handset 24 Cleaning 72 73 Connecting tone 55 Connections 7 Copy 45 Cordless handset Registrati...

Page 80: ...22 Redial list 22 Remote operation 49 Remote operation ID 52 Reports Broadcast programming 75 Broadcast sending 37 Caller ID list 29 53 75 Journal 34 53 75 Power down 70 Printer test 75 Sending 34 52 Setup 75 Telephone number 75 Reset Base unit 55 66 Cordless handset 66 Resolution 34 45 Ringer type Base unit 52 Cordless handset 57 Ring pattern for Distinctive Ring 44 Ring setting FAX ONLY 52 TAM F...

Page 81: ...81 Notes ...

Page 82: ...82 Notes ...

Page 83: ...83 Notes ...

Page 84: ...copyrighted by Panasonic System Networks Co Ltd and may be reproduced for internal use only All other reproduction in whole or in part is prohibited without the written consent of Panasonic System Networks Co Ltd Panasonic System Networks Co Ltd 2005 1 62 4 chome Minoshima Hakata ku Fukuoka 812 8531 Japan ...

Reviews: