background image

Features Summary

54

Programmable Features

Programming

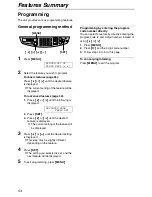
The unit provides various programming features.

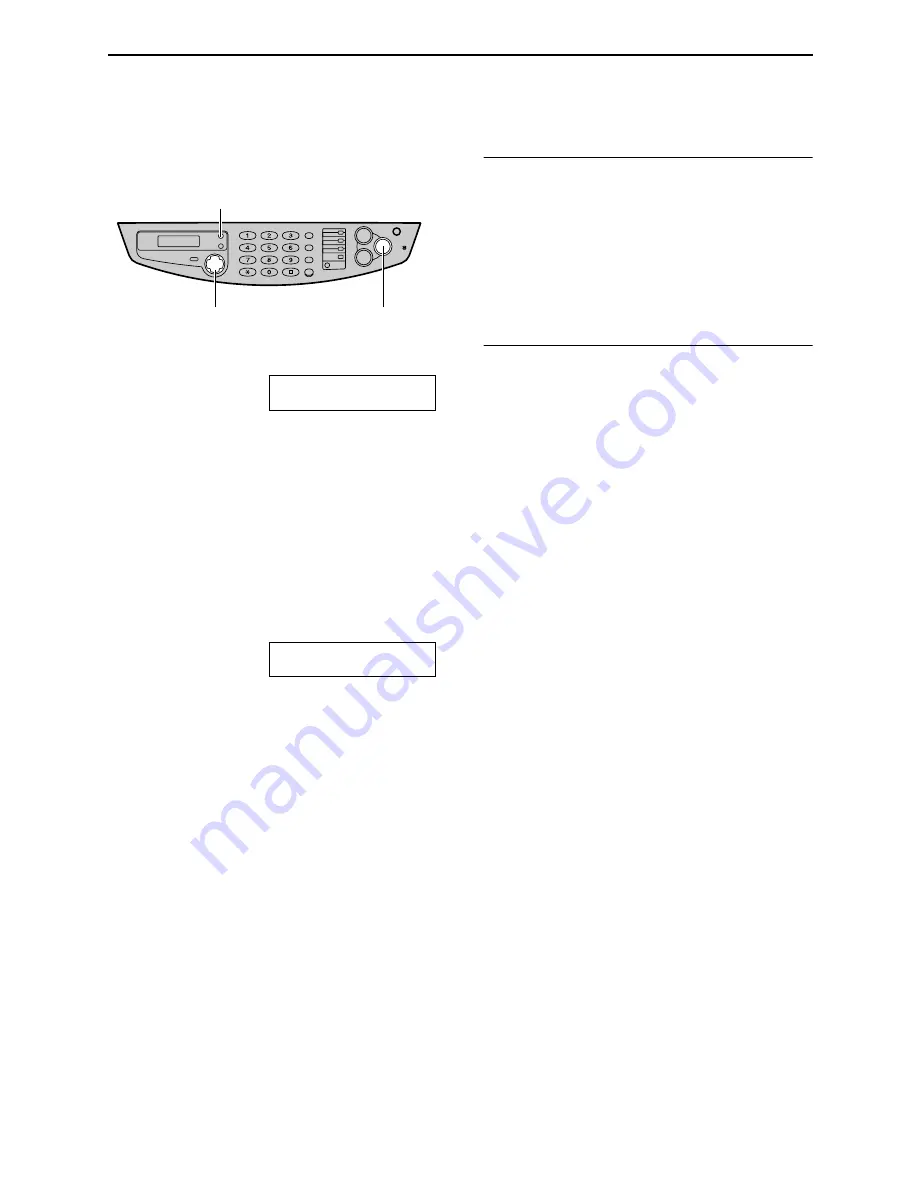
General programming method

1

Press 

{

MENU

}

.

SYSTEM SET UP
PRESS NAVI.[

(


)

]

2

Select the feature you wish to program.

For basic features (page 55):

Press 

{<}

 or 

{>}

 until the desired feature 

is displayed.

L

The current setting of the feature will be 
displayed.

For advanced features (page 56):

1.

Press 

{<}

 or 

{>}

 until the following is 

displayed:

ADVANCED MODE

PRESS SET

2.

Press 

{

SET

}

.

3.

Press 

{<}

 or 

{>}

 until the desired 

feature is displayed.

L

The current setting of the feature will 
be displayed.

3

Press 

{+}

 or 

{-}

 until the desired setting 

is displayed.

L

This step may be slightly different 
depending on the feature.

4

Press 

{

SET

}

.

L

The setting you selected is set, and the 
next feature will be displayed.

5

To exit programming, press 

{

MENU

}

.

Programming by entering the program 
code number directly

You can select a feature by directly entering the 
program code (# and 2-digit number) instead of 
using 

{<}

 or 

{>}

.

1.

Press 

{

MENU

}

.

2.

Press 

{#}

 and the 2-digit code number.

3.

Follow steps 3 to 5 on this page.

To cancel programming

Press 

{

MENU

}

 to exit the program.

{

SET

}

{

MENU

}

{<}


{>}


{+}


{-}

Summary of Contents for KX-FB422CX

Page 1: ...Operating Instructions Flat Bed Plain Paper Fax with Copier Model No KX FB422CX Please read these Operating Instructions before using the unit and save for future reference General Information ...

Page 2: ...lm L Do not rub or use an eraser on the printed side of recording paper as the print may smear Copyright L This manual is copyrighted by Kyushu Matsushita Electric Co Ltd KME and its licensee Under the copyright laws this manual may not be reproduced in any form in whole or part without the prior written consent of KME and its licensee Kyushu Matsushita Electric Co Ltd 2002 Date of purchase Serial...

Page 3: ...tre when service is required Opening or removing covers may expose you to dangerous voltages or other risks Incorrect reassembly can cause electric shock when the unit is subsequently used 13 Unplug this unit from the wall outlet and refer servicing to an authorised service centre when the following conditions occur A When the power supply cord or plug is damaged or frayed B If liquid has been spi...

Page 4: ...nctive Ring 22 Help Button Help function 24 Volume Adjusting volume 25 Initial Programming Date and time your logo and fax number 26 Telephone Automatic Dialling Storing names and telephone numbers into one touch dial 30 Storing names and telephone numbers into navigator directory 31 Editing a stored entry 32 Erasing a stored entry 33 Making a phone call using one touch dial and navigator director...

Page 5: ... Asked Questions When a function does not work check here 62 Jams Recording paper jam 65 Document jams sending 67 Cleaning White plate and scanner glass 68 Document feeder rollers 69 Thermal head and roller shaft 70 General Information Printed Reports Reference lists and reports 73 Specifications Technical data about this product 74 Index Program index 76 Index 77 ...

Page 6: ...ommend that you buy a full size replacement film 120 metres for continuous use of your unit For best results use genuine Panasonic replacement film as follows L The ink film is not reusable Do not rewind and use the ink film again Power cord 1 Telephone line cord 1 Handset 1 Handset cord 1 Paper stacker 1 Paper tray 1 A4 paper guide 1 Ink film 1 Operating instructions 1 Model No Item Specification...

Page 7: ... Paper stacker The paper stacker may not be shown in all illustrations F Recording paper entrance G Paper tray H Tension plate I Document entrance J Document cover K Printer cover L Printer cover open button Rear view A Power inlet B Telephone line jack C External telephone jack D ADF Auto Document Feeder cable E Speaker L E K J I H F A B C D G A B C D E ...

Page 8: ...TION L To select print quality page 35 50 I RECEIVE MODE L To change the receiving mode J NAVIGATOR VOLUME L To adjust volume page 25 L To search for a stored name page 34 39 L To select the features or feature settings during programming page 54 L To navigate to the next operation K TONE L To change from pulse to tone temporarily during dialling when your line has rotary pulse services L FLASH L ...

Page 9: ...ntly insert the two tabs on the document cover into the slots on the unit 1 then close the document cover 2 2 Connect the ADF cable to the jack on the back of the unit L The arrow _ on the ADF cable must be facing up 1 2 Document cover Slots Tabs ADF cable Arrow _ ...

Page 10: ...on 1 Open the printer cover 2 2 Slide down the shipping lock to unlock position L The label for unlocking the shipping lock is attached to the unit Remove and read it 3 Close the printer cover by pushing down on both sides until locked Caution L Whenever transporting the unit be sure to slide up the shipping lock to lock it Printer cover Printer cover open button 1 2 Shipping lock Unlock position ...

Page 11: ...he printer cover open button 1 Open the printer cover 2 L For first time installation of the supplied ink film skip to step 5 3 For replacement only Pull out the blue gear and remove the used ink film Remove the used core 4 For installation only Remove the stopper and tag from the new ink film For replacement only Remove the stopper and tag from the new ink film Paper stacker Ejected paper Printer...

Page 12: ...film is wrapped around the blue core at least once 7 Close the printer cover by pushing down on both sides until locked Note L The ink film is safe to touch and will not rub off on your hands like carbon paper Rear ink film roll Gear of blue core Left slot Front ink film roll 1 2 Gear of blue core Ink film Slack Reverse Correct Blue core The ink film is not wrapped around the blue core Incorrect T...

Page 13: ... 2 Insert the paper tray into the slot on the back of the unit Note L Do not place the unit in an area where the paper tray may be obstructed i e by a wall etc L Recording paper will be ejected from the front of the unit Do not place anything in front of the unit To use A4 size paper Insert the bottom tab on the A4 paper guide into the lower slot Press the guide into the upper slot Pegs Paper stac...

Page 14: ...hold open while inserting the paper L The paper should not be over the tab L If the paper is not inserted correctly readjust the paper or the paper may jam To add paper 1 Pull the tension plate forward and hold open while removing all of the installed paper 2 Add paper to the stack of paper you removed and straighten 3 Fan the stack of paper 4 Pull the tension plate forward and hold open while ins...

Page 15: ...ceives faxes and phone calls on single line but different numbers Distinctive Ring page 22 General information for connections Caution L When you operate this product the power outlet should be near the product and easily accessible Note L To avoid malfunction do not position fax machine near appliances such as TVs or speakers which generate an intense magnetic field L If any other device is conne...

Page 16: ...r situation You wish to use the fax machine and your answering machine in the same room Telephone wiring image in house or office Connections Fax machine Answering machine Answering machine Not included Telephone line cord To a single telephone line jack To a power outlet 220 240 V 50 60 Hz Power cord Remove the stopper ...

Page 17: ... be disconnected and the call will be switched to the fax machine The fax machine will receive a fax automatically If the answering machine is turned off You can receive a fax with the fax machine and an extension telephone if connected With the fax machine 1 When the fax machine rings lift the handset of the fax machine 2 When document reception is required a fax calling tone slow beep is heard o...

Page 18: ...ur situation You wish to use the fax machine only for fax reception transmission Telephone wiring image in house or office Connections Fax machine Telephone line cord To a single telephone line jack To a power outlet 220 240 V 50 60 Hz Connect to LINE Power cord ...

Page 19: ...MODE until the following is displayed How to receive calls Just leave it When the other party sends a fax the fax machine will receive it automatically Note L The number of rings before a call is answered in FAX ONLY mode can be changed feature 06 on page 55 SET RECEIVE MODE FAX TEL FAX ONLY MODE ...

Page 20: ...ax machine and an extension telephone in a different room Most calls are phone calls and the fax machine is mostly used to send documents Telephone wiring image in house or office Connections Room Extension telephone Fax machine Room Telephone line cord To a single telephone line jack To a power outlet 220 240 V 50 60 Hz Connect to LINE Power cord ...

Page 21: ...ed a fax calling tone slow beep is heard or no sound is heard press FAX START L The fax machine will start reception With the extension telephone 1 When the extension telephone rings lift the handset of the extension telephone 2 When document reception is required a fax calling tone slow beep is heard or no sound is heard press 9 pre selected fax activation code firmly 3 Replace the handset L The ...

Page 22: ... number to use for fax besides the current phone number To get a new phone number you need to subscribe to Distinctive Ring service at your local telephone company L Distinctive Ring service may be called Identa Ring service The name of service depends on the telephone company Telephone wiring image in house or office Connections Room Fax machine Answering machine Room Telephone line cord To a sin...

Page 23: ...e telephone line You will gain phone numbers and each phone number has a different ring pattern To use one number for fax program the ring pattern assigned for fax in feature 32 by referring to the ring pattern table page 49 How to receive calls If the number assigned for phone calls is called the fax machine and answering machine will ring and then the answering machine will record voice message ...

Page 24: ...e time your logo and fax number QUICK SET UP PRESS SET 2 How to program the features FEATURE LIST PRESS SET 3 How to store names and telephone numbers in the directory and how to dial them DIRECTORY PRESS SET 4 Help with problems receiving faxes FAX RECEIVING PRESS SET 5 How to use the copier function COPIER PRESS SET 6 List of available reports REPORTS PRESS SET 3 Press SET PRINTING SET HELP ...

Page 25: ...ger back on press While the ringer volume is set to off When a call is received the unit will not ring and will display the following INCOMING CALL Ringer pattern You can select the ringer pattern feature 17 on page 55 The ringer pattern you selected will sound when the unit receives a call Handset receiver volume 3 levels high to low are available While using the handset press or Monitor volume 8...

Page 26: ...g 2 digits for each using the dial keypad Example August 10 2002 Press 0 8 1 0 0 2 M 08 D 10 Y 02 TIME 12 00AM 5 Enter the correct hour minute by selecting 2 digits for each using the dial keypad Press to select AM or PM Example 10 15PM 1 Press 1 0 1 5 M 08 D 10 Y 02 TIME 10 15AM 2 Press until PM is displayed M 08 D 10 Y 02 TIME 10 15PM 6 Press SET L The next feature will be displayed 7 Press MENU...

Page 27: ...NU Note L You can enter your logo by pressing or in step 4 In this case press to move the cursor see page 28 for details To change capital or lower case letters Pressing the key will change to capital or lower case alternately 1 Press 2 2 times LOGO B 2 Press 4 3 times LOGO B I 3 Press LOGO B i 4 Press 5 3 times LOGO Bi l To correct a mistake Press or to move the cursor to the incorrect character ...

Page 28: ...xt character Display order of characters Keys Characters 1 1 _ 2 A B C a b c 2 3 D E F d e f 3 4 G H I g h i 4 5 J K L j k l 5 6 M N O m n o 6 7 P Q R S p q r s 7 8 T U V t u v 8 9 W X Y Z w x y z 9 0 0 To change capital or lower case letter FLASH Hyphen button To insert a hyphen HANDSET MUTE Insert button To insert one character or one space STOP Delete button To delete a character The cursor is ...

Page 29: ...ss MENU Note L You can enter your fax number by pressing or in step 4 In this case press to move the cursor L The button replaces the digit with a and the button replaces it with a space Example 234 5678 Press 2 3 4 5 6 7 8 L To enter a hyphen in a telephone number press FLASH To correct a mistake Press or to move the cursor to the incorrect number and make the correction To delete a number Press ...

Page 30: ...e 28 for instructions Example NAME JOHN STORE PRESS SET 4 Press SET Example S01 5 Enter the telephone number up to 30 digits using the dial keypad Example S01 1114497 L If you want to enter a hyphen press FLASH 6 Press SET REGISTERED u DIRECTORY SET PRESS STATION OR b DIRECTORY SET PRESS NAVI L To program other entries repeat steps 2 to 6 7 Press STOP to exit the program Helpful hint L You can con...

Page 31: ...ET REGISTERED u NAME STORE PRESS SET L To program other entries repeat steps 3 to 6 7 Press MENU to exit the program Helpful hint L You can confirm the stored entries in the telephone number list page 73 Note L When the following is displayed in step 6 you can store only 5 more entries REGISTERED SPACE 5 DIRS L If there is no space to store new entries the following is displayed in step 6 Erase un...

Page 32: ...MENU Example NAME MARY EDIT DELETE 4 Press Example NAME MARY STORE PRESS SET L If you do not need to edit the name skip to step 6 5 Edit the name see page 28 and page 31 for instructions 6 Press SET Example NO 0123456 L If you do not need to edit the telephone number skip to step 8 7 Edit the telephone number For further details see page 31 8 Press SET REGISTERED SET MENU ...

Page 33: ... until the desired entry is displayed Example PETER 9876543 b SEND PRESS SET EDIT PRESS MENU 3 Press MENU Example NAME PETER EDIT DELETE 4 Press DELETE OK YES SET NO STOP L To cancel erasing press STOP 5 Press SET DELETED L The stored name and number are erased STOP SET MENU ...

Page 34: ...ally Using the directory 1 Press DIRECTORY 2 Press or until the desired entry is displayed Example LISA 2233445 b SEND PRESS SET EDIT PRESS MENU L If the desired name has not been stored press STOP and dial the number manually 3 Press MONITOR or lift the handset L The unit will start dialling automatically To search for a name by initial Example LISA 1 Press 2 Press or to enter the directory 3 Pre...

Page 35: ...op of the document guides Note L Do not open the document cover when sending a fax with the auto document feeder To select the resolution Select the desired resolution according to the type of document STANDARD For printed or typewritten originals with normal sized characters FINE For originals with small printing SUPER FINE For originals with very small printing This setting only works with other...

Page 36: ...number 3 Press FAX START L The document will be fed into the unit and scanned into memory The unit will then transmit the data If the document exceeds the memory capacity sending will be cancelled and this feature will be turned off automatically Transmit the entire document manually To stop transmission Press STOP Sending report for confirmation This report will provide you with a printed record ...

Page 37: ...document cover 4 If necessary press RESOLUTION repeatedly to select the desired resolution page 35 5 Dial the fax number Example TEL 5678901 6 Press FAX START PUT DOC ON GLASS PRESS START L Confirm that the document is placed correctly on the scanner glass 7 Press FAX START Example PAGES 01 01 STANDARD u NEXT DOCUMENT PRESS START b NEXT DOCUMENT OR WAIT TO SEND L To send a single page wait for the...

Page 38: ...or correction fluid has dried completely L Do not send the following types of documents Use copies for fax transmission Paper with a faint image Paper with printing on the opposite side that can be seen through the other side i e newspaper L To transmit the document with a width of less than standard A4 size 210 mm we recommend transmitting the document using the scanner glass Minimum size Maximum...

Page 39: ...d the unit grasps the document STANDARD 3 If necessary press RESOLUTION repeatedly to select the desired resolution page 35 4 Enter the fax number Using stations 1 3 Press the desired station key Using stations 4 6 Press LOWER then press the desired station key Using navigator directory Press or then press or to display the desired entry and press SET L If the desired name has not been stored in n...

Page 40: ...ning all pages wait for the fax machine to start sending Fax auto redial If the line is busy or if there is no answer the unit will automatically redial the number up to 5 times L This feature is also available for delayed transmission feature 25 on page 56 L During redial the following will be displayed WAITING REDIAL L To cancel redialling press STOP If your unit does not send a fax L Confirm th...

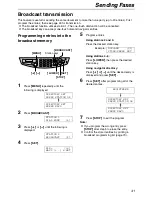
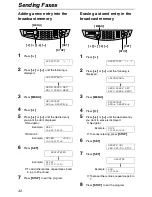
Page 41: ...STATION 1 DIAL MODE 3 Press or until the following is displayed STATION 1 BROADCAST 4 Press SET DIR 00 NAVI SET 5 Program entries Using stations 2 and 3 Press the desired station key Example DIR ANN 01 STORE PRESS SET Using stations 4 6 Press LOWER then press the desired station key Using navigator directory Press or until the desired entry is displayed and press SET 6 Press SET after programming ...

Page 42: ... To add other entries repeat steps 5 and 6 up to 20 entries 7 Press STOP to exit the program Erasing a stored entry in the broadcast memory 1 Press DIRECTORY 2 Press or until the following is displayed BROADCAST b SEND PRESS SET EDIT PRESS MENU 3 Press MENU BROADCAST ADD DELETE 4 Press 5 Press or until the desired entry you want to erase is displayed L Navigator Example DICK 13281432968 L To cance...

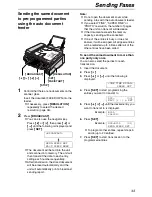
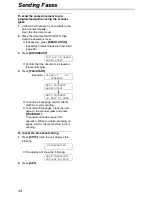
Page 43: ...ith the auto document feeder L If you select FINE SUPER FINE or PHOTO resolution the number of pages that the unit can transmit will decrease L If the document exceeds the memory capacity sending will be cancelled L If one of the entries is busy or does not answer it will be skipped All skipped entries will be redialled up to 5 times after all of the other entries have been called To send the same...

Page 44: ... document is placed on the scanner glass 4 Press FAX START Example PAGES 01 01 STANDARD u NEXT DOCUMENT PRESS START b NEXT DOCUMENT OR WAIT TO SEND L To send a single page wait for the fax machine to start sending L To send multiple pages place the next page on the scanner glass and press FAX START To send more pages repeat this operation When you finish scanning all pages wait for the fax machine...

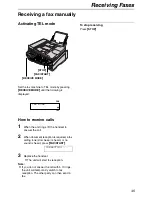
Page 45: ... handset to answer the call 2 When document reception is required a fax calling tone slow beep is heard or no sound is heard press FAX START CONNECTING 3 Replace the handset L The unit will start fax reception Note L If you do not answer the call within 10 rings the unit will temporarily switch to fax reception The other party can then send a fax To stop receiving Press STOP STOP FAX START RECEIVE...

Page 46: ...ng RECEIVE MODE until the following is displayed How to receive calls Just leave it When receiving calls the unit will automatically answer all calls and only receive fax documents L The number of rings before a call is answered in FAX ONLY mode can be changed feature 06 on page 55 RECEIVE MODE SET FAX TEL FAX ONLY MODE ...

Page 47: ...r compatible machine Therefore you pay for the call Make sure that no documents are fed into your unit and that the other party s machine is ready for your call 1 Press MENU repeatedly until the following is displayed POLLING PRESS SET 2 Press SET FAX 3 Dial the fax number 4 Press SET CONNECTING L The unit will start fax reception MENU SET ...

Page 48: ...ed for a fax the fax machine will automatically start fax reception This service is convenient if you wish to have a different number for fax in a single telephone line To use this service you must subscribe to the Distinctive Ring service of your local telephone company Activating the Distinctive Ring feature 1 Press MENU SYSTEM SET UP PRESS NAVI 2 Press then 3 1 DISTINCTIVE RING OFF 3 Press or t...

Page 49: ...MENU SYSTEM SET UP PRESS NAVI 2 Press then 3 2 FAX RING PATTERN RING B D 3 Press or to select the ring pattern assigned for fax A Standard ring one long ring B Double ring two short rings C Triple ring short long short rings D Other triple ring short short long rings B D default setting For the ring pattern of B C and D 4 Press SET 5 Press MENU Telephone number Ring pattern Use 012 1234 Standard r...

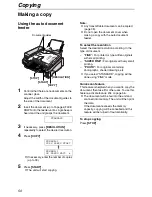
Page 50: ...cover when making a copy with the auto document feeder To select the resolution Select the desired resolution according to the type of document FINE For printed or typewritten originals with small printing SUPER FINE For originals with very small printing PHOTO For originals containing photographs shaded drawings etc L If you select STANDARD copying will be done using FINE mode Quick scan feature ...

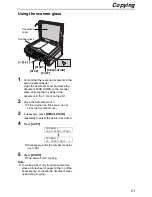
Page 51: ... a thick book do not close the document cover 3 If necessary press RESOLUTION repeatedly to select the desired resolution 4 Press COPY NUMBER 1 COPY PRESS START b NUMBER 1 OR PRESS NAVI L If necessary enter the number of copies up to 99 5 Press START L The unit will start copying Note L To make a clear copy from transparencies place a blank sheet of paper on the top of the transparency and leave t...

Page 52: ... select 92 86 or 72 then press START L See the following table for the recommended reduction rates Letter 216 mm 279 mm Legal 216 mm 356 mm A4 210 mm 297 mm L Legal sized document is available only when using the auto document feeder Example 72 reduced copy Note L If the appropriate reduction rate is not selected the document may be divided and the top of the second sheet will be deleted L If the ...

Page 53: ...S 01 01 FINE u NEXT DOCUMENT PRESS START b NEXT DOCUMENT OR WAIT TO COPY L To copy a single page wait for the fax machine to start copying L To copy multiple pages place the next page on the scanner glass and press START To copy more pages repeat this operation When you finish scanning all pages wait for the fax machine to start copying Example Making 2 copies of a 4 page original document Note L ...

Page 54: ...SET 3 Press or until the desired feature is displayed L The current setting of the feature will be displayed 3 Press or until the desired setting is displayed L This step may be slightly different depending on the feature 4 Press SET L The setting you selected is set and the next feature will be displayed 5 To exit programming press MENU Programming by entering the program code number directly You...

Page 55: ...ult 2 3 4 and 5 EXT TAM If you are using the unit with an answering machine set to 5 EXT TAM Code 12 Securing the remote operation for the answering machine REMOTE TAM ACT OFF If you are using the unit with an answering machine activate this feature and program the remote activation ID to secure the remote operation for the answering machine 1 Follow steps 1 and 2 on page 54 2 Press or to select O...

Page 56: ...ng hours offered by your telephone company This feature can be set up to 24 hours in advance of the desired time To send a document 1 Insert the document into the auto document feeder 2 Follow steps 1 and 2 on page 54 3 Press or to select ON 4 Press SET 5 Enter the fax number 6 Press SET 7 Enter the transmission start time L Press to select AM or PM 8 Press SET 9 Press MENU L To cancel after progr...

Page 57: ... problem and make sure the unit is supplied with enough paper to print the stored document The beeps will stop ON default You will hear a beeping sound OFF Deactivates this feature Code 46 Setting the friendly reception FRIENDLY RCV ON To receive a fax automatically when you answer a call and hear a fax calling tone slow beep ON default You do not have to press FAX START for fax reception OFF You ...

Page 58: ...tinues the other party s machine may not be a facsimile or may have run out of paper Check with the other party L The connecting tone volume cannot be adjusted ON default You will hear connecting tones OFF Deactivates this feature Code 80 Resetting advanced features to their default settings SET DEFAULT RESET NO To reset the advanced features 1 Press MENU 2 Press then 8 0 3 Press or to select YES ...

Page 59: ...R NOT YOUR UNIT Code 54 59 70 L A transmission or reception error occurred because of a problem with the other party s fax machine Check with the other party MEMORY FULL L The document was not received as a result of the memory being full NO DOCUMENT L The document was not fed into the unit properly Reinsert the document and try again OTHER FAX NOT RESPOND L The other party s fax machine is busy o...

Page 60: ... of paper Install paper and press SET to clear the message L The recording paper was not fed into the unit properly page 66 Reinstall paper page 14 and press SET to clear the message L The recording paper has jammed near the recording paper entrance Clear the jammed paper page 65 and press SET to clear the message Do not install folded or heavily curled paper CLOSE ADF COVER L The ADF cover is ope...

Page 61: ...The ink film is slack Tighten it page 12 L The fax machine is positioned near appliances such as TVs or speakers which generate an intense magnetic field PAPER JAMMED L A recording paper jam occurred Clear the jammed paper page 65 PLEASE WAIT L The unit is checking that there is no slack on the ink film Wait for a moment while the check is completed POLLING ERROR L The other party s fax machine do...

Page 62: ... mode is set Tell the other party the number is only used for faxes L Change to TEL mode by pressing RECEIVE MODE L If you use a Distinctive Ring service make sure you have set the same ring pattern assigned by the telephone company page 48 The receiving mode does not function properly L A Distinctive Ring of feature 31 is set page 48 The REDIAL PAUSE button does not function properly L If this bu...

Page 63: ...ll is not a fax Change the receiving mode to TEL mode by pressing RECEIVE MODE A blank sheet is ejected L If a blank sheet is ejected after the received document is printed out the receiving reduction rate is not programmed correctly Program the proper rate in feature 36 page 57 L The other party placed the document in their fax machine the wrong way Check with the other party A white line or a sm...

Page 64: ...the answering machine to 1 or 2 I cannot retrieve recorded voice messages on the answering machine from a remote location L You did not program your remote access code into your fax machine correctly Program the same code that is programmed on the answering machine on the fax machine with feature 12 page 55 I pressed the remote access code to access the answering machine remotely but the line was ...

Page 65: ... cover open button 1 Open the printer cover 2 3 Remove the jammed paper carefully by pulling it toward you When the recording paper has jammed under the roller When the recording paper has jammed and wrapped around the roller When the recording paper has jammed near the exit guide Paper stacker Ejected paper Printer cover Printer cover open button 1 2 Jammed paper Roller Jammed paper Roller Jammed...

Page 66: ...ate forward and hold open while inserting the paper When the recording paper was not fed into the unit properly The display will show the following CHECK PAPER Remove the recording paper and straighten Pull the tension plate forward and hold open while inserting paper Press SET to clear the message Gear of blue core Ink film Slack Reverse Correct Blue core The ink film is not wrapped around the bl...

Page 67: ... carefully L Do not pull out the jammed document forcibly before lifting the ADF cover L If you cannot remove the jammed document open the document cover remove the document then close the document cover 2 Close the ADF cover Jammed document ADF cover Document cover Jammed document ADF cover ...

Page 68: ...nt cover Clean the white plate and scanner glass with a soft and dry cloth 2 Close the document cover Attaching the white sheet to the document cover If the white sheet is detached from the document cover when cleaning place the white sheet on the scanner glass with fastener facing up alligning the top edge of the white sheet to the T mark on the unit and close the document cover White plate Docum...

Page 69: ...isfeeding of your original occurs frequently clean the document feeder rollers 1 Lift and hold open the ADF cover 2 Clean the document feeder rollers with a soft and dry cloth 3 Close the ADF cover ADF cover Document feeder rollers ADF cover ...

Page 70: ... cord 3 Press down the printer cover open button 1 Open the printer cover 2 4 Remove the ink film and clean the thermal head with a cloth moistened with isopropyl rubbing alcohol and let it dry thoroughly Replace the ink film Caution L To prevent a malfunction due to static electricity do not use a dry cloth and do not touch the thermal head directly 5 Turn the gear of blue core in the direction o...

Page 71: ...to unlock the two locks 2 and open the exit guide 3 7 Clean the roller shaft with a cloth moistened with isopropyl rubbing alcohol and let it dry thoroughly Slack Reverse Correct Blue core The ink film is not wrapped around the blue core Incorrect Tight 1 turn 2 1 2 2 1 1 3 Exit guide Lock Exit guide Lock Exit guide Roller shaft ...

Page 72: ...ing 72 8 Close the exit guide 9 Close the printer cover by pushing down on both sides until locked 10Connect the power cord and the telephone line cord Exit guide Printer cover Power cord Telephone line cord ...

Page 73: ...ture 22 on page 56 Printer test list allows you to check the print quality of your unit If the test print has a smudge or blurred points or lines clean the thermal head page 70 Broadcast programming list provides you with entries which are stored in the broadcast feature page 41 1 Press PRINT REPORT OR Press MENU repeatedly until the following is displayed PRINT REPORT PRESS NAVI 2 Press or until ...

Page 74: ...solution 15 4 lines mm in super fine resolution Photo resolution 64 level Scanner type Contact Image Sensor Printer type Thermal Transfer on plain paper Data compression system Modified Huffman MH Modified READ MR Modified Modified Read MMR Modem speed 14 400 12 000 9 600 7 200 4 800 2 400 bps Automatic Fallback Operating environment 5 C 35 C 20 80 RH Relative Humidity Dimensions Approx height 210...

Page 75: ...ing the other side of the paper if you are not happy with the print quality or if misfeeding occurs L For proper feeding and best print quality we recommend using long grained paper L Do not use paper of different types or thickness at the same time This may cause a paper jam L Avoid double sided printing L Do not use paper printed from this unit for double sided printing with other copiers or pri...

Page 76: ... size 55 17 Ringer pattern 25 55 Advanced features 22 Journal report 36 56 23 Overseas mode 56 25 Delayed transmission 56 31 Distinctive Ring 48 32 Ring pattern 49 34 Quick scan 56 36 Receiving reduction 57 39 Display contrast 57 41 Remote fax activation code 57 44 Fax receiving alert 57 46 Friendly reception 57 58 Original mode 57 68 ECM selection 57 76 Connecting tone 58 80 Reset advanced featur...

Page 77: ...41 57 Fax auto redial 40 Fax number Feature 03 29 55 Fax receiving 45 Friendly reception Feature 46 57 H Help 24 I Ink film 11 J Jams Document 67 Paper 65 66 Journal report Feature 22 36 56 L Logo Feature 02 27 55 N Navigator directory Making a phone call 34 Selecting characters 28 Sending faxes 39 Storing 31 O One touch dial Sending faxes 39 Storing 30 Original mode Feature 58 57 Overseas mode Fe...

Page 78: ...nding Broadcast 43 From memory 36 Manually 35 Navigator directory 39 One touch dial 39 Sending report Feature 04 36 55 Set default Feature 80 58 Shipping lock 10 Storing Broadcast 41 Navigator directory 31 One touch dial 30 V Volume 25 ...

Page 79: ...79 ...
Page 80: ...PFQX1757ZA CM0602YH0 Kyushu Matsushita Electric Co Ltd 1 62 4 chome Minoshima Hakata ku Fukuoka 812 8531 Japan ...

Reviews: