background image

19

Installing 

KX-DT301/KX-NT303

1. Open the cover.

2. Plug the flat cable into the 

connector as shown.

3. Close the cover.

4. Connect the USB cable to 

the USB port.

Ensure that the USB cable goes 

through the cable guide.

Please use a USB cable shorter 

than 3 m.

KX-DT301

The USB Module can be connected between the DPT and the 

personal computer through USB interface to implement personal 

CTI (Computer Telephony Integration).

Connect to a PC

Installing 

KX-DT301/KX-NT303

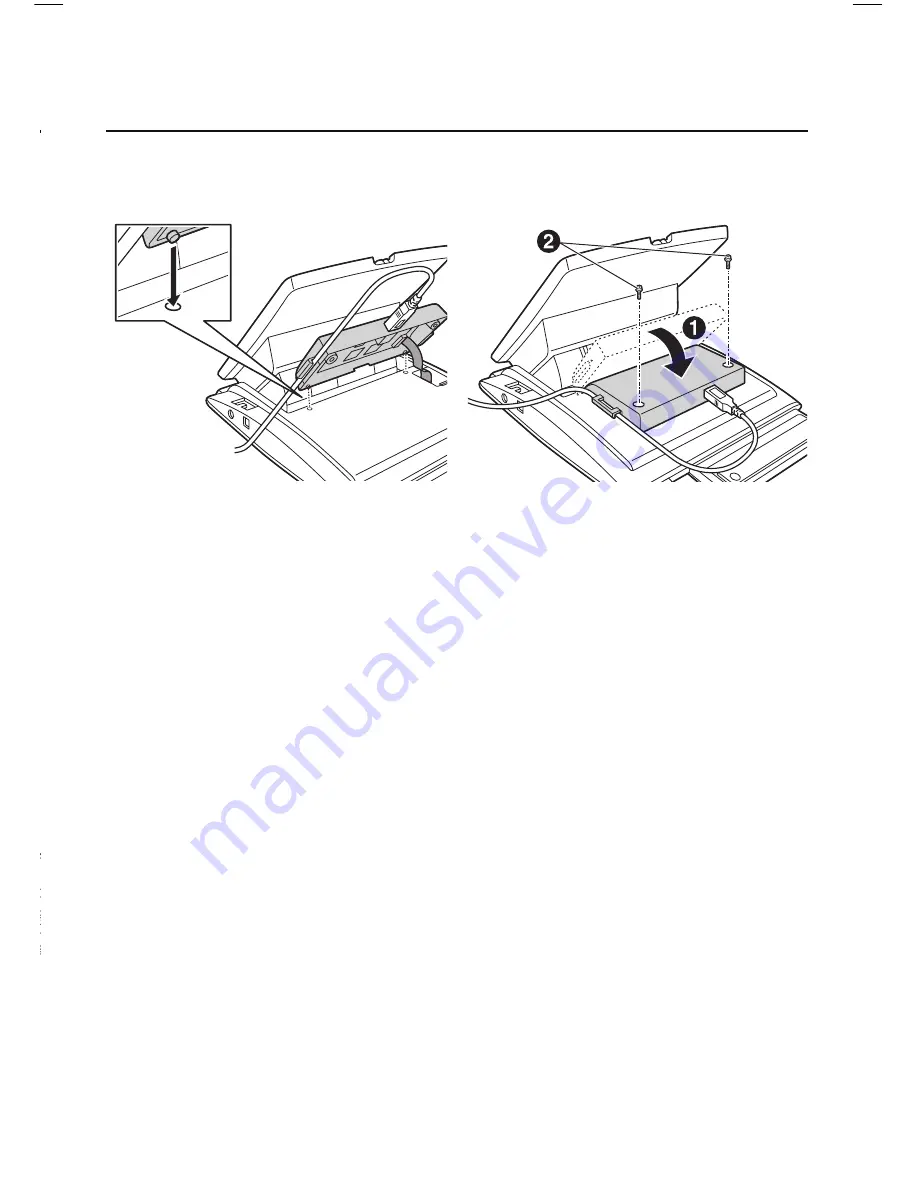
5. Insert the protrusions on the 

KX-DT301 into the 2 holes in 

the unit.

6. Attach the KX-DT301 to your 

unit with the screws (included 

with KX-DT301).

7. Install the USB driver. Refer 

to Installation Manual on the 

CD-ROM included with 

KX-DT301.

LTD KT-DT300 Q_R_Guide_EN_FA.indd   19

7/14/09   8:51:08 AM

Summary of Contents for KX-DT 343 Series

Page 1: ...Digital Proprietary Telephones Quick Quick Refer Reference Guid Guide M O D E L S M O D E L S K X D T 3 4 3 K X D T 3 4 3 K X D T 3 4 3 K X D T 3 4 6 K X D T 3 4 6 K X D T 3 4 6 ...

Page 2: ... any abrasive powder to clean the cabinet Wipe it with a soft cloth Do not use any handset other than a Panasonic handset Do not disassemble this product Dangerous electrical shock could result The unit must only be disassembled and repaired by qualified service technicians When a failure occurs which exposes any internal parts disconnect the telephone line cord immediately and return this unit to...

Page 3: ...Installing the KX DT301 KX NT303 17 Thank you for purchasing a Panasonic Digital Proprietary Telephone DPT Please read this manual carefully before using this product and save this manual for future use For more details please refer to the manuals of the PBX Note In this manual the suffix of each model number is omitted unless necessary Accessories included 1 This telephone comes with the wall mou...

Page 4: ...DP this optional device cannot be used Trademark The Bluetooth word mark and logos are owned by the Bluetooth SIG Inc and any use of such marks by Panasonic Corporation is under licence KX DT343 KX DT346 Features Display 3 Line 6 Line Flexible Buttons 24 24 LCD Backlight Options KX NT303 Add on 12 Key Module KX NT307 PSLP1528 Bluetooth Module 1 2 3 KX DT301 USB Module 3 KX DT390 DSS Console with 6...

Page 5: ... Dialing To store To dial CO C Tone extension no CO outside phone no REDIAL quick dialing no CO desired no max 32 digits Enter outside line access number before outside phone number STORE AUTO DIAL PAUSE PAUSE assigned as a One touch Dialing button One touch Dialing personal speed dialing no 2 digits desired phone no max 32 digits Enter outside line access number before outside phone number C Tone...

Page 6: ...arty Conversation To add other parties during a conversation i e conference To leave a conference STORE AUTO DIAL system speed dialing no 3 digits doorphone no 2 digits C Tone C Tone HOLD CO INTERCOM CO C Tone outside phone no To an extension To an outside party extension no CO TRANSFER desired phone no Talk to the new party Talk with multiple parties C Tone C Tone CONF CONF C Tone CONF Yo O I E S...

Page 7: ...el or exit press or To enter characters refer to Entering Characters Press ENTER While on hook Press Up or Down until desired item appears Press Left or Right until desired log directory appears Off hook CANCEL EXIT Press CLEAR CLEAR While confirming the log information Press Up or Down until desired item appears Press STORE or ENTER AUTO DIAL STORE Enter name max 20 characters name OR Press STORE...

Page 8: ...ckground Music Paging To enter characters refer to Entering Characters For further information refer to the Business Telephone System User Manual While on hook Enter phone number max 32 digits Enter name max 20 characters name phone no Press STORE or ENTER AUTO DIAL STORE OR Press STORE or ENTER AUTO DIAL STORE OR Press EXIT or PAUSE OR PAUSE EXIT Press Right four times Press Up or Down until desi...

Page 9: ...Q R S p q r s 7 U V t 8 u v X Y Z w x y z 9 0 0 Table 1 Standard mode Times Buttons Times Buttons 1 2 3 4 5 6 7 8 9 A D G J M P T W ä B C a b c À E F d e f Ð H I g h i Ì K L j k l 5 N O m n Ñ o Q R S p q r s U V t u v X Y Z w x y z ý 9 0 ö 1 ü 10 11 12 13 14 15 Á Â Ã Ä Å Æ Ç 2 È É Ê Ë 3 Í Î Ï 4 Ò Ó Ô Õ Ö Ø Œ 6 ß 7 Ù Ú Û Ü 8 Table 2 Option mode space 1 2 3 4 5 6 7 8 9 0 ...

Page 10: ...of call waiting for intercom calls do you prefer Call Waiting Selection 3 1 0 1 2 No call CW Tone Off Tone CW Tone On Voice announcement through the built in speaker OHCA Announce 3 Voice announcement through the handset Whisper OHCA Do you prefer to receive call waiting for outside calls 3 0 0 No No Tone CW Tone Off 1 Yes Tone CW Tone On Which type of call waiting tone do you prefer Call Waiting ...

Page 11: ...x 10 digits same PIN ENTER STORE same PIN ENTER STORE extension PIN max 10 digits stored extension PIN new PIN max 10 digits Would you like to prevent others from seeing your personal directory and call log Directory and Call Log Lock 9 for both calls for intercom calls 5 2 5 1 for outside calls 5 0 OR FWD DND If nothing is entered for one minute in the programming mode the telephone returns to no...

Page 12: ... your extension R CONF Conference Used to establish a multiple party conversation T INTERCOM Used to make or receive intercom calls Y AUTO ANS Auto Answer MUTE Used to receive an incoming call in hands free mode or mute the microphone handset during a conversation U AUTO DIAL STORE Used for System Personal Speed Dialing or storing programme changes y o t q w U I O Q T Y W R P p e r KX DT346 i E u ...

Page 13: ...ER Used to assign the selected item r Microphone Used for hands free conversations t Navigator Key Used to adjust the volume and the display contrast or select desired items y CANCEL Used to cancel the selected item u Flexible Buttons Used to seize an outside line or perform a feature that has been assigned to the key i LCD Panel Can be adjusted to the desired angle o Soft Buttons S1 S4 S1 S4 loca...

Page 14: ...conversation Press Up to increase or Down to decrease the volume Handset Headset volume 1 While using the handset or headset Ringer volume While on hook or receiving a call LCD Contrast While on hook Ring Tone LCD Backlight While on hook PAUSE PAUSE OR Press 2 times OR CO OR PAUSE STORE INTERCOM AUTO DIAL PAUSE Automatic Always ON Always OFF PAUSE PAUSE OR STORE AUTO DIAL OR STORE AUTO DIAL ...

Page 15: ... to the connector When connecting cords Ensure the cords are inserted in the grooves and are clamped to prevent damage to the connectors Back view Headset Recommended RP TCA86 RP TCA91 RP TCA92 Clamp Connect to a PBX Connect to a digital proprietary telephone Digital XDP connection a single line telephone XDP or parallel connection The telephone line cord included e the ease ease E USE c N FF ...

Page 16: ...n the wall mounting adaptor to confirm that the cords are not being pinched 4 Drive the 2 screws included into the wall either 83 mm or 100 mm apart and mount the unit on the wall Slide the wall mounting adaptor up to this point 83 mm 100 mm Washer Drive the screw to this point Make sure that the wall that the unit will be attached to is strong enough to support the unit approx 1 65 kg 3 64 lb Mak...

Page 17: ...amage to the telephone be sure to unplug the extension line before you set up or remove the KX DT301 USB Module or the KX NT303 Add on 12 Key Module Connect the KX NT303 first when installing both the KX DT301 and the KX NT303 KX NT303 The Add on 12 Key Module allows 12 additional flexible buttons to be added to this unit These buttons are used to seize an outside line make a call using One touch ...

Page 18: ...t the USB cable to the USB port Ensure that the USB cable goes through the cable guide Please use a USB cable shorter than 3 m KX DT301 The USB Module can be connected between the DPT and the personal computer through USB interface to implement personal CTI Computer Telephony Integration Connect to a PC 5 In K th 7 In to C K ...

Page 19: ... KX NT303 5 Insert the protrusions on the KX DT301 into the 2 holes in the unit 6 Attach the KX DT301 to your unit with the screws included with KX DT301 7 Install the USB driver Refer to Installation Manual on the CD ROM included with KX DT301 ...

Page 20: ...Panasonic Canada Inc 5770 Ambler Drive Mississauga ON L4W 2T3 www panasonic ca 04 09 PSQX46842A KK1208YHO ...

Reviews: