background image

3.

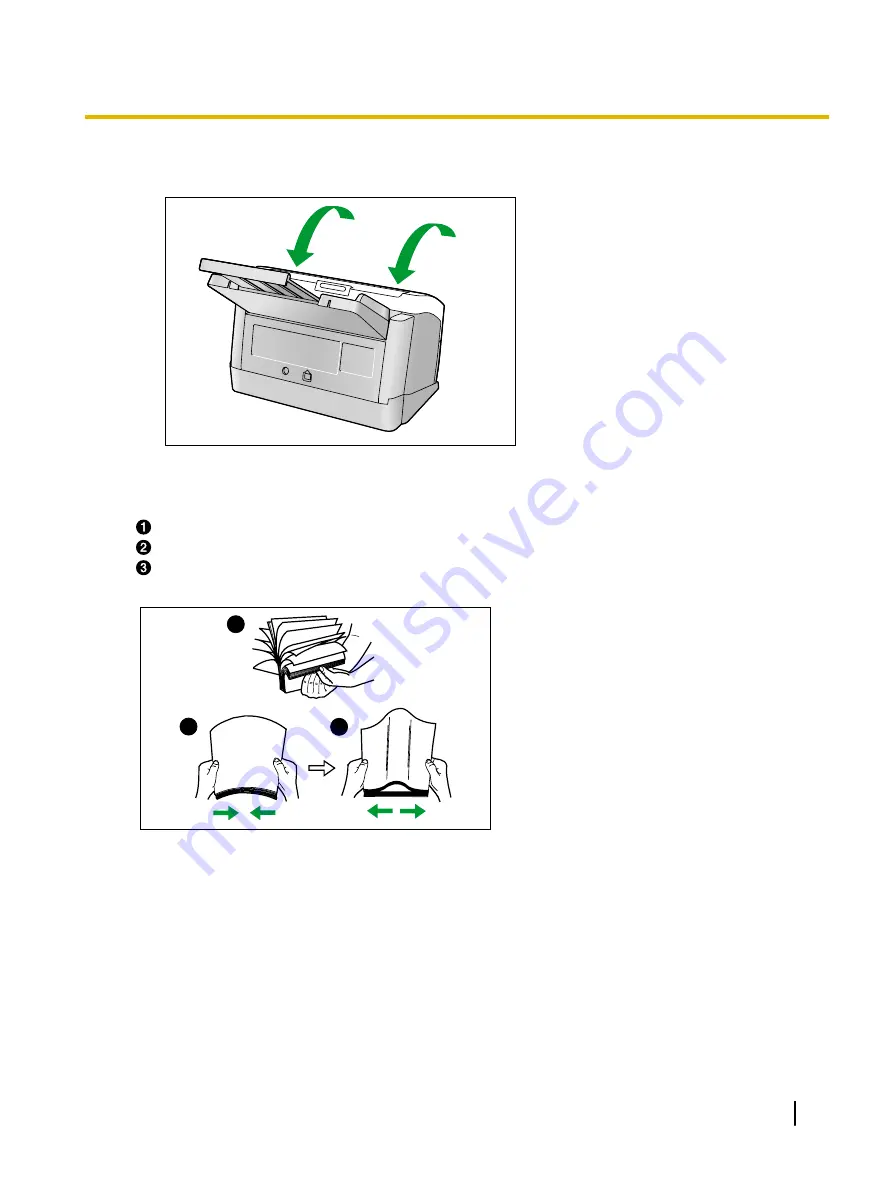
Close the ADF door.

Push both sides of the ADF door down slowly until it clicks into place.

4.

Fan the documents.

Documents that have been stapled together or stacked together (as in a file folder) will need to be
separated.
Fan the stack of documents to separate all the edges.
Hold both ends and bend the documents as shown in the illustration.
To flatten the documents, hold firmly and pull them apart as shown in the illustration.

1

2

3

Repeat these steps as necessary.

Operating Manual

19

Operation

Summary of Contents for KV-S1065C

Page 1: ...these instructions please read the installation manual enclosed with this unit Please carefully read these instructions and the enclosed Installation manual Keep all documentation in a safe place for...

Page 2: ...are available on the ISIS driver screen and on the TWAIN driver screen by clicking the help button that appears on each of the software s operation screens You can view explanations about the settings...

Page 3: ...untries IBM is a trademark of International Business Machines Corporation in the United States other countries or both Intel and Intel Core are trademarks of Intel Corporation in the U S and other cou...

Page 4: ...er jams from the feeding section 22 Mixed Batch Card Guide 24 Installing the mixed batch card guide 24 Using the mixed batch card guide 24 Using Control Sheets 25 About Printing Control Sheets 26 Clea...

Page 5: ...CD ROM Roller Cleaning Paper sold separately Keep the roller cleaning paper out of reach of small children Do not store the roller cleaning paper in direct sunlight or in a place with a temperature o...

Page 6: ...iable instruments This list is not inclusive and no liability is assumed for either its completeness or accuracy In case of doubt contact your legal counsel Notice Install your machine near a supervis...

Page 7: ...anel and LED Indicators page 9 Security slot Use a commercially available security cable LED Red LED Green Shows the scanner s status For details see Control Panel and LED Indicators page 9 Feed tray...

Page 8: ...Rear 5 4 3 6 1 2 Mixed batch card guide Power connector AC adaptor Power cord Plugs may vary in shape depending on country area USB cable USB connector 8 Operating Manual Location of Controls...

Page 9: ...tinue after the dog eared document is scanned and ejected Start Stop key Start Stop If you set Wait Key for Manual Feed Mode 1 in your application software pushing this key starts scanning During scan...

Page 10: ...OFF Blink 2 times consecutively Double feed detected error OFF Blink 3 times consecutively Dog ear detected error ON OFF Error 1 If no operation is performed for 30 minutes or longer the scanner will...

Page 11: ...Press the power key A of the scanner to ON 1 The LED Green will blink and then it will become steady To turn OFF the scanner power press and hold the power key for one second or more Operating Manual...

Page 12: ...ners and Cameras Properties and then display the scanner property dialog box by clicking Properties button In Windows 7 select your scanner in Devices and Printers and then display the Scan properties...

Page 13: ...nts check box to on 6 Click OK Note When multiple applications are selected in the Send to this application list the Choose Application dialog box will display prompting you to select an application i...

Page 14: ...he feed speed can be set to Slow in the TWAIN driver the ISIS driver or in Image Capture Plus For details refer to the help of each piece of software Recommended paper Plain paper Acceptable cards ISO...

Page 15: ...ents Extremely smooth shiny paper or paper that is highly textured Carbonless copy paper Transparent or partially transparent documents such as OHP sheet and tracing paper Photographs 1 1 Photographs...

Page 16: ...each piece of software When scanning a document using manual scanning feed the document 1 page at a time If paper jams occur at the exit slot remove the exit guides and then scan the documents For de...

Page 17: ...set the document flat before scanning When scanning important documents confirm that the number of scanned images matches the number of pages in the document Also check the condition of scanned docum...

Page 18: ...he arrow 1 Notice When scanning a document manually Manual feed the document 1 page at a time When scanning important documents or bound documents feed them manually Manual When scanning a document ma...

Page 19: ...gether or stacked together as in a file folder will need to be separated Fan the stack of documents to separate all the edges Hold both ends and bend the documents as shown in the illustration To flat...

Page 20: ...es A slightly larger than the actual size of the documents 1 6 Carefully align the documents The documents feed better when the leading edges are aligned slantwise as shown in the illustration 1 2 20...

Page 21: ...The height of all the documents on the tray should be less than 7 5 mm 0 3 in Exceeding this height might cause paper jams or skewing 8 Adjust the document guides A to the size of the documents to be...

Page 22: ...g to the following instructions Removing paper jams from the feeding section 1 Remove all documents from the feed tray 2 Press the door open button A and open the ADF door B 1 2 3 Remove the jammed do...

Page 23: ...ument is jammed in the exit area pull it forward as shown in the illustration 4 Close the ADF door Push both sides of the ADF door down slowly until it clicks into place Operating Manual 23 Care and M...

Page 24: ...batch card guide respectively The card set on the mixed batch card guide is fed after completing the paper document scanning The mixed batch card guide is suitable for the following card ISO format ca...

Page 25: ...from the provided CD ROM B S i m p l e x A Documents Control sheet Code Documents Control sheet functions Simplex Duplex Binary 256 level gray Color Dynamic Threshold Dither Error diffusion Function 1...

Page 26: ...ts Note In order to print control sheets Adobe Reader must been installed on your computer Refer to the instruction manual for your printer for details about changing print settings 1 Insert the CD RO...

Page 27: ...eaners containing abrasives or surfactants for cleaning the outside of the scanner Clean the scanner at least once a month 1 Press and hold the power key for one second or more to turn off the scanner...

Page 28: ...take out the roller cleaning paper A Notice Keep the roller cleaning paper out of reach of small children Do not store the roller cleaning paper in direct sunlight or in a place with temperature over...

Page 29: ...ess and hold the power key for one second or more to turn off the scanner power 2 Press the door open button A and open the ADF door B 2 1 3 Open the paper feed roller cover green A 1 Operating Manual...

Page 30: ...d the roller to prevent it from rotating Wipe the roller from one end to the other in the direction indicated by the arrow all the way around as shown in the illustration 5 Close the paper feed roller...

Page 31: ...ection of the arrow all the way around them as shown in the illustration 7 Use the roller cleaning paper to clean the surface of the conveyor rollers A and exit rollers B Wipe the rollers from one end...

Page 32: ...llustration 1 9 Close the ADF door Push both sides of the ADF door down slowly until it clicks into place 10 Reset the roller cleaning counter in User Utility to 0 Turn ON the scanner power Start User...

Page 33: ...he scanning glass reference area or double feed detectors 1 Press and hold the power key for one second or more to turn off the scanner power 2 Press the door open button A and open the ADF door B 2 1...

Page 34: ...4 Remove dust on the double feed detectors A with a cotton swab 1 5 Close the ADF door Push both sides of the ADF door down slowly until it clicks into place 34 Operating Manual Care and Maintenance...

Page 35: ...nt parts or optional units please contact your dealer The double feed prevention roller and the paper feed roller are consumables Please purchase the Roller exchange kit KV SS058 and replace each roll...

Page 36: ...t KV SS058 and replace the double feed prevention roller and paper feed roller Replacing the Rollers 1 Press and hold the power key for one second or more to turn off the scanner power 2 Press the doo...

Page 37: ...ew double feed prevention roller in the optional Roller exchange kit KV SS058 6 Install the new double feed prevention roller into the metal holder with the longer groove facing to the right side rear...

Page 38: ...ntion roller cover green A firmly 1 Notice Be sure to close the double feed prevention roller cover until it clicks into place 8 Open the paper feed roller cover green A 1 38 Operating Manual Replacem...

Page 39: ...ed roller A 1 10 Take out the new paper feed roller in the optional Roller exchange kit KV SS058 11 Install the new paper feed roller with the gear on the left side Operating Manual 39 Replacement Par...

Page 40: ...rotate in the feeding direction 13 Close the ADF door Push both sides of the ADF door down slowly until it clicks into place 14 Reset the roller replacing counter in User Utility to 0 Turn ON the sca...

Page 41: ...Manual The USB interface of the computer is not installed correctly Check the computer whether the USB interface of your computer is installed correctly using the device manager s property The scanner...

Page 42: ...nction is enabled though the scanning method is set to manual Disable the double feed detection function The document is not aligned correctly Realign the document page 19 The document set on the feed...

Page 43: ...the scanned documents The scanning glass is dirty Clean the scanning glass page 33 There is noise or wave patterns moire pattern on the scanned image The scanning resolution settings combined with pa...

Page 44: ...cking materials The scanner should be handled in the correct horizontal position Required Materials Original scanner carton and packing materials Shipping tape and scissors 1 Press and hold the power...

Page 45: ...up and set it on its back side A and then remove the exit guides A A Note Attach the exit guides A in the following manner Tilt the scanner up and set it on its back side A and then attach the exit gu...

Page 46: ...exit guides with the rounded area facing downwards as shown D A D B C A A 5 Put the USB cable CD ROM feed tray exit guides power cord and mixed batch card guide into the accessory box 46 Operating Man...

Page 47: ...6 Pack the scanner 1 2 4 5 6 7 8 3 Installation Manual AC adaptor Power cord USB cable Drivers Utilities Manuals CD ROM Exit guides Feed tray Mixed batch card guide Operating Manual 47 Appendix...

Page 48: ...mplex Letter 45 pages min A4 45 pages min Duplex Letter 90 images min A4 90 images min Resolution 100 600 dpi 1 dpi step Optical 300 dpi 600 dpi Automatic switch Tonal gradation Binary Grayscale Color...

Page 49: ...or less While the AC adaptor is connected to the AC outlet Operating Environment Temperature 15 30 C 59 86 F Humidity 20 80 RH Storage Environment Temperature 0 40 C 32 104 F Humidity 10 80 RH 1 The s...

Page 50: ...ay 7 47 Feed tray capacity 49 I Image control 48 Installation Manual 47 L LED 9 LED Green 7 9 LED Red 7 9 Life 49 M Maintenance 49 Manual feed selector 7 18 Mixed batch card guide 8 47 O Operating Env...

Page 51: ...W Weight 49 Operating Manual 51 Index...

Page 52: ...DD1111NU1052 Panasonic System Networks Co Ltd 2011 Web Site http www panasonic net...

Reviews: