background image

12

VQT3Y41

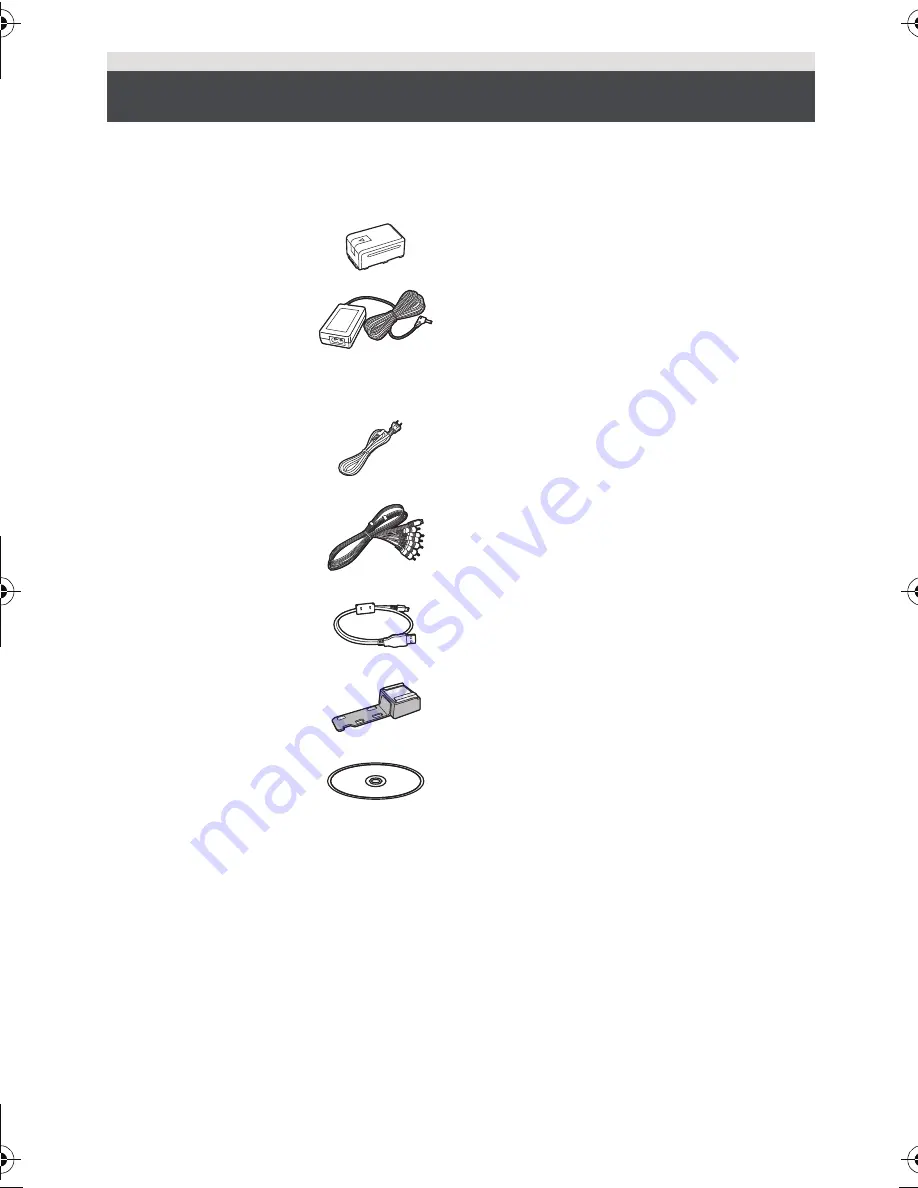
Check the accessories before using this unit.
Keep the accessories out of reach of children to prevent swallowing.
Product numbers correct as of Dec. 2011. These may be subject to change.

Accessories

Battery pack

VW-VBK180

AC adaptor

(P/PC)
VSK0780

(PU)
VSK0781

AC cable

K2CA2CA00025

AV multi cable

K1HY12YY0016

USB cable

K2KYYYY00201

Shoe adaptor

VYC1055

CD-ROM

Software

HC-V700M&V700-PPCPU-VQT3Y41_mst.book  12 ページ  2011年12月28日 水曜日 午前10時21分

Summary of Contents for HC-V700

Page 1: ...http www panasonic com contactinfo For Canadian assistance please call 1 800 561 5505 or visit us at www panasonic ca Owner s Manual High Definition Video Camera Model No HC V700 HC V700M Before connecting operating or adjusting this product please read the instructions completely VQT3Y41 PC P PU ...

Page 2: ...ock or product damage Do not install or place this unit in a bookcase built in cabinet or in another confined space Ensure this unit is well ventilated Do not obstruct this unit s ventilation openings with newspapers tablecloths curtains and similar items Do not place sources of naked flames such as lighted candles on this unit Date of Purchase Dealer Purchased From Dealer Address Dealer Phone No ...

Page 3: ...he equipment and receiver Connect the equipment into an outlet on a circuit different from that to which the receiver is connected Consult the dealer or an experienced radio TV technician for help FCC Caution To assure continued compliance follow the attached installation instructions and use only shielded interface cables with ferrite core when connecting to computer or peripheral devices Any cha...

Page 4: ... that the AC mains lead can be unplugged from the socket outlet immediately if any problem occurs Battery pack Lithium ion battery pack Use the specified unit to recharge the battery pack Do not use the battery pack with equipment other than the specified unit Do not get dirt sand liquids or other foreign matter on the terminals Do not touch the plug terminals i and j with metal objects Do not dis...

Page 5: ...ation High Definition Video Camera Battery holder AC adaptor Bottom A lithium ion battery that is recyclable powers the product you have purchased Please call 1 800 8 BATTERY for information on how to recycle this battery U S A CANADA CONSUMERS ATTENTION ...

Page 6: ... grounding prong The wide blade or the third prong are provided for your safety If the provided plug does not fit into your outlet consult an electrician for replacement of the obsolete outlet 10 Protect the power cord from being walked on or pinched particularly at plugs convenience receptacles and the point where they exit from the apparatus 11 Only use attachments accessories specified by the m...

Page 7: ...ERATURE If the unit is suddenly moved from a cold place to a warm place moisture may form on the SD card and inside the unit DO NOT LEAVE YOUR CAMERA OR THE POWER SUPPLY TURNED ON WHEN NOT IN USE STORAGE OF YOUR CAMERA Store and handle your camera in a manner that will not subject it to unnecessary movement avoid shaking and striking Your camera contains a sensitive pick up device which could be d...

Page 8: ...non built in memory related component Handling of built in memory HC V700M This unit is equipped with the built in memory When using this component pay attention to the following points Back up data periodically The built in memory is temporary storage In order to avoid erasing data due to static electricity electromagnetic waves breakage and failures back up the data to a PC or DVD disc l 112 125...

Page 9: ... for the playback mode still pictures only Scene s recorded in 1080 60p 1080 60i or side by side SbS 3D AVCHD scene s Pages for reference are indicated by an arrow for example l 00 This owner s manual is designed for use with models and Pictures may be slightly different from the original The illustrations used in this owner s manual show model however parts of the explanation refer to different m...

Page 10: ...r Function 50 1080 60p recording 51 Recording with the Touch Function 52 Touch function icons 52 Recording functions of operation icons 55 Operation icons 55 Recording functions of menus 61 Manual recording 74 White Balance 75 Manual shutter speed iris adjustment 76 Manual Focus adjustment 77 Recording 3D image 78 Advanced Playback Playback Operations 81 Motion picture playback using operation ico...

Page 11: ...image storage 123 With a PC What you can do with a PC 125 End User License Agreement 127 Operating environment 129 Installation 132 Connecting to a PC 133 About the PC display 135 Starting HD Writer AE 4 0 136 Reading the operating instructions of the software applications 136 If using Mac 137 Others Indications 138 Messages 141 About recovery 142 Troubleshooting 143 Cautions for use 149 About cop...

Page 12: ...ach of children to prevent swallowing Product numbers correct as of Dec 2011 These may be subject to change Accessories Battery pack VW VBK180 AC adaptor P PC VSK0780 PU VSK0781 AC cable K2CA2CA00025 AV multi cable K1HY12YY0016 USB cable K2KYYYY00201 Shoe adaptor VYC1055 CD ROM Software ...

Page 13: ...nd off indicating that charging has begun It will turn off when the charging is completed Inserting removing an SD card Check that the access lamp has gone off 1 Open the SD card cover and insert remove the SD card into from the card slot B Face the label side C in the direction shown in the illustration and press it straight in as far as it will go Press the center of the SD card and then pull it...

Page 14: ...it Closing the LCD monitor turns off the unit To turn on the unit A The status indicator lights on To turn off the unit B The status indicator goes off Selecting a mode Operate the mode switch to change the mode to or How to use the touch screen You can operate by directly touching the LCD monitor touch screen with your finger Touch Touch and release the touch screen to select icon or picture Slid...

Page 15: ...u 3 Touch the media to record motion pictures or still pictures The media is selected separately to motion pictures or still pictures is highlighted in yellow 4 Touch ENTER Recording motion pictures 1 Change the mode to 2 Open the LCD monitor 3 Press the recording start stop button to start recording A When you begin recording changes to Recording still pictures 1 Change the mode to 2 Open the LCD...

Page 16: ...and thumbnail scroll lever E when no operation is performed for approximately 5 seconds To display the next previous page jSlide the thumbnail display upward downward while touching it jTouch up down of the thumbnail scroll lever 5 Select the playback operation by touching the operation icon F Operation icon Operation icons and screen display will disappear when no touch operation is performed for...

Page 17: ... multi cable only the supplied cable 10 Microphone terminal MIC A compatible plug in powered microphone can be used as an external microphone Audio will be stereo 2 ch with the external microphone input Microphone input level meter is displayed when the external microphone is connected l 69 When the unit is connected with the AC adaptor sometimes noise may be heard depending on the microphone type...

Page 18: ...ount SHOE ADAPTOR l 164 19 Status indicator l 25 20 Recording start stop button l 31 21 LCD monitor Touch screen l 26 It can open up to 90o It can rotate up to 180o A towards the lens or 90o B towards the opposite direction 22 Battery holder l 20 11 13 14 15 16 12 17 18 19 20 22 21 Due to limitations in LCD production technology there may be some tiny bright or dark spots on the LCD monitor screen...

Page 19: ...oom lever W T In Motion Picture Recording Mode or Still Picture Recording Mode l 49 Thumbnail display switch Volume lever sVOLr In Playback Mode l 38 29 Mode switch l 26 30 Grip belt Adjust the length of the grip belt so that it fits your hand 1 Flip the belt 2 Adjust the length 3 Replace the belt 31 DC input terminal DC IN l 21 Do not use any other AC adaptors except the supplied one 23 24 25 26 ...

Page 20: ...e direction shown in the figure Preparation Power supply It has been found that counterfeit battery packs which look very similar to the genuine product are made available to purchase in some markets Some of these battery packs are not adequately protected with internal protection to meet the requirements of appropriate safety standards There is a possibility that these battery packs may lead to f...

Page 21: ...et 2 Connect the AC adaptor to the DC input terminal Be careful not to pinch the DC input terminal cover The status indicator will flash red at an interval of 2 seconds approximately 1 second on 1 second off indicating that charging has begun It will turn off when the charging is completed Connecting to the AC outlet It is possible to use this unit with power supplied from the AC outlet by turning...

Page 22: ...l number Voltage Capacity minimum Charging time Recording mode Maximum continuous recordable time Actual recordable time Supplied battery VW VBK180 optional 3 6 V 1790 mAh 2 h 25 min 5 h 45 min 1080 60p 1 h 15 min 40 min HA HG HX HE 1 h 20 min 40 min iFrame 1 h 25 min 45 min VW VBK360 optional 3 6 V 3580 mAh 4 h 20 min 10 h 40 min 1080 60p 2 h 40 min 1 h 20 min HA HG HX 2 h 50 min 1 h 25 min HE 2 ...

Page 23: ...e SD Memory Card 32 MB or less cannot be used for the motion picture recording 4 GB or more Memory Cards that do not have the SDHC logo or 48 GB or more Memory Cards that do not have the SDXC logo are not based on SD Memory Card Specifications The operation of Memory Cards exceeding 64 GB cannot be guaranteed When the write protect switch A on SD card is locked no recording deletion or editing wil...

Page 24: ...e USB cable jExpose the unit to vibrations or shock Performing the above while the lamp is on may result in damage to data SD card or this unit Do not expose the terminals of the SD card to water dirt or dust Do not place SD cards in the following areas jIn direct sunlight jIn very dusty or humid areas jNear a heater jLocations susceptible to significant difference in temperature condensation can ...

Page 25: ...ff the unit B The status indicator goes off The unit will not turn off while recording motion pictures even if the LCD monitor is closed In the following cases opening the LCD monitor does not turn on the unit Press the power button to turn on the unit jWhen the unit is originally purchased jWhen you have turned off the unit using the power button To turn off the unit while connecting an external ...

Page 26: ...h and release the touch screen to select icon or picture Touch the center of the icon Touching the touch screen will not operate while you are touching another part of the touch screen Slide while touching Move your finger while pressing on the touch screen Preparation Selecting a mode Motion Picture Recording Mode l 31 Still Picture Recording Mode l 33 Playback Mode l 37 81 Preparation How to use...

Page 27: ... side of on the Touch Menu It is also possible to switch the operation icons by sliding the Touch Menu right or left while touching it B You can change the operation icons to display l 44 C Displayed only during the Manual Mode l 74 D Displayed only when connected to a TV l 108 To display the Touch Menu A Touch Menu Recording Mode Playback Mode Display of the Touch menu will disappear when no touc...

Page 28: ...em is used to display the time 3 Touch ENTER A message prompting for World Time setting may be displayed Perform the World Time setting by touching the screen l 41 Touch EXIT to complete the setting The date and time function is driven by a built in lithium battery If the time display becomes the built in lithium battery needs to be charged To recharge the built in lithium battery connect the AC a...

Page 29: ...hones with your hand etc Basic motion picture recording The unit should normally be held steady when recording If you move the unit when recording do so slowly maintaining a constant speed The zoom operation is useful for recording subjects you cannot get close to but overuse of zoom in and zoom out can make the resulting motion picture less enjoyable to watch Recording Yourself Rotate the LCD mon...

Page 30: ...r still pictures 1 Change the mode to or 2 Select the menu l 40 3 Touch the media to record motion pictures or still pictures The media is selected separately to motion pictures or still pictures is highlighted in yellow 4 Touch ENTER Basic Selecting a media to record HC V700M MEDIA SELECT MENU ...

Page 31: ...stantly displayed when the remaining recordable time becomes less than 30 minutes To change the recording format change the Recording Mode l 62 or press and hold the 1080 60p button l 51 Still pictures can be recorded while recording the motion picture l 34 The images recorded between pressing the recording start stop button to start recording and pressing it again to pause recording become one sc...

Page 32: ...ed with the recording format set to AVCHD Progressive are supported by AVCHD Progressive compatible equipment It is not always possible to play back motion pictures recorded with the recording format set to AVCHD Progressive on AVCHD Progressive compatible equipment In such a case play back on this unit instead When motion picture is recorded in AVCHD format Only motion pictures recorded with the ...

Page 33: ...y In dark environments the video light will turn on Using a flash or tripod is recommended when recording still pictures in dark places because the shutter speed becomes slow You can also take a picture just by touching the subject to focus Touch Shutter l 54 To print a picture save the picture to the SD card l 109 and print using a PC or a printer Basic Recording still pictures A Focus indication...

Page 34: ...ton fully press to the bottom to take the picture It is possible to record still pictures while recording motion pictures Simultaneous recording Remaining number of recordable pictures is displayed while still pictures are being recorded Built in flash Red eye Reduction self timer l 58 do not work While recording motion pictures or during the PRE REC operation image quality is different from ordin...

Page 35: ...al zoom is used Basic Intelligent Auto Mode Mode Effect Portrait Faces are detected and focused automatically and the brightness is adjusted so it is recorded clearly Scenery The whole landscape will be recorded vividly without whiting out the background sky which may be very bright 1 Spotlight Very bright object is recorded clearly 1 Low light It can record very clearly even in a dark room or twi...

Page 36: ... effective range of Automatic White Balance adjustment on this unit 2 Blue sky 3 Cloudy sky rain 4 Sunlight 5 White fluorescent lamp 6 Halogen light bulb 7 Incandescent light bulb 8 Sunrise or sunset 9 Candlelight If the Automatic White Balance is not functioning normally adjust the White Balance manually l 75 Auto Focus The unit focuses automatically Auto Focus does not work correctly in the foll...

Page 37: ...e is touched and is displayed in the 1080 60p scenes and is displayed in the side by side scenes when ALL AVCHD is touched 4 Touch the scene or the still picture to be played back It will switch to the screen displaying and thumbnail scroll lever E when no operation is performed for approximately 5 seconds in the thumbnail display screen For details about deleting refer to page 93 To display the n...

Page 38: ...ill be heard only during normal playback F Operation icon Operation icons and screen display will disappear when no touch operation is performed for a specific period of time To display them again touch the screen It will be played back in 2D only or 3D only when slide show is played back connected to the 3D compatible TV It will play back in 2D if the still picture at the start of the slide show ...

Page 39: ... or not play back motion pictures recorded on this unit even if the products support AVCHD iFrame format Video signals for the iFrame that can be played back with this unit are 960k540 30p Motion pictures recorded in AVCHD and iFrame are not compatible with each other This unit may degrade or not play back motion pictures recorded or created on other products and other products may degrade or not ...

Page 40: ...ayed by touching 4 Touch the desired item to enter the setting 5 Touch EXIT to exit the menu setting About guide display After touching touching the submenus and items will cause function descriptions and settings confirmation messages to appear After the messages have been displayed the guide display is canceled Basic Using the menu screen MENU MENU MENU ...

Page 41: ...ch HOME Touch ENTER 3 Only when setting your home region Touch to select your home region and touch ENTER Touch DAYLIGHT SAVING to set daylight saving time appears and the summer time setting is turned on the time difference from GMT is set forward by one hour Touch DAYLIGHT SAVING again to return to the normal time setting 4 Only when setting the region of your travel destination Touch DESTINATIO...

Page 42: ...ted To return the display to the home setting Set the home region using Step 1 to 3 and close the setting by touching EXIT If you cannot find your travel destination in the area shown on the screen set it by using the time difference from your home region It is possible to change the date and time display mode It is possible to change the date format You can set the display method of the zoom butt...

Page 43: ...PRE REC is used jDuring playback of the slide show The unit is put into recording pause approx 1 second when the unit is turned on with the mode set to or Depending on the recording conditions start time may be longer than 1 second In the quick power on mode the zoom magnification becomes approx 1k This unit is put into recording pause approx 0 6 seconds after the LCD monitor is reopened When in Q...

Page 44: ... the unit off using the power button Touch screen operation starting and stopping of recording and unit on off can be confirmed with this sound 2 Beeps for 4 times When an error occurs Check the sentence displayed on the screen l 141 You can change the operation icons to display in the Touch Menu Register 3 favorite operation icons The default settings are Fade PRE REC and Video Light for Motion P...

Page 45: ...t the images actually recorded 1 Touch LCD SET 2 Touch the desired setting item 3 Touch to adjust settings 4 Touch ENTER Touch EXIT to exit the menu screen Please refer to page 103 Please refer to page 103 Please refer to page 103 Please refer to page 104 Please refer to page 102 Please refer to page 106 POWER LCD Makes even brighter Makes brighter Normal Makes less bright Automatic adjustment LCD...

Page 46: ...older number format the SD card and built in memory and then perform NUMBER RESET Please be aware that if a medium is formatted then all the data recorded on the medium will be erased and cannot be restored Back up important data on a PC DVD disc etc l 112 125 Please be aware that if a medium is formatted then all the data recorded on the medium will be erased and cannot be restored Back up import...

Page 47: ...o close the indication The SD card requires some space to store information and manage system files so the actual usable space is slightly less than the indicated value The usable space is generally calculated as 1 GB 1 000 000 000 bytes The capacities of this unit PCs and software are expressed as 1 GB 1 024k1 024k1 024 1 073 741 824 bytes Therefore the indicated value of the capacity appears to ...

Page 48: ...sition If DEMO MODE is switched to ON and you touch EXIT when there is no SD card inserted and while this unit is connected to the AC adaptor the demonstration automatically starts If any operation takes place the demonstration is canceled However if no operations take place for approx 10 minutes the demonstration automatically starts again To stop the demonstration set DEMO MODE to OFF or insert ...

Page 49: ...k without degrading the picture quality for the still picture recording mode Extra Optical Zoom Extra optical zoom ratio varies depending on the setting of PICTURE SIZE and ASPECT RATIO l 70 71 If you take your finger off the zoom lever during zoom operation the operation sound may be recorded When returning the zoom lever to the original position move it quietly When the zoom magnification is at ...

Page 50: ...ilizer Lock Advanced Recording Image Stabilizer Function RECORD SETUP HYBRID O I S ON or OFF RECORD SETUP O I S MODE1 or MODE2 MODE1 The function works all the time MODE2 The function works when the button is pressed We recommend using this mode when you are recording yourself or recording with a tripod in Still Picture Recording Mode Optical image stabilizer button Press the button to turn optica...

Page 51: ...ssible to set from the menu Please refer to page 156 for details about approximate recordable time Advanced Recording 1080 60p recording RECORD SETUP REC MODE 1080 60p ヒパベパバプパㄑ 1080 60p button To set to 1080 60p recording mode press and hold the button until is displayed To return to normal recording mode press and hold the button until disappears MENU ...

Page 52: ...uch zoom bar Touch zoom function is useful for making fine adjustments to the zoom magnification 1 Touch Touch zoom bar appears 2 Touch and hold the touch zoom bar It will zoom to the touched position It will zoom in when T side is touched and zoom out when W side is touched It is also possible to perform zoom operation by touching and sliding the touch zoom bar toward the T side or the W side Ple...

Page 53: ...ame blinks in red and then disappears Touch a characteristic part color etc on the object to lock onto it again When the button is pressed halfway in Still Picture Recording Mode the focus is set to the object that is locked The target frame turns green when it focuses and the target cannot be changed This function cannot be used in Manual Mode When Manual Mode is set in Still Picture Recording Mo...

Page 54: ...e of purchase To make the display of disappear change the setting of the O I S LOCK DISPLAY Stabilization may not be possible under strong shaking conditions To record while moving the unit quickly release Optical Image Stabilizer Lock It is possible to focus and record a still picture of a subject that is touched 1 Touch 2 Touch the subject Focus area is displayed at the touched position and a st...

Page 55: ... Operation icons 1 Not displayed in Still Picture Recording Mode 2 Not displayed in Motion Picture Recording Mode The operation icons that are displayed in the Touch Menu can be changed SELECT OPERATION ICONS l 44 If you turn off the unit or change the mode to PRE REC Backlight compensation Color night rec Self timer and Tele Macro functions are canceled If you turn off the unit the Fade function ...

Page 56: ...the brightness is insufficient the effect may not be clear This allows recording of the pictures and sound to start approximately 3 seconds before the recording start stop button is pressed appears on the screen Aim the unit at the subject beforehand There is no beep sound PRE REC is canceled in the following cases jIf you change the mode j If you remove the SD card j If you remove the SD card whi...

Page 57: ... SD card inserted jWhen it is set to Manual Focus jWhen FACE RECOG is set to OFF or no one is registered In FACE RECOG only Depending on the recording conditions type of smile camera shake etc the face of the subject may not be detected correctly The number of recording pixels are 3200k1800 or 1920k1080 l 70 When still pictures that have been recorded using the Smile Shot are displayed as thumbnai...

Page 58: ...enomena where human eyes become red from flashes The flash is activated 2 times The red eye phenomenon tends to appear in certain recording conditions and more with some people than with others When faces are detected in the Intelligent Auto Mode the Red Eye Reduction is set to on This is for recording still pictures using the timer Each time the icon is selected the indication changes by one sett...

Page 59: ...ratio is 16 9 the zoom magnification will be 26k The Tele Macro function is canceled automatically when the zoom magnification becomes lower than 26k in Motion Picture Recording Mode Tele Macro function is canceled automatically when the zoom magnification becomes lower than the sizes below in Still Picture Recording Mode jLess than 21k when the aspect ratio is 4 3 or 3 2 jLess than 26k when the a...

Page 60: ...wing order ON AUTO OFF When set to AUTO the video light turns on in Low Light Mode in Intelligent Auto Mode When the video light is in use the recordable time when using the battery is shortened The approximate available range of the video Light is approximately up to 1 2 m 3 9 feet Using the Color Night Rec function at the same time will make conditions even brighter When you take a picture in a ...

Page 61: ...ighting Advanced Recording Recording functions of menus SCENE MODE RECORD SETUP SCENE MODE desired setting OFF Cancel the setting 5Sports To make fast moving scenes less shaky with slow playback and pause of playback Portrait To make people stand out against the background Soft Skin To makes skin colors appear softer for a more attractive appearance Spotlight Improved quality when subject is brigh...

Page 62: ...rding Mode The larger the digital zoom magnification the more the image quality is degraded This function cannot be used in Still Picture Recording Mode Switch the picture quality and recording format of the motion pictures to record 1 Recording will have higher quality in the order of HA HG HX and HE 2 It can record with highest quality image in this unit 3 iFrame is a format suitable for Mac iMo...

Page 63: ...d l 98 110 Once you have performed RELAY SCENE COMBINE you can use the Relay Recording function again If the RELAY REC is set to ON without performing the RELAY SCENE COMBINE a message is displayed You will be able to perform Relay Recording by touching YES but you will not be able to perform the RELAY SCENE COMBINE after that Still pictures are recorded to the SD card after Relay Recording is dis...

Page 64: ...son s name Touch the text entry icon in the center of the screen and enter the name After entering the name touch Enter Entering text The characters can be conveniently input without moving the cursor when the Auto Cursor Position is set to ON l 46 A maximum of 9 characters can be entered 4 Touch ENTER to end registration Touch EXIT RECORD SETUP FACE RECOG SET SET Icon Description of operation A e...

Page 65: ...he person you wish to change FOCUS ICON This changes the focus indication icon l 33 that appears during still picture recording Only displayed when Face Recognition is in use Touch the icon you wish to have displayed 3 Touch ENTER Canceling a registered person 1 Select the menu Touching DELETE ALL cancels all the registered people 2 When DELETE is selected Touch the person to cancel When touched t...

Page 66: ...iority Prioritized face framing Prioritized face framing is displayed as orange frames Focus and adjustment of brightness will be performed against the prioritized face framing Prioritized face framing is only displayed with Portrait Mode in the Intelligent Auto Mode The white frame is for face detection only Focus will be set to prioritized face framing when the button is pressed halfway when rec...

Page 67: ...ith the 3D Conversion Lens optional Switch to Manual Mode l 74 For details refer to AUTO SLOW SHTR 2D This function s default setting is ON When a 3D Conversion Lens is used the recording scene will become darker We recommend setting this function to ON If the unit continues to be tilted upside down from the normal horizontal position while recording motion pictures it is automatically put into re...

Page 68: ...ion pictures and that follow the rules for signal transmission Message is displayed when this unit is moved rapidly When CAMERA PANNING IS TOO FAST appears move the unit slowly while recording Set to OFF to turn off the message indication Message will not appear while pausing the recording Message will appear even if it is pausing the recording if DEMO MODE is set to ON This will reduce the wind n...

Page 69: ...al recording can be performed Adjust the microphone input level so that the last 2 bars of the gain value are not red Otherwise the sound is distorted Select a lower setting for microphone input level 3 Touch ENTER to set the microphone input level and then touch EXIT Microphone input level meter appears on the screen When ZOOM MIC is ON the volume will be different depending on the zoom rate The ...

Page 70: ...rity of the picture when printing The number of recording pixels that can be set changes depending on selected screen aspect ratio l 71 Picture size and Maximum zoom ratio Extra optical zoom cannot be used The maximum zoom magnification is 21k PICTURE ADJUST RECORD SETUP PICTURE ADJUST SHARPNESS Sharpness of the edge COLOR Depth of the color of the image EXPOSURE Brightness of the image WB ADJUST ...

Page 71: ...hod This function s default setting is 4 3 When the aspect ratio is set to 4 3 or 3 2 black bands may appear on the left and right of the screen The edges of still pictures recorded on this unit with a 16 9 aspect ratio may be cut at printing Check the printer or photo studio before printing PICTURE PICTURE SIZE desired setting Picture size Aspect ratio 3200k1800 16 9 1920k1080 ASPECT RATIO PICTUR...

Page 72: ...is to be stored A confirmation message is displayed when Enter is touched after selecting the start point and finish point Touch YES to store the pictures If you turn off the unit or change the mode this function is canceled The maximum number of times you can record on a media is 15 In the case of SD cards it is the maximum number of recordable scenes per card Color balance and brightness on the ...

Page 73: ...ht to AUTO or OFF l 60 When switching to Intelligent Auto Mode the setting is fixed to AUTO and cannot be changed You can add a shutter sound when recording still pictures No shutter sound is emitted in Motion Picture Recording Mode AF ASSIST LAMP PICTURE AF ASSIST LAMP AUTO SHTR SOUND PICTURE SHTR SOUND desired setting Volume low Volume high OFF Cancel the setting MENU MENU ...

Page 74: ...on Picture Recording Mode and Still Picture Recording Mode Press the iA MANUAL button to switch to Manual Mode appears on the screen Advanced Recording Manual recording MNL MANUAL A manual icons Focus l 77 White Balance l 75 Manual Shutter Speed l 76 Iris Adjustment l 76 FOCUS WB SHTR IRIS FOCUS WB SHTR IRIS FOCUS WB SHTR IRIS MNL ...

Page 75: ...e display continues flashing the White Balance cannot be set In this case use other White Balance modes When the display flashes the Manual White Balance previously adjusted is stored Whenever recording conditions change re set the White Balance When setting both the White Balance and the iris gain set the white balance first is not displayed on the screen when is being set Icon Mode Recording con...

Page 76: ...al shutter speed adjustment When the shutter speed is set lower than 1 15 in the Still Picture Recording Mode using a tripod is recommended Also White Balance cannot be set The shutter speed will be set to 1 30 when the unit is turned on again or when the Quick Start is performed You may see a band of light around an object that is shining very bright or highly reflective During normal playback im...

Page 77: ...ocus by touching The in focus area is displayed in blue The normal screen returns approximately 2 seconds after you finish bringing the subject into focus Touch FOCUS to end the adjustment When MF ASSIST is OFF the blue area is not displayed To restore Auto Focus touch AF in Step 3 or press the iA MANUAL button again The blue display does not appear on the images actually recorded RECORD SETUP MF ...

Page 78: ... the 3D Conversion Lens to the unit Tighten the attachment screw of the step up ring by rotating to LOCK Attach the 3D Conversion Lens securely so it will not tilt or move 3 Turn on the unit Turn on with the unit in a horizontal state The 3D Conversion Lens adjustment mode screen will appear automatically after performing the initial setting If the 3D Conversion Lens adjustment mode screen does no...

Page 79: ... ECONOMY AC will not work while you adjust the 3D Conversion Lens attachment position When the 3D Conversion Lens is attached the auto slow shutter setting is AUTO SLOW SHTR 3D The default setting of AUTO SLOW SHTR 3D is ON l 67 While 3D recording if moving the unit fast the message is more likely to appear The LCD monitor on this unit will not display in 3D If the unit is turned on in the shade e...

Page 80: ...icture quality Functions not available during 3D recording Button lever operations Motion picture recording functions jZoom in out function 1 jHybrid Optical Image Stabilizer 2 jIntelligent Auto Mode Night portrait and Macro j1080 60p recording 3 jManual Focus jiFrame REC MODE jSmile Shot jVideo light jTele Macro jFace Recognition jZoom Microphone Setup menu Still picture recording functions jQuic...

Page 81: ...sed continue touching is for slow rewind playback Playback is slow while touching Normal playback is restored when you touch When Slow motion pictures are played back in reverse they will be shown continuously at approximately 2 3rd the speed of normal playback intervals of 0 5 seconds Slow motion Playback of the scenes in iFrame or the scenes saved as MP4 will be shown in intervals of 1 second Fr...

Page 82: ...point of the scene you wish to see Operate the zoom lever to side and change over the thumbnail display to Highlight Time Frame Index l 38 1 Touch To display the next previous page jSlide the thumbnail display upward downward while touching it jTouch up down on the thumbnail scroll lever l 37 2 Touch the desired search condition 3 SECONDS 6 SECONDS 12 SECONDS MINUTES FACE HIGHLIGHT This cannot be ...

Page 83: ... playback can be resumed from where it was stopped If playback of a motion picture is stopped appears on the thumbnail view of the stopped scene The memorized resume position is cleared if you turn off the unit or change the mode The setting of RESUME PLAY does not change Zooming in on a still picture during playback Playback zoom You can zoom in by touching a still picture during playback 1 Touch...

Page 84: ...re is enlarged the more its quality deteriorates Zooming out from the zoomed still picture Touch to zoom out k4 k2 k1 Touch to return to normal playback k1 You can also perform zoom operations using the zoom lever Playback zoom cannot be performed for the still pictures recorded in 3D It will perform the playback zoom after switching to 2D playback when the zoom operation is performed A Displayed ...

Page 85: ... the same day they are grouped separately whenever the 1080 60p recording 1080 60i recording or side by side recording are switched 1 2 are added after the date displayed on the date list Even if iFrame scenes are recorded on the same day they are grouped separately in the following cases 1 2 is added after the recording date displayed on the screen jWhen the number of scenes exceeds 99 jWhen NUMB...

Page 86: ...till pause or digest playback are inserted It will be played back with the date of last recording To change the settings refer to page 88 3 Touch in the thumbnail view To change the settings refer to page 88 4 Select the playback operation l 37 81 When the playback is finished or stopped the screen to select SAVE l 90 or SELECT AGAIN EXIT is displayed Touch the desired item Playing back of all the...

Page 87: ... MUSIC SELECT to different settings change MUSIC SELECT after setting EFFECT SETUP When MUSIC SELECT is selected Touch the desired sound When EFFECT SETUP is set to NONE you will be able to select NO MUSIC When NO MUSIC is selected the audio recorded at the time of shooting is played back To adjust the volume of music during playback or audio testing operate the volume lever l 38 4 Touch ENTER To ...

Page 88: ...o be played back Up to 99 scenes can be selected in succession When touched the scene is selected and is displayed Touch the scene again to cancel the operation 4 Touch Enter ENTER Playing back with the settings changed SCENE SETUP Select the scene or date to be played back FAVORITE SCENE SETUP Set up the favorite scenes l 89 FAVORITE SCENE PLAY Set up if the favorite scenes are to be included in ...

Page 89: ...k l 81 3 Touch and stop the playback It will return to the thumbnail display screen and is displayed on the scenes added as favorite scenes All the scenes checked as favorite may not be played back depending on the Playback time setting l 90 To clear the favorite scenes from the thumbnail display 1 Touch Reset 2 Touch RESET ALL or RESET SELECTED The check on all the favorite scenes will be cleared...

Page 90: ...is short Setting up the title 1 Touch to select your favorite title sheet Title and date will not be displayed when NONE is selected 2 Touch TITLE 3 Enter the title Input method is same operation as for the face recognition l 63 Touch Enter after entering the title A maximum of 18 characters can be entered 4 Touch ENTER to end registration The date of the first scene of the Highlight Playback will...

Page 91: ...nd is displayed on the thumbnail of the scenes saved by the Highlight Playback Changing the playback settings and playing back the slide show 1 Touch l 27 2 Only when you would like to change the settings Touch SET to select the item to change QUALITY AVCHD It will be saved in high definition image quality COMPATIBILITY MP4 It will be saved in image quality 640k360 30p appropriate for playing back...

Page 92: ...LIDE INTERVAL cannot be set when EFFECT SETUP is set When MUSIC SELECT is selected Touch the desired sound To adjust the volume of music during playback of the slide show or audio testing operate the volume lever l 38 Touch ENTER To test the music audio Touch START and start the audio testing Touch the other music option to change the music to be tested When you touch STOP the music playback stops...

Page 93: ... scenes or still pictures by date all the scenes or still pictures on the selected date will be deleted Protected scenes still pictures cannot be deleted 3 When MULTI is selected in Step 2 Touch the scene still picture to be deleted When touched the scene still picture is selected and the indication appears on the thumbnail Touch the scene still picture again to cancel the operation Up to 99 scene...

Page 94: ...res conforming to DCF standard with this unit all the data related to the scenes still pictures may be deleted When still pictures recorded on an SD card by other products are deleted a still picture other than JPEG that cannot be played back on this unit may be erased Deleting part of a scene AVCHD Unnecessary part of an AVCHD scene can be deleted The deleted scenes cannot be restored Change the ...

Page 95: ...uch to set the dividing point It is convenient to use Slow motion Playback and Frame by frame Playback l 81 Touch YES to continue dividing the same scene To continue dividing other scenes touch NO and repeat Steps 2 3 4 Touch Return to complete dividing Unwanted parts can be deleted l 93 To delete all the divided points The scenes that were deleted after division cannot be recovered You cannot div...

Page 96: ... and Frame by frame Playback l 81 Set the dividing point so there will be 2 seconds or more for the part for deletion and 3 seconds or more for the part to be kept 4 Touch the part for deletion 5 Touch YES and confirm play back the part for deletion A confirmation message appears when NO is touched Proceed to Step 7 6 Stop the playback A confirmation message appears 7 Touch YES To continue dividin...

Page 97: ...ouch CANCEL while deleting personal information The personal information that has already been deleted when the deletion is canceled cannot be restored During Disc Playback when connected to a DVD burner optional personal information cannot be deleted Protecting scenes still pictures Scenes still pictures can be protected so that they are not deleted by mistake Even if you protect some scenes stil...

Page 98: ...h YES Scene in the built in memory will be deleted Protected scenes in the built in memory are not deleted 4 Touch EXIT when the relay scene combining complete message is displayed The thumbnail view of the SD card is indicated Relay Recording information will be deleted when the relay scenes are combined and Relay Recording will be possible again When the relayed scenes in the built in memory or ...

Page 99: ...ncel relay information The personal information of the relayed scene in the built in memory or SD card is deleted the personal information of the combined relay scene is deleted EDIT SCENE RELAY INFO CANCEL Combining of the relay scene cannot be performed if the available space on the SD card is less than the volume of the relayed scene in the built in memory It is recommended to combine the relay...

Page 100: ... your TV Confirm the terminals on your TV and use a cable compatible with the terminals Image quality may vary with the connected terminals A High quality 1 HDMI terminal 2 Component terminal 3 Video terminal A HDMI mini cable optional Be sure to connect to the HDMI terminal B AV multi cable supplied Picture quality 1 High definition images when connecting to HDMI terminal 2 High definition images...

Page 101: ... with an AV multi cable The name of the channel may differ depending on the connected TV Check the input setting input switch and the audio input setting on the TV For more information please read the operating instructions for the TV 3 Change the mode to to play back When the AV multi cable is connected to this unit the setup screen of the AV multi destination is displayed on the screen of this u...

Page 102: ...d the information displayed on the screen operation icon and time code etc can be displayed not displayed on the TV This setting is only available in recording mode SETUP TV ASPECT 4 3 TV ASPECT setting 16 9 4 3 MENU SETUP EXT DISPLAY desired setting SIMPLE Information partially displayed DETAIL All information displayed OFF Not displayed MENU Refer to the following support site for information ab...

Page 103: ...election is set to in the Playback Mode and it is switched between the 3D still picture and the 2D still picture jWhen the 1080 60p 1080 60i or side by side scenes are switched Connecting with the AV multi cable Select the desired setting of AV multi connector output Changing the component output setting Set VIDEO LIGHT to OFF when recording with the TV connected to the component terminal to confi...

Page 104: ...ew name for EZ Sync This function allows you to use your remote control for the Panasonic TV for easy operations when this unit has been connected to a VIERA Link compatible device using a HDMI mini cable optional for automatic linked operations Not all operations are possible VIERA Link is a unique Panasonic function built on a HDMI control function using the standard HDMI CEC Consumer Electronic...

Page 105: ...e control for the TV to turn off the power this unit also turns off Automatic input switching If you connect with a HDMI mini cable and then turn on this unit the input channel on the TV automatically switches to this unit s screen If the TV s power is in standby status it will turn on automatically if Set has been selected for the TV s Power on link setting Depending on the HDMI terminal on the T...

Page 106: ...played in the thumbnail display at playback for the still pictures recorded in 3D Playback switches between 3D image and 2D image automatically If your television does not switch to a 3D image make the necessary settings on the TV For further details please read the operating instructions for the TV Advanced Playback 3D image playback SETUP 3D PLAYBACK AUTO AUTO The scene still picture recorded in...

Page 107: ...ill appear for a few seconds between scenes recorded in 3D and scenes recorded in 2D When you select a 3D thumbnail it may take a few seconds for playback to start After playback the thumbnail display may take a few seconds to reappear It will play back in 2 screens when connected to the TV not compatible with 3D using an AV multi cable supplied Depending on the 3D compatible television used switc...

Page 108: ...usting 3D effect of the 3D image It is possible to adjust the disparity of the scenes and still pictures playing back in 3D for better view 1 Play back the scenes or still pictures recorded in 3D 2 Touch Playback disparity adjustment bar is displayed while displaying in 3D 3 Touch to adjust settings Playback disparity adjustment bar will disappear after approx 5 seconds without any touch operation...

Page 109: ...ion pictures and recording date and file number when playing back still pictures Depending on the media condition some remaining capacity of the SD card or built in memory may not be used If the remaining capacity on a single SD card is not enough you can copy to multiple SD cards following the instruction on the screen In this case the last scene copied to an SD card is automatically divided to f...

Page 110: ...ill picture again to cancel the operation When SELECT DATE is selected When touched the date is selected and surrounded by red Touch the date again to cancel the operation Up to 99 scenes still pictures or 99 dates can be set in succession If 2 or more SD cards are necessary to copy change the card following the instructions on the screen 4 Touch EXIT when the copy complete message is displayed Th...

Page 111: ...ecorded on a PC with HD Writer AE 4 0 etc cannot be copied The settings for the copied motion pictures and still pictures will be cleared if the protected motion pictures or still pictures are copied The order in which the scenes or still pictures were copied cannot be changed Approximate time for copying When copying a recorded motion picture of full 4 GB size Approx 5 minutes to 15 minutes When ...

Page 112: ...M When you copy to DVD RW DVD R DVD R DL RW R or R DL the disc is automatically finalized to allow playback on other devices and additional copying will not be possible 2 Only DVD RAM copied with the DVD burner can additionally copy 3 Connect this unit and a DVD burner before formatting If you format a used disc you can copy on that disc Please be aware that if a disc is formatted then all the dat...

Page 113: ...DVD burner A USB Connection Cable supplied with DVD burner B DVD burner optional Insert the plugs as far as they will go 4 Insert the disc in the DVD burner Insert the DVD disc with the recording side down when using the DVD burner 5 Touch the desired item BURN DISC Refer to page 114 for how to copy discs PLAY DISC Refer to page 117 for how to play back the copied discs To terminate the connection...

Page 114: ...T DATE is selected When touched the date is selected and surrounded by red Touch the date again to cancel the operation Up to 99 scenes 99 dates can be selected in succession 4 Touch START When 2 or more discs are necessary for copying follow the on screen instructions to switch discs You may need more discs than displayed number of discs when you are copying additionally to a used DVD RAM Eject t...

Page 115: ...sert a disc with recorded motion pictures in high definition picture quality into devices that do not support the AVCHD format In some cases the disc may get stuck in the device The disc will not play back on devices that do not support the AVCHD format When inserting a disc containing recorded motion still pictures into other devices a message prompting you to format the disc may be displayed Do ...

Page 116: ...s to the full capacity of a disc Disc type Copy time High Definition Standard XP Standard SP DVD RAM Approx 50 min to 1 h 20 min Approx 1 h to 1 h 30 min Approx 2 h to 3 h DVD RW RW Approx 35 min to 1 h 15 min DVD R R Approx 15 min to 45 min Even if the data capacity to be copied is small the time it takes for copying may be about the same as the time shown in the table When copying motion picture...

Page 117: ...een It is also possible to switch the media to play back by touching the play mode select icon When the DVD burner is connected the disc icon can be selected from the displayed media types The still picture or the motion picture can be selected on the same screen Managing the copied disc Connect this unit to the DVD burner and then touch PLAY DISC l 113 Formatting discs This is for initializing DV...

Page 118: ...mpting you to format the disc We recommend setting AUTO PROTECT to ON in order to prevent accidental deletion 2 Copy to the disc l 114 After copying the disc is write protected To release the disc protection Touch EXIT and close the message screen after the auto protection is released Displaying disc information Information such as the type of recorded disc the number of recorded scenes and whethe...

Page 119: ... SD cards or by connecting with the USB cable To dub iFrame and MP4 scenes refer to page 122 Copy Dubbing Dubbing with a Blu ray disc recorder video device etc Equipment used for dubbing Dubbing picture quality To dub Equipment with SD card slot High definition picture quality Insert the SD card directly l 120 Equipment with USB terminal High definition picture quality Connect with supplied USB ca...

Page 120: ...en will appear on the screen of the unit Dubbing in high definition picture quality You can dub using a Panasonic Blu ray disc recorder or high definition AVCHD compatible DVD recorder Depending on the recorders or the media to be copied to you may not be able to copy in high definition AVCHD picture quality For further details see the operating instructions of your recorder Note that the equipmen...

Page 121: ...on dubbing and playback methods read the instructions for the Blu ray disc recorder or DVD recorder When you connect the unit to a Blu ray disc recorder a dubbing operations screen may appear on the television connected to the Blu ray disc recorder In this case as well perform the operations of Steps 1 to 4 You cannot change the mode of the unit or turn off the unit while it is connected to a Blu ...

Page 122: ...em before dubbing l 42 102 For setting when connecting the AV multi cable refer to page 103 Dubbing in standard picture quality Change the video input on the video device and TV that this unit is connected to The channel set will differ depending on the terminal to which the unit is connected See the operating instructions of the video device for details Insert the plugs as far as they will go Do ...

Page 123: ...igh definition AVCHD picture quality you can store 3D motion picture The motion picture is recorded unaltered in side by side format If the dubbed motion picture does not change to 3D motion picture make the necessary settings on the TV For further details please read the operating instructions for the TV It may not be possible to copy 3D still pictures MPO format depending on the recorder being u...

Page 124: ...th HD Writer AE 4 0 When you use HD Writer AE 4 0 to handle scenes recorded in 3D the following operations are possible jCopying data to a PC Scenes recorded in 3D will be copied unaltered as 3D image jCopying in Blu ray disc AVCHD format Scenes recorded in 3D will be copied unaltered as 3D image jCopying in DVD Video format Scenes recorded in 3D will be converted to 2D image when copied jEditing ...

Page 125: ...with the HD Writer AE 4 0 Data type Copying data to a PC Motion picture and still picture Copying in Blu ray disc AVCHD format The scenes recorded in 1080 60p can be copied as 1080 60p Important Notice l 126 The scenes recorded in iFrame or the scenes saved as MP4 cannot be copied in Blu ray disc or in AVCHD format Copying in DVD Video format Converted to conventional standard quality MPEG2 format...

Page 126: ...r software About Conversion Assist Function When you want to convert the recording quality and write to media the Conversion Assist Function which is a linking function between this unit and the HD Writer AE 4 0 is activated by connecting this unit to the PC with the USB cable When the Conversion Assist Function is used it is possible to write to media faster than when operating only on PC Please ...

Page 127: ...ling or Disassembly Licensee may not reverse engineer decompile or disassemble the Software except to the extent either of them is permitted under law or regulation of the country where Licensee resides Panasonic or its distributors will not be responsible for any defects in the Software or damage to Licensee caused by Licensee s reverse engineering decompiling or disassembly of the Software Artic...

Page 128: ...chnical limitations in the MICROSOFT SQL SERVER COMPACT 3 5 2 Licensee shall not use copy distribute regrant for use or otherwise handle the Software in any way beyond the range of use granted under Article 9 1 and shall not conduct operations such as reverse engineering decompilation disassembling etc of the MICROSOFT SQL SERVER COMPACT 3 5 3 All rights including copyright patent rights etc relat...

Page 129: ...al Ultimate SP1 Windows Vista 32 bit Home Basic Home Premium Business Ultimate SP2 Windows XP 32 bit SP3 CPU Intel Pentium 4 2 8 GHz or higher including compatible CPU Intel Core 2 Duo 2 16 GHz or higher or AMD Athlon 64 X2 Dual Core 5200 or higher is recommended when using playback function or MPEG2 output function Intel Core 2 Quad 2 6 GHz or higher is recommended when using editing or Continuou...

Page 130: ...rmance PC depending on the functions to be used It may not properly play back or properly operate depending on the environment of the PC used Refer to the operating environment and notes Operation during the playback may become slow if the CPU or memory is not fulfilling the requirements of the operating environment Always use the most current driver for the video card Always make sure there is en...

Page 131: ...ndows 7 Windows Vista 1 GHz or higher 32 bit k86 or 64 bit k64 processor including compatible CPU Windows XP Intel Pentium III 450 MHz or higher or Intel Celeron 400 MHz or higher RAM Windows 7 1 GB or more 32 bit 2 GB or more 64 bit Windows Vista Home Basic 512 MB or more Windows Vista Home Premium Business Ultimate Enterprise 1 GB or more Windows XP 512 MB or more 1 GB or more recommended Interf...

Page 132: ... Yes If Windows 7 is in use or the following screen is not displayed automatically select Start Computer or double click on Computer on the desktop and then double click Panasonic 2 Click Yes Operate following the instruction on the screen If the country or region cannot be selected select NTSC Area Uninstalling HD Writer AE 4 0 Follow the steps below to uninstall any software applications that yo...

Page 133: ...s unit is automatically recognized as an external drive of the PC l 135 When you select an option other than PC reconnect the USB cable When using the battery the LCD monitor turns off after about 5 seconds Touch the screen to turn the LCD monitor on Do not use any other USB cables except the supplied one Operation is not guaranteed with any other USB cables When this unit is connected to a PC usi...

Page 134: ...ecorder During charging the status indicator flashes You cannot charge when the status indicator flashes rapidly or when it does not light at all Charge using the AC adaptor l 21 It will take 2 or 3 times longer to charge compared to when using the AC adaptor If the status indicator flashes at a particularly fast or slow rate refer to page 151 About the screen indication of the unit Do not disconn...

Page 135: ...ecorded with this unit can be copied to the PC with Explorer or other programs 1 Double click the folder that contains the still pictures DCIM 100CDPFQ etc 2 Drag and drop the still pictures onto the destination folder on the PC s HDD Do not delete the SD card s folders Doing so may make the SD card unusable in this unit When data not supported by this unit has been recorded on a PC it will not be...

Page 136: ...s Panasonic HD Writer AE 4 0 HD Writer AE For details on how to use the software applications read the PDF operating instructions of the software Reading the operating instructions of the software applications You will need Adobe Acrobat Reader 5 0 or later or Adobe Reader 7 0 or later to read the PDF operating instructions Select Start All Programs Panasonic HD Writer AE 4 0 Operating Instruction...

Page 137: ...s unit This unit is automatically recognized as an external drive of Mac When you select an option other than PC reconnect the USB cable When using the battery the LCD monitor turns off after about 5 seconds Touch the screen to turn the LCD monitor on 3 Double click CAM_SD displayed on the desktop For users who have CAM_SD and CAM_MEM are displayed on the desktop Files are stored in 100CDPFQ or 10...

Page 138: ...22 Built in memory recording possible status White Card recording possible status Green Recognizing the card Motion Picture Recording Mode l 62 MNL 3D R 1h20m Remaining time for motion picture recording l 31 Relay Recording l 63 Power LCD l 45 Image Stabilizer l 50 80 Optical Image Stabilizer Lock l 54 80 White Still picture recording icon Red Recording still picture R3000 Remaining number of stil...

Page 139: ...76 White Green Focus indication l 33 Hi Speed Burst Shooting l 72 AF assist lamp l 73 PRE REC AWB C Display Touch Menu l 27 Backlight Compensation l 59 Tele Macro l 59 Intelligent Contrast Control l 56 Microphone Level l 69 Video Light l 60 Smile Shot l 57 Fade White Fade Black l 56 Color Night Rec function l 60 Intelligent Exposure l 59 ß ßA Flash l 58 ßi ßj Flash Level l 58 Red Eye Reduction l 5...

Page 140: ...d motion pictures still pictures l 97 Play mode selection display l 37 Relay recorded scene l 63 Still picture recorded using Smile Shot l 57 Scenes saved with Highlight Playback l 90 Scenes with facial recognition l 97 Scenes recorded in 3D l 106 3D Accessing the card l 121 134 Accessing the built in memory l 121 134 Time display The built in battery is low l 28 Warning for recording of yourself ...

Page 141: ...SD card then turn the unit off and then on again THIS BATTERY CANNOT BE USED Use a battery that is compatible with this unit l 20 If using a Panasonic battery compatible with this unit remove the battery and then insert it again If the message appears even after repeating this several times this unit needs repair Detach the power and contact consumer support l 167 168 169 Do not attempt to repair ...

Page 142: ...n the condition of the data it may not be possible to completely repair the data If recovery fails it will not be possible to play back scenes recorded before the unit turned off When data recorded on another device is recovered it may not be possible to play back the data on this unit or the other device If recovery fails turn the unit off and on again after waiting a while If recovery fails repe...

Page 143: ...s is not a malfunction A characteristic of this is that the number of round spots and their position differ in every picture Power Problem Check points This unit cannot be turned on This unit does not stay on long enough Battery runs down quickly Charge the battery again to ensure it is sufficiently charged l 21 In cold places the battery using time becomes shorter The battery has a limited life I...

Page 144: ...N TURN ON AGAIN is displayed The unit has automatically detected an error Restart the unit by turning the unit off and on The unit will be turned off in about 1 minute if the unit is not turned off and on Repair is needed if it is repeatedly displayed even if it is restarted Detach the power connected contact consumer support l 167 168 169 Do not attempt to repair the unit by yourself Indication P...

Page 145: ... or brightness of the image changes or you may see horizontal bars in the image The LCD monitor flickers indoors Color or brightness of the image may change or you may see horizontal bars in the image when the object is recorded under fluorescent light mercury light or sodium light etc but this is not a malfunction In Motion Picture Recording Mode record in Intelligent Auto Mode or set the shutter...

Page 146: ...nnected by the USB cable this unit is not detected by the other devices When connected to other devices using only the battery reconnect using the AC adaptor VIERA Link does not work Setting on this unit Connect with a HDMI mini cable l 104 Touch then touch SETUP VIERA Link ON l 104 Turn the unit off and then back on again Setting on other devices If the TV input does not switch automatically swit...

Page 147: ...ble is disconnected an error message will appear on the PC To disconnect the USB cable safely double click the icon in the task tray and follow the instructions on the screen Cannot see the PDF operating instructions for HD Writer AE 4 0 You will need Adobe Acrobat Reader 5 0 or later or Adobe Reader 7 0 or later to read the PDF operating instructions for HD Writer AE 4 0 Others Problem Check poin...

Page 148: ...t exceeds 4 GB may momentarily stop at every 4 GB of data when played back with another device It may not play back smoothly when the editing of scenes was done with the HD Writer AE 4 0 but it will play back smoothly if you set the seamless settings in the HD Writer AE 4 0 Refer to the operating instructions for the HD Writer AE 4 0 Principal reasons for not playing back smoothly When the scenes ...

Page 149: ... extend the cords and the cables Do not spray insecticides or volatile chemicals onto the unit If the unit is sprayed with such chemicals its body may be marred and the surface finish may peel off Do not leave rubber or plastic products in contact with the unit for a long time When you use the unit in a sandy or dusty place such as a beach do not let sand or fine dust get into the body and termina...

Page 150: ...ot be held responsible in the unlikely case that private data is divulged The battery used in this unit is a rechargeable lithium ion battery It is susceptible to humidity and temperature and the effect increases the more the temperature rises or falls In cold areas the full charge indication may not appear or the low battery indication may appear about 5 minutes after starting use At high tempera...

Page 151: ...e the following should be considered Flashing with approx 4 second period off for approx 2 seconds on for approx 2 seconds When the battery is over discharged or the temperature of the battery is too high or low It can be charged but it may take a few hours to complete the charging normally It will flash in approx 2 second intervals when normal charging resumes Even in such cases it may start flas...

Page 152: ...it slowly We recommend using a tripod About 3D viewing Anyone who is hyper sensitive to light suffers from heart disease or is otherwise unwell should avoid viewing 3D image Doing may have an adverse affect on such medical conditions If you feel tired uncomfortable or otherwise strange when viewing 3D image stop viewing at once Continuing to view may cause illness Please rest appropriately after s...

Page 153: ...pears select YES and then follow the on screen instructions The customer is responsible for the management of the data in the SD card When the LCD monitor gets dirty wipe it with a soft cloth such as eye glass cleaner Do not touch the LCD monitor with your finger nails or rub or press with strong force It may become hard to see or hard to recognize the touch when the LCD protection sheet is affixe...

Page 154: ...ffort to ensure that condensation does not form If it does form take the actions described below Causes of condensation Condensation takes place when the ambient temperature or humidity is changed as follows When this unit is brought inside from the cold e g a ski slope to a warm room When this unit is moved from an air conditioned car to outside When a cold room has been warmed up quickly When co...

Page 155: ... s reprinted with permission from Microsoft Corporation IBM and PC AT are registered trademarks of International Business Machines Corporation of the U S Intel Pentium Celeron and Intel Core are trademarks of Intel Corporation in the U S and or other countries AMD Athlon is a trademark of Advanced Micro Devices Inc iMovie Mac and Mac OS are trademarks of Apple Inc registered in the U S and other c...

Page 156: ...tion is recorded or recording of short scene is repeated Use time in the row of 4 GB in above table as a guideline for the time that can be copied onto one DVD disc 4 7 GB Others Recording modes approximate recordable time Recording mode 1080 60p 1080 60i HA HG HX HE Picture size frame rate 1920k1080 60p 1920k1080 60i 1920k1080 60i 1920k1080 60i 1920k1080 60i SD card 4 GB 19 min 30 min 40 min 1 h ...

Page 157: ...le pictures is 9999 or less The memory capacity indicated on the label of an SD card is the total of the capacity for copyright protection and management and the capacity that can be used on the unit a PC etc Others Approximate number of recordable pictures Picture size 2848k2136 1760k1320 640k480 Aspect ratio 4 3 SD card 4 GB 1100 2800 28000 16 GB 4700 11500 118000 64 GB 18500 47000 475000 Built ...

Page 158: ...bps VBR HA Average 17 Mbps VBR HG Average 13 Mbps VBR HX Average 9 Mbps VBR HE Average 5 Mbps VBR iFrame Maximum 28 Mbps VBR SbS 3D Average 17 Mbps VBR For picture size and recordable time of a motion pictures refer to page 156 Still picture recording format JPEG Design rule for Camera File system based on Exif 2 2 standard MPO format compatible 3D still pictures For picture size of a still pictur...

Page 159: ...60 cm 24q Tele Filter diameter 46 mm Zoom i Zoom OFF 26k 46k i Zoom 60k 1500k Digital Zoom Using image sensor effective area Image stabilizer function Optical Hybrid Optical Image Stabilizer Active Mode Rotation correction Optical Image Stabilizer Lock function Monitor 3 0z wide LCD monitor Approx 460 K dots Microphone Stereo with a Zoom Microphone Function Speaker 1 round speaker dynamic type Whi...

Page 160: ...Battery charging function Charges from USB terminal when the main unit is off Flash Available range Approx 1 0 m to 2 5 m 3 3 feet to 8 2 feet Dimensions 55 mm W k69 mm H k119 5 mm D 2 165 q W k2 717 q H k4 705 q D including projecting parts Mass Weight Approx 270 g Approx 0 595 lbs without battery supplied and an SD card optional Approx 271 g Approx 0 597 lbs without battery supplied Mass Weight ...

Page 161: ...x 0 20 lbs 3D Conversion Lens optional Power source Power consumption DC output AC 100 V to 240 V 50 60 Hz VSK0780 AC 110 V to 240 V 50 60 Hz VSK0781 12 W DC 5 0 V 1 6 A Lens F2 4 f 1 47 mm 35 mm equivalent 34 mm Minimum recording distance Approx 1 2 m 3 9 feet Minimum required illumination Approx 18 lx 1 30 with Low Light Mode in the Scene Mode ...

Page 162: ...ing to OFF Others Optional accessories Accessory No Figure Description VW BC10PP Battery charger VW VBK180 1 Rechargeable Lithium Ion Battery Pack VW VBK360 1 Rechargeable Lithium Ion Battery Pack RP CDHM15 RP CDHM30 HDMI mini cable VW CLT2 2 3D Conversion Lens Step up ring VW W4907H 2 Wide conversion lens VW LF46N 2 Filter kit ...

Page 163: ...y No Figure Description VW LDC103PP 3 Video DC Light VZ LL10PP Light bulb for video DC light VW SK12PP Shoe adaptor VW ACK180PP Accessory kit RP SDL16GU1K RP SDL08GU1K RP SDL04GU1K RP SDL02GU1K Class 4 16 GB SDHC Memory Card Class 4 8 GB SDHC Memory Card Class 4 4 GB SDHC Memory Card Class 4 2 GB SD Memory Card RP SDU64GE1K RP SDU32GU1K RP SDU16GU1K RP SDU08GU1K RP SDU04GU1K Class 10 64 GB SDXC Me...

Page 164: ...removing the shoe adaptor slide the SHOE ADAPTOR RELEASE lever and remove the shoe adaptor while sliding the lever Be careful about the following When 2 lens accessories such as the ND filter and wide conversion lens are fitted and the zoom lever is pressed toward the W side the 4 corners of an image will be darkened Vignetting Attaching the lens cap of the Filter Kit VW LF46N optional When the fi...

Page 165: ...IS ORDER TO PANASONIC NATIONAL PARTS CENTER 20421 84th Ave S Kent WA 98032 Ship To Mr Mrs Ms First Last Street Address City State Zip Phone Day Night 4 Shipping information UPS delivery requires complete street address Please photocopy this form when placing an order 3 Method of payment check one American Express VISA MasterCard Please do not send cash 2 Items Ordered Quantity Accessory Price Each...

Page 166: ...ted in the Owner s Manual and send it prepaid adequately insured and packed well in a carton box When shipping Lithium Ion batteries please visit our Web Site at www panasonic com BatteryHandling as Panasonic is committed to providing the most up to date information Include a letter detailing the complaint a return address and provide a daytime phone number where you can be reached A valid registe...

Page 167: ...hen write to the warrantor s Consumer Affairs Department at the addresses listed for the warrantor PARTS AND SERVICE WHICH ARE NOT COVERED BY THIS LIMITED WARRANTY ARE YOUR RESPONSIBILITY Customer Services Directory United States and Puerto Rico Obtain Product Information and Operating Assistance locate your nearest Dealer or Service Center purchase Parts and Accessories or make Customer Service a...

Page 168: ...justments misadjustment of consumer controls improper maintenance improper batteries power line surge lightning damage modification introduction of sand humidity or liquids commercial use such as hotel office restaurant or other business or rental use of the product or service by anyone other than an Authorized Servicer or damage that is attributable to acts of God Dry cell batteries are also excl...

Page 169: ... Ecuador 1800 PANASONIC 1800 726276 Costa Rica 800 PANA737 800 7262737 El Salvador 800 PANA 800 7262 Guatemala 1 801 811 PANA 1 801 811 7262 Chile 800 390 602 From a cell phone 797 5000 Venezuela 800 PANA 800 800 7262 800 Uruguay 0 800 PANA 0 800 7262 Peru 0800 00726 Argentina 0800 333 PANA 0800 333 7262 0810 321 PANA 0810 321 7262 Paraguay 0800 11 PANA 0800 11 7262 Mexico Service To obtain inform...

Page 170: ...py Disc 114 Dubbing 119 122 Dubbing 3D 123 From built in memory to SD card 110 From SD card to built in memory 110 Creating still picture from motion picture 82 Custom effect 87 D Date and time display 42 Date and time setting 28 Delete 93 Deleting part of a scene 94 Deleting personal information 97 Demo mode 48 Digital cinema color 68 Digital zoom 62 Direct playback 82 Disc status 118 Divide 95 D...

Page 171: ...psed 31 Recovery 142 Red eye reduction 58 Relay information canceling 99 Relay recording 63 Relay scene combining 98 Remaining number of still pictures 34 Remaining time left for recording 31 Repeat playback 83 Resume playback 83 S Scene mode 61 Scene protect 97 SD Memory Card 23 SD Speed Class Rating 23 SDHC Memory Card 23 SDXC Memory Card 23 Select operation icons 44 Self recording 29 Self timer...

Page 172: ...o que comenzó la carga Se apagará cuando se completa la carga Insertar extraer una tarjeta SD Verificar que la lámpara de acceso se haya apagado 1 Abra la tapa de la tarjeta SD e introduzca retire la tarjeta SD en de la ranura correspondiente B Oriente el lado de la etiqueta C en la dirección mostrada en la ilustración e introdúzcalo hasta el fondo Presione el centro de la tarjeta SD luego sáquela...

Page 173: ...brir el monitor LCD y se apaga al cerrarlo Para encender el dispositivo A El indicador de estado se ilumina Para apagar el dispositivo B El indicador de estado se apaga Selección del modo Utilice el selector de modo para cambiar el modo a o Cómo usar la pantalla táctil Puede actuar directamente tocando el monitor LCD pantalla táctil con el dedo Toque Toque y suelte la pantalla táctil para seleccio...

Page 174: ...películas o fotografías El medio se selecciona de forma separada para las películas o fotografías y se resalta en amarillo 4 Toque ENTRAR Grabación de películas 1 Cambie el modo a 2 Abra el monitor LCD 3 Pulse el botón de inicio parada de grabación para iniciar la grabación A Cuando comienza a grabar cambia a Grabación de películas 1 Cambie el modo a 2 Abra el monitor LCD 3 Para tomar una imagen p...

Page 175: ...r página jDeslice la vista en miniatura hacia arriba hacia abajo mientras la toca jToque arriba abajo en la barra de desplazamiento de la miniatura 5 Seleccione la operación de reproducción tocando el icono de operación F Icono de funcionamiento Los iconos de operación y la visualización de la pantalla desaparecerán cuando no se realiza una función de toque por un período específico de tiempo Para...

Page 176: ...of North America Division of Panasonic Corporation of North America One Panasonic Way Secaucus NJ 07094 Panasonic Canada Inc 5770 Ambler Drive Mississauga Ontario L4W 2T3 Panasonic Corporation 2011 Printed in Japan VQT3Y41 F1211KY0 9000 P ...

Reviews: