background image

file:///C|/U

...shetabi/AppData/Local/Temp/Rar$EXa0.393/viewing/SGML_VIEW_DATA/ALL/H-HS043PP/SVC/DSC1504015CE/doc/DSC1504015CE_02.xml[11/12/2018 3:38:46 PM]

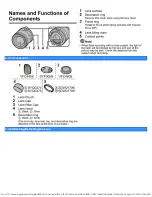
2.3 Components

Summary of Contents for H-HS043E

Page 1: ...ing SGML_VIEW_DATA ALL H HS043PP SVC DSC1504015CE doc DSC1504015CE_cvr xml 11 12 2018 3 07 32 PM Order No DSC1504015CE B26 Interchangeable Lens for Digital Camera Model No H HS043PP H HS043E H HS043GK Colour S Silver Type K Black Type ...

Page 2: ... al Temp Rar EXa0 393 viewing SGML_VIEW_DATA ALL H HS043PP SVC DSC1504015CE doc DSC1504015CE_cvr xml 11 12 2018 3 07 32 PM Panasonic Corporation 2015 Unauthorized copying and distribution is a violation of law ...

Page 3: ...f the circuit is changed or modifed the information will be followed by supplement service manual 1 2 Important Notice 1 2 1 About LENS MAIN UNIT Ref 203 1 LENS MAIN UNIT Ref 203 is not supplied due to diffculty of the transportation issue Fragile Dust free packing and requires critical lens adjustments Therefore any needs of the LENS MAIN UNIT Ref 203 carefully confrm its performance in advance 2...

Page 4: ...S043PP SVC DSC1504015CE doc DSC1504015CE_01 xml 11 12 2018 3 19 23 PM 3 No adjustment is required when replacing the part mentioned on Fig 1 1 But when tighten the concerned screws apply proper torque mentioned on 4 Disassembly and Assembly Instruction section ...

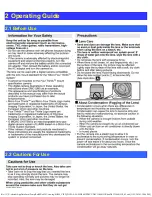
Page 5: ...file C U shetabi AppData Local Temp Rar EXa0 393 viewing SGML_VIEW_DATA ALL H HS043PP SVC DSC1504015CE doc DSC1504015CE_02 xml 11 12 2018 3 38 46 PM 2 Operating Guide 2 1 Before Use 2 2 Cautions For Use ...

Page 6: ...file C U shetabi AppData Local Temp Rar EXa0 393 viewing SGML_VIEW_DATA ALL H HS043PP SVC DSC1504015CE doc DSC1504015CE_02 xml 11 12 2018 3 38 46 PM 2 3 Components ...

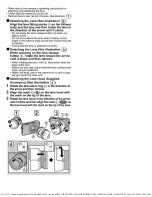
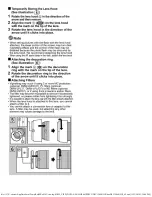
Page 7: ...file C U shetabi AppData Local Temp Rar EXa0 393 viewing SGML_VIEW_DATA ALL H HS043PP SVC DSC1504015CE doc DSC1504015CE_02 xml 11 12 2018 3 38 46 PM 2 3 1 Accessories 2 3 2 Attaching Detaching the Lens ...

Page 8: ...file C U shetabi AppData Local Temp Rar EXa0 393 viewing SGML_VIEW_DATA ALL H HS043PP SVC DSC1504015CE doc DSC1504015CE_02 xml 11 12 2018 3 38 46 PM ...

Page 9: ...file C U shetabi AppData Local Temp Rar EXa0 393 viewing SGML_VIEW_DATA ALL H HS043PP SVC DSC1504015CE doc DSC1504015CE_02 xml 11 12 2018 3 38 46 PM ...

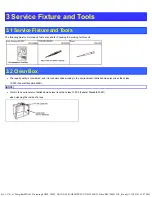
Page 10: ...ls The following Service Fixture and Tools are used for Checking Servicing for this unit 3 2 Clean Box The repair quality is considered and it is recommended working in the environment of satisfed clean level less than class 10 000 Federal Standard 209D NOTE Work in the environment of satisfed clean level less than class 10 000 Federal Standard 209D when cleaning the inside of a lens ...

Page 11: ...d 209D As for procedure refer to the 5 Maintenance for details 2 To minimize the possibilities risk of getting the dust dirt on the lens surface keep covering the lens unit with lens caps front rear other than necessary cases 3 Do not touch the surface of the lens glasses with your fngers 4 Blow off the dust on the surface of the lens with a blower brush 5 Use lens cleaning KIT BK VFK1900BK Procee...

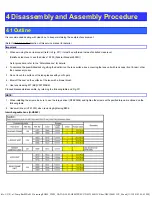
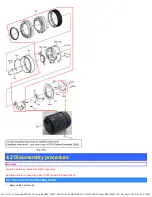
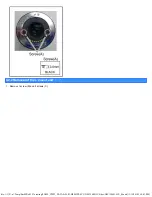
Page 12: ...DSC1504015CE doc DSC1504015CE_04 xml 11 12 2018 3 39 43 PM 4 2 Disassembly procedure Important It must be performed inside of satisfed clean level Satisfed clean level Less than class 10 000 Federal Standard 209D 4 2 1 Removal of the Shading frame 1 Remove the 2 screws A ...

Page 13: ...file C U al Temp Rar EXa0 393 viewing SGML_VIEW_DATA ALL H HS043PP SVC DSC1504015CE doc DSC1504015CE_04 xml 11 12 2018 3 39 43 PM 4 2 2 Removal of the L mount unit 1 Remove 1 screw B and 3 screws C ...

Page 14: ...al Temp Rar EXa0 393 viewing SGML_VIEW_DATA ALL H HS043PP SVC DSC1504015CE doc DSC1504015CE_04 xml 11 12 2018 3 39 43 PM 4 2 3 Removal of the Lens P C B unit and the Mount contact unit 1 Disconnect 2 connectors ...

Page 15: ...a0 393 viewing SGML_VIEW_DATA ALL H HS043PP SVC DSC1504015CE doc DSC1504015CE_04 xml 11 12 2018 3 39 43 PM 4 2 4 Removal of the Mount contact unit 1 Disconnect 1 connector 4 2 5 Removal of the 4 5th unit 1 Remove 3 screws D ...

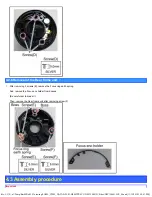
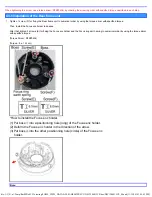
Page 16: ...4015CE_04 xml 11 12 2018 3 39 43 PM 4 2 6 Removal of the Rear frame unit 1 After removing 2 screws E remove the Focus ring earth spring And remove the Focus enc holder from bosses Be careful not to break it Then remove the Rear frame unit after removing screw F 4 3 Assembly procedure Important ...

Page 17: ... in numerical order by using the torque driver with specifed torque Then install the Focus enc holder to bosses After that tighten 2 screws E for fxing the Focus enc holder and the Focus ring earth spring in numerical order by using the torque driver with specifed torque Torque Driver RFKZ0456 Torque 8 1 N cm How to install the Focus enc holder 1 Put boss into a positionning hole long of the Focus...

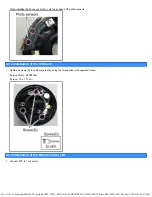
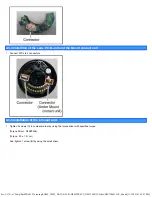
Page 18: ...9 43 PM When installing the Focus enc holder note the position of the photo sensors 4 3 2 Installation of the 4 5th unit 1 Tighten 3 screws D in numerical order by using the torque driver with specifed torque Torque Driver RFKZ0456 Torque 10 1 N cm 4 3 3 Installation of the Mount contact unit 1 Connect FPC to 1 connector ...

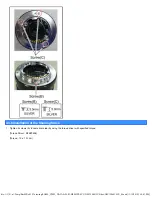
Page 19: ...39 43 PM 4 3 4 Installtion of the Lens P C B unit and the Mount contact unit 1 Connect FPCs to 2 connectors 4 3 5 Installation of the L mount unit 1 Tighten 3 screws C in numerical order by using the torque driver with specifed torque Torque Driver RFKZ0456 Torque 20 1 N cm And tighten 1 screw B by using the small driver ...

Page 20: ...DATA ALL H HS043PP SVC DSC1504015CE doc DSC1504015CE_04 xml 11 12 2018 3 39 43 PM 4 3 6 Installation of the Shading frame 1 Tighten 2 screws A in numerical order by using the torque driver with specifed torque Torque Driver RFKZ0456 Torque 10 1 N cm ...

Page 21: ...file C U al Temp Rar EXa0 393 viewing SGML_VIEW_DATA ALL H HS043PP SVC DSC1504015CE doc DSC1504015CE_04 xml 11 12 2018 3 39 43 PM ...

Page 22: ...ion of the dust dirt frst whether it is outside lens surface or not 1 When it is outside surface of the lens When the dust and or dirt gets on the outer side surface of the Lens glasses order the following procedures a Blow off the dust on the Lens glass surface with the Blower gently Do not Blow too strongly b Wipe out the dirt on the lens glass surface with Lens cleaning KIT VFK1900BK if necessa...

Page 23: ...isfed clean level Less than class 10 000 Federal Standard 209D As for clean box refer to the 3 2 Clean Box in details 2 When install the screws use torque driver RFKZ0456 with specifed torque 3 To keep the Lens performance can only use the original 1st 3rd 4th and 5th unit So the 1st 3rd 4th and 5th unit is not supplied as spare parts Also do not exchange the 1st 3rd 4th and 5th unit taking from o...

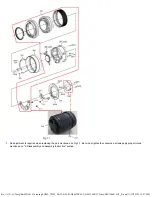
Page 24: ...le C U ocal Temp Rar EXa0 949 viewing SGML_VIEW_DATA ALL H HS043PP SVC DSC1504015CE mec2 en html print_all htm 11 13 2018 9 10 11 AM Model No H H043PP E GK Parts list note Model No H H043PP E GK Frame and Casing Section ...

Page 25: ...rint Parts List file C U ocal Temp Rar EXa0 949 viewing SGML_VIEW_DATA ALL H HS043PP SVC DSC1504015CE mec2 en html print_all htm 11 13 2018 9 10 11 AM Model No H H043PP E GK Packing Parts and Accessories ...

Page 26: ...mec2 en html print_all htm 11 13 2018 9 10 11 AM Model No H H043PP E GK Parts List Change Safety Ref No Part No Part Name Description Q ty Remarks 101 SYF0059 LENS FRONT CAP 1 102 VFC4605 LENS REAR CAP 1 103 VFC4456 LENS STORAGE BAG 1 104 SQT0843 OPERATING INSTRUCTIONS ENGLISH GER MAN FRENCH SPANISH 1 E ...

Page 27: ... DECORATION RING 1 K 111 SDW0170S DECORATION RING 1 S 112 SYQ0374 LENS HOOD 1 K 112 SYQ0375 LENS HOOD 1 S 200 SXW0174 LENS UNIT 1 K 200 SXW0175 LENS UNIT 1 S 203 LENS MAIN UNIT 1 NOT SUPPLIED 204 SML0050 FOCUS ENC HOLDER 1 205 SXQ0321 REAR FRAME UNIT 1 K 205 SXQ0322 REAR FRAME UNIT 1 S 206 SMC0047 FOCUS RING EARTH SPRING 1 207 VEJ2336 MOUNT CONTAT UNIT 1 208 SXQ0337 L MOUNT UNIT 1 209 SHADING FRAM...

Reviews: