11
CAUTION:
1. Set the snug point detection level from "L1". Setting the snug point detection level from "L2" may result in cracking or defor-
mation of the target material.
2. If the tool stops before the snug point at snug point detection level "L1", set the snug point detection level to "L2".
3. Changing the snug point detection level from "L1" to "L2" may increase the torque. Set the number of torque stages again
after making this change.
4. The setting will not be changed until you press the OK button.
5. After changing the setting, be sure to check the new setting value.
IMPORTANT INFORMATION:
1. You can set the snug point detection level and retightening prevention time at the same time by changing the retightening pre-
vention time before pressing the OK button and then pressing the OK button.
2. Pressing the torque setting mode button toggles the display between the snug point detection level setting value and the num-
ber of torque stages setting value.
3. The tool ships with the snug point detection level set to "L1".
4. When the number of torque stages has been set as shown below, the snug point detection level cannot be switched from "L1"
to "L2".
Summary of Contents for EYFLA4AR
Page 3: ...3 3 Troubleshooting Guide ...
Page 4: ...4 ...
Page 5: ...5 ...
Page 6: ...6 4 Service Fixture and Adjustment 4 1 Check Parts Identify Procedure ...
Page 7: ...7 ...
Page 8: ...8 ...
Page 24: ...24 7 Wiring Connection Diagram ...
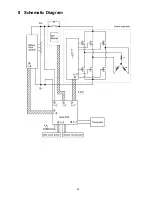
Page 25: ...25 8 Schematic Diagram ...
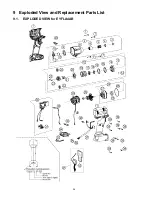
Page 26: ...26 9 Exploded View and Replacement Parts List 9 1 EXPLODED VIEW for EYFLA4AR ...
Page 28: ...28 9 3 EXPLODED VIEW for EYFLA5AR ...
Page 30: ...30 9 5 EXPLODED VIEW for EYFLA5QR ...


