2 - ENGLISH
Attention
z
Turn off the power and disconnect the power plug from the wall outlet before you replace the air
filter unit.
z
When attaching the air filter unit, make sure that the projector is stable, and work in an
environment that is safe, even in the event of the air filter unit dropping.
z
Do not put anything into the air vents. Doing so may result in malfunction of the projector.
z
Be sure to reset the filter counter after replacing the air filter unit.
Illustrations in this manual
z
Illustrations contained in this manual that show the projector may differ from the actual objects
they depict.
1)
Turn off the power and then remove the AC power plug from the wall outlet.
z
When the power is to be turned off, be absolutely sure to follow the procedure described in
“Powering Off the Projector” in the operating instructions of the projector.
2)
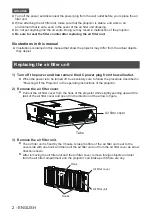
Remove the air filter cover.
z
Pull out the air filter cover from the hook of the projector while slightly pushing upward the
tabs of the air filter cover and open it in the direction of the arrow in figure.
Tabs
Air filter cover
3)
Remove the air filter unit.
z
The air filter unit is fixed by the 3 hooks. Grasp the fibre of the air filter unit near to the
cover side with one hook and then pull the air filter unit out from the air filter cover as arrow
direction shown.
z
After removing the air filter unit and the air filter cover, remove foreign objects and dust
from the air filter compartment and the projector’s air intake port if there are any.
Air filter cover
Hook
Hooks
Air filter unit
Replacing the air filter unit


