background image

11

of 

.

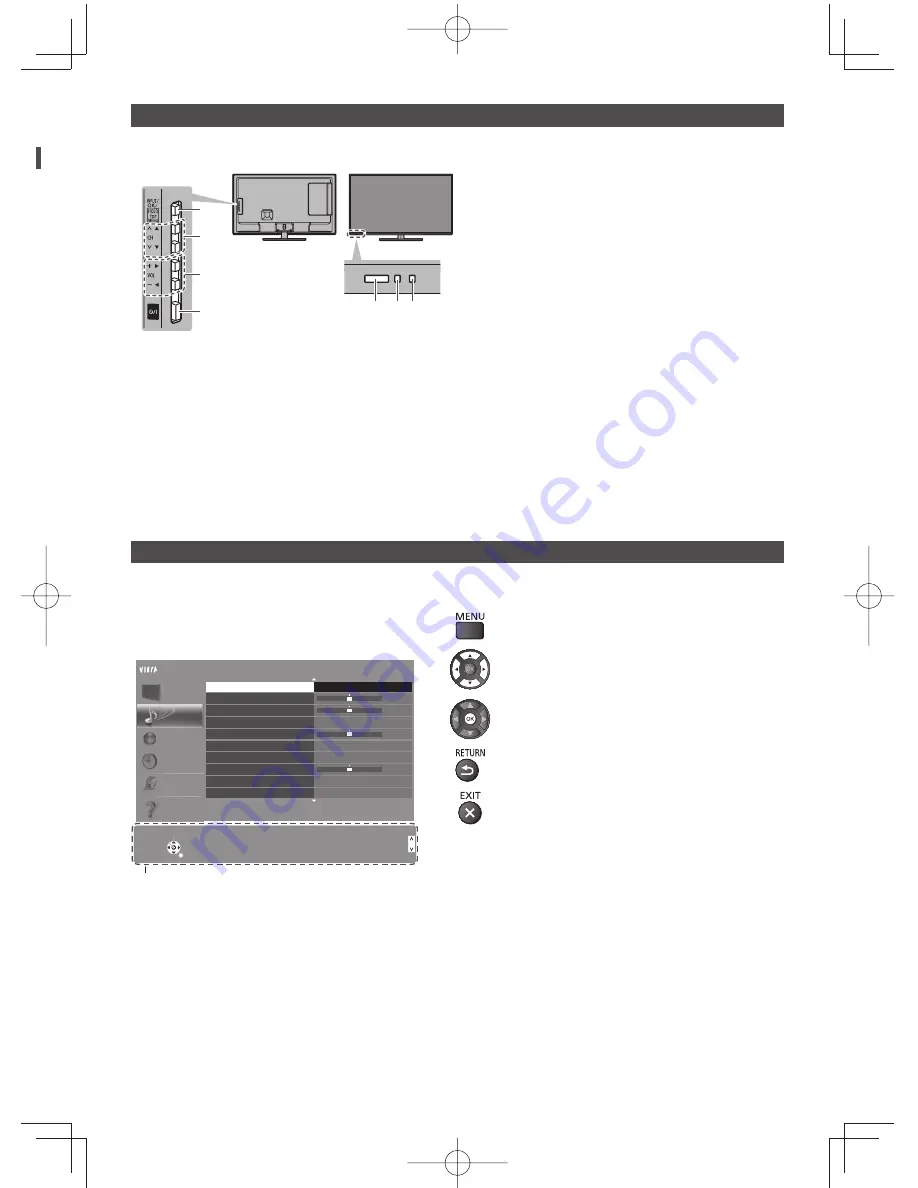
 Indicator / Control panel


 When pressing 1, 2, 3 buttons, the control panel guide appears on the right side of the screen for 3 seconds to 
highlight the pressed button.

 Using the On Screen Displays 

- Operation guide

 Many features available on this TV can be accessed via the On Screen Display menu.


 Operation guide

 Operation guide will help your operation by using the 
remote control.
 Example: [Sound Menu]


1/2

0
0

0

0

 Mode

 Standard

 Bass
 Treble
 Equaliser

 Auto Gain Control

 Surround

 Volume Correction
 Speaker Distance to Wall
 SPDIF Selection

 Off
 Off

 Auto


 Main Menu

 Picture

 Sound

 Network

 Timer

 Setup

 Select

 Selects your favourite sound 
mode.

 Page up

 Change

 RETURN

 Page down

 Operation guide

Select

Selects your favourite sound
mode.

Page up

Change

RETURN

Page down

 Balance

 Help

 Over 30cm


 How to use remote control


 Open the main menu


 Move the cursor / select from a range of options / 
select the menu item (up and down only) / adjust 
levels (left and right only)


 Access the menu / store settings after adjustments 
have been made or options have been set


 Return to the previous menu


 Exit the menu system and return to [Home Screen]

 1

 Input mode selection


 Press repeatedly until you reach the desired 
mode.

 [Main Menu]


 Press and hold for about 3 seconds to display 
main menu.

 OK

 (when in the menu system)

 2

 Channel Up / Down
 Cursor Up / Down (when in the menu system)

 3

 Volume Up / Down
 Cursor Left / Right (when in the menu system)

 4

  Mains power On / Off switch


 Use to switch the mains power.

 5

  Remote control signal receiver


 Do not place any objects between the TV remote 
control signal receiver and remote control.

 6

 Ambient sensor


 Senses brightness to adjust picture quality when 
[Ambient Sensor] in the Picture Menu is set to 
[On].

 7

 Power LED

 Red:

 Standby

 Green:

 On


 The LED blinks when the TV receives a command 
from the remote control.

 Rear side of the TV

 3

 1

 4

 2

 5  6  7

Summary of Contents for E6G series

Page 1: ...ctions 6 Identifying Controls 10 First time Auto Tuning 12 Using your VIERA Operations 13 How to Use eHELP 14 Others FAQs 15 Maintenance 15 Specifications 16 Thank you for purchasing this Panasonic product Please read these instructions carefully before operating this product and retain them for future reference The images shown in this manual are for illustrative purposes only TQB4GC1028 1 CGG E6...

Page 2: ...ease refer to that legislation for more information on the relevant laws and regulations involved or contact the owner of the rights in the content you wish to record or playback This product is licensed under the AVC patent portfolio license for the personal and non commercial use of a consumer to i encode video in compliance with the AVC Standard AVC Video and or ii decode AVC Video that was enc...

Page 3: ...er the TV in any way Safety Precautions To help avoid risk of electrical shock fire damage or injury please follow the warnings and cautions below Mains plug and lead Warning If you detect anything unusual immediately remove the mains plug Mains plug types vary between countries This TV is designed to operate on AC 110 240 V 50 60 Hz Insert the mains plug fully into the socket outlet Ensure that t...

Page 4: ...TV in order to help prevent excessive heat which could lead to early failure of some electronic components Minimum distance cm 10 10 10 10 Ventilation should not be impeded by covering the ventilation openings with items such as newspapers tablecloths and curtains Whether you are using a pedestal or not always ensure the vents at the bottom of the TV are not blocked and there is sufficient space t...

Page 5: ... Bracket 32 inch model 42 inch model 50 inch model Assembly screw 4 M4 25 Base Assembling the pedestal 2 1 3 A C B D Removing the pedestal from the TV Be sure to remove the pedestal in the following way when using the wall hanging bracket or repacking the TV 1 Remove the assembly screws from the TV 2 Pull out the pedestal from the TV 3 Remove the assembly screws from the bracket Secure the base as...

Page 6: ...als 3 1 6 4 2 5 1 USB 1 2 port 2 HDMI1 3 3 Aerial terminal see below 4 AV1 COMPONENT VIDEO p 8 5 DIGITAL AUDIO OUT 6 ETHERNET p 8 Basic connections Mains lead and aerial Special notices for receiving digital terrestrial services If you receive analogue and digital TV signals through two separate aerials use an RF mixer to mix them Analogue and Digital TV signal RF mixer Aerial Digital TV Analogue ...

Page 7: ...tain optimum quality picture and sound If a communal aerial system is used you may require the correct connection cable and plug between the wall aerial socket and the TV Your local Television Service Centre or dealer may be able to assist you in obtaining the correct aerial system for your particular area and the accessories required Any matters regarding aerial installation upgrading of existing...

Page 8: ...connection or wireless connection Setup of the network connection will start when first using the TV p 12 Wired connection TV Internet environment LAN cable Shielded Use the Shielded Twist Pair STP LAN cable Wireless connection Internet environment Access point Built in wireless LAN Other connections DVD player COMPONENT equipment TV DVD Player Listening Viewing Camcorder Game equipment VIDEO equi...

Page 9: ...or the connections read the manuals of the equipment and amplifier Types of connectable equipment to each terminal Features Terminal AV1 DIGITAL AUDIO OUT ETHERNET HDMI 1 3 USB 1 2 COMPONENT VIDEO To play back videocassettes DVDs VCR DVD Player To watch satellite broadcasts Set top box To watch camcorder images Video camera To play games Game equipment To use amplifier with speaker system 1 To use...

Page 10: ...ection navigation and operation of various functions 10 Volume Up Down 11 Numeric buttons Changes channel and teletext pages Sets characters When in Standby mode switches TV on 12 eHELP Displays eHELP Built in Operating Instructions 13 Input mode selection TV switches to Digital TV Analogue TV AV switches to AV input mode from Input Selection list 14 Aspect Changes aspect ratio 15 Subtitles Displa...

Page 11: ...he main menu Move the cursor select from a range of options select the menu item up and down only adjust levels left and right only Access the menu store settings after adjustments have been made or options have been set Return to the previous menu Exit the menu system and return to Home Screen 1 Input mode selection Press repeatedly until you reach the desired mode Main Menu Press and hold for ab...

Page 12: ...alogue channels Even if some channels are not tuned correctly you can try to tune them by Auto Tuning in Setup menu When you select the analogue TV signal select your area When selecting CATV Other press the OK button and then select the Channel Plan from Indian CATV South Africa American System American CATV or Japan CATV 3 Select the type of Home Screen The demonstration to explain how to use my...

Page 13: ...creen instructions or refer to eHELP Watching my Home Screen Watching TV 1 Select the TV viewer from Home Screen select access 2 Select Digital TV or Analogue TV If you use an RF selector switch it whenever you switch between Digital TV and Analogue TV 3 Select a channel up down or To select 2 or more digit channel position number e g 399 To access each feature Access APPS list and select a featur...

Page 14: ...ation in eHELP If this is not the first time to view eHELP from when the TV is turned on the confirmation screen is displayed to select whether First Page or Last Page 2 Select the category and item Category field Item field Sub item field Description select category access select item access select sub item access To return to the previous field To scroll the description if more than 1 page While...

Page 15: ...e of parts of the front top and rear panels has risen these temperature rises do not cause any problems in terms of performance or quality The LCD panel moves slightly and clattered sound is heard when it is pushed with a finger There is some flexibility around the panel to prevent damage to the panel This is not a malfunction Maintenance First remove the mains plug from the socket outlet Display ...

Page 16: ...2 Content Type Audio Return Channel Deep Colour This TV supports HDAVI Control 5 function ETHERNET 10BASE T 100BASE TX USB 1 2 USB 2 0 DC 5 V Max 500 mA DIGITAL AUDIO OUT PCM Dolby Digital DTS Fibre optic Sound Speaker 90 mm 22 mm 2 8 Ω Audio output 20 W 10 W 10 W Receiving systems Band name 17 Systems Function 17 Systems Function 1 PAL B G H Reception of broadcast transmissions and Playback from ...

Page 17: ...imensions shown are approximate For the information of the open source software refer to eHELP Support Licence When using the wall hanging bracket Please contact your local Panasonic dealer to purchase the recommended wall hanging bracket 32 inch model a 200 mm b 200 mm 42 inch model a 400 mm b 400 mm 50 inch model a 400 mm b 200 mm Rear of the TV Holes for wall hanging bracket installation a Dept...

Page 18: ...18 ...

Page 19: ...19 ...

Page 20: ...plus your purchase receipt as a permanent record of your purchase to aid in identification in the event of theft or loss and for Warranty Service purposes Model Number Serial Number Information on Disposal in other Countries outside the European Union This symbol is only valid in the European Union If you wish to discard this product please contact your local authorities or dealer and ask for the ...

Reviews: