background image

Getting started

RQT6012

6

P

B

P

R

Y

AC IN

L

R

SUB-

 WOOFER

AUDIO OUT

VIDEO

OUT

S VIDEO

OUT

COMPONENT

VIDEO OUT

(480P/480I)

AUDIO

IN

L

R

VIDEO

IN

P

B

P

R

Y

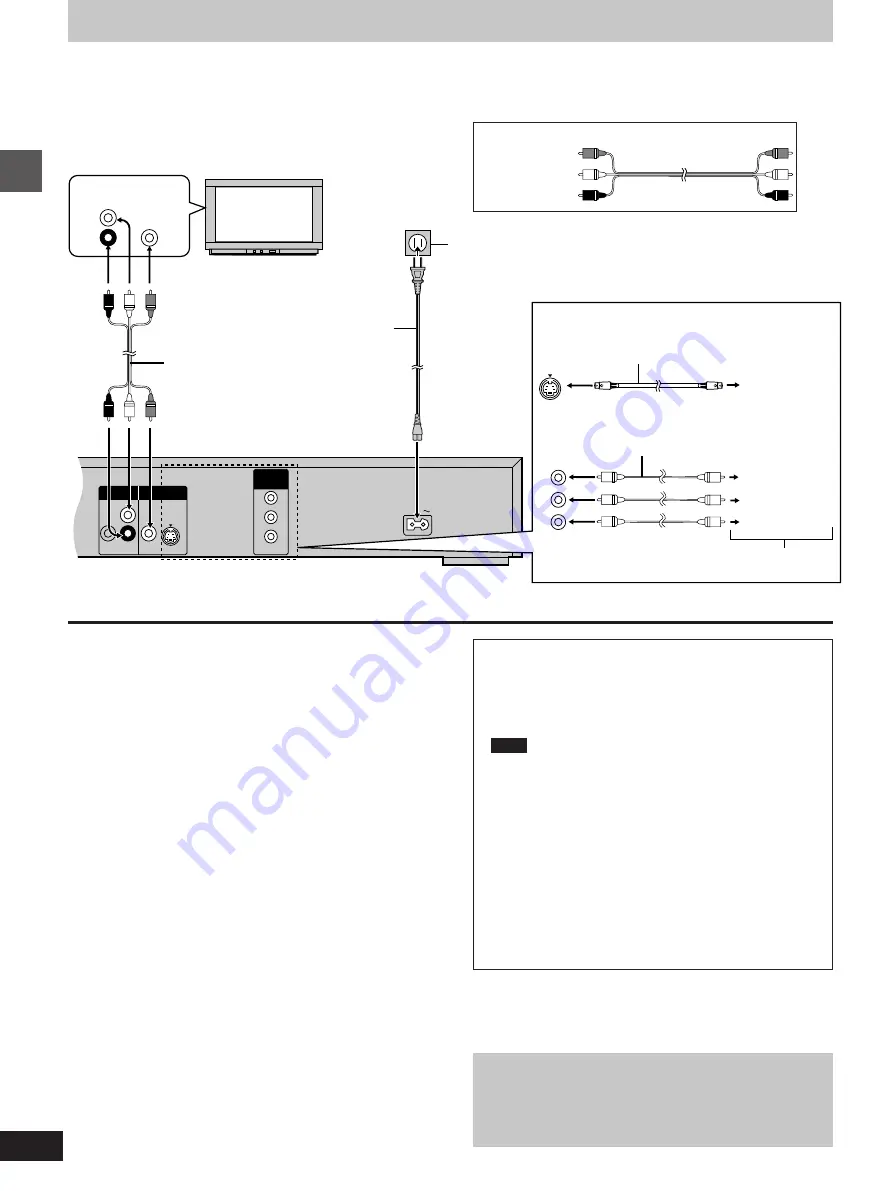
Connection to a television

This page explains how to connect the unit to a television and set it up so you hear the audio through the television’s speakers. Connections and
procedures that enable you to enjoy more powerful sounds are described beginning on page 23.

[Before\connection]

³

Disconnect the AC power supply cord.

³

Refer to the television’s operating instructions.

To household
AC outlet
(AC 120V, 60 Hz)

Audio/video cable (included)

Television

AC power supply cord
(included)

Back of the unit

[A]

 S VIDEO OUT terminal

The S-video terminal achieves a more vivid picture than the VIDEO
OUT terminal by separating the chrominance (C) and luminance (Y)
signals. (Actual results depend on the television.)

[B]

 COMPONENT VIDEO OUT terminal

These terminals can be used for either interlace or progressive out-
put and provide a purer picture than the S VIDEO OUT terminal.
Connection using these terminals outputs the color difference signals
(P

B

/P

R

) and luminance signal (Y) separately in order to achieve high

fidelity in reproducing colors.

³

The description of the component video input terminals depends on
the television or monitor (e.g. Y/P

B

/P

R

, Y/B-Y/R-Y, Y/C

B

/C

R

). Con-

nect to terminals of the same color.

³

After making this connection, change the black level for a better pic-
ture (

á

 page 21, Video–Black Level Control).

Conserving power

This unit consumes a small amount of power, even when it is turned
off (approx. 2 W). To save power when the unit is not to be used for a
long time, unplug it from the household AC outlet.

Connect Your Unit Directly To Your
Television.

Do not connect the unit through your video cassette recorder
when setting up your home entertainment system, because
the picture may not be played correctly due to the copy guard.

[A]

 S VIDEO OUT terminal

[B]

 COMPONENT VIDEO OUT terminal

S-video cable (not included)

TV’s S-video
input
terminal

Video cable (not included)

TV’s component video
input terminals

Y terminal

P

B

 terminal

P

R

 terminal

Audio/video cable (included)
Yellow (VIDEO)

White (L)

Red (R)

To enjoy progressive video

1. Connect to the component video (480p) input terminals on

a television compatible with this unit’s copy guard system.

2. Press [PROGRESSIVE OUT] on the front panel so the

indicator lights (

á

 page 9).

Note

³

The screen may shift off center when using progressive out-
put. Adjust the position of the screen if this occurs
(

á

 page 19, Video—Horizontal position).

³

Video will not be displayed correctly if you connect to a
television that is incompatible with this unit’s copy guard
system.

³

The unit does not output video signals from the VIDEO OUT
and S VIDEO OUT terminals when the “PROGRESSIVE
OUT” indicator is on.

For your reference
All televisions manufactured by Panasonic and that have 480p
input connectors are compatible. Consult the manufacturer if
you have another brand of television.

Summary of Contents for DVDRP56 - DIG. VIDEO DISCPLAYE

Page 1: ... manual was printed with soy based ink En la página 31 hay una guía de referencia rápida en español º Region number supported by this unit Region numbers are allocated to DVD players and software according to where they are sold The region number of this unit is 1 You can play DVDs marked with labels containing 1 or ALL See page 3 for details For U S A only The servicenter list and warranty can be...

Page 2: ...r to the presence of important operating and maintenance servicing instructions in the literature accompanying the ap pliance RISK OF ELECTRIC SHOCK DO NOT OPEN CAUTION THIS PRODUCT UTILIZES A LASER USE OF CONTROLS OR ADJUSTMENTS OR PERFORM ANCE OF PROCEDURES OTHER THAN THOSE SPECI FIED HEREIN MAY RESULT IN HAZARDOUS RADIATION EXPOSURE DO NOT OPEN COVERS AND DO NOT REPAIR YOURSELF REFER SERVICING ...

Page 3: ...selected title or track 11 Advanced operations Repeat play 12 Repeat play A B repeat play 12 Changing the play sequence 13 Program play Random play 13 Increasing your enjoyment of movies 14 ADVANCED SURROUND V S S 14 BASS PLUS 14 DIALOGUE ENHANCER 15 CINEMA 15 ONE TOUCH CINEMA MEMORY 15 Table of contents º Discs that can be played Logo Disc type DVD Video Video CD Audio CD Video system NTSC NTSC I...

Page 4: ...ts and stands rec ommended by the manufacturer Move carts with care Sudden stops excessive force and uneven surfaces can cause carts to overturn 7 Wall and ceiling mounting Do not mount the unit on walls or ceilings unless specified in the in structions Environment 1 Water and moisture Do not use the unit near water such as near a bathtub or swimming pool Avoid damp basements 2 Heat Situate the un...

Page 5: ...trol Batteries Insert so the poles i and j match those in the remote control Do not use rechargeable type batteries Do not mix old and new batteries use different types at the same time heat or expose to flame take apart or short circuit attempt to recharge alkaline or manganese batteries use batteries if the covering has been peeled off Mishandling of batteries can cause electrolyte leakage which...

Page 6: ...ge the black level for a better pic ture á page 21 Video Black Level Control Conserving power This unit consumes a small amount of power even when it is turned off approx 2 W To save power when the unit is not to be used for a long time unplug it from the household AC outlet Connect Your Unit Directly To Your Television Do not connect the unit through your video cassette recorder when setting up y...

Page 7: ...te the setting here The Video menu is shown 6 Press ACTION to end the settings To return to the previous screen Press RETURN For your reference DVDs are recorded in a variety of aspect ratios You can change the way software is shown on a regular television 4 3 with the above operation If you have a widescreen television 16 9 use the televi sion s screen modes The menu language is set to English bu...

Page 8: ...DIO 16 N Angle button ANGLE 16 O Numbered buttons 1 9 0 S10 09 P Cancel button CANCEL 13 OPEN CLOSE RANDOM PROGRESSIVE OUT DIALOGUE ENHANCER ADVANCED SURROUND ONETOUCH CINEMA MEMORY BASS PLUS CINEMA POWER V S S A 7 8 9 1 2 3 56 4 Main unit Page 1 Standby on switch ê I POWER 07 Press to switch the unit from on to standby mode or vice versa In standby mode the unit is still consuming a small amount ...

Page 9: ...displayed even after you finish playing an item Press º when you finish to preserve the unit s motor and your television screen Volume may be lower when playing DVDs than when playing other discs or during television broadcasts If you turn the volume up on the television or amplifier be sure to reduce the volume again before playing other sources so that a sudden increase in output does not occur ...

Page 10: ...rts the correct play time will not be displayed This unit is not compatible with ID3 tags Refer to the glossary on page 25 for more information about MP3 B Resume function DVD VCD CD If you press º during play the unit remembers the position If you press 1 PLAY while is flashing play restarts from the position you stopped it To start play from a memorized position after switching the unit to stand...

Page 11: ...he main unit Play starts again when you release the shuttle dial Audio will be heard during search for most discs You can turn this audio off if you want to DVD and Video CD only á page 21 Audio Audio during Search D Slow motion play DVD VCD While paused Press 6 or 5 Turn the shuttle dial 6 5 on the main unit The picture stills again when you release the shuttle dial twice once Chapter track Chapt...

Page 12: ...ess REPEAT MODE á above To return to menu play press º and press MENU Note Repeat play may not work as desired with some DVDs Repeat play does not work if the disc s elapsed play time is not shown on the unit s display You cannot use repeat play to repeat an entire DVD º To repeat only your favorite tracks VCD CD 1 Program the tracks you want á page 13 2 Press 1 PLAY Play will start 3 Press REPEAT...

Page 13: ...e numbered buttons to select the track To select a 2 digit number Example To select track 23 press S10 then 2 and 3 To select a track using the cursor buttons Press ENTER and 3 4 to select a track then press ENTER again to register the track number Repeat step 2 to program other tracks Total Time tells you the total time of the programmed tracks 3 Press 1 PLAY Play now begins in the programmed seq...

Page 14: ...ADVANCED SURROUND V S S DVD Dolby Digital 2 channel or over only Use Advanced Surround V S S Virtual Surround Sound to enjoy a surround like effect if you are using 2 front speakers If you are play ing a disc with surround effects recorded on it the effect is broadened and sound seems to come from virtual speakers on either side Press V S S Press ADVANCED SURROUND V S S on the main unit Each time ...

Page 15: ... enjoy better pictures by changing the picture quality Press CINEMA Each time you press the button C Cinema mode Indicator on the FL display lights up Mellows movies enhances detail in dark scenes N Normal mode Factory preset You can make finer adjustments to the picture if desired á page 19 Digital picture mode User mode C ONE TOUCH CINEMA MEMORY This feature allows you to reselect the settings y...

Page 16: ...ime you press the button Refer to A on page 18 for language abbreviations To clear display the subtitles 1 Press SUBTITLE 2 Press 1 3 Press 3 4 to select ON or OFF C Angles During play Press ANGLE The number changes each time you press the button Numbered buttons Angle number Subtitle language number Soundtrack number Notes regarding soundtracks subtitle languages and angles You can also use 3 4 o...

Page 17: ...ress 3 4 to select the menu Each time you press the button Play menu A l l Display menu B l l Audio menu C l Video menu D 3 Press 2 1 to select the item 4 Press 3 4 to select the setting Items with 3 or 4 above and below can be changed by 3 4 Press ENTER if the setting does not change after pressing the cursor buttons 3 4 Some items require different operations Read the explana tions on the follow...

Page 18: ...oundtrack language See A at right for language abbreviations Audio signal type See B at right for details Karaoke vocal on off Karaoke DVD only Solo OFF or ON Duet OFF V1iV2 V1 or V2 DVD Subtitle language See A at right for language abbreviations Subtitles on off ON OFF DVD Angle number VCD with playback control only Menu play Indicates whether menu play playback control is on or off T 2 C 2 1 46 ...

Page 19: ...l or over only Dialogue Enhancer á page 15 ON OFF OFF OFF ON Audio menu Icon Content DVD VCD Digital picture mode N Normal mode C Cinema mode á page 15 U User mode Ð The following items are also displayed when you select U Contrast j7 to i7 Increases the contrast between white and black parts of the picture Brightness 0 to i15 Brightens the picture Color j7 to i7 Adjust the shade of the picture s ...

Page 20: ...ou want to change and press ENTER 4 Press 3 4 to select the option and press ENTER The screen now shows the menu again To return to the previous screen Press RETURN When you are finished Press ACTION 2 1 ACTION 1 2 3 4 TOP MENU MENU DISPLAY PLAY MODE SUBTITLE AUDIO ANGLE ENTER RETURN 1 2 3 A B REPEAT 4 5 6 7 8 9 ACTION CANCEL 0 S10 V S S REPEATMODE RETURN ENTER 3 4 Audio PCM Down Conversion Dolby ...

Page 21: ...rround DVD Digital output of DTS Digital Surround signals á page 22 D Range Compression DVD Dolby Digital only Change the dynamic range for late night viewing Dynamic range is the difference between the loudest sound and the softest sound By compressing this range you can listen at low volume but still enjoy clear dialogue Audio during Search DVD VCD Choose whether to have sound during search Menu...

Page 22: ...elect the item with 3 4 and press ENTER and follow the on screen instructions ACTION ENTER RETURN Ratings Unlock Player Change Password Change Level Temporary Unlock SELECT Changing initial settings Entering a password DVD Refer also to Common procedures á page 20 and the Disc menu in Summary of initial settings á page 21 When setting ratings When the level is 8 The password screen is shown when y...

Page 23: ...system component 24 B 24 C Digital connection Connect to a digital amplifier or system component PCM Down Conversion Select Yes Dolby Digital Select PCM DTS Digital Surround Select Off 22 Reference page How to do it 22 BASS PLUS Select ON To enjoy heavy bass with a subwoofer Connect an active subwoofer 24 14 OPTICAL L R SUB WOOFER AUDIO OUT VIDEO OUT S VIDEO OUT DIGITAL AUDIO OUT PCM BITSTREAM OPT...

Page 24: ...ignal directly onto an MD The signals on DVDs will be converted to 48 kHz 16 bit linear PCM Ensure the following conditions are met There is no copy guard recorded on the disc The recording equipment can handle a sampling frequency of 48 kHz 16 bit Amplifier or system component Audio cable Back of the unit Optical digital audio cable Do not bend when connecting Select No in PCM Down Conversion á p...

Page 25: ...CDs and CDs are divided up into sections called tracks and the numbers allocated to these sections are called track numbers Bitstream This is the digital form of multiple channel audio data e g 5 1 chan nel before it is decoded into its various channels Dolby Digital This is a method of coding digital signals developed by Dolby Labora tories Apart from stereo 2 channel audio these signals can also...

Page 26: ... 1 3 The disc may be dirty and may require cleaning 5 Ensure that the disc is installed with the label of the side to be played facing upwards 9 An alternative language is not selected with discs which do not contain more than one language In the case of some discs the alternative language cannot be selected with AUDIO or SUBTITLE Try selecting it from the disc s menu if one is available 9 Subtitl...

Page 27: ...position with the on screen menu icons C Displays Picture distorted during search No picture The picture shown on the television is not normal The sides of the picture are cut off or black bands appear at the top and bottom of the screen There is ghosting when progressive output is on Picture quality is poor The picture is off center when using progressive output You inserted a disc the unit canno...

Page 28: ...Fax 787 768 2910 Servicenter List U S A F12030 As of DEC 00 Factory Servicenters Locations CALIFORNIA 6550 Katella Avenue Cypress CA 90630 800 Dubuque Avenue S San Francisco CA 94080 3878 Ruffin Road Suite A San Diego CA 92123 COLORADO 1640 South Abilene Street Suite D Aurora CO 80012 FLORIDA 3700 North 29th Avenue Suite 102 Hollywood FL 33020 GEORGIA 8655 Roswell Road Suite 100 Atlanta GA 30350 I...

Page 29: ...per set up adjustments operation or maintenance alteration modification power line surge lightning damage interference commercial use such as hotel office restaurant or other business or rental use of the product or serviced by anyone other than an PASC Factory Servicenter or an authorized PASC Servicenter or damage that is attributable to acts of God LIMITS AND EXCLUSIONS There are no express war...

Page 30: ...Reference RQT6012 30 Memo ...

Page 31: ...do de espera Para reanudar la reproducción Pulse 1 PLAY mientras parpadea en el visualizador del aparato º Salto de capítulos o pistas Durante la reproducción o durante la pausa Pulse o 9 º Visión cuadro a cuadro DVD VCD Durante la pausa Pulse 2 o 1 º Avance rápido y rebobinado SEARCH Durante la reproducción Pulse 6 o 5 º Reproducción a cámara lenta DVD VCD Durante la pausa Pulse 6 o 5 A la toma d...

Page 32: ...I Power supply AC 120 V 60 Hz Power consumption 14 W Dimensions 430 W k247 D k82 H mm 1615 16q W k93 4q D k 31 4q H excluding protrusions Mass 2 6 kC 5 7 lb Specifications RQT6012 P F0601MM0 Panasonic Consumer Electronics Company Division of Matsushita Electric Corporation of America One Panasonic Way Secaucus New Jersey 07094 http www panasonic com 2001 Matsushita Electric Industrial Co Ltd Print...
Reviews: