background image

R

Q

T6

974

20

Ad

v

a

nce

d

 ope

ratio

n

s

Changing settings

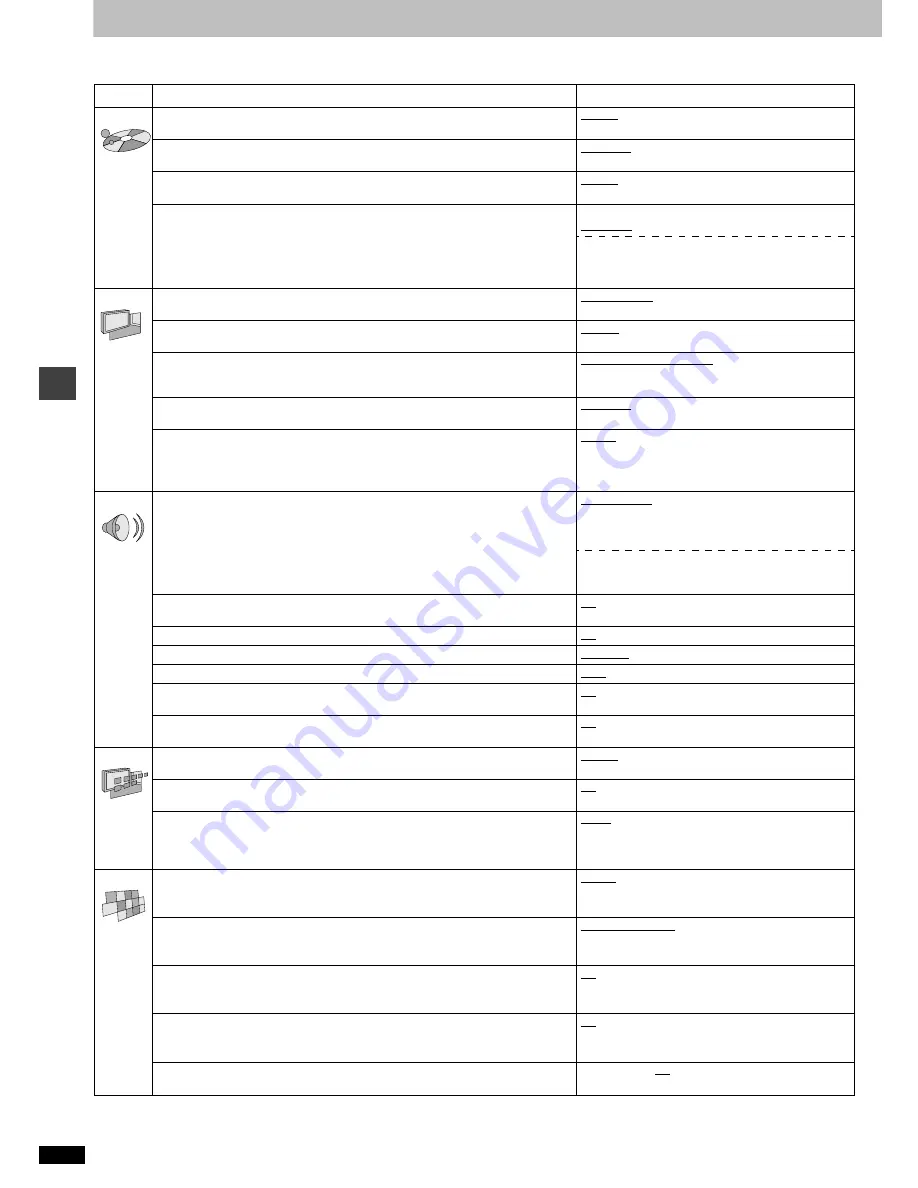
This chart shows the settings for this unit. Change the settings to suit your preferences and to suit the unit to the environment in which it is 
being used. The changes remain intact even if you switch the unit to standby. See page 21 for operation.

§

1

The original language of each disc is selected.

§

2

Input a code number with the numbered buttons (

 page 22).

§

3

If the language selected for “Audio” is not available, subtitles of that 
language will automatically appear if available on that disc.

§

4

Prohibits play of DVD-Video with corresponding ratings recorded on 
them.

§

5

Audio will be heard when playing some DVD-Audio despite the settings 
you make here.

Menus

Items

Options

 (Underlined items are the factory preset.)

Disc

Audio
Choose the audio language.

English

French

Spanish

Original

§

1

Other 

¢¢¢¢

§

2

Subtitle
Choose the subtitle language.

Automatic

§

3

English

French

Spanish

Other 

¢¢¢¢

§

2

Menus
Choose the language for disc menus.

English

French

Spanish

Other 

¢¢¢¢

§

2

Ratings (

 page 21)

Set a ratings level to limit DVD-Video play.

The password screen is shown if you choose levels 0 to 7 or if you choose 

“Ratings” when levels 0 to 7 have been selected.

Select “Level 0” to prevent play of discs that do not have ratings levels recorded 

on them.

Setting ratings (When level 8 is selected)
8 No Limit

1 to 7

§

4

0 Lock All

Changing ratings (When level 0–7 is selected)
Unlock Player

Change Password

Change Level

Temporary Unlock

Video

TV Aspect (

 page 9)

Choose the setting to suit your television and preference.

4:3 Pan&Scan

4:3 Letterbox

16:9

Progressive Out (Component)
Choose “Enable” to enable progressive output.

Disable

Enable

TV Type
Select to suit the type of television.

Standard (Direct View TV) CRT Projector
LCD TV/Projector

Projection TV

Plasma TV

Still Mode
Specify the type of picture shown when paused.

Automatic

Field

Frame

Black Level Control
Change the black level of the picture if you connected a television through the 
COMPONENT VIDEO OUT terminals.

Lighter:

When connected through VIDEO OUT or S 
VIDEO OUT.

Darker:

When connected through COMPONENT 
VIDEO OUT (Y/P

B

/P

R

).

Audio

Speaker Setting (

 page 22)

Choose the settings to suit your audio system and the listening environment.

Multi-channel:
when 3 or more speakers are connected.

Speaker presence and size

Delay time

Channel balance

2-channel:
when 2 speakers or an amplifier with a Dolby Pro 
Logic decoder is connected.

Digital Audio Output (

 page 21)

Select whether to output digital signals or not.

On

Off

PCM Down Conversion (

 page 21)

No

Yes

Dolby Digital (

 page 21)

Bitstream

PCM

DTS Digital Surround (

 page 21)

PCM

Bitstream

Dynamic Range Compression (Dolby Digital only)
Change the dynamic range for late night viewing.

Off

On

Audio during Search

§

5

Choose whether to have sound during search.

On

Off

Display

Menu Language
Choose the language for these menus and the on-screen messages.

English

Français

Español

On-Screen Messages
Choose whether to show on-screen messages or not.

On

Off

FL Dimmer
Changes the brightness of the unit’s display.

Bright

Dim

Auto: The display is dimmed during play, but 

brightens when you perform operations such as 
slow-motion, search, and pause.

Others

HighMAT
Play HighMAT discs as HighMAT discs, or as regular WMA/MP3/JPEG discs. 
(Reload the disc for the setting to be effective.)

Enable: Play HighMAT discs as HighMAT discs.
Disable: Play HighMAT discs as regular WMA/MP3/

JPEG discs.

Mixed Disc—Audio & Stills
Select which type of file the unit plays when playing a disc containing both JPEG 
and WMA/MP3. (Reload the disc for the setting to be effective.)

Audio (MP3/WMA)

Stills (JPEG)

DVD-Video Mode
Select how to play pictures contained on some DVD-Audio.
The setting returns to “Off” when you remove the disc or turn the unit off.

Off: DVD-Audio are played as DVD-Audio.
On: You can play DVD-Video content on DVD-Audio.

Demo

Off
On: A demonstration of the on-screen displays 

starts. Press any button to stop it.

QUICK SETUP (

 page 9)

Answer questions to make basic settings.

Yes

No

Summary of Contents for DVD-S55

Page 1: ...sing this product For optimum performance and safety please read these instructions carefully before connecting operating or adjusting this product Please keep this manual for future reference For U S A This manual was printed with soy based ink As an ENERGY STAR Partner Panasonic has determined that this product meets the ENERGY STAR guidelines for energy efficiency Region number The player plays...

Page 2: ...es 21 Entering a password Ratings 21 Digital output 21 Speaker setting 22 Glossary 23 Specifications 23 Troubleshooting guide 24 Limited Warranty ONLY FOR U S A 26 Product Service 26 Guía de referencia rápida en español 27 Spanish Quick Reference Accessories Please check and identify the supplied accessories Use numbers indicated in parentheses when asking for replacement parts Only for U S A To o...

Page 3: ... try to correct the interference by one or more of the following measures Reorient or relocate the receiving antenna Increase the separation between the equipment and receiver Connect the equipment into an outlet on a circuit different from that to which the receiver is connected Consult the dealer or an experienced radio TV technician for help Any unauthorized changes or modifications to this equ...

Page 4: ...aution when moving the cart apparatus combination to avoid injury from tip over 13 Unplug this apparatus during lightning storms or when unused for long periods of time 14 Refer all servicing to qualified service personnel Servicing is required when the apparatus has been damaged in any way such as power supply cord or plug is damaged liquid has been spilled or objects have fallen into the apparat...

Page 5: ...ETUP 9 21 B Open Close button OPEN CLOSE 10 C Numbered buttons 1 9 0 S10 10 D Slow Search buttons 6 5 SLOW SEARCH 10 E Play button 1 PLAY 10 F Pause button PAUSE 10 G Menu Play list button MENU PLAY LIST 10 13 H Return button RETURN 9 I Angle Page button ANGLE PAGE 11 14 15 J Quick replay button QUICK REPLAY 11 K Position memory button POSITION MEMORY 11 L Double re master button DOUBLE RE MASTER ...

Page 6: ... corresponding audio input terminals on the television After making this connection change the black level for a better picture page 20 Video Black Level Control Video cable not included Television s COMPONENT VIDEO IN terminals For better pictures S video cable not included S VIDEO OUT terminal The S video terminal achieves a more vivid picture than the VIDEO OUT terminal by separating the chromi...

Page 7: ...there are with digital signals Connect the equipment to the unit s 2 channel AUDIO OUT L R terminals or Select 2 channel in Speaker Setting page 20 when connecting the equipment to the unit s FRONT L R 5 1 channel AUDIO OUT terminals Conserving power This unit consumes a small amount of power even when it is turned off 1 W To save power when the unit is not to be used for a long time unplug it fro...

Page 8: ...nic DVD video recorder or DVD video camera are played as DVD Video on this unit CD R and CD RW discs This unit can play CD R RW audio recording disc recorded with CD DA video CD SVCD conforming to IEC62107 WMA MP3 or JPEG Close the sessions or finalize the disc after recording See page 13 for more information about WMA MP3 and JPEG HighMAT discs This unit is compatible with HighMAT discs containin...

Page 9: ...Press ENTER and then SETUP to end the settings To return to the previous screen Press RETURN To access this screen again later page 20 Others QUICK SETUP TV Aspect Select 4 3 regular or 16 9 widescreen to suit your television If you have a regular 4 3 television you can also select how video on some discs is shown page 20 Video TV Aspect 4 3 Pan Scan Factory preset Widescreen software is expanded ...

Page 10: ...VIGATOR TOP MENU DISPLAY SUBTITLE PLAY MODE ZOOM AUDIO ANGLE PAGE QUICKREPLAY POSITION MEMORY DOUBLE RE MASTER RETURN MENU PLAY LIST SKIP STOP PLAY SLOW SEARCH CANCEL SETUP OPEN CLOSE 3 2 1 9 8 S10 0 7 6 5 4 PAUSE ENTER 1 2 3 1 D E RETURN MENU 6 5 SLEEP ANGLE PAGE QUICK REPLAY POSITION MEMORY GROUP SUBTITLE 9 TOP MENU 3 4 2 1 ENTER 3 2 Numbered buttons Stop Press flashes on the display Press 1 PLA...

Page 11: ...ck a few seconds within the current item program track or title JPEG Skip back a few pictures During play Press QUICK REPLAY This feature may not work while playing some parts of a disc or at all with some discs JPEG You can rotate pictures ninety degrees While a picture is displayed 1 Press ANGLE PAGE 2 Press 3 4 to select Rotate right or Rotate left and press ENTER To clear the popup screen Pres...

Page 12: ...licensed from Fraunhofer IIS and Thomson multimedia Windows Media and the Windows logo are trademarks or registered trademarks of Microsoft Corporation in the United States and or other countries WMA is a compression format developed by Microsoft Corporation It achieves the same sound quality as MP3 with a file size that is smaller than that of MP3 HighMAT and the HighMAT logo are either trademark...

Page 13: ...nd content lists 3 Press 1 then 3 4 to select an item and press ENTER To exit the list screen Press MENU RAM Use the program list to find programs to play 1 Press DIRECT NAVIGATOR Titles appear only if you have entered them You cannot change program and disc titles 2 Press 3 4 to select the program The selected program plays in the background You can select programs with the numbered buttons To se...

Page 14: ...ect OFF or ON Changing the position and brightness of the subtitles 1 While the subtitle icon is on the screen press 2 1 to highlight Subtitle Position or Subtitle Brightness 2 Press 3 4 to adjust Adjust position between 0 and s60 in 2 unit steps For brightness select Auto so the brightness adjusts automatically against the background or a level between 0 and s9 DVD A Moving picture part DVD V Dur...

Page 15: ...w for the aspect ratio of the picture Making fine adjustments to the zoom ratio While the ZOOM icon is displayed Press 3 4 The ratio changes in 0 01 units between 1 00 and 1 60 and in 0 02 units between 1 60 and 2 00 On the main unit 1 Press ZOOM MODE Each time you press the button 2 Turn and hold the zoom dial UP right to zoom in DOWN left to zoom out To restore the original ratio Press ZOOM unti...

Page 16: ...ed off or the disc tray is opened 1 DVD A DVD V Press the numbered buttons to select a group or a title DVD V Some items cannot be selected DVD A You can select more than one group To enter all groups select All using 2 1 and press ENTER To deselect a group press the numbered buttons corresponding to the group you want to clear 2 Press 1 PLAY To exit the all group program random mode Press PLAY MO...

Page 17: ...or remaining time for the program play list group track or title or chapter during program and random play Select a position to start play by specifying a time with the numbered buttons and press ENTER Changing the time display VCD CD Press 3 4 to show the elapsed play time remaining time for the track or remaining time for the disc Elapsed play time VCD SVCD only WMA MP3 For display only cannot b...

Page 18: ...nd 1 Press 2 1 to select the marker pin icon 2 Press 3 4 to select 11 20 You can select the next group when the current group is full 3 Press 1 The markers are ordered by time This means that the marker numbers can change when you add and erase markers If places have been marked e g with a DVD video recorder they are displayed You can clear existing markers but they are restored when you open the ...

Page 19: ...tails are sharper C1 Cinema1 Mellows images and enhances detail in dark scenes C2 Cinema2 Sharpens images and enhances detail in dark scenes U1 U2 U3 User mode right Video output mode 480I Interlace video 480P Progressive video You can change the video output mode only when Progressive Out Component in the SETUP menu is set to Enable page 20 When progressive output is on closed captions will not b...

Page 20: ...he black level of the picture if you connected a television through the COMPONENT VIDEO OUT terminals Lighter When connected through VIDEO OUT or S VIDEO OUT Darker When connected through COMPONENT VIDEO OUT Y PB PR Audio Speaker Setting page 22 Choose the settings to suit your audio system and the listening environment Multi channel when 3 or more speakers are connected Speaker presence and size ...

Page 21: ... Factory preset Output as 96 kHz or 88 2 kHz Yes Converted to 48 kHz or 44 1 kHz Note Signals are converted to either 48 kHz or 44 1 kHz despite the above settings if the signals have a sampling frequency of over 96 kHz or the disc has copy protection Some equipment cannot handle sampling frequencies of 88 2 kHz even if they can handle 96 kHz Read your equipment s operating instructions for detail...

Page 22: ...unit itself or the disc being played The display s D MIX indicator goes out in these cases Speaker setting Speaker presence and size a Large Small No SETUP SELECT ENTER RETURN ms ms dB 0 dB dB L Exit Test LS R SW C RS dB 0 0 0 0 0 b a c a a LS RS a c b c a c a Exit Test signal Front L Center Front R Surround Subwoofer LS LS Delay time b d Center speaker Difference Setting Approx 50 cm 11 2 feet 1 ...

Page 23: ...ed by comparing past and future I and P pictures so it has the lowest volume of information Linear PCM pulse code modulation These are uncompressed digital signals similar to those found on CDs Signal system NTSC Operating temperature range i5 to i35 oC i41 to i95 oF Operating humidity range 5 to 90 RH no condensation Discs played 8 cm or 12 cm 1 DVD RAM DVD VR compatible 2 DVD Audio 3 DVD Video 4...

Page 24: ...other than the ones listed in these operating instructions You can only play DVD Video if their region number is 1 ALL or multiple region number including 1 The disc may be dirty and may require cleaning Ensure that the disc is loaded with the label of the side to be played facing upwards Check that the DVD RAM has something recorded on it 8 Cover page 8 10 Cannot select alternative languages This...

Page 25: ...he AUDIO ONLY feature on If the D MIX indicator on the display goes out while playing a multi channel DVD Audio disc sound will only be output from speakers specified by the disc Read the disc s instructions for details Press 1 PLAY to restore normal play after changing the speed Noise may occur when playing WMA files 6 7 15 19 15 22 19 Piercing noise comes from the speakers If you have connected ...

Page 26: ...TY ARE LIMITED TO THE PERIOD OF THE LIMITED WARRANTY Some states do not allow the exclusion or limitation of incidental or consequential damages or limitations on how long an implied warranty lasts so the exclusions may not apply to you This warranty gives you specific legal rights and you may also have other rights which vary from state to state If a problem with this product develops during or a...

Page 27: ... 1 PLAY Conexión a un televisor Instalación rápida Para disfrutar del vídeo progresivo AC IN OPTICAL PB PR DIGITALAUDIOOUT PCM BITSTREAM COMPONENT VIDEO OUT 480P 480I AUDIO OUT VIDEO OUT SURROUND L R SURROUND FRONT R R L Y FRONT L L R 5 1ch 2ch CENTER SUB WOOFER AUDIO IN R VIDEO IN L Televisor rojo blanco amarillo rojo blanco amarillo A la toma de CA del hogar CA 120 V 60 Hz Cable de alimentación ...

Page 28: ...lectric Corporation of America One Panasonic Way Secaucus New Jersey 07094 http www panasonic com Panasonic Sales Company Division of Matsushita Electric of Puerto Rico Inc PSC Ave 65 de Infantería Km 9 5 San Gabriel Industrial Park Carolina Puerto Rico 00985 Panasonic Canada Inc 5770 Ambler Drive Mississauga Ontario L4W 2T3 www panasonic ca pr ...

Reviews: