E - 12
Setup
(continued to next page)
(continued to next page)
(continued to next page)
(continued to next page)
(continued to next page)
B. Connecting a VCR
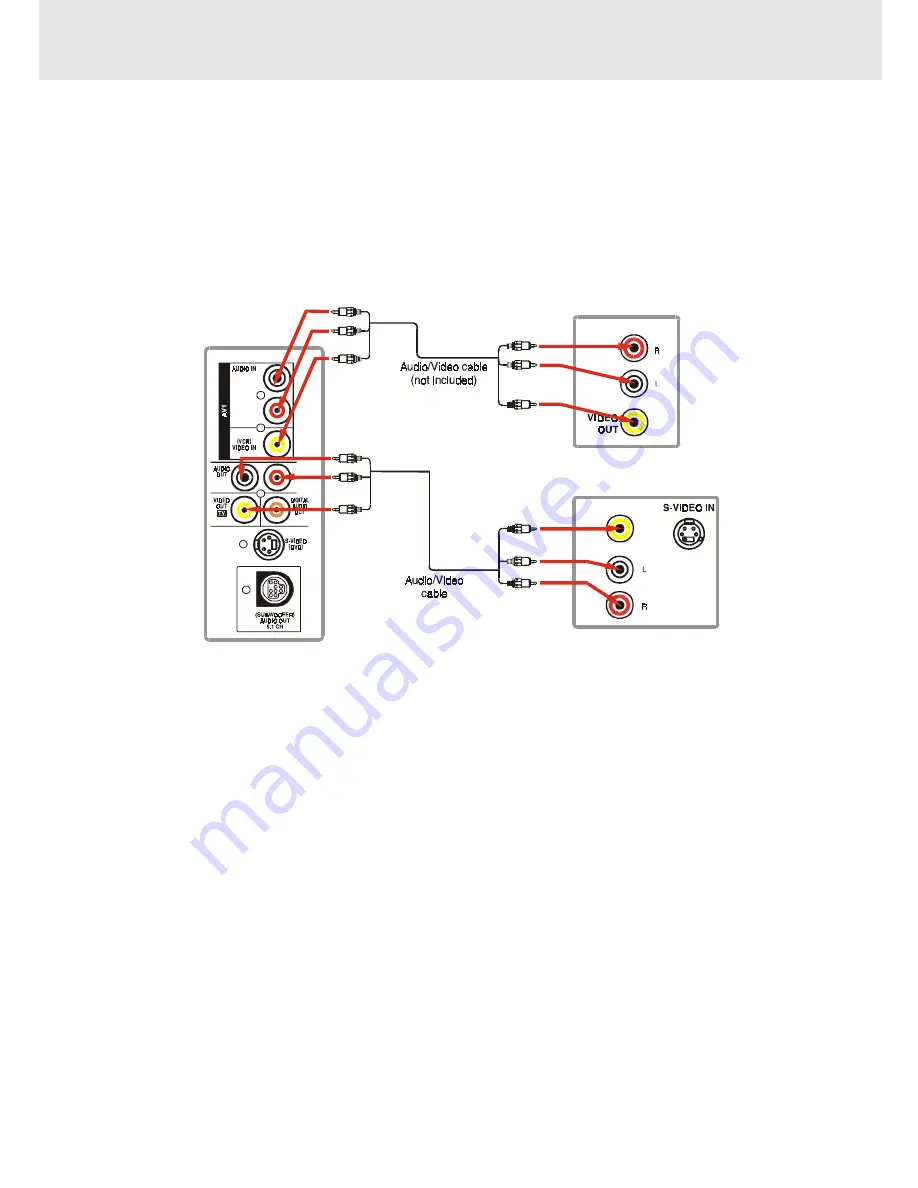
1. Using the supplied Audio/Video cable, connect the yellow plug from VIDEO OUT jack on your Unit to VIDEO IN
jack on your TV, connect the left and right AUDIO OUT jacks on your Unit to AUDIO IN jacks on your TV. If you
want the sound come from the speakers of the Main Unit, you need not to connect these left and right Audio
cable from the Main Unit to your TV.
2. Using the Video cable (not supplied), connect the VIDEO IN (VCR) jack on your Unit to VIDEO OUT jack on your
VCR.
3. Using the Audio cable (not supplied), connect the left/right AUDIO IN jacks on your Unit to the AUDIO OUT jacks
on your VCR.
Watching a DVD
1. Turn on the Unit, use the FUNCTION button on the remote control or DVD button on the front panel to select
"DVD".
2. Turn on your TV and follow the instructions included with it to select the VIDEO input which corresponds to the
VIDEO IN jack you connected to the Unit to.
Watching a Videotape
1. Turn on the Unit, use the FUNCTION button on the remote control or AV1, AV2 buttons on the front panel to
select "AV_IN".
2. Turn on your TV and follow the instructions included with it to select the VIDEO input which corresponds to the
VIDEO IN jack that is connected to the Unit.
3. Turn on the VCR and follow the instructions included with it to play the videotape.
Note:
• If you have a mono VCR, the volume level from the speakers will be low. To avoid this, connect the left/right audio
out from the Unit to the left/right audio inputs on your TV using the included A/V cable.
DVD Unit
VIDEO IN
AUDIO IN
TV
To AUDIO IN
To AUDIO OUT
To VIDEO IN
To VIDEO OUT
(white)
(white)
(red)
(red)
(yellow)
(yellow)
To AUDIO OUT
To AUDIO IN
To VIDEO
OUT
To VIDEO IN
(white)
(white)
(red)
(red)
(yellow)
(yellow)
R
R
L
L
AUDIO OUT
VCR


