background image

12

RQT6263

Basic operations

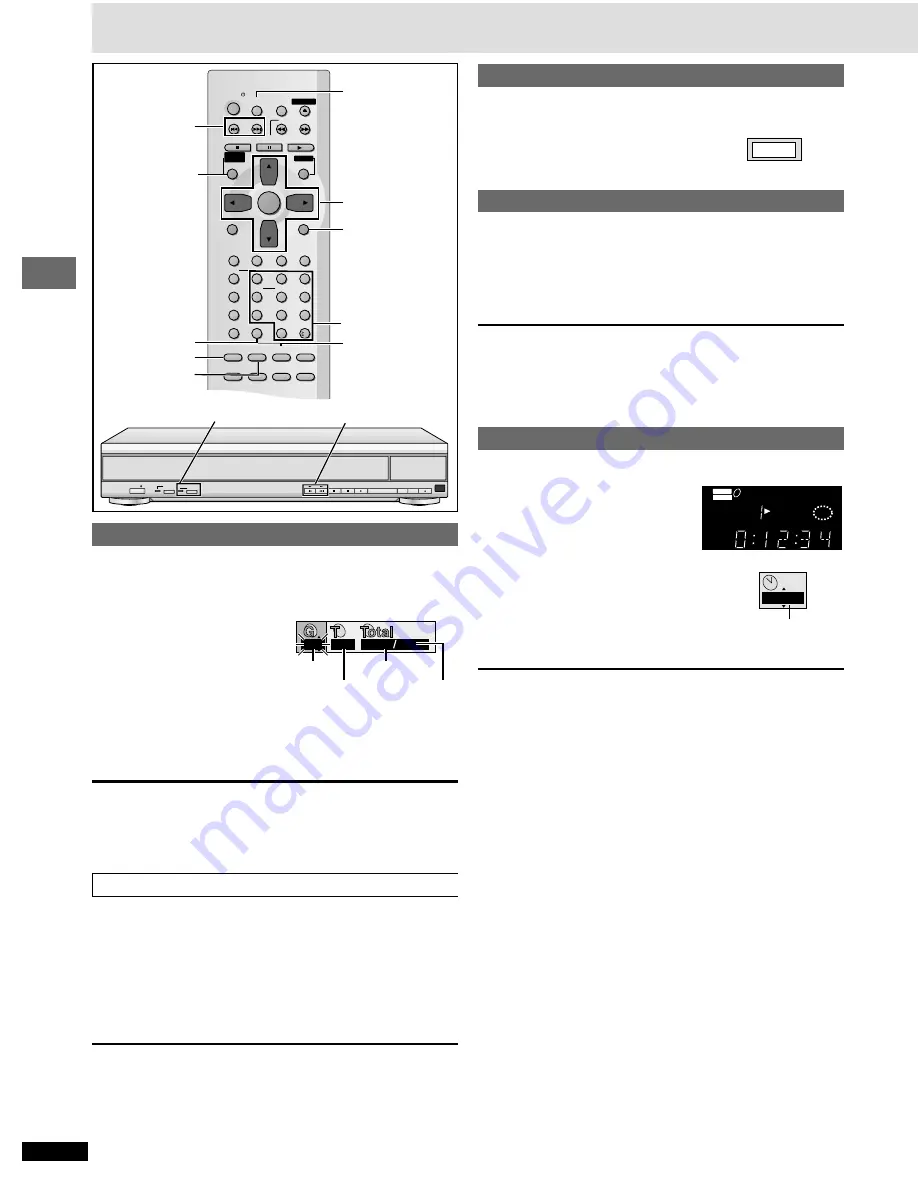
Selecting groups to play

[DVD-A] 

[WMA] [MP3]

The tracks on DVD-Audio and WMA/MP3 are divided into groups. How
these groups are played depends on the recording method.

1

Press [GROUP].

The group number changes
each time you press the button.

2

Press [ENTER].

3

Press the numbered buttons to select the track
number and press [ENTER].

The selected group and track begin to play.

[Note]

You can also select groups and tracks with the cursor buttons.

Selection may not be allowed in some situations.

You can play all the groups in succession in Sequential Mode
(

 page10). 

\DVD-A\

Playing bonus groups

[DVD-A]

Some discs contain bonus groups. To enjoy these groups you may have to
enter a password. Refer to the disc’s jacket.

1. Select the bonus group while stopped (

 steps 1 and 2, above).

2. Enter the 4-digit password with the numbered buttons.

You can erase it by pressing [CANCEL].

3. Press [ENTER].
4. Press the numbered buttons to select a track and press [ENTER] to

start play.

[Note]

Some discs will show a menu screen to accept your password. Follow the
on-screen instructions.

You may have to reenter the password after removing the disc in the play
position or switching the unit to standby.

In Sequential Mode, bonus groups can be played as long as your
password is accepted.

POWER     / I

PROGRESSIVE

OUT

AUDIO

ONLY

DISC

EXCHANGE

DISC

SKIP

OPEN/

CLOSE

: 9


5

Basic play

Numbered
buttons

Selecting still pictures—Page Skip

[DVD-A]

During play or while paused

Press [PAGE].

The page changes each time you press the button.

To enjoy even higher quality sound—AUDIO ONLY

[RAM] [DVD-A] [DVD-V] 

[VCD]


[CD] [WMA] [MP3]

You can enjoy higher quality audio by stopping the video signal.

During play

Press [AUDIO ONLY].

The indicator on the main unit lights.

AUDIO ONLY is canceled if you press the button again or turn the unit off.

[Note]

Video is output when you stop the disc and during operations such as
search.

The television screen can appear unusual while video signals are not
being output.

Setting the unit to turn off—SLEEP timer

\RAM\ \DVD-A\ \DVD-V\


[VCD]


[CD] [WMA] [MP3]

Press [SLEEP] to select
the setting.

Each time you press the button:
OFF 

#

AUTO

§

#

60 min 

#

90 min 

#

120 min

  ^————————————————}

§

The unit turns off 5 minutes after play

finishes.

To cancel the SLEEP timer
Press [SLEEP] to select “OFF”.

To confirm the remaining time
Press [SLEEP].

\Note\

AUTO also works with DVDs that show a menu after play finishes.

AUTO does not work if you press [

], [MENU] or [TOP MENU]. It is

activated again when you restart play.

AUTO does not work correctly with some discs (e.g., if menus appear

after playing Video CDs).

 Auto standby

The unit switches to standby mode after about 30 minutes in the stop
mode, irrespective of the SLEEP setting.

AUDIO ONLY button/indicator

The unit turns off after
60 minutes.

:

9

SLEEP

CANCEL

AUDIO ONLY

GROUP

SLEEP

SLOW/SEARCH

SKIP

STOP

PLAY

MENU

TOPMENU

ENTER

DISPLAY

SUBTITLE

DISC

DISC1

DISC2

DISC3

PROGRAM

DISC4

DISC5

SEQUENTIAL

FL SELECT

AUDIO ONLY

POSITION

MEMORY

A-B

REPEAT

REPEAT

RANDOM

PAGE

ZOOM

GROUP

CANCEL

AUDIO

ANGLE QUICK REPLAY

RETURN

SETUP

1

2

3

4

5

6

7

8

0

9

10

OPEN/CLOSE

PLAYLIST

DIRECT

NAVIGATOR

PAUSE

POWER

PAGE

3

,

4

,

2

1

ENTER

RETURN

TOP MENU

PAGE 1

AUDIO

DVD

VIDEO

VR

CD

WMA

MP3

TRACK  CHAP 

GROUP TITLE

ASS

B

SLEEP

PG 

DISC

2

1

3 4

5

60 min

  Z

Z

Group No.

Track No. in group

1

1

1

18

Track No. in disc

Total No. of

tracks on disc

e.g. MP3

Summary of Contents for DVD-CP72S Operating

Page 1: ... to where they are sold The region number of this player is 1 The player will play DVD Video marked with labels containing 1 or ALL Example Before connecting operating or adjusting this product please read these instructions completely Please keep this manual for future reference AUDIO VIDEO As an ENERGY STAR Partner Panasonic has determined that this product meets the ENERGY STAR guidelines for e...

Page 2: ...en Menu Icons 18 Common procedures 18 Disc information 18 Unit information 19 Progress indicator 20 Changing settings 21 Common procedures 22 Entering a password Ratings 22 Digital output 23 Speaker setting 23 Reference Troubleshooting guide 24 Glossary 25 Limited Warranty 26 Customer Services Directory 26 Product Service 26 Guía de referencia rápida en español 27 Spanish Quick Reference Specifica...

Page 3: ...help Any unauthorized changes or modifications to this equipment would void the user s authority to operate this device This device complies with Part 15 of the FCC Rules Operation is subject to the following two conditions 1 This device may not cause harmful interference and 2 this device must accept any interference received including interference that may cause undesired operation Inside of pro...

Page 4: ...ith carts and stands recommended by the manufacturer Move carts with care Sudden stops excessive force and uneven surfaces can cause carts to overturn 7 Wall and ceiling mounting Do not mount the unit on walls or ceilings unless specified in the instructions Maintenance To clean this unit wipe with a soft damp cloth Never use alcohol paint thinner or benzine to clean this unit Before using chemica...

Page 5: ...discs with exposed adhesive from tape or left over peeled off stickers Do not use scratch proof protectors or covers Do not use discs printed with label printers available on the market Logo Disc information Do not use irregularly shaped discs e g heart shaped as these can damage the unit Discs that cannot be played PAL discs the audio on DVD Audio can be played DVD ROM CD ROM CDV CD G iRW DVD RW ...

Page 6: ...monitor e g Y PB PR Y B Y R Y Y CB CR Connect to terminals of the same color After making this connection change the black level for a better picture page 21 Video Black Level Control When making this connection ensure you connect the audio cables to the corresponding audio input terminals on the television Connection to a television This page explains how to connect the unit to a television and s...

Page 7: ...ing instructions A Digital Connect an amplifier with Dolby Digital and DTS decoders to enjoy surround sound You can also enjoy high quality stereo sound with sampling frequencies of 88 2 and 96 kHz if the material isn t copy protected and the equipment you connect is compatible with these signals B Analog Connect an amplifier with multi channel audio input terminals to enjoy surround sound This un...

Page 8: ...uming a small amount of power R Drawer 9 S Skip Search buttons 9 6 5 11 T FL Display 10 U Progressive out indicator 9 V Progressive out button PROGRESSIVE OUT 9 W Audio only indicator 12 X Disc exchange button DISC EXCHANGE 10 Y Disc skip button DISC SKIP 10 Z Remote control signal sensor Buttons such as 3 function the same as the controls on the remote control Disc tray number Do not mix old and ...

Page 9: ...ll not be displayed Quick setup The QUICK SETUP screen appears when you press SETUP the first time after purchase and assists you to make necessary settings You can access this screen again later if you need to page 21 Others QUICK SETUP Preparation Turn on the television and select the appropriate video input on the television to suit the connections for the player 1 Press POWER Í to turn on the ...

Page 10: ...TITLE ASS B PG DISC 2 1 3 4 5 AUDIO DVD VIDEO VR CD WMA MP3 TRACK CHAP GROUP TITLE ASS B PG DISC 2 1 3 4 5 POWER I PROGRESSIVE OUT AUDIO ONLY DISC EXCHANGE DISC SKIP OPEN CLOSE 9 6 5 DISC EXCHANGE DISC SKIP 1 6 5 POWER Í TOP MENU SLEEP SLOW SEARCH SKIP STOP PLAY MENU TOPMENU ENTER DISPLAY SUBTITLE DISC DISC1 DISC2 DISC3 PROGRAM DISC4 DISC5 SEQUENTIAL FLSELECT AUDIOONLY POSITION MEMORY A B REPEAT R...

Page 11: ...group first page 12 Resume function RAM DVD A DVD V VCD CD WMA MP3 When the elapsed play time is displayed The position you stopped play at is recorded by the unit when is flashing on the display While is flashing press 1 PLAY to start play from where you stopped it When playing DVD Video Chapter Preview below The position is cleared when the disc is changed or the unit is switched to standby To c...

Page 12: ...DIO ONLY RAM DVD A DVD V VCD CD WMA MP3 You can enjoy higher quality audio by stopping the video signal During play Press AUDIO ONLY The indicator on the main unit lights AUDIO ONLY is canceled if you press the button again or turn the unit off Note Video is output when you stop the disc and during operations such as search The television screen can appear unusual while video signals are not being...

Page 13: ...t information for a track CD CD text 1 Press 3 4 to select a track 2 Press 1 to show the text information Press 2 1 to select other tracks Press ENTER to play tracks selected here To return to the list screen Press RETURN Finding a track to play Enter part of a track title to make a search Although the characters are upper case the unit also searches for lower case Example search for tracks includ...

Page 14: ...list Press 4 to show other play lists if there are more than six You can select play lists with the numbered buttons To select a 2 digit number e g 23 S10 2 3 3 Press ENTER to start play To clear the play list screen Press PLAY LIST The unit returns to the condition it was in before you called up the play list To display information about a selected play list 1 Select the play list and press 1 2 P...

Page 15: ... Press 3 4 to select OFF or ON Angles DVD A DVD V During play Press ANGLE 4 3 TV ZOOM function RAM DVD A DVD V Widescreen software often appears as a letterbox picture page 9 when shown on a regular 4 3 aspect television Use 4 3 TV ZOOM to expand these pictures to fill more of the television The sides of the picture are cut off when you do this During play Press ZOOM Each time you press the button...

Page 16: ...as long as your password is accepted page 12 Program play You can select up to 32 items to play in the order you choose When Sequential Mode is on RAM DVD A VCD CD WMA MP3 You can program all the items on discs While stopped 1 Press PROGRAM 2 1 Press the numbered buttons to select a disc 2 DVD A WMA MP3 Press the numbered buttons to select a group 3 Press the numbered buttons to select a program R...

Page 17: ...ermines the end of a program title track as point B when the end of the program title track is reached A B repeat is canceled when you press QUICK REPLAY Random play When Sequential Mode is on RAM DVD A VCD CD WMA MP3 You can play all discs except DVD Video in random order While stopped 1 Press RANDOM 2 Press 1 PLAY Note DVD Video and empty trays are skipped during random play When Sequential Mode...

Page 18: ...during play D 2 b a c d e f g h b c i j d g l 128kbps 44 1kHz k 2 3 12 18 m n Page 1 o SLEEP SLOW SEARCH SKIP STOP PLAY MENU TOPMENU ENTER DISPLAY SUBTITLE DISC DISC1 DISC2 DISC3 PROGRAM DISC4 DISC5 SEQUENTIAL FLSELECT AUDIOONLY POSITION A B PAGE ZOOM GROUP CANCEL AUDIO ANGLE QUICKREPLAY RETURN SETUP 1 2 3 4 5 6 7 8 0 9 10 OPEN CLOSE PLAYLIST DIRECT NAVIGATOR PAUSE POWER 3 4 2 1 ENTER RETURN DISPL...

Page 19: ...sing the television s speakers Distance A Television s width Note Advanced Surround will not work or will have less effect with some discs Turn off the surround sound effects on the equipment you have connected when using this effect Turn Advanced Surround off if it causes distortion Even if three or more speakers are connected output from this unit will be in stereo two channels when Advanced Sur...

Page 20: ...hange the video output mode only when Progressive Out in the Video menu is set to Enable page 21 c Transfer Mode Select the method of conversion for progressive output to suit the type of material being played page 25 Glossary Film and video Auto 1 normal for viewing film material Auto 2 for viewing film material the same as Auto 1 but able to convert 30 frame per second progressive video Video fo...

Page 21: ...amic range for late night viewing Audio during Search 5 Choose whether to have sound during search Menu Language Choose the language for these menus and the on screen messages On Screen Messages Choose whether to show on screen messages or not DVD Video Mode Select how to play pictures contained on some DVD Audio The setting returns to Off when you change the disc or turn the unit off Demo A demon...

Page 22: ... Arabic 6582 Armenian 7289 Assamese 6583 Aymara 6588 Azerbaijani 6590 Bashkir 6665 Basque 6985 Bengali Bangla 6678 Bhutani 6890 Bihari 6672 Breton 6682 Bulgarian 6671 Burmese 7789 Language code list Byelorussian 6669 Cambodian 7577 Catalan 6765 Chinese 9072 Corsican 6779 Croatian 7282 Czech 6783 Danish 6865 Dutch 7876 English 6978 Esperanto 6979 Estonian 6984 Faroese 7079 Fiji 7074 Finnish 7073 Fr...

Page 23: ...when the speaker does not support low frequency reproduction If the subwoofer is set to No the front speakers will automatically be set to Large Delay time b DVD V Dolby Digital and DTS center and surround speakers only For optimum listening with 5 1 channel sound all the speakers except for the subwoofer should be the same distance from the seating position If you have to place the center or surr...

Page 24: ...on Troubleshooting guide Operation Some operations may be prohibited by the disc The unit may not be operating properly due to lightning static electricity or some other external factor Reset procedure Press POWER Í to switch the unit to the standby mode and then back to ON Alternatively press POWER Í to switch the unit to the standby mode disconnect the AC power supply cord and then reconnect it ...

Page 25: ... pulse code modulation These are uncompressed digital signals similar to those found on CDs Playback control PBC If a Video CD has playback control you can select scenes and information with menus called menu play in these instructions 6 7 19 19 23 23 Sound Page No sound Distorted sound Piercing noise comes from the speakers Check the connections Check the volume on the equipment you have connecte...

Page 26: ...pany 787 750 4300 or fax 787 768 2910 Parts One 1 Year One 1 Year Ten 10 Days Product or Part Name DVD Player DVD Recorder Rechargeable Batteries DVD RAM Disc in exchange for defective item Labor Ninety 90 Days One 1 Year Not Applicable Limited Warranty Limits And Exclusions This warranty ONLY COVERS failures due to defects in materials or workmanship and DOES NOT COVER normal wear and tear or cos...

Page 27: ... memoriza la posición en la que usted detuvo la reproducción hasta que usted abre la bandeja del disco o pone el aparato en el modo de espera Para reanudar la reproducción Pulse 1 PLAY mientras parpadea en el visualizador del aparato Conexión a un televisor Para disfrutar de vídeo progresivo Haga la conexión a los terminales de entrada de vídeo componente 480P de una televisión compatible con el s...

Page 28: ...ion 16 W Dimensions 430 W k406 5 D k75 8 H mm 1615 16z W k16z D k3z H Mass 4 5 kg 9 9 lb Specifications RQT6263 P Printed in Singapore F0502YM0 Note Specifications are subject to change without notice Mass and dimensions are approximate Power consumption in standby mode approx 2 5 W C 2002 Matsushita Electric Industrial Co Ltd Panasonic Consumer Electronics Company Division of Matsushita Electric ...

Reviews: