background image


Introduction


Thankyou for purchasing you new Panasonic Digital TV receiver. This User’s Manual 
is the GUIDE to be used to help you install and operate your new digital TV receiver. 
In it you shall find comprehensive descriptions to familiarise yourself with all the 
functionalities with which your receiver is equipped. We strongly advise you follow the 
instructions in this manual. Once you become acquainted with the operations of your 
receiver you will only need this manual for reference. 


1.1  IMPORTANT: First time Installers 

IMPORTANT

: For first time installers, please read Section 4, “Installing Your Digital 

Receiver”, to learn how to connect your digital receiver to your TV.  Once you have 
completed the setup, go to Section 6.3, “Preferences”, to select various system 
settings according to your personal preference, and 6.4, “Advanced Settings”, to set 
your region for correct current time and to conduct channel search. 


2  The Digital Receiver 

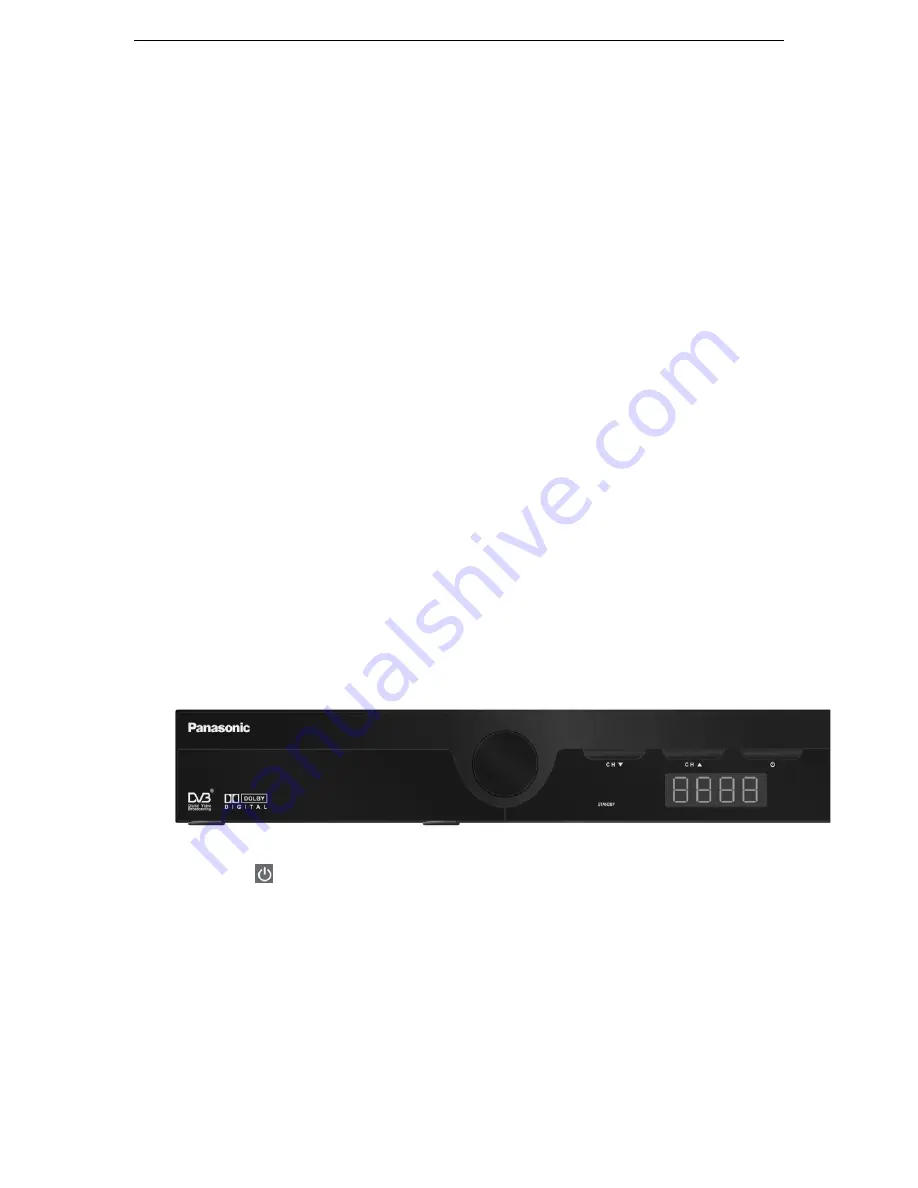
2.1 Front 

Panel 


z


Power Button:

 Turns the Digital Receiver On / Off (Standby mode). 

z


Front Panel Arrow Buttons:


S

/

T

 buttons to select channels within the 

menus.  

z


Stand-By Indicator (LED):

 Lights red in Stand-By mode. When the 

Digital Receiver is working the LED turns green. 

z


Front Panel display:

 The display shows current time when in standby 

mode and TV channel number when in normal viewing mode 


4

Summary of Contents for DV3 TU-SZT105A

Page 1: ...ruction Manual Standard Definition Digital Terrestrial Receiver Model Number TU SZT105A Trade Mark of the DVB Digital Video Broadcasting Project 1991 to 1996 Declaration of Conformity No 3539 22 April 2005 ...

Page 2: ...ant magnitude to constitute the risk of electric shock to persons This symbol is intended to alert the user to the presence of important operating and maintenance servicing instructions in the literature accompanying the appliance DO s and DON Ts DO s z Avoid exposing the equipment to direct sun rays excessive heat and moisture as they will damage the receiver z Prevent the equipment from overheat...

Page 3: ...ur Digital Receiver QUICK CONNECT GUIDE 7 4 1 Installing Your Digital Receiver QUICK SET UP GUIDE 8 5 Operating Instructions Knowing your basic controls 9 5 1 Switching On Your Digital Receiver 9 5 2 Changing or Selecting Channels 10 6 Using the Main Menu 10 6 1 Program Guide 11 6 2 TV Radio Channels 13 6 3 Preferences 13 6 4 Advanced Settings 18 6 5 STB Information 20 7 Glossary 21 8 Troubleshoot...

Page 4: ...s please read Section 4 Installing Your Digital Receiver to learn how to connect your digital receiver to your TV Once you have completed the setup go to Section 6 3 Preferences to select various system settings according to your personal preference and 6 4 Advanced Settings to set your region for correct current time and to conduct channel search 2 The Digital Receiver 2 1 Front Panel z Power But...

Page 5: ...m maintenance only 2 3 Box Contents The box that carries your Digital TV Receiver should also contain the following items z Remote Control z Two Batteries AAA Size z SCART to RCA Connector Cable z RF Cable z User s Manual and Warranty Card 3 The Remote Control 3 1 Preparing the Remote Control z Remove the cover of the battery compartment on the back of the remote control z Insert 2 AAA 1 5V batter...

Page 6: ...NDEX To obtain a list of programs on available channels This information is only shown if your Service Provider transmits program information INDEX To go to index page in Teletext mode z EXIT To go back one level in the menus z To call up the program information plates and extended channel information in program guide menu This information is only available if the service provider or network trans...

Page 7: ...eo and audio connections To TV he SCART connector and RCA tart nnect the power pack to the Set Top Box Use the 2 good quality outside 3 to connect to your television t the white TV has COMPONENT levision has so or l give the best picture Connect the nect the blue S 1 Co connector marked POWER Connect the Set Top Box to a roof antenna Use the connector marked RF IN Use the included SCART to RCA con...

Page 8: ...that is the same as the AV lead connect you have made to the TV display refer Quick Connect Guide section 4 elect Region Western Australia Tasmania Northern Territory Australian Capital Territory Please select your state region South Australia New South Wales Victoria Queensland Condition is re correct local time The regions are New South Wales Victoria Queensland South Australia Western Australia...

Page 9: ...ws information about the program that you are currently watching The information To become acquainted with the operations and functions of your receiver y The following section is an introduction to the features that will be most com digital receiver is in STANDBY mode Inf The Information Pla plate appears briefly whenever you switch to a new channel or when there s a problem with TV signal recept...

Page 10: ...n Menu Your receiver comes with a directory of features on the Main On Screen Display OSD The Main OSD is your gateway to customising many of the features offered by your receiver To access the Main OSD press the MENU button The Main OSD feature comprises the following categories of services Program Guide provides access to 1 Programs Schedule ows you to program 1 Favourite Channels u to access 1 ...

Page 11: ... In the list highlight the desired program by pressing the to view the detailed description of the program If the broadcaster has not transmitted detailed description for the program the text No description available will u wish to see what programs are being broadcast on other channels use the button to access the list of all programs shown for the current and next days viewing subject to availab...

Page 12: ...B default the item All Categories is highlighted You have to de select that item before selecting specific program type s As you select some categories and go back to program guide menu only programs of the selected categories will be visible y Booked Programs To review what programs are currently booked press blue to call up the Booked Programs OSD To cancel or re engage the booking press OK If t...

Page 13: ...l you will be asked to enter the password If you wish to delete any channel press the button yellow and an X sign will be shown on that channel You may un delete that channel by pressing the same key again If one or more channels are deleted you will be asked to confirm the removal of those channels upon leaving the TV Radio channels menu Once you confirm their removal you cannot un delete them Th...

Page 14: ...ill appear at the left and right of the screen in order to present the picture in a correct viewing aspect ratio SCART Mode From here you may adjust SCART mode to Component output or Composite output or RGB output You must choose the correct mode to match the video input Connection of the TV that you did in the Quick Connect Guide MPEG Audio Level From here you may adjust MPEG audio level from 12 ...

Page 15: ...tion Options Refer to Table 2 Digital Audio Selection Table Table 2 Digital Audio Selection Table Default Audio Mode Digital Audio Selection Options Dolby Digital 1 Bitstream 2 PCM stereo 3 Off MPEG 1 1 PCM stereo 2 Off Bitstream Select this if your TV or A V receiver has a digital audio input and can decode Dolby Digital PCM stereo Select this if your TV or A V receiver has a digital audio input ...

Page 16: ...hoice appears to provide best performance of lip sync on your display device Teletext contrast The OSD contrast of teletext pages can be adjusted by selecting different options Teletext Operation Teletext is only available on certain broadcast channels The time taken to display the pages and sub pages is set by the teletext transmitter Teletext is also used for Closed Captioning of television prog...

Page 17: ... is not transmitting teletext there may not be any indication on the screen Press the TEXT button to return to normal viewing STTL Displays subtitles if available This is the same as turning the teletext ON and selecting page 801 Page Selection Pages can be selected in two ways a Press the Up Down buttons to increase or decrease the page number by one b By entering the page number using 0 9 on the...

Page 18: ...ic sub page by pressing left right cursor key to select the sub page number 6 4 Advanced Settings Default password 0000 In addition to the settings in Preferences section 6 3 the Advanced Settings are used to program your digital receiver Again some of the settings especially Channel Installation may require assistance from your Service Provider Your digital receiver will ask you to key in a passw...

Page 19: ... This function is strongly recommended for regular users However the user should be aware that all existing channels will be removed as soon as you confirm start of auto scan In the Auto Scan channels OSD all channels found will be listed The channel search may take a few minutes If you abort an auto scan during the scan process some channels may not be available to you Manual Channel Search In th...

Page 20: ...a Northern Territory and Australian Capital Territory This setting will allow the digital receiver to display the current time in the I Plate or when the receiver is in Stand By mode 6 5 STB Information From here you can get general information about the Receiver ID software and hardware version on which it is operating 20 ...

Page 21: ...e Password Password A personal 4 digit numbers for controlling specific features of the digital receiver including access to locked channels Also known as the PIN Number Electronic Program Guide EPG The instantaneous and continuously updated electronic program guide for quick and easy reference or program selection Network The Network that provides one or more services to the viewers OSD On screen...

Page 22: ... the screen or sometimes the picture freezes Could be caused by low TV signal strength or poor quality reception To check the signal level use the information plate as described on page 9 If the signal strength is black in colour you will have adequate signal strength Any other colour you may need to have your antenna and antenna cabling checked Why does the show guide EPG show some digital TV sta...

Page 23: ...r Composite video CVBS Decoding and display of Closed Captions Activated by specific hot key Caption Teletext Decoding and display of Teletext ETS 300 706 Level 1 5 TOP Activated by specific hot key Audio ISO11172 3 layer I and layer II Dolby Digital Sampling rate 32 44 1 and 48KHz Bit rates Layer I 32 448KHz Layer II 32 384KHz Audio output Stereo Audio AL AR and down mixing surround Lt Rt Audio d...

Page 24: ...ccessory Remote Control Batteries User s Manual SCART to RCA 6 RF Cable Panasonic RO3 AAA One CVBS Y Pb Pr AL AR 3C 2V IEC male to female EMC Safety Compliant to AS NZS 1053 AS NZS 60065 Dimensions 268x185x45 mm L x W x H General Information Weight Net TBD Copyright 2005 All Rights Reserved 24 ...

Reviews: