background image

63

Function

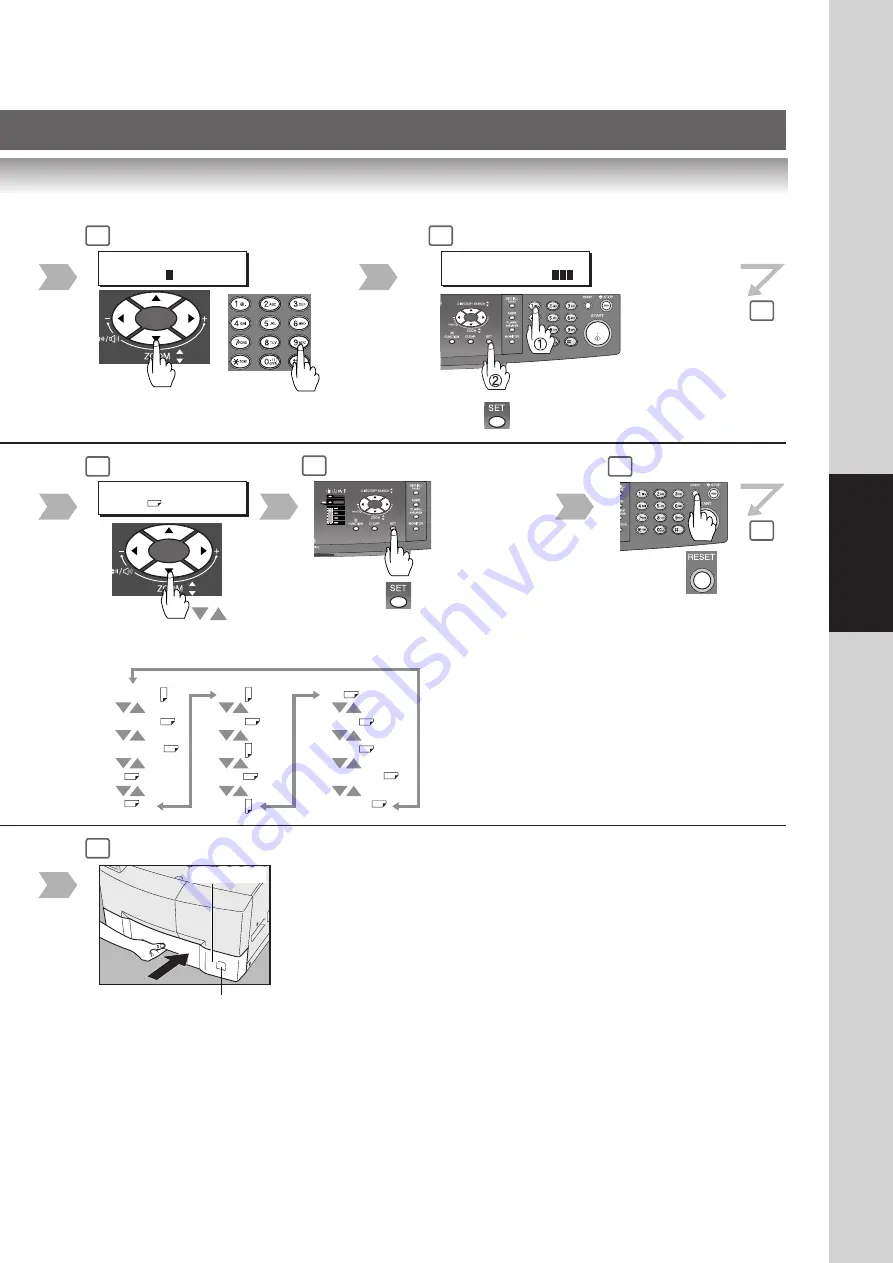
Paper Tray

4

5

6

9

11

9 (09 KEY OPERATOR MODE)

GENERAL PARAM. (0-9)
ENTER NO.  OR 


^

09 KEY OPERATOR MODE
ENTER PASSWORD=

12

10

15

or

3-digit
(See page 13)

TRAY-1
LETTER


^

Select a
Paper Size

When setting
another Paper
Tray, repeat steps
7 to 9

 A3

 B4

 LETTER

 INVOICE

 LETTER

 B5

 A5

 A4

 B5

 A4

 LEDGER

 LEGAL

 FLS1

 FLS2

 A5

Change the Paper Size Indicator

Summary of Contents for DP-80116P

Page 1: ...y Network Scan Functions Digital Imaging Systems Model No DP 8020E 8020P 8016P Before operating this machine please carefully read this manual and keep this documentation in a safe place for future reference Illustration shows optional accessories that may not be installed on your machine English Accessories Problem Solving ...

Page 2: ...truction manuals are included on the CD for this machine please use the correct manual when an operator intervention is necessary Application Software Quick Image Navigator Network Scanner when optional Network Scanner Module is installed Utilities Network Status Monitor Address Book Editor Network Configuration Editor Panafax Desktop when optional Fax Communication Board is installed Multi Taskin...

Page 3: ...21 Control Panel Key Indicator Names See pages 22 23 Operating Instructions for making copies See pages 24 51 Changing the Initial Machine Modes General Copier Printer and Scanner Settings See pages 52 67 Combined Function Table See page 68 Document Scanning See pages 70 71 Address Book See pages 72 73 Function See pages 74 75 Direct Connection with Crossover Cable See pages 76 77 Troubleshooting ...

Page 4: ...ook Place original on the Platen Sheet Press any Hard Key on the Control Panel Input text with a Keyboard Option Input numbers Number of Copies etc Go to next step Go to next step below When making copies When scanning document s Getting to know your machine Before starting Problem solving Appendix When setting the machine modes Press Hard Key A B C Symbols Icons 5 Accessories ...

Page 5: ...ontrol Panel 22 Making Copies Basic Copy Copying the Same Size Originals 1 1 24 Position of the Original s 24 Copying with Preset or Variable Zoom Ratios 24 Using the ADF i ADF Option 25 Creative Features 1 2 Copy 2 2 Copy 2 1 Copy DP 8020E 8020P with optional ADF only 26 2 2 Copy 2 1 Copy DP 8020E 8020P with optional ADF only 28 Book 2 Copy DP 8020E 8020P only 30 N in 1 32 2 Page Copy 34 Double E...

Page 6: ... 64 Network Settings 66 Combined Function Table 68 Accessories Components 69 Network Scanner Document Scanning 70 Document Scanning 70 Address Book 72 Adding your PC s IP Address 72 Function 74 Scan Parameters 74 Select Mode 74 Direct Connection with Crossover Cable 76 Direct Connection with Crossover Cable 76 Problem Solving Troubleshooting 78 Replacing the Battery Set the Date and Time 80 Append...

Page 7: ...rd provided with your machine When an extension power cord is required always use a properly rated cord 120 V 15 A If you use a cord with an unspecified current rating the machine or plug may emit smoke or become hot to the touch Do not attempt to repair pull bend chafe or otherwise damage the power cord Do not place a heavy object on the cord A damaged cord can cause fire or electric shocks Never...

Page 8: ...lace any metal parts such as staples or clips on the machine If metal and flammable parts get into the machine they can short circuit internal components and cause fire or electric shocks If debris metal or liquid gets into the machine switch Off and unplug the machine Contact your authorized Panasonic dealer Operating a debriscontaminated machine can cause fire or electric shock Never open or rem...

Page 9: ...is wrapped around the heat roller do not try to remove it yourself to avoid injuries or burns Switch Off the machine immediately and contact your authorized Panasonic dealer Do not use conductive paper e x folding paper carbonic paper and coated paper When a misfed paper jam occurs they can cause a short circuit and fire Do not place any heavy objects on the machine An off balance machine can tip ...

Page 10: ...nplug the machine TV and or radio and replug them into outlets that operate on different circuits Reorient the TV and or radio antennas and cables until the interference stops For an outdoor antenna ask your local electrician for support Use a coaxial cable antenna Denotes hazards that could result in minor injury or damage to the machine TO REDUCE THE RISK OF SHOCK OR FIRE USE ONLY NO 26 AWG OR L...

Page 11: ...ble eye injury CAUTION USE OF CONTROLS ADJUSTMENTS OR PERFORMANCE PROCEDURES OTHER THAN THOSE SPECIFIED HEREIN MAY RESULT IN HAZARDOUS RADIATION EXPOSURE Precautions Precautions This product has a fluorescent lamp that contains a small amount of mercury It also contains lead in some components Disposal of these materials may be regulated in your community due to environmental considerations For di...

Page 12: ...signed for the machine The machine should not be installed in areas with the following conditions Extremely high or low temperature and humidity The machine should be installed under the following ambient conditions Temperature 50 86 F Relative humidity 30 80 In areas with chemical fume concentration With unstable or uneven conditions floors etc Direct exposure to sunlight or fluorescent light In ...

Page 13: ...count user name and password System Administrator The system administrator can manage user account by using Windows Server User authentication can be set independently for each function copying faxing scanning and printing Dept Departmental Code When the Department Counter function is set up the Dept Department Code input screen is displayed on the LCD Display A registered Department Code 1 to 8 d...

Page 14: ...e procedures for other optional Paper Trays Adding Paper Sheet Bypass Copying on Special Paper etc Load Paper Face Up Paper Weight 16 24 lb Paper Capacity 550 Sheets 20 lb Adjust the width guides Incorrect adjustment may cause the paper to wrinkle misfed or skew Original Guides Quick Operation Chart NOTE When changing the paper size refer to page 62 1 1 2 3 Adding Paper Turn the Power Switch to th...

Page 15: ... LTR LTR ZOOM 100 COPIES 001 2 Page Copy See page 34 N in 1 See page 32 Erase See page 38 Effects See page 40 Double Exposure See page 36 2 Sided Original Copy See pages 26 31 2 Sided Copy DP 8020E 8020P only Type of Original See page 25 Manual Exposure From Platen only Toner Level Check Operation When CHECKING TONER PLEASE WAIT message appears the machine is checking the toner level and no operat...

Page 16: ... 2 REMOVE MISFED PAPER J46 ATTENTION For optimum copy quality use the recommended Panasonic Toner Store Toner Bottle in a cool dark place Do not unseal the Toner Bottle unless you are ready to use it Shake it well 6 NOTE Do not reuse the toner from the Toner Waste Container 1 2 1 2 6 5 Slide the Corona Cleaner in and out 3 or 4 times slowly then return the Corona Cleaner Handle to original positio...

Page 17: ...ntainer Paper Tray Lift Upward and insert the Tray Left Cover Heat Roller Cover Jam Removal Knob Misfed Paper Left Cover Misfed Paper Corona Cleaner Handle Toner Bottle New Toner Bottle New Toner Bottle Empty 4 6 3 5 8 9 10 5 8 7 4 4 3 Close the Front Cover To Release To Lock 3 ...

Page 18: ...r ADF Option for DP 8020E 8020P 8016P J70 J71 J79 J92 J93 1 2 REMOVE MISFED PAPER J70 Removing Misfed Paper i ADF Option for DP 8020E J70 J71 J72 J73 J76 J78 J79 J92 J93 REMOVE MISFED PAPER J70 6 7 Removing Misfed Paper 2nd 3rd 4th Paper Tray Option J02 J03 J04 J07 J08 J09 J12 J13 J14 J22 J23 J24 REMOVE MISFED PAPER J02 Feed Cover Lift Upward and insert the Cover 1 2 6 7 1 2 Ex Ex Ex ...

Page 19: ... Getting To Know Your Machine Misfed Paper Misfed Paper Lift Upward and Pull Out Paper Tray 1 2 Misfed Paper Misfed Paper Exit Unit ADF Tray ADF Cover Misfed Paper ADF 3 4 5 6 6 3 4 8 9 5 3 4 ADF Cover 10 ...

Page 20: ...ft Cover Problem Solving Removing Misfed Paper J19 J32 J82 J85 J87 ADU for DP 8020E only 1 2 REMOVE MISFED PAPER J82 EX Code Check Points U01 Front and or Left Cover is open U07 Feed Cover is open See page 18 U13 Low Toner or Out of Toner U14 Toner Waste Container is full U15 Toner Waste Container is incorrectly installed U16 Developer Unit is incorrectly installed Call your Service Provider User ...

Page 21: ...ay 1 See page 16 J02 Pull the paper tray out and remove jammed J03 paper from the optional paper trays Tray 2 to 4 J04 See page 18 J07 Remove misfed paper J08 See page 18 J09 J12 J13 J14 J22 J23 J24 Cause with 2nd 3rd 4th Paper Tray NOTE The J Code indicates the most probable Jam location If the jam message reappears after the jam is cleared paper is most likely jammed at other location s Check th...

Page 22: ...Centering mode See page 40 MEMORY Keys Selects Job Memory mode See pages 48 49 COPY Key To use the unit as a photocopier SCAN FILE Key To use the Scan File function See pages 70 75 FAX EMAIL Key Used to select the FAX EMAIL communication Original Mode Select Keys Indicators Selects original mode See pages 25 and 70 LIGHTER DARKER Key Indicators To adjust the Manual Exposure See pages 25 and 70 Ene...

Page 23: ... changing the paper size initial function values default values and key operator settings ALARM LED RED Lights Flashes when trouble occurs ACTIVE LED GREEN Flashes when machine is in operation Lights When the machine stops due to the following condition s No paper in the selected tray or toner has run out Paper has misfed etc Flashes When the machine alerts of the following condition s No paper in...

Page 24: ... When copying a thick Booklet do not close the ADF i ADF LTR Letter R INV Invoice R INV Invoice LGL Legal LTR Letter LDR Ledger INV INV LTR LGL LDR LTR LDR INV LTR LGL INV LTR INV INV R LTR R LGL LDR or For ADF For i ADF INV Invoice LTR Letter LGL Legal LDR Ledger From Platen only Copying with Preset or Variable Zoom Ratios 1 2 or For ADF For i ADF LTR Letter R INV Invoice R INV Invoice LGL Legal ...

Page 25: ...etter R INV Invoice R LGL Legal LTR Letter INV Invoice LDR Ledger For Preset Ratios For Variable Zoom Ratios Up to 200 in 1 Down to 50 in 1 Originals that cannot be used Post Cards Drawing Papers Transparencies Labelling Papers Heavyweight Papers Thin Art Papers Film Thermal Papers Inappropriate Originals Paper with a smooth surface such as glossy and coated papers Transparencies Originals with a ...

Page 26: ... 2 6 7 Next Original 1 YES Go to next step For i ADF 1 2 Copy only ANOTHER ORIGINAL 1 YES 2 NO NOTE If 2 NO is selected the machine will start copying only one side of the original s 2 1 Copy 2 Sided 1 Sided Copy NOTE 1 When copying 2 2 or 2 1 Copy using the optional ADF 2 If the memory overflows while scanning originals all scanned data will be cancelled If this occurs restart from Step 1 Steps 6...

Page 27: ... 1 Sided Original to 2 Sided Copy 2 Sided Original to 2 Sided Copy 2 Sided Original to 1 Sided Copy The following steps illustrate how to make multiple copies when the Sort Mode is selected See page 42 ANOTHER ORIGINAL 1 YES 2 NO 1 YES Continues to copy another original repeat steps 1 and 5 to step 8 2 NO Starts making copies 2 9 Exits this mode 10 ...

Page 28: ...ls A B C Odd Number Pages SET ORIGINAL ON ADF INSERT SECOND SIDE ORIENTATION AS IS 1 3 5 A B C 2 A B Reverse Side Page No C 4 6 Long Edge Originals 6 4 2 Short Edge Originals 2 4 6 Place the reverse side of the original s of step 1 in the order and direction of ejection Even Number Pages 2 2 Sided Original to 2 Sided Copy 1 Above Step 2 Sided Original to 1 Sided Copy 5 Step NOTE When copying 1 2 C...

Page 29: ...RIGINALS ON ADF 7 Exits this mode 8 PRESS START TO CONTINUE NOTE If the page count for the Back side does not match the page count for the Front side i e page double fed of the 2 Sided originals a TOTAL PAGE MISMATCH will be displayed and all scanned data will be cancelled If this occurs restart from Step 1 and Step 4 2 to Step 6 ...

Page 30: ...res For Book Format is Facing 1 2 Select Ledger or Letter R size Original Size Ledger Letter R For Book Format is Flipping 1 YES Continues to copy another original repeat steps 1 and 4 2 NO Starts making copies The following steps illustrate how to make multiple copies when the Sort Mode is selected See page 42 ANOTHER ORIGINAL 1 YES 2 NO 5 2 NOTE If the selected original size is not corrected boo...

Page 31: ... step 7 2 NO Starts making copies The following steps illustrate how to make multiple copies when the Sort Mode is selected See page 42 ANOTHER ORIGINAL 1 YES 2 NO 8 2 5 3 Select Book Original to 2 Sided Copy 4 Number of Copies Max 999 Exits this mode 6 For Sort Mode only NOTE The copy size will be automatically selected If the selected paper size is not set into the paper tray s set paper on the ...

Page 32: ...INV Invoice LGL Legal LTR Letter LDR Ledger 5 NOTE If the original s Orientation is incorrect when N in 1 copy mode is used the copy sequence may not reproduce properly If this occurs change the N in 1 default Orientation in the Copier Settings Parameter No 05 N in 1 DEF See page 57 1 A B C 1 ABC Portrait Landscape 8 9 Number of Copies Max 999 Combination for N in 1 copy operation 1 2 1 2 1 2 1 2 ...

Page 33: ...ode 12 11 2 2 in 1 7 4 or 4 in 1 ANOTHER ORIGINAL 1 YES 2 NO For 4 in 1 Copy 8 Select 1 YES Repeat steps 8 and 9 Select 1 YES Repeat steps 8 and 9 3 10 NOTE The COPY SIZE Zoom Ratio is automatically selected when N in 1 Copy Mode is used You can also adjust the reduction ratio manually if desired 6 LTR Letter R INV Invoice R LGL Legal LTR Letter INV Invoice LDR Ledger For Preset Ratios For Variabl...

Page 34: ...illustrate how to make multiple copies when the Sort Mode is selected See page 42 ANOTHER ORIGINAL 1 YES 2 NO 1 YES Continues to copy another original repeat steps 1 and 5 2 NO Starts making copies Page Order L R Starts copying from the Left page Page Order R L Starts copying from the Right page NOTE The page order can be set in the Copier Settings Parameter No 16 2 PAGE MODE DEF See page 58 Defau...

Page 35: ...999 Exits this mode 7 6 5 NOTE 1 If the selected original size is not corrected the book original image will not be copied correctly 2 A copy size will be automatically selected If the selected copy size paper is not set into the paper tray s set paper on the Sheet Bypass see page 14 or select another copy size using the COPY SIZE Key see page 25 ...

Page 36: ...ge Back Side Image Copy Size Letter ex Invoice R NOTE When opening the Platen Cover or optional ADF i ADF An incorrect position detection of the original may occur when a strong light shines on the glass during this mode An incorrect exposure may occur when there is a black line at the edge of the original or an image which the machine interprets as a black pattern in this mode The final copy may ...

Page 37: ...nal 7 Select Invoice or Letter 3 The following steps illustrate how to make multiple copies when the Sort Mode is selected See page 42 ANOTHER ORIGINAL 1 YES 2 NO 1 YES Continues to copy another original repeat steps 1 and 4 to step 7 2 NO Starts making copies 2 5 8 9 ...

Page 38: ... Platen only LTR Letter R INV Invoice R INV Invoice LGL Legal LTR Letter LDR Ledger 6 LEFT MARGIN 10mm For Margin EQUAL RATE VOID MARGIN 5mm For Edge 5 99 mm 6 BOOK MARGIN CENTER VOID 20mm 5 99 mm 1 or For ADF For i ADF LTR Letter R INV Invoice R INV Invoice LGL Legal LTR Letter LDR Ledger NOTE Shift position of Margin and blank edge value can be changed with Copier Setting Mode See page 57 ...

Page 39: ...TO SELECT or 2 EDGE PRESS SET TO SELECT 7 Number of Copies Max 999 Book ERASE MODE 1 3 ENTER NO OR or 5 3 BOOK PRESS SET TO SELECT 7 Number of Copies Max 999 MARGIN EDGE Exits this mode 8 Exits this mode 8 6 6 This Key will flash ERASE Key will be changed from flashes to lights ...

Page 40: ...page 58 6 NOTE The final copy may be affected if colored background original s do not have a white edge or if it is less than 2 mm wide The default setting of Digital Skyshot Mode should be set to OFF in the Copier Settings Parameter No 07 DIGITAL SKYSHOT Remove the originals from the ADF before selecting the Centering and Image Repeat mode An incorrect position detection of the original may occur...

Page 41: ... TRAY 3 TRAY 4 BYPASS Centering Image Repeat Exits this mode 7 NOTE Tray 2 3 and 4 are options See page 69 6 NOTE An incorrect position detection of the original may occur when a strong light shines onto the glass during Centering and Image Repeat mode Also an image which the copier interprets as a black pattern in the Centering and Image Repeat modes ...

Page 42: ... Priority Setting For ADF 2 Sort For Platen 1 Non Sort 6 Non Sort Copy is stored on the Output Tray 1 or For ADF For i ADF Steps 5 to 8 from Platen only NOTE If 2 NO is selected the machine will start copying one side of the original s Rotate Sort Multiple copy sets are sorted automatically and are stored on the Output Tray in alternate direction rotate Initial Sort Rotate Mode is 1 OFF this setti...

Page 43: ...laten only 3 LTR Letter R INV Invoice R INV Invoice LGL Legal LTR Letter LDR Ledger 5 8 From Platen only PRESS START TO CONTINUE 8 ANOTHER ORIGINAL 1 YES 2 NO NO Starts making copies YES Continues to copy another original repeat steps 1 and 4 2 to step 7 ...

Page 44: ... Enable the Copier Settings Parameter No 08 MANUAL SKYSHOT first See page 57 NOTE Other jobs requiring memory cannot be performed while M1 and M2 buttons are being used for the Skyshot mode NOTE The default setting of Digital Skyshot Mode is NORMAL In this setting the unit scans once If there are black areas around the borders in the copies set the Digital Skyshot Mode to QUALITY to soften the dar...

Page 45: ...g light shines onto the glass during digital skyshot mode An incorrect exposure may occur when there is a black line at the edge of the original or an image which the machine interprets as a black pattern in the digital skyshot mode Number of Copies Max 999 3 2 Custom size or Default M1 M2 size can be changed by Function mode See page 58 Number of Copies Max 999 3 ...

Page 46: ...51 80 1 Originals 50 sheets 1st scan Originals Remaining 30 sheets 2nd scan 1st and 2nd Scanned Data are combined into one job 5 sets of 80 sheets sorted copies are printed NOTE Job Build and SADF function cannot be combined with 2 1 and 2 2 Concurrent Copying function cannot be used when the Job Build and SADF function are set to the ON position in the Copier Settings Parameter No 12 SADF DEFAULT...

Page 47: ...al 30 sheets 3 Lights Sort mode is selected Select the Sort mode Starts the printing process Starts the printing process ex 5 sets of 80 sheet sorted copies Number of Copies Max 999 3 4 5 When starting the printing process Set the next copy job repeat steps 1 to 3 Next original s will be scanned Next Jobs can be reserved up to 12 jobs When the 1st copy job is completed next original s will be auto...

Page 48: ... mode interrupts the current running copy job and allows other copy jobs to be processed Other Job 1 2 Power Saver Mode Sleep Shutdown Mode Flashes Power Saver Mode To exit Lights Sleep Shutdown Mode Job Memory Two Copy Jobs can be stored in Memory M1 to M2 for recall at a later time To store a job in memory 2 1 NOTE JOB MEMORY mode will not be deleted even if the power switch is turned Off When u...

Page 49: ... Connection Internet Fax Email Function Facsimile Function If the LAN Cable is not connected and the DHCP DEFAULT is set to VALID while in this mode Shutdown the machine will not answer an incoming Fax call See page 55 3 4 Other Job is completed 5 6 To recall a job stored in memory or 1 2 or Number of Copies Max 999 3 When the original size is not shown on the LCD display after selected M1 or M2 s...

Page 50: ... ONE TOUCH 4 1 Keyboard Option Other Features Communications Utility Icon Job Status Utility Icon Confirm that the Communications Utility and the Job Status Utility icons are displayed on the task bar of your PC If they are not click Start button and then select All Programs Panasonic Panasonic Document Management System Communications Utility to activate the Communications Utility icon and or sel...

Page 51: ...ALES_3 10 74 252 66 05 SALES_2 10 74 252 66 ENTER LETTER S SA_ Enter letter s See page 70 01 SALES 10 74 252 66 3 3 and Press COPY key and FUNCTION key simultaneously 6 COMPLETION NOTICE SELECT DESTINATION or Number of Copies Max 999 4 1 Copy Job Completed Notice will be displayed on your PC 5 ...

Page 52: ...s manual for function settings on options Function setting is accessible only when the machine is in Ready Mode Fax Email and Scanner Settings are only available when optional Network Scanner Module and or Fax Communication Board or Internet Fax E mail Module is installed See page 69 Procedure 1 2 COPY General Copier Settings FAX EMAIL Fax Email Settings SCAN FILE Scanner Settings PRINT Printer Se...

Page 53: ...r from the MS DOS command prompt Scanner Settings Changing the Initial Scanner Modes Original mode Compression mode Resolution etc See page 61 Fax Email Settings Changing the Initial Fax Email Modes Refer to Operating Instructions For Facsimile Internet Fax Email 3 4 Setting the desired Function Parameter s Select a setting with the Keypad Confirm a setting with the SET Key Select a mode with the ...

Page 54: ...03 AUTO RESET TIME Selects the Control Panel reset time 3 1 min 1 OFF 2 30 sec 3 1 min 4 2 min 5 3 min 6 4 min 04 ENERGY SAVER MODE Sets the Energy Saver mode and time 3 SLEEP 1 INVALID 2 POWER SAVER 3 SLEEP 10 min 4 SHUTDOWN Power Saver mode timer 1 240 min Sleep Shutdown mode timer 1 240 min 05 ENERGY SAVER TIME Sets the Energy Saver Timer Sleep or Start00 00 Shutdown mode End00 00 Start ON 00 0...

Page 55: ...Cursor Keys and Keypad 18 DAYLIGHT TIME Set Daylight Time according to your local 2 MAR 2nd regulation 1 No Daylight Time is not applied 2 MAR 2nd From 2 a m on the 2nd Sunday in March to 2 a m on the 1st Sunday in November This setting is applied from 2007 year In 2006 Daylight Time will be ended on Last Sunday in October 3 APR 1st From 2 a m on the 1st Sunday in April to 2 a m on the Last Sunday...

Page 56: ...2 5 Selects whether to change the Community public Name 2 SNMP Enable read write 30 DEVICE NAME 5 Inputs the device name when required For Status Monitor EtherTalk Machine Name 31 DEVICE LOCATION 5 Inputs the device location when required For Status Monitor 33 USER AUTH Set the User Authentication Mode COPY 1 INVALID 2 VALID INVALID FAX 1 INVALID 2 VALID INVALID PRINTER 1 INVALID 2 VALID INVALID S...

Page 57: ... Select a Function Sub Function ex ORIENTATION then select For Ledger a Sub Function ex PORTRAIT Letter R Invoice 1 ORIENTATION 2 L SCAPE Select from the following original sizes For Legal Letter Ledger Legal Letter 1 PORTRAIT Letter R Invoice or Invoice R 2 LAYOUT Sub Function Sub Function 1 PORTRAIT 2 L SCAPE 1 2 in 1 2 LAYOUT Sub Function Sub Function 1 L R 1 2 in 1 2 4 in 1 Sub Function 2in1 1...

Page 58: ... HOME Selects the halftone default setting 2 TEXT PHOTO 1 TEXT 2 TEXT PHOTO 3 PHOTO 02 TEXT CONTRAST Selects the default contrast setting for the Text mode 3 1 5 03 T P CONTRAST Selects the default contrast setting for the Text Photo 3 mode 1 5 04 PHOTO CONTRAST Selects the default contrast setting for the Photo mode 3 1 5 05 MAX COPY SETTING Select the maximum number of copies allowed per job 999...

Page 59: ... PCL 1 Sets the default PCL pitch 10 00 0 44 99 99 11 POINT SIZE PCL 1 Sets the default PCL point size 12 00 4 00 999 75 12 LINES PAGE PCL 1 Sets the default PCL lines page 60 5 128 13 RETURN CHARACTER PCL 1 Sets the default PCL return character 1 CR 1 CR 2 CR LF 14 MUTUAL A4 LETTER Selects whether the mutual size A4 LETTER is 1 OFF enabled 1 OFF 2 ON 15 MAILBOX MEMORY 2 Indicates the mailbox memo...

Page 60: ...TO PRINT 07 FONT LIST PRINT PCL 2 Prints the PCL font list PRESS SET TO PRINT 08 FONT LIST PRINT PS 1 Prints the PS font list PRESS SET TO PRINT 09 MAILBOX DATA HOLD 3 Selects the automatic holding time frame for the 7 DAYS mailbox data Infinity 1 DAY 2 DAYS 3 DAYS 4 DAYS 5 DAYS 6 DAYS 7 DAYS 10 DELETE MAILBOX 3 Selects whether to delete All the mailbox data or only the data Before the time frame ...

Page 61: ...setting 3 S FINE 1 STANDARD 2 FINE 3 S FINE 04 BIND POSITION Selects the default bind position of 2 Sided 1 LONG EDGE original 1 See below 1 LONG EDGE 2 SHORT EDGE 05 FILE TYPE NAME Selects the default File Type format 1 TIFF 1 TIFF 2 PDF 06 CHANGE KEYBOARD Selects the Keyboard Type when One Touch 1 QWERTY Sheet is changed on the Keyboard 2 1 QWERTY 2 QWERTZ 3 AZERTY Modes Function Initial Setting...

Page 62: ...ZE KEY OPR MODE 00 34 ENTER NO OR 01 PAPER SIZE 1 TRAY 1 LETTER 1 GENERAL SETTINGS PRESS SET TO SELECT Paper Guide A 14 Paper Guide B Adjustment Paper Guide A Length Adjustment 1 TRAY 1 2 TRAY 2 3 TRAY 3 4 TRAY 4 8 NOTE TRAY 2 3 4 are options See page 69 Select a Paper Tray NOTE It is recommended that the paper guide B is fixed in place with a screw consult your authorized Panasonic dealer for det...

Page 63: ... 0 9 ENTER NO OR 09 KEY OPERATOR MODE ENTER PASSWORD 12 10 15 or 3 digit See page 13 TRAY 1 LETTER Select a Paper Size When setting another Paper Tray repeat steps 7 to 9 A3 B4 LETTER INVOICE LETTER B5 A5 A4 B5 A4 LEDGER LEGAL FLS1 FLS2 A5 Change the Paper Size Indicator ...

Page 64: ...to enable the Department Counter feature For Example 1 2 3 6 11 1 General Settings FUNCTION MODE 1 2 ENTER NO OR 13 DEPT COUNTER MODE KEY OPR MODE 00 34 ENTER NO OR 7 10 DEPT COUNTER 001 123450 MAX COPIES 001 123456 ID CODE 001 0123 DEPT COUNTER 001 123145 For Department Counter Clear the counter to 0 or 13 DEPT COUNTER MODE 1 TOTAL COUNTER SET SET or DEPT COUNTER 002 123500 MAX COPIES 002 125000 ...

Page 65: ... DEPT CODE 1 300 ENTER NO OR Department No 01 300 MAX COPIES 001 12345678 ID CODE 001 12345678 ID Code 1 to 8 digit For Maximum Copies Maximum number of Copies 8 digit 12 or 3 digit See page 13 9 DEPT COUNTER 001 123145 For Department Counter Clear the counter to 0 10 For ID Identification Code ID CODE 001 12345678 ID Code 1 to 8 digit ...

Page 66: ...m eter No 19 TCP IP ADDRESS 20 TCP IP SUBNET MSK and 21 TCP IP G W ADDR in the same manner as shown in the following example Same procedure as steps 2 to 5 above 19 TCP IP ADDRESS Input the TCP IP Address Ex 192 168 1 100 Use the key to enter a period 1 9 2 1 6 8 1 1 0 0 19 TCP IP ADDRESS 192 168 1 100 Turn the Power Switch on the Right Side of the machine OFF and ON 6 1 2 10 For Example ...

Page 67: ... 34 ENTER NO OR Input the Subnet Mask same procedure as in step 6 or Input the Gateway Address same procedure as in step 6 8 7 6 20 TCP IP SUBNET MSK 21 TCP IP G W ADDR 22 DHCP DEFAULT 2 VALID INVALID 4 3 5 Select 19 TCP IP ADDRESS 4 times 9 10 ...

Page 68: ...1 Sort Rotate Sort Non Sort Zoom Edge Book Margin Image Repeat Centering Interrupt Manual Skyshot Digital Skyshot Double Exposure Possible Combined Functions Unavailable Combined Functions Next Selection is Carried Out When the same function is selected twice the second selection is ignored Functional combination that cannot be performed A R NOTE While making copies with the 2 1 or 2 2 Copy using ...

Page 69: ...current Copy Electronic Sorting Memory PS PCL Print Job Spooling Expansion Board DA EM600 Expansion F ROM 8 MB Printer Controller Module DA PC820 Printer Controller for PCL6 Multi Page Description Language Controller Module DA MC820 For DP 8020E 8020P only Printer Controller for PS PCL6 3rd Paper Tray DA DS185 For DP 8020E 8020P only ADF DA AS181 i ADF DA AR202 Duplexing For DP 8020E only Keyboard...

Page 70: ...entering letter s use either of the following methods With Keypad ex SALES S x9 E x6 L x7 A x5 S x9 ex ABC A x5 B x6 C x7 With Keyboard When optional Keyboard DA KB180 is installed When inputting a special character press _ Key S FINE 600 x 600 dpi FINE 300 x 300 dpi When the TEXT mode is selected as follows and S FINE and FINE are not selected 150 x 150 dpi Select type of Original s PHOTO Mainly ...

Page 71: ... letter s ONE TOUCH 4 10 PANA 10 74 252 63 01 SALES 10 74 252 66 Select a Station PC s Address 3 1 3 2 3 3 3 1 3 2 3 3 3 1 3 2 Keyboard Option NOTE ONE TOUCH is available when the optional Keyboard DA KB180 is installed 3 3 5 Next Original 6 7 DATA IS BEING TRANSFERRED TO PC TRANSFER COMPLETED ANOTHER ORIGINAL 1 YES 2 NO PRESS START LTR 8 1 YES Continues to scan another original s repeat steps 5 a...

Page 72: ...mmunications Utility software follow the steps below Address Book 1 Right Click Panasonic Communications Utility icon on the Task Bar and then select Scanner Configuration Check Auto Registration and then enter the Name and Key Name to be saved into the machine Max 15 characters 1 2 2 1 Refer to right column 2 The Name and Key Name can change in this window ...

Page 73: ...ner Click OK Click Add Device if your PC address information is registered onto the machines located on the different subnet Enter the machine s Device Name and IP Address Click OK 2 3 2 3 Click Add Click OK 1 4 1 4 3 ...

Page 74: ...sition Sets File Type Name SCAN PARAM 0 6 ENTER NO OR or 7 1 SCAN FILE NAME PRESS SET TO SELECT For Scan File Name SCAN FILE NAME ENTER NAME FILE TYPE TIFF 1 TIFF 2 PDF or FILE NAME DATE TIME 1 DATE TIME 2 CUSTOM or When Selecting Custom Enter a File Name See page 70 Select Mode When adding a file name or selecting a compression format before scanning document s FUNCTION 1 2 ENTER NO OR or 2 SELEC...

Page 75: ...E 1 2 ENTER NO OR 2 SELECT MODE PRESS SET TO SELECT SELECT MODE 1 2 ENTER NO OR 6 2 SCAN PARAMETERS PRESS SET TO SELECT 6 7 or Scan File Name Compression 4 5 6 2 COMPRESSION PRESS SET TO SELECT For Compression 7 COMPRESSION JBIG 3 MMR 4 JBIG MH MR MMR JBIG or or ...

Page 76: ...over To PC Right Side of Machine Rear Side of PC NOTE Do not use Standard LAN Cable Turn OFF and ON the Power Switch Machine and the PC Input your PC s IP Address into the Address Book in the machine see page 72 or into the Panasonic DMS software refer to the enclosed CD Scan the document s to your PC See page 70 NOTE If the Hard Disk Drive Unit DA HD18 is installed see page 13 LAN Cable Crossover...

Page 77: ...t Properties 3 Select Internet Protocol TCP IP Click Properties Click OK 4 7 5 Select Use the following IP address then Input IP Address and the Subnet Mask Click OK 6 For Windows XP 1 Open the Control Panel 3 2 2 Select Switch to Classic View if using the Category View Mode Select Network Connections 3 4 4 Right click Local Area Connection Enabled and select Properties 5 Select the Internet Proto...

Page 78: ...message appear on the display Remove the misfed paper See pages 16 21 Does the Misfed Paper indicator message and J codes appear on the display Turn the Power Switch on the Right Side of the machine to the OFF and ON position If the error code does not clear call your Service provider Does E codes and messages appear on the display Turn the Power Switch on the Right Side of the machine to the OFF ...

Page 79: ...et Wipe marks off with a cloth and a neutral detergent Wipe again with a dry cloth Platen Sheet Platen Glass Adjusting the Double Feed Switch For DA AS181 When original s do not feed correctly adjust the position of the Double Feed Switch as follows Double Feed Switch Position of Switch Normal Operation Original does not feed Several originals are fed at one time Clean the Corona Wire of the Drum ...

Page 80: ...message will be displayed Turn the Power Switch on the Right Side of the machine to the OFF position If the Hard Disk Drive Unit DA HD18 is installed see page 13 1 2 6 REPLACE BATTERY U90 10 09 KEY OPERATOR MODE ENTER PASSWORD 11 KEY OPR MODE 00 34 ENTER NO OR or 17 DATE TIME NOTE The service life of the battery is approximately 1 year under normal use 3 digit See page 13 When setting the Date and...

Page 81: ...the Month Date Year Time that you wish to change then input the new data using the Keypad CAUTION denotes hazards that could result in minor injury or damage to the machine THIS PRODUCT CONTAINS A LITHIUM BATTERY REPLACE ONLY WITH THE SAME OR EQUIVALENT TYPE IMPROPER USE OR REPLACEMENT MAY CAUSE OVERHEATING RUPTURE OR EXPLOSION RESULTING IN INJURY OR FIRE DISPOSE OF USED BATTERIES ACCORDING TO THE...

Page 82: ...ble from 101 to 200 in 1 increments Reduction Ratios Preset 79 77 65 61 50 Variable from 99 to 50 in 1 increments Paper Feed Standard Paper Tray 550 sheets Sheet Bypass 50 Sheets Optional Paper Trays 550 sheets x 3 3rd and 4th Paper Trays are for DP 8020E 8020P only Paper Weight Paper Tray 16 24 lb Bypass 15 34 lb ADU 17 24 lb DP 8020E Quantity Selector Max 999 sheets Output Tray capacity is 250 s...

Page 83: ...H MR MMR JBIG File Format Multi page TIFF PDF 256 Gradation Send to Station PC Yes Single Address only Send to Station FTP Yes Single Address only Send to Station Printer N A Pop up Notification Yes Protocol LPR TCP IP Applicable OS Windows 98 Me NT 4 0 2000 XP Tray Capacity Letter Invoice 50 sheets 20 lb Ledger Legal 30 sheets 20 lb Original Size Invoice Letter Legal Ledger Paper Weight 14 28 lb ...

Page 84: ... 128 MB DA SM28B For Electronic Sorting Expansion Flash Memory Card 4 MB UE 410047 Additional Page Memory for Fax Communication Board Expansion Flash Memory Card 8 MB UE 410048 Additional Page Memory for Fax Communication Board 8 MB Expansion Board DA EM600 Additional Expansion for PCL and PS printing Printer Controller Module DA PC820 Printer Controller for PCL6 Multi Page Description DA MC820 Pr...

Page 85: ...side of machine For your convenience space is provided below to record information you may need in the future Model No Serial No Date of Purchase Dealer Address Telephone Number Supplies Telephone Number Service Telephone Number Energy Star As an ENERGY STAR Participant Panasonic has determined that this product meets the ENERGY STAR guidelines for energy efficiency ENERGY STAR is a U S registered...

Page 86: ...ws Windows NT Windows Server Outlook Windows logo are either registered trademarks or trademarks of Microsoft Corporation in the USA and other countries Adobe Acrobat Reader Adobe logo are either registered trademarks or trademarks of Adobe Systems Incorporated All other trademarks identified herein are the property of their respective owners PEERLESSPage is a trademark of the PEERLESS Systems Cor...

Reviews: