background image

28

RQT9307

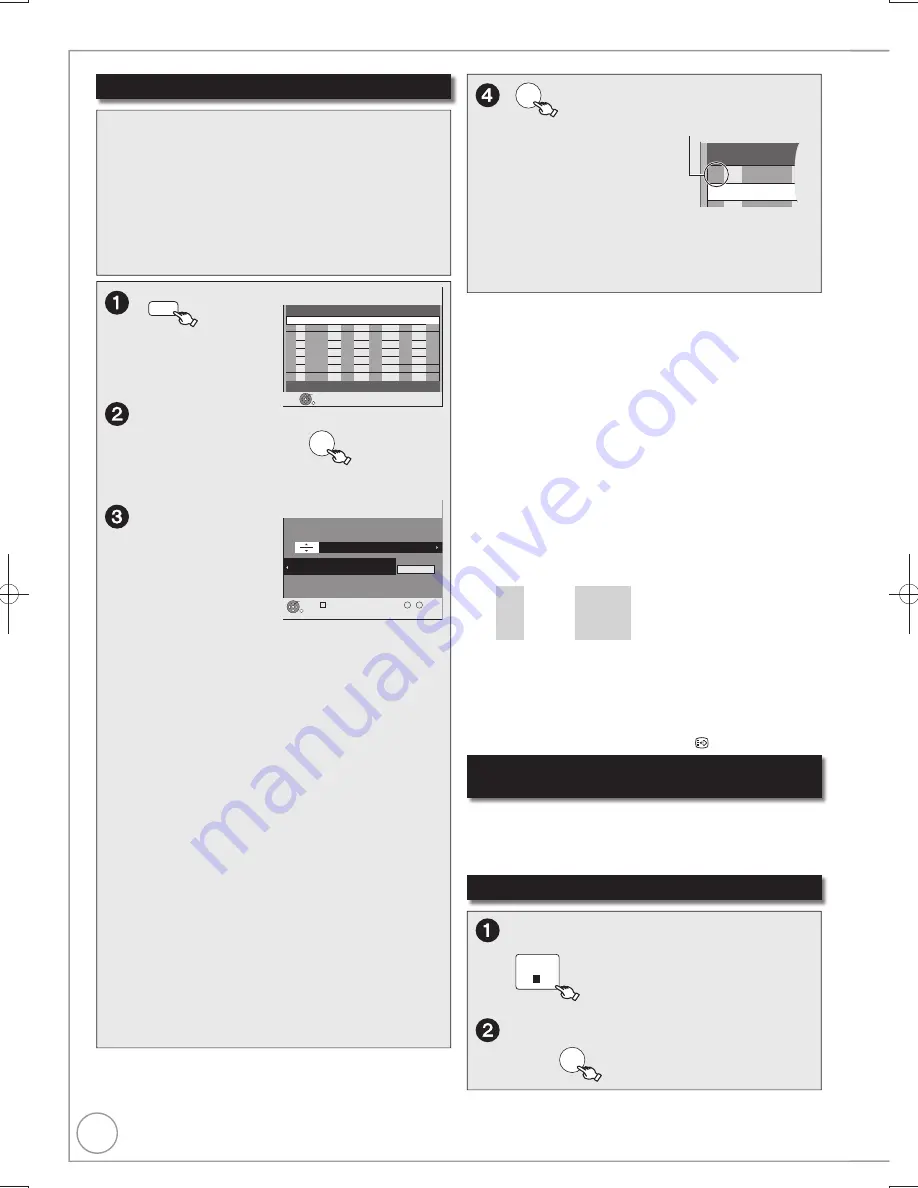
Advanced Timer Recording

Manual timer recordings


OK

– The timer icon is displayed in the left column.

No.  Channel 

BBC 1  15

01 



– “

” lights on the unit’s display to indicate timer 

recording standby has been activated. 

– Repeat steps 

 to programme other 

recordings.

– Press [

] to turn the unit off.

Notes

 “

” on the unit’s display 

fl

 ashes when the unit cannot go to timer 

recording standby.

 If two timer recording times overlap, the 

fi

 rst recording always has 

priority. The second recording will start only after the 

fi

 rst recording 

has 

fi

 nished.

 Recorded subtitles cannot be deleted later.

 A timer recording will not start while a disc is being formatted, deleted 

or 

fi

 nalised. The recording begins afterwards. 

 When “Channel” is set in “AV1”, “AV2” or “AV3”, “STTL” and “AD” 

setting is unavailable.

Tips

To exit the timer recording list

Press [PROG/CHECK].

 “Date” Setting

Each press of [

] changes items in the order below.

(Each press of [

] changes items in the reverse order.)

Current date

One month later 
minus one day

Weekly timer

Daily timer

SUN-SAT

MON-SAT

MON-FRI

SAT

SUN


---

Titles recorded using the same daily, weekly or series timer are 
bundled and displayed as a “group” in the DIRECT NAVIGATOR 
screen (

¼

 35) except when using Auto Renewal Recording.

 You can also use the numbered buttons to enter “Channel”, “Date”, 

“Start” and “Stop”.

 You can also press [DRIVE SELECT] to switch the drive, [REC 

MODE] to switch “Mode”, then press [STTL 

 ] to switch “STTL”.


PROG/CHECK

Timer

Recording

1:58 SP

DVD

30:24 SP

HDD

Remain

TUE  18/08/09   12:54:00

RETURN

OK

Press OK to store new programme.

Mode STTL

Stop

Start

No.

Date

HDD

DVD

Channel

Drive

space

New Timer Programme

AD


 to select “New Timer 

Programme”, then 

OK

 If 

New Timer Programme

” is already selected, 

press [OK].

Timer 

Recording 

1:58 SP 

DVD 

30:24 SP 

HDD 

Remain 

TUE  18/08/09  12:54:00

RETURN 

OK 

Number 

-- 

Programme Name 

Please set Channel. 

All Channels : -----

Change
Category

-- : -- 

Start

-- / -- --- 

Date

SP

Mode

--- 

STTL

--- 

HDD
DVD

Channel

-- : --

Stop

AD

---


 to move 

through the 
items and 

 to set 

the items.

Channel: – TV Station Name/External Input 

 When recording digital satellite programmes, 

select “AV2”.

 You can press the “Blue” button to change 

the category.

[e.g., Free Channels, Radio, Registered 

Favourites (

¼

 60, Favourites Edit)]

Date:

– You can set a daily or weekly programme 

(

¼

 right, Tips).

Start (start time)/Stop (end time):

– Hold button to change in 30-minute increments 

or decrements. 

Drive:

– HDD or DVD 

When the recording drive is “DVD” and there 

is not enough remaining space, recording 

automatically switches to the “HDD” (

¼

 30, 

Relief Recording).

Mode:

– Recording mode (

¼

 24)

STTL [Subtitles (

¼

 42)]

1, 

2

:

– AUTO/OFF

AD [Audio Description (

¼

 42)]

1, 

3

:

– AUTO/OFF

RENEW

(

[HDD]

)

– Auto Renewal Recording (

¼

 30)

ON/OFF

Programme Name:

Press [OK] (

¼

 43, Entering Text).

Notes

 Recording stops and the timer programme is deleted. (Daily, weekly 

and series timer programmes remain and timer recording will start 
from the next time the timer recording is set.)

To cancel a timer recording in progress


  While the unit is on


STOP

– Con

fi

 rmation screen appears.


 to select “Stop Recording”, 

then 

OK

Preparation:

 Turn on the television and select the appropriate video 

input to suit the connections to this unit.


]RAM\

 If the disc is protected, release protection (

¼

 58).

 Insert a disc with enough remaining blank space.

 Confirm that the clock on the unit’s display is set to the 

correct time.

 If connected via a digital satellite receiver, please ensure 

before a timer recording starts the required channel is set 
on the digital satellite receiver.

1

  If “AUTO” is selected, and if the programme includes the 

information of subtitles or Audio Description, they are 
automatically recorded with the programme.

2

  When there are multiple languages, select the subtitle 

(

¼

 61, 

DVB Preferred Subtitles). 

3

  You can switch the Audio Description and change its volume 

during timer recording.

Language for broadcast with multi-audio 
or multi-subtitle

In timer recording of broadcast with multi-audio or multi-
subtitle, audio and subtitle language to be recorded will follow 
the setting of “DVB Preferred Multi Audio” and “DVB Preferred 
Subtitles” in the Setup menu (

¼

 61).

DMR-EX769EB.indb   28

DMR-EX769EB.indb   28

2009/01/26   17:06:12

2009/01/26   17:06:12

Summary of Contents for DMREX769EB

Page 1: ...Broadcasting Project Declaration of Conformity No 5964 22nd October 2008 Notice for DVB functions This DVD Recorder is for viewing and recording free to view channels only not Pay TV or encrypted channels unless connected to an external source capable of receiving Pay TV or encrypted channels This unit does not have an analogue broadcast tuner This unit has the capability for DVB specifications Bu...

Page 2: ...ations with the TV You can set the Timer Recordings on Digital STB Digital Satellite Receiver when it is connected to this unit with Scart cable EXT LINK 27 Linked timer recordings with external equipment Pause Live TV 44 Pause the TV programme you are watching High Quality Picture Connection with HDMI terminal 12 Deep Colour 84 HDMITM V 1 3a with Deep Colour Easy to Find and Select Two or more ti...

Page 3: ...KEEP DRY Before use Remove the connector cover How to replace the fuse The location of the fuse differ according to the type of AC mains plug figures A and B Confirm the AC mains plug fitted and follow the instructions below Illustrations may differ from actual AC mains plug 1 Open the fuse cover with a screwdriver Fuse cover Figure A Figure B 2 Replace the fuse and close or attach the fuse cover ...

Page 4: ...rectly and not damaged Poor connection and lead damage can cause fire or electric shock Do not pull bend or place heavy items on the lead Grasp the plug firmly when unplugging the lead Pulling the AC mains lead can cause electric shock Do not handle the plug with wet hands This can cause electric shock Foreign matter Do not let metal objects fall inside the unit This can cause electric shock or ma...

Page 5: ...necting with an HDMI High Definition Multimedia Interface Terminal 70 Reference Troubleshooting Guide 75 When Other Panasonic Products Respond to this Remote Control 75 To Reset This Unit 75 General Issues Power 76 General Issues Displays 76 General Issues Operation 77 General Issues GUIDE Plus 77 General Issues DVB T 78 General Issues VIERA Link 79 Playback Issues Picture 79 Playback Issues Sound...

Page 6: ...usceptible to damage As a basic rule save important content to a disc as backup The HDD is a device that is not built to withstand vibration shock or dust Depending on the setup environment and handling of the HDD some content may become damaged and play and recording may no longer be possible Especially during operation do not subject the unit to any vibration shock or remove the AC mains lead fr...

Page 7: ... following points to ensure continued listening and viewing pleasure Dust and dirt may adhere to the unit s lens over time making it impossible to record or play discs Use the DVD lens cleaner not included about once every year depending on frequency of use and the operating environment Carefully read the lens cleaner s instructions before use DVD lens cleaner RP CL720E Do not place the unit on am...

Page 8: ...w subtitles 42 Transmission window TV operations 67 Channel select Change pages in the GUIDE Plus list 18 20 31 Show timer recording list 28 Input select Tuner AV1 AV2 AV3 18 27 34 Skip approx 1 minute forward 36 Exit the menu screen Show the GUIDE Plus screen 18 21 31 Show FUNCTION MENU display 44 By using the FUNCTION MENU display you may access the main functions Playback Recording etc quickly ...

Page 9: ...icator This indicator lights up when a disc is inserted Digital broadcast indicator Lights when the unit is receiving digital broadcast or GUIDE Plus data Copying indicator Linked timer recordings with external equipment indicator 27 Timer recording indicator 21 On When a Timer recording programme is registered Flashes When the unit cannot go to Timer recording standby Drive HDD or DVD indicator M...

Page 10: ... included from the RF OUT on the unit to the RF IN on the TV 21 pin Scart cable from the AV1 TV on the unit to the AV on the TV TV RF IN AV RF IN HDMI AV OUT HDMI IN AV1 RF OUT 1 2 3 This unit TV HDMI cable You can enjoy high quality picture by adding the HDMI cable connection 12 The RF coaxial cable cannot be used for showing pictures from the unit The unit must be connected using another method ...

Page 11: ...mes a small amount of power even when it is turned off approx 0 9 W Power Save is set to On Digital satellite receiver AV1 TV This unit TV RF IN AERIAL RF IN AV2 EXT RF OUT RF IN DISH INPUT RF OUT AV AV TV AV VCR AV HDMI IN HDMI OUT 1 2 3 4 5 6 HDMI cable You can enjoy high quality picture by adding the HDMI cable connection 12 HDMI AV OUT HDMI IN The RF coaxial cable cannot be used for showing pi...

Page 12: ...e High Speed HDMI Cables that have the HDMI logo as shown on the cover When setting video output to 1080p please use the HDMI cables 5 0 meters or less Notes If connecting to equipment that is only compatible with 2 channel audio output audio with 3 channels or more will be down mixed 84 and output as 2 channels even if connecting with an HDMI cable some discs cannot be down mixed You cannot conne...

Page 13: ...t do Can do It is possible to startup and start recording within several seconds Depending on the type of TV or the connected terminal it may take time to display the screen When setup has completed the confirmation screen appears OK The Owner ID settings screen appears and press the numbered buttons to enter your choice of a 4 digit PIN number Owner ID RETURN leave PIN number Name House No Postco...

Page 14: ... not set correctly adjust the clock to select Yes then OK The cursor moves to Name to enter the name to select a letter then to move to next character Repeat this to enter the name OK to store the name and and then repeat steps to enter and store House No and Postcode RETURN The Owner ID settings screen disappears Auto Setup for your unit is complete You can now choose your favourite channels and ...

Page 15: ... out when the unit is switching layers Second recordable layer Inner section of the disc DVD R DL R DL When switching layers Video and audio may momentarily cut Outer section of the disc First recordable layer Playback direction The available space Title 1 Title 2 Can do Cannot do Recording Modes and Durations 24 HDD and Disc Handling Quick Start Guide STEP 3 Formatting and or recording initializi...

Page 16: ...e to view Impossible to view Types of disc or title recorded on HDD for the type of connected TV 1 If your television is not equipped to handle PAL 525 60 signals the picture will not be shown correctly 2 Select NTSC in TV System 65 When playing back a disc or title recorded on the HDD ensure that you match the TV System setting to the disc or title PAL or NTSC 65 TV type Disc Titles recorded on H...

Page 17: ...oft dry lint free cloth in a straight line from the centre of the disc to the edge of the disc Return discs to their cases when not in use this helps to protect against scratches and dirt Storing discs Do not place or store discs in the following locations Direct sunlight Very dusty or humid areas Near a heat source Places that undergo extreme shifts in temperature condensation can occur Where sta...

Page 18: ...N M E N U D I R E C T N A V A I G A T A A O R RETURN PLAY x1 A A 3 PA P P USE STOP SLOW SEARCH SKIP CH PA P P GE SELECT INPUT 0 9 8 7 6 5 4 3 2 1 AV A A TV DRIVE SELECT DELETE MANUAL SKIP PROG CHECK EXIT OPTION STTL GUIDE OK CH VOL Selecting a Channel without the GUIDE Plus system To select desired channel Press CH To directly enter Channels You can also select channels with the numbered buttons e...

Page 19: ... screens that appear on the TV may be navigated as follows e g DINOSAUR Play Chapter List Subtitles Trailer DVDTOPMENU DVD V to select an item then OK You can sometimes use the numbered buttons to select an item VCD Press the numbered buttons to select an item e g 5 0 5 15 1 5 HDD RAM R R DL RW V R R DL RW DVD V RW VR VCD CD to turn the unit on DRIVE SELECT to select the HDD or DVD drive If you se...

Page 20: ...REC MODE REC CREAT A A E CHAPTER F U N C T I O N M E N U D I R E C T N A V A I G A T A A O R GUIDE RETURN PLAY x1 A A 3 PA P P USE STOP SLOW SEARCH SKIP CH PAGE 0 9 8 7 6 5 4 3 2 1 AV A A TV DRIVE SELECT DELETE MANUAL SKIP PROG CHECK EXIT OK OPTION STTL SELECT INPUT CH VOL Tips If a programme to record has subtitle Audio Description or multiple audio you can record with them They cannot be switche...

Page 21: ...AllTypes Category Time info BBC 1 BBC 2 Channel 4 Channel 5 2 OPTION Select Advert etc Holiday Programme 2 BBC 2 Guide Link Split and Series are displayed here If Selection Screen appears press to select Single Timer Rec then press OK Refer to Series recording 32 for Series Timer Rec Confirm the programme start and end time by TV magazine etc and correct if necessary using then OK Timer icon y The...

Page 22: ...OK RETURN Playback Recording Copy Others Drive Select Delete Remain 30 00 SP HDD TV Guide to select the title then PAUSE A check mark is displayed Repeat this step until you select all necessary items Press again to cancel OK to select Delete then OK Tips To return to the previous screen Press RETURN To view other pages Press to select Previous or Next then press OK You can also press to view othe...

Page 23: ...RE MODE REPE AT OPEN DC IN 9V I CD SEQUENTIAL DISC DOUBLE RE MASTER DISC EXCHANGE DISC SKIP OPEN CLOSE 1 2 3 4 5 Record to DVD R etc Finalise Play on other DVD equipment RW If the disc failed to play on other equipment we recommend you create top menu 59 You cannot directly record to a DVD R DL and R DL disc on this unit Record to the HDD and then copy to the disc RAM CPRM compatible discs only R ...

Page 24: ...ount of data recorded to suit the picture quality so actual recording times and remaining recording times shown by the unit will be different R DL R DL The difference will be especially noticeable Use a disc enough remaining blank space When recording to DVD RAM using EP 8Hours mode play may not be possible on DVD players even if they are compatible with DVD RAM In this case use EP 6Hours mode Tip...

Page 25: ...ding Time HDD RAM R RW V R RW This function allows specifying the length of recording time up to 4 hours Notes This function does not work during timer recording or Flexible Recording Recording stops and the set time is cleared if you press The unit turns off automatically after recording finished Direct TV Recording DIRECTTVREC Press and hold for about 1 second The titles are recorded to the HDD ...

Page 26: ...o exit the screen Press EXIT To stop recording partway Press To show the remaining recording time Press STATUS to show the remaining recording time Remaining time REC 0 59 BBC ONE Wales HDD 1 DVB Advanced Recording With the unit stopped F U N C T I O N M E N U to select Others then OK Flexible Rec Start Cancel Record in FR mode Set rec time Maximum rec time 8 Hour 00 Min 8 Hour 00 Min RETURN SELEC...

Page 27: ...rforming the recording When EXT L lights on the unit s display Direct TV Recording is unavailable To record programmes from a SKY Digital STB digital satellite receiver using timer programming This unit cannot record NTSC signals to discs that already have PAL signal recordings However both types of programmes can be recorded onto the HDD Preparation RAM If the disc is protected release protection...

Page 28: ...AD to move through the items and to set the items Channel TV Station Name External Input When recording digital satellite programmes select AV2 You can press the Blue button to change the category e g Free Channels Radio Registered Favourites 60 Favourites Edit Date You can set a daily or weekly programme right Tips Start start time Stop end time Hold button to change in 30 minute increments or de...

Page 29: ...ete a programme with the following steps 1 Press to select the programme then press OPTION 2 Press to select Delete then press OK To exit the timer recording list Press PROG CHECK Notes Recording may fail if there are changes to the station s programming disappears from the unit s display when no timer programme is set or when all timer programmes are deactivated is displayed on a series recording...

Page 30: ...hannels BBC 1 AD OFF Notes on timer recording When a timer recording is set DVDs that were recorded using a different TV system cannot be played unless the TV system is changed in the Setup menu 65 or the timer recording has completed or has been cancelled Timer recordings are activated regardless of whether the unit is turned on off Timer recordings begin when the set time is reached even when pl...

Page 31: ...rammes and you can set the timer recording of the programmes using the advertisement screen Follow the on screen instructions The information from the GUIDE Plus system will not be lost even if the unit is turned off at the mains outlet Tips When the unit displays No Data or the empty GUIDE Plus list The empty field Landscape TV Guide Tue 18 08 09 19 45 Tue 18th All Channels AllTypes Time BBC 1 BB...

Page 32: ...ries for 13 weeks Selecting the programme from the desired programme type or category This function lets you display a GUIDE Plus list sorted by programme type e g Movie Sport or category e g Free Channels Radio GUIDE The GUIDE Plus list appears AllChannels FreeChannels Data All Channels Radio Favourite 1 Favourite 2 Favourite 3 Favourite 4 AllTypes Movie Entertainment Sport Children s Education L...

Page 33: ...UIDE Plus list appears OPTION Select Advert Free Word Search to select Free Word Search then OK Enter the word you would like to search for then STOP Entry method 43 Entering text to select Simplified Search or Detailed Search then OK Free Word Search Simplified Search Detailed Search Detailed Search may result in many hits but search time will be longer Simplified Search It searches the programme...

Page 34: ...ith an S Video cable instead of the yellow video cable 2 Connect to terminals of the same colour If the audio output of the external device is monaural connect to L MONO on the AV3 input terminals at the front L MONO AUDIO R VIDEO S VIDEO AV3 IN S Video cable 1 Audio video cable 2 Other video equipment Connect to Audio Video output terminals Preparation When the output signal from the external dev...

Page 35: ...enient when searching for one title to playback from many titles Press OPTION Press to select Sort then press OK Press to select the item then press OK If you select an item other than No The DIRECT NAVIGATOR screen will reappear after playback of the selected title has finished You cannot play titles continuously Skip and Time Slip will only function with the title currently being played back If ...

Page 36: ...While paused OK Each press shows the next or previous frame Press and hold to advance or reverse frame by frame in succession Press PLAY to restart normal playback Notes If continued for approx 5 minutes slow motion play pauses automatically except DVD V VCD VCD allow slow motion in the forward direction only HDD RAM R R DL RW V R R DL This function does not work with finalised discs RW RW VR Skip...

Page 37: ...1 MP3 Menu 0 9 Number Group No Prev Next Selected group to select a track then OK to play R R DL CD You can play MP3 files recorded with a computer onto a DVD R DVD R DL and CD R CD RW Playing MP3 Tips indicates the track currently playing To stop playing Press To exit the menu screens Press DIRECT NAVIGATOR To view other pages Press To select the track with the numbered buttons e g 5 0 0 0 5 15 0...

Page 38: ...arding Album View screen right JPEG Menu Album View Slideshow Previous Page 01 01 Next OK RETURN OPTION Press OK to show pictures 001 002 10 10 08 Total 5 10 10 08 Total 3 Photo_002 Photo_001 CD JPEG to select the album then OK JPEG Menu Picture JPEG View Previous Page 001 001 Next 0001 Album Name 103__DVD 0002 0003 0004 0005 0006 0007 0008 0009 OK RETURN OPTION Slideshow CD JPEG to select the sti...

Page 39: ...K When zooming in the still picture may be cut off Zoom in information is not stored Zoom in and Zoom out do not work with images that have a resolution larger than 640 480 pixels Slideshow You can display still pictures one by one with regular interval From the Album View screen to select an album then PLAY x1 3 You can also start Slideshow with the following steps From the Album View screen Pres...

Page 40: ...idual manuals for other manufacturers equipment supporting VIERA Link function What is Q Link Q Link Q Link is a convenient function that offers linked operations of this unit and a Panasonic TV You can use this function by connecting the equipment with a fully wired 21 pin Scart cable When the TV is on Easy playback VIERA Link Q Link When the TV is on and the following operations are performed th...

Page 41: ...DD This is useful when you have to briefly stop watching TV to run an errand If you stop the Pause Live TV function then the TV programme temporarily saved on the HDD will be deleted When you want to pause the TV programme Turn on the Pause Live TV function using the TV remote control This unit turns on automatically When you want to resume Display the Control Panel right then press OK The TV prog...

Page 42: ...iew another page of Digital Teletext Press to select another page then press OK You can also use the numbered buttons to select another page Quickly access to certain topic areas and navigation Use colour buttons according to on screen instructions When Subtitle appears in digital channel information STTL to show subtitles Press again to hide Notes Programmes are recorded with subtitles when you r...

Page 43: ...s to recorded titles etc Also you can search for desired programmes on GUIDE Plus list by entering key words or the programme name Free Word Search Find Titles 33 When viewing the Enter Name screen etc _ Enter Name 1 2 3 4 5 A B C a D E F d G H I N O g J K L j M m 6 7 8 9 0 b c e f h i k l n _ o Space P Q R S p T U V t W X Y Z w q r s u v x y z OK RETURN SELECT 1 2 3 4 5 6 7 8 9 0 Top Menu Preview...

Page 44: ...ect the channel When you want to pause the TV programme Press L R HDD BBC Pause Live TV Pause Live TV This icon indicates that the Pause Live TV is working When you want to resume playback Press PLAY The programme is saved on the HDD in SP recording mode 24 regardless of the recording mode and the drive selected before starting saving At least 1 hour up to 8 hours of TV programmes can be temporari...

Page 45: ...menu list To view more options Press to select Edit then press OK Items that cannot be selected are grey If you select Chapter View 47 Switching the DIRECT NAVIGATOR appearance 35 To edit the group of titles HDD 35 Refer to Title Operations right Set up Protection Cancel Protection Partial Delete Divide Title ChangeThumbnail EnterTitle Name Properties Create Group Release Grouping Table Display Al...

Page 46: ...OK Tips For quicker editing Use Search 36 or Time Slip 36 to find the desired point To skip to the start or end of a title press start or end For better precision use Slow motion 36 and Frame by Frame 36 Notes Divided titles retain the name of the original A short amount of video and audio just before and after the division point get cut out You cannot divide a title when the resulting parts are t...

Page 47: ...ECT NAVIGATOR To view other pages Press to select Previous or Next then press OK You can also press to view other pages Multiple editing Only Delete Chapter Select with then press Repeat A check mark appears Press again to cancel You can divide a title into multiple chapters Perform steps of Accessing the Chapter View left Press to select Create Chapter then press OK DIRECT NAVIGATOR Create Chapte...

Page 48: ...ess to select the source chapter you want to add to a playlist then press OK Press to cancel Press OPTION to select Create Chapter then press OK if you want to create a new chapter in the source title 47 Press to select the position to insert the chapter then press OK Press repeatedly to return to step if you want to add additional source titles Chapters are registered to the playlist Repeat steps...

Page 49: ...OK Press to select a chapter Multiple editing right Tips To play Press OK To edit Press OPTION to display the menu list You can go back to the Playlist View Move Chapter Create Chapter Combine Chapters Delete Chapter Playlist View Add Chapter Refer to Chapter Operations right Chapter Operations Add Chapter Press to select Add Chapter then press OK 48 Creating Playlists Move Chapter Press to select...

Page 50: ...udio types Dolby Digital and LPCM etc Titles that contain many deleted segments R R DL RW Titles recorded in EP mode and FR recordings 5 hours or longer mode Displayed 51 R R DL RW Titles recorded in 16 9 aspect R R DL RW V Titles recorded in 16 9 aspect using EP mode or FR recordings 5 hours or longer mode 2 If you select a recording mode with better picture quality than the original the picture ...

Page 51: ... to fill a new disc when copying to it the equivalent of up to 4 hours of free space in SP mode is needed on the HDD When the number of titles recorded to the HDD and the number of titles to be copied to the DVD R DL and R DL is greater than 499 in total When playing a title recorded on both layers video and audio may momentarily cut out when the unit is switching layers 15 Regarding copying of th...

Page 52: ... 9 25 AV2 4 10 SAT 16 10 BBC 3 10 FRI 22 05 AV2 3 10 FRI 20 00 BBC1 27 9 SAT 12 15 BBC 26 9 FRI 13 30 002 003 004 005 006 007 Title Name Time No Channel Date Day 008 BBC 11 10 SAT 21 00 RETURN OK Rec time 0 52 SP Disc Space 4310MB Total Size 0MB 0 Total 0 Sort Properties Grouped Titles Properties Press to select Properties then press OK The name recording date channel etc of the selected title are...

Page 53: ...e 02 02 Next 007 BBC 1 10 10 FRI 008 OK RETURN OPTION Previous Next Playlists VIDEO Select BBC 1 11 10 SAT 0 30 XP Press to select the title or playlist then press A check mark is displayed Repeat this step until you select all necessary items Press again to cancel The items will be copied in the order of the copying list If you want to specify the order repeat selecting one item at a time When yo...

Page 54: ... R DVD R DL DVD RW DVD Video format R and R DL to the HDD and re edit While playing a disc the content being played is copied to the HDD according to the set time Operations and on screen displays during copy are also recorded Almost all DVD Video on sale have been treated to prevent illegal copying and cannot be copied Preparation Insert the finalised disc 17 After performing steps Format is auto...

Page 55: ...n 1 2 3 Hour 00 2 Cancel All Copy Direction Copy Mode Copy Time DVD HDD DVD Video XP Set the time a few minutes longer Press to select Hour and Min then press to set the recording time Press OK Press to confirm Copying to the HDD continues for the set time even after the content being played finishes Set a few minutes longer than the source title in order to include the operation time before play ...

Page 56: ...sc audio subtitle image quality sound effect Repeat Play etc In addition when receiving the multi channel broadcast you can change the audio settings Menu options will differ based on disc type and contents Setting On Screen Display HDD RAM R R DL RW V R R DL RW DVD V RW VR VCD You can change the settings of disc audio subtitle etc Soundtrack HDD RAM R R DL RW V R R DL RW RW VR The disc s audio at...

Page 57: ...ts film contents with different frame rates and appropriately converts it Video Select when using Auto1 and Auto2 and the content is distorted Input NR Reduces the noise while recording Automatic Noise reduction only works on picture input from a video tape On Noise reduction works for any video input Off Noise reduction is off Select when you want to record input as is HDD RAM R R DL RW V R R DL ...

Page 58: ...the unit cannot use You can delete all titles on HDD or the single sided DVD RAM at once Important Once deleted contents cannot be recovered HDD RAM Perform preparation steps of Accessing the Management Menus left Press to select Delete all titles then press OK Press to select Yes then press OK Press to select Start then press OK A message appears when deleting is finished Press OK to complete HDD...

Page 59: ...ng This can render the disc unusable When finalising a high speed recording compatible disc it may take longer than displayed on the confirmation screen approximately 4 times longer After finalising R R DL R R DL The disc becomes play only and you can no longer record or edit it RW V You can record and edit the disc after formatting although it becomes play only after finalising When copying in hi...

Page 60: ...ourites during timer recording standby Channel numbers cannot be changed due to broadcast restrictions Setup Disc Picture Sound Display Connection Tuning Others OK RETURN TAB SELECT Favourites Edit DVB Auto Setup DVB Manual Tuning AddNewDVBChannels Signal Condition DVB Preferred Multi Audio DVB Preferred Subtitles English English Favourites Editor RETURN SELECT Favourite Select Add All Add All Cha...

Page 61: ...EWS 24 27 TV 9 BBC Radio Wales 27 Radio 9 The unit starts searching for newly available digital terrestrial channels This takes about 5 minutes The bar over the table shows you the search progress At the end of the search the number of found new digital stations appears No new DVB channels found is displayed when no new channels can be found Press OK to save the newly found channels Tips To cancel...

Page 62: ...ther Subtitle Automatic English German French Italian Spanish Other Menus English German French Italian Spanish Other Settings for Recording Press OK to show the following settings Recording time in EP mode Select the maximum number of hours for recording in EP mode EP 6Hours You can record for 6 hours on an unused 4 7 GB disc EP 8Hours You can record for 8 hours on an unused 4 7 GB disc Chapter C...

Page 63: ... may be lower than that of normal XP mode recordings The audio recording becomes Dolby Digital even if you selected LPCM when using a recording mode other than XP Incorrect settings can cause noise to be output which can be harmful to your ears and speakers and audio will not be recorded properly on media such as mini discs Refer to the operating instructions for connected devices to verify whethe...

Page 64: ...splay On Screen Messages 5 sec Bright Screen Saver On FUNCTION MENU Display Off Automatic New Channel Message select Connection select item OK Setup Picture Sound Display Connection Tuning Others Disc Progressive TV Aspect 16 9 Off HDMI Settings AV 1 Output RGB 2 AV 2 Settings PAL TV System RETURN TAB SELECT TV Aspect This setting needs to be changed when connected to a 4 3 standard aspect TV 16 9...

Page 65: ...nd component this is not a malfunction of the unit 4 3 Picture output expands left or right 16 9 Picture is output as original aspect with side panels Digital Audio Output HDMI and Optical Optical Only Select when this unit is connected to an amplifier with an optical digital audio cable 70 and connected to a TV with an HDMI cable 70 and you want to enjoy the highest quality of audio from discs VI...

Page 66: ...ndby below to Off and update manually below Software Update Search Now TV Guide Download in Standby On When the unit is turned off TV Guide data is downloaded automatically Off Software Update in Standby On You can perform the unit updates automatically when the unit is turned off Off TV Guide Software search period Selects the time to automatically perform TV Guide download and updates when the u...

Page 67: ... codes if available Some TVs may not be compatible with the unit s remote control TV operation buttons Remote Control Codes for the TV Manufacturer Code No Panasonic 01 02 03 04 AIWA 35 AKAI 27 30 BEJING 33 BEKO 05 71 72 73 74 BENQ 58 59 BP 09 BRANDT 10 15 BUSH 05 CENTREX 66 CHANGHONG 69 CURTIS 05 DAEWOO 64 65 DESMET 05 DUAL 05 ELEMIS 05 Manufacturer Code No FERGUSON 10 34 FINLUX 61 FISHER 21 FUJI...

Page 68: ... cables as far away as possible from other cables Do not roll up the RF coaxial cables Before connection turn off the mains for all connected equipment and read the appropriate operating instructions Connect AC mains lead only after all other connections are complete BE SURE TO READ THE CAUTION FOR AC MAINS LEAD ON PAGE 3 Additional Connections RF IN AV RF IN RF IN HDMI AV OUT HDMI IN RF OUT RF OU...

Page 69: ...same colour The S VIDEO OUT terminal achieves a more vivid picture than the VIDEO OUT terminal Actual results depend on the television AUDIO IN VIDEO IN R L AUDIO VIDEO This unit TV L R Notes If you have a regular television CRT cathode ray tube Use component output with progressive Off Factory setting 64 even if it is progressive compatible because progressive output can cause some flickering Thi...

Page 70: ...our You can improve sound quality by connecting this unit to an amplifier or system component using the audio cable or the optical digital audio cable This unit Amplifier or System Component OPTICAL OPTICALIN DIGITALAUDIOOUT PCM BITSTREAM Insert fully with this side up Do not bend cable sharply AUDIO IN R L AUDIO VIDEO This unit Amplifier or System Component L R Connect an amplifier or system comp...

Page 71: ...folders groups and 3000 files tracks on a disc with MP3 or still pictures JPEG 16 17 You cannot write to a CD R or CD RW with the unit Setup Page How can I enjoy High Quality Video up converted to 1080p Connect the unit to 1080p compatible HDTV using an HDMI cable Set HDMI Video Format in the Setup menu to 1080p 12 65 What equipment is necessary to play multi channel surround sound You cannot play...

Page 72: ...cannot record MP3 signals GUIDE Plus Page Is it possible to programme a recording with a start and end time that are different from the GUIDE Plus system You can manually change the start and end time of programmes in the Timer Recording menu But if timings are altered by more than 10 minutes Guide Link will not be able to function 28 Can I receive GUIDE Plus system data via a connected digital sa...

Page 73: ...layed when less than 100 hours are available and the example LP 151h is displayed when over 100 hours are available SP and LP are recording modes 35 50 means 35 hours 50 minutes and 151h means 151 hours SW DL The unit is performing a software update 66 UNSUPPORT You have inserted a disc the unit cannot play or record onto 15 16 UNFORMAT You inserted an unformatted DVD RAM DVD RW RW an unused R R D...

Page 74: ...le recorded using a different encoding system from that of the TV system currently selected on the unit Alter the TV System setting on this unit to suit 65 Cannot play on this unit You tried to play a non compatible image 17 No Disc The disc is upside down If it is a single sided disc insert it so the label is facing up No folders There is no compatible folder in this unit 17 Not enough space in t...

Page 75: ...d I for more than 10 seconds The unit is turned off Troubleshooting Guide Language code list Enter the code with the numbered buttons Abkhazian 6566 Chinese 9072 Hausa 7265 Lithuanian 7684 Romanian 8279 Telugu 8469 Afar 6565 Corsican 6779 Hebrew 7387 Macedonian 7775 Russian 8285 Thai 8472 Afrikaans 6570 Croatian 7282 Hindi 7273 Malagasy 7771 Samoan 8377 Tibetan 6679 Albanian 8381 Czech 6783 Hungar...

Page 76: ...does not indicate a problem with the unit Regular disc rotating sound Poor reception due to atmospheric conditions Image disturbance during search Periodic interruptions to the reception due to digital satellite broadcasting breaks Operations are slow to respond when Power Save is set to On Operations are not working due to a poor quality disc Try again using a Panasonic disc The unit freezing due...

Page 77: ...isplayed and the disc cannot be ejected The unit is carrying out the recovery process The disc may be defective Do the following to eject the disc Try another disc 1 Press I on the main unit to switch to standby mode If the unit doesn t switch to standby mode reset the unit 75 To restore the unit if it freezes 2 While the unit is turned off press and hold and CH on the main unit at the same time f...

Page 78: ...e pictures to break up and audio to mute or distort momentarily Impulse noise interference from an infrequently used electrical appliance or a passing vehicle or lawn mower with a noisy ignition system Perform DVB Auto Setup in the Setup menu 61 Unusual station sorting The station sorting of this unit is pre defined Use Favourites to sort the stations as you want them 60 The digital channel inform...

Page 79: ...etup menu to 16 9 65 Check the settings for TV Aspect in the Setup menu 64 It may be possible to adjust the display mode on the TV Refer to your television s operating instructions The screen changes automatically When Screen Saver in the Setup menu is set to On the display may turn to the screen saver mode automatically if there is no operation for 5 minutes or more Press OK to return to the prev...

Page 80: ... different aspect ratios between scenes recorded with different resolutions between playlist chapters Make sure the connections are pushed in firmly 10 12 68 70 Try connecting an alternative cable No sound Low volume Distorted sound Cannot hear the desired audio type Check the connections and the Digital Audio Output settings Check the input mode on the amplifier if you have connected one 10 12 63...

Page 81: ...and subtitles on some discs Use the disc s menus to make changes 19 No subtitles Subtitles are not recorded on the disc Set Subtitle in the Disc menu to On 56 Angle cannot be changed This function depends on software availability Angles can only be changed during scenes where different angles are recorded You have forgotten your ratings password With the tray open press DRIVE SELECT to select the ...

Page 82: ...DVD Recorders This unit cannot record NTSC signals to discs that already have PAL signal recordings However both types of programmes can be recorded onto the HDD Play of discs recorded with both PAL and NTSC on another unit is not guaranteed 65 Some broadcasts are copyright protected 15 23 84 Timer recording does not work properly The timer programme is incorrect or different timer programme times...

Page 83: ...ing or high speed copying to a DVD R DVD R DL DVD RW DVD Video format R R DL and RW the sound of the disc rotating may be louder than normal however this is not a problem Cannot record video or sound from the external device The external device is not correctly connected The proper external input channel AV2 or AV3 is not selected Press INPUT SELECT to change 11 12 34 68 Recording Issues Recording...

Page 84: ...lay such media You can finalise DVD R DVD R DL DVD RW DVD Video format R and R DL on the unit After finalising the disc becomes play only and you can no longer record or edit However finalised DVD RW can be formatted to become recordable Folder This is a place on the disc where groups of data are stored together In the case of this unit it refers to the place where still pictures JPEG are stored F...

Page 85: ...ted to the aerial etc Thumbnail This refers to a miniature representation of a picture used to display multiple pictures in the form of a matrix 1080i In one high definition image 1080 1125 alternating scan lines pass every 1 50th of a second to create an interlace image Because 1080i 1125i more than doubles current television broadcasts of 480i 525i the detail is much clearer and creates a more r...

Page 86: ...Ds Laser Power No hazardous radiation is emitted with the safety protection Television system Tuner System DVB T Channel Coverage UK UHF 21 to 68 ch RF converter output Not provided Video Video system PAL colour signal 625 lines 50 fields NTSC colour signal 525 lines 60 fields Recording system MPEG2 Hybrid VBR Video In PAL NTSC AV1 AV2 21 pin AV3 pin jack 1 Vp p 75 termination S Video In PAL NTSC ...

Page 87: ...pparatus from the AC Mains disconnect the power supply cord plug from AC receptacle CLASS 1 LASER PRODUCT For your safety be sure not to connect or handle the equipment with wet hands Your attention is drawn to the fact that recording pre recorded tapes or discs or other published or broadcast material may infringe copyright laws Back of product Inside of product Information for Users on Collectio...

Page 88: ...btitle 20 28 Select subtitle 61 Show subtitle 42 Edit Chapter 47 Playlists 48 Title 45 Enabling discs to be played on other equipment Finalise 59 Encrypted 42 Finalise 59 84 Flexible Recording 26 Format 58 84 FR Flexible recording mode 24 FREEVIEW 21 FUNCTION MENU Display 44 GUIDE Plus 21 31 33 HDAVI Control 12 40 41 65 70 HDMI 12 65 70 High Speed Copy 62 Initialize 66 JPEG 17 38 39 84 Language Co...

Reviews: