background image

Advanced Copy

FUNCTIONS

FUNCTIONS

To Others

DVD

HDD

VHS

L

CK

O

SD

The entire cassette/disc can be copied or 
the duration of the copying can be 
determined.
The titles are transferred without chapters.

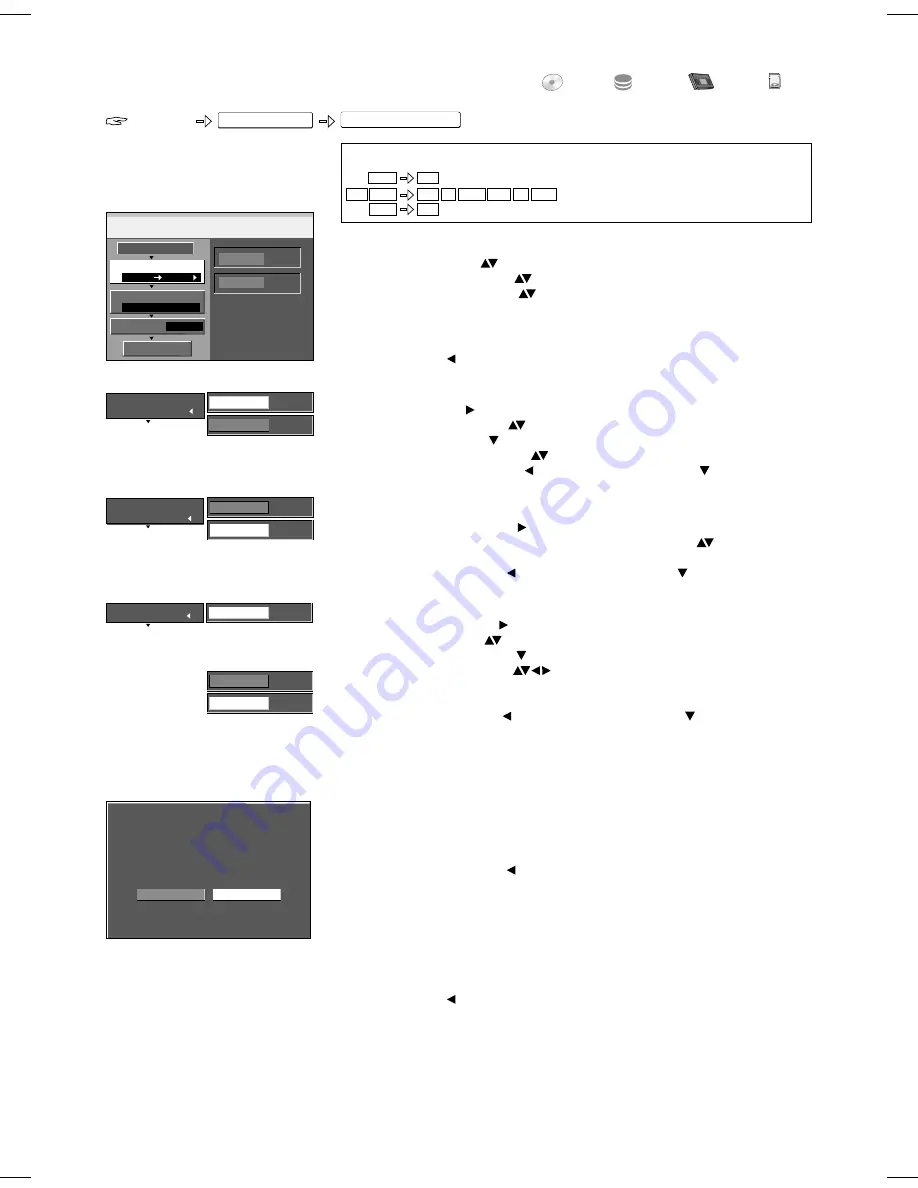
1


Copy Direction

!

Select [Source] with    and press 

ENTER

 to confirm.

!

Select the source drive with  

 and press 

ENTER

 to confirm. 

!

Select [Destination] with    and press 

ENTER

 to confirm.

!

Select the destination drive with  

 and press 

ENTER

 to confirm. 

!

Return to [Copy Direction] with     and select [Copy Mode] with   .

Time-triggered copying

Cancel All

All created settings are cancelled!

!

Select [Yes] with    and confirm with 

ENTER

.

!

Press 

FUNCTIONS

.

!

Select [To Others] with  

 and confirm with 

ENTER

.

!

Select [Advanced Copy] with  

 and confirm with 

ENTER

.

!

Select the desired option with  

.

2 Copy Mode

!

Select [Recording Mode] with    and confirm with 

ENTER

.

!

Select the desired recording mode [XP, SP, LP, EP or FR] with  

 and confirm 

with 

ENTER

. The format is detected automatically.

!

Return to [Copy Mode] with     and select [Copy Time] with   .

3 Copy Time

!

Select [Time Setting] with     and confirm with 

ENTER

.

!

Select [On] or [Off] with  

 and confirm with 

ENTER

[On]: Select [Copy Time] with    and confirm with 

ENTER

Change the time setting with  

 and confirm with 

ENTER

.

[Off]: When the copy time is switched off, the entire disc

/

VHS cassette is copied if 

there is sufficient space on the destination drive.

!

Return to [Copy Time] with    and select [Start Copying] with   .

Recording mode FR and time setting [Off]
Copying starts after the tape rewinds to the beginning. Titles are automatically 
created for each index signal.

Finalizing

Before copying starts, you can select whether you want to finalize the disc after 
copying.

!

Confirm [Copy Only] with 

ENTER 

if the disc just needs to be copied.

!

Select [Copy&Finalize] with    and confirm with 

ENTER

 if the disc needs to be 

finalized after copying. 
Finalization cannot be cancelled.

Start Copying

!

Press 

ENTER

 to start copying.

!

Select [Yes] with    and confirm with 

ENTER

.

The screen displays are also recorded during copying. In the case of a DVD-Video, 
the original picture and sound quality may not be fully achieved.

!

Press 

RETURN

 for 3 seconds to end copying.

Copy

1

DVD

HDD

DVD-Video

SP

2

3

DVD

HDD

Select the copy direction.

Cancel All

Copy Direction

Copy Mode

Copy Time

Source

Destination

Off

Start Copying

3

Copy Time

Select the copy direction.

Press 

ENTER

 to change

the setting.

DVD

Source

HDD

Destination

DVD-Video

Format

SP

Recording Mode

1

Copy Direction

2

Copy Mode

Off

Time Setting 

Set the time to finish 
copying.

Press 

ENTER

 to change

the setting.

On

Time Setting

2:00

Copy Time

Start copying only.
Cannot play the disc on other DVD players.

Copy & Finalize

Copy only

Finalizing is to enable the disc to be played on
other DVD players.

Timer Recording does not work during this operation.

HDD

DVD-V

VHS

-R

+R

S-VHS

RAM

-RW(V)

+R DL

-R DL

DVD-V

VHS

56

Summary of Contents for DMR-EX95V

Page 1: ... operate or adjust any settings on the unit Trademark of the DVB Digital Video Broadcasting Project 1991 to 1996 th Declaration of Conformity No 3955 12 January 2006 This DVD Recorder is for viewing and recording free to view channels only not pay TV or encrypted channels PAL NTSC DVD Recorder Model No DMR EX95V Operating Instructions TM ...

Page 2: ...television set 33 Playlists 59 61 Connecting a TV with COMPONENT VIDEO Specifying a time as the recording duration 34 Creating a playlist 59 input terminal 19 DVD HDD playback during recording 34 Launching the Playlists menu 60 Progressive television picture 19 Direct TV recording 34 Editing playlists in the SUB MENU 60 Recording from an external unit e g a camera 34 Editing chapters in the SUB ME...

Page 3: ...RE ELECTRIC SHOCK OR PRODUCT DAMAGE DO NOT EXPOSE THIS APPARATUS TO RAIN MOISTURE DRIPPING OR SPLASHING AND THAT NO OBJECTS FILLED WITH LIQUIDS SUCH AS VASES SHALL BE PLACED ON THE APPARATUS CAUTION DO NOT INSTALL OR PLACE THIS UNIT IN A BOOKCASE BUILT IN CABINET OR IN ANOTHER CONFINED SPACE ENSURE THE UNIT IS WELL VENTILATED TO PREVENT RISK OF ELECTRIC SHOCK OR FIRE HAZARD DUE TO OVERHEATING ENSU...

Page 4: ...compatible This symbol on the products and or accompanying documents means that used electrical and electronic products should not be mixed with general household waste For proper treatment recovery and recycling please take these products to designated collection points where they will be accepted on a free of charge basis Alternatively in some countries you may be able to return your products to...

Page 5: ...s We are sure that you will be completely satisfied with this unit Matsushita Electric Industrial Co Ltd http www panasonic co jp global Included Accessories Guarantee Card Operating Instructions Inserting batteries The batteries last for about a year depending on how often you use the remote control unit Do not mix old with new batteries or batteries of different types Only use batteries without ...

Page 6: ...control to control your TV Press and hold the TV on and off button Enter the two digit code for your television Switching to AV input on your Panasonic television Press AV Switches between TV reception and AV input each time the button is pressed Some television models of the listed brands e g older Panasonic units cannot be controlled via the remote control Setting up the remote control If you ar...

Page 7: ...than 3 seconds to eject the cassette VHS INDEX Find the beginning of a recording VHS RESET Reset the tape counter Selection of channels title numbers etc Pause a recording or playback Switch the TV on and off Select the AV input on the TV set CH Select the programme position on the TV set VOLUME TV volume control CH Programme selection button ShowView Record menu SLOW Slow motion playback SEARCH S...

Page 8: ... connected Finalization not possible during the recording 78 Digital channel SD VHS EXT L XP SP LP EP REC PLAY DVD D SD Other messages Shows Timer mode or Timer recording The inserted medium is being shown Recording mode All on Flexible recordings Timer Recordings FR mode The selected drive is being displayed The selected drive is recording Flashes shortly before a Timer Recording starts Current t...

Page 9: ...icated to modules of digital DVD or analogue VHS signal processing Both groups of outputs are used for analogue and digital sources But there are limitations e g During recording or scheduled recording on DVD the VHS playback is only possible on outputs of 6 and 7 1 2 HDMI AV OUT Digital audio output 3 4 5 6 7 8 9 10 11 COMPONENT VIDEO OUT Y PB PR AV1 TV L R AV2 EXT VIDEO OUT Y Luminance signal br...

Page 10: ...a fully wired 21 pin Scart cable for this optimal connection type 11 After completing the above connections proceed to the Auto Setup to tune in TV Channels 1 Connect the aerial to RF IN Aerial input of the DVD Recorder 2 Connect RF OUT Aerial output of the DVD Recorder with the aerial input of the TV 3 Connect the AV1 terminal 21 pin Scart terminal of the DVD Recorder with the Scart input of the ...

Page 11: ...able to use Q Link the unit must be connected to a TV with Q Link or a similar feature via a fully wired 21 pin Scart cable Depending on different countries or regions the digital TV programme has its own selection of operating frequency channels frequency bands transmission parameters and frequencies The unit automatically searches for all available digital television stations Active Antenna If a...

Page 12: ...ins lead included Connect only after all other connections are complete To household mains socket AC 220 V to 240 V 50 Hz Fully wired 21 pin Scart cable To household mains socket Satellite receiver s rear panel AUDIO OUT L R OPTICAL DIGITALAUDIOOUT PCM BITSTREAM VIDEO OUT S VIDEO OUT COMPONENTVIDEOOUT Y P P B R RF OUT RF IN AV 2 EXT AV 1 TV AC IN AV OUT 4 AV IN 2 4 AV OUT 3 4 LNB IN 1 ...

Page 13: ...digital analogue connect your DVD Recorder as a downstream unit If your television supports Q Link use a fully wired 21 pin Scart cable to connect it to the TV The stations automatically downloaded through Download from TV If your television supports RGB set the AV1 Output to RGB 1 or RGB 2 in the Setup menu Auto Setup follows automatically and it ends with the note No stations found Select No wit...

Page 14: ...f the DVD Recorder with the audio video of the television 4 Connect the DVD Recorder and the television to the power supply system Television s rear panel To household mains socket RF coaxial cable Audio Video cable included Video Yellow L White R Red RF coaxial cable included This unit s rear panel AC mains lead included Connect only after all other connections are complete To household mains soc...

Page 15: ...AUDIO OUT L R and S VIDEO OUT of the DVD Recorder with the S VIDEO and audio input of the TV 4 Connect the DVD Recorder and the television to the power supply system Television s rear panel To household mains socket RF coaxial cable Audio cable L White R Red S VIDEO cable RF coaxial cable included This unit s rear panel AC mains lead included Connect only after all other connections are complete T...

Page 16: ...pply system The HDMI connection can be used only with units that are suited for HDMI E Television s rear panel To household mains socket RF coaxial cable HDMI cable Only use fully wired cables showing the HDMI logo Use cable of max 5 m in length to avoid interference with the video signal HDMI RF coaxial cable included This unit s rear panel AC mains lead included Connect only after all other conn...

Page 17: ...start of the title Press SKIP or SLOW SEARCH to return to the start of the playback Download from TV analogue channels only Station transfer from television set During data transfer from TV data for the station list are automatically downloaded from the TV set The stations are stored in the same presets of the DVD Recorder as on your TV set This unit allows for Timer Recordings using the programmi...

Page 18: ... and the right channel will be recorded Connection to DV input Before you connect the DV cable make sure that all units are switched off After you have connected the cable switch on the units Connect the DV output of the DV unit e g digital camcorder with the DV input terminal of the DVD Recorder Use a DV cable After you have connected the cable switch on both units You can connect a DV compatible...

Page 19: ...IDEO IN on the television Select the Progressive On setting Progressive output Conventional televisions On a normal television Progressive output can cause flickering even if the television is Progressive compatible Select the Progressive Off setting Progressive compatible televisions PAL Progressive output HDMI Settings Active Antenna Off 19 Progressive television picture The progressive picture ...

Page 20: ...u will now see the menu Edit Profiles Use PAGE to scroll backwards or forwards page for page through the two tables Profile Select Four different profiles are available Use the GREEN button to select a profile Add Select the required station in the left table with Use the YELLOW button to accept the selected station Every station can only be added to the profile once Press ENTER to save the profil...

Page 21: ...minutes in SP mode 9 Title number shows the recording mode and the elapsed play time of the title VHS Current tape counter 10 Title number shows the recording mode and the recording time of the title Status displays You can display detailed informationen only during playback or recording VHS only recording They are not recorded 68 REC Record PAUSE Pause PLAY Quick View Playback Pause playback Fast...

Page 22: ...7 2 ZDF 17 11 Al Services heute 17 00 17 30 NOW info Change Category Multi Audio Press to display the banner Change Category Press to display the banner Press the BLUE button to change the category Use to change between NOW and NEXT The banner contains information about the current NOW and following NEXT programme It cannot be selected during playback or recording Banners can only be selected for ...

Page 23: ...ata loss Cigarette smoke insect spray and other vapours must not penetrate the unit because otherwise this can cause faults Hard disk The hard disk is only a temporary memory Your HDD Hard disk drive is a high precision recording unit with a particularly long recording capacity and high recording speed The recording is made in DVD Video Recording format VR Films or parts of films can be edited and...

Page 24: ... erasable You must format this disc to be able to rewrite it again Through finalization the DVD RW V becomes a DVD V that can be played on other units A finalized DVD RW V can be reformatted and rewritten Formatting deletes all data A RW becomes a DVD V by creating a Top Menu Playback on another unit Finalization On the recording unit Recording with this recorder Playback on this recorder Recordin...

Page 25: ... RW VR format on this unit Programmes limited on one time recording can be played back If you format the disc you can record and play it in DVD Video format with this unit Some DVD Audio discs with multi channel sound are designed by the manufacturer to prevent inter mixing on the entire disc or at certain places Depending on the disc type the regional code and the recording conditions it may not ...

Page 26: ...card Such action may result in malfunction or loss of the card s contents Use an SD card for playback and transfer copying pictures taken for example with a Digital Camera MPEG2 moving pictures can be copied to the hard disk or DVD RAM Direct playback of MPEG2 moving pictures from the SD card is not possible Inserting the storage card Removing the storage card Do not touch the memory card contacts...

Page 27: ...ect a title and confirm with ENTER Playback of a selected title During playback use the number buttons to select the desired title chapter or piece and confirm with ENTER When the screen saver is shown you can enter a group number On some discs this function is only available when playback stops Due to the programme structure determined by the manufacturer all described functions may not be availa...

Page 28: ...ds Frame playback Press in PAUSE mode Each time the button is pressed the next or the previous frame is displayed Press PLAY to resume playback Press SKIP during playback or PAUSE mode to skip chapters titles or pictures MANUAL SKIP Press MANUAL SKIP during playback Playback jumps forward approx 30 seconds Forwards only Moving pictures only Stopping playback Press STOP Playback stops and the telev...

Page 29: ...HS Playback from DVD HDD Select the VHS drive with DRIVE SELECT Select PLAY to start playback Select STOP to end playback Press DIRECT NAVIGATOR during the recording or Timer Recording The title view appears Select a title with and confirm with ENTER Playback of the selected title begins Use STOP to end playback Playback during recording standby does not affect Timer Recordings Recording begins at...

Page 30: ...d If you press and hold the button the search starts for the length that the button is pressed Press PLAY to resume playback The forwards backwards search is cancelled after 10 minutes JET REW To quickly rewind to the beginning of the cassette Approx 43 seconds for a E180 cassette Depending on the video cassette or the operating condition the rewind speed may vary If the tape rewinds to the beginn...

Page 31: ...e a slight decrease in picture quality Write protecting cassettes Remove the write protection tab to protect cassettes from accidentally being erased If you want to record to a protected cassette cover the gap with adhesive tape Cleaning video heads Use a cleaning tape to clean the video heads The picture shows interference or is blurred during playback During normal playback or in slow motion pre...

Page 32: ...mat Digital programmes limited to one time recording can only be recorded to 12 cm DVD RAM Recording Programmes in 16 9 format are recorded in 4 3 format 16 9 format is used to record to DVD RAM or HDD Titles in PAL or NTSC format can be displayed on the following TV sets Maximum number of recordable titles TV type Disc HDD Yes No Multi system TV PAL NTSC Yes Yes Yes Yes NTSC TV PAL TV PAL NTSC NT...

Page 33: ... cannot record to DVD HDD and VHS at the same time DVD HDD recording of TV programmes Select the station with CH or the number buttons Select the recording mode with REC MODE Switch between SP LP EP and XP with each push of the button Press REC to start the recording Select STOP to stop the recording If you resume recording a new title will be created Press REC again to resume recording You can pl...

Page 34: ...r HDD drive with DRIVE SELECT Select the recording mode with REC MODE In STOP mode use INPUT SELECT to select input channel AV3 Start playback on the external unit Press REC at the point where you want to start the recording Use STOP to stop the recording Select the recording mode with REC MODE In STOP mode use INPUT SELECT to select input channel AV3 Press PLAY At the point where you wish to star...

Page 35: ... 9 0 9 0 9 0 9 0 9 0 9 0 9 0 9 0 9 0 9 0 9 0 9 0 9 0 9 0 9 0 9 Jump to the beginning end of a title chapter with PAUSE and SKIP Find the position for a marking with SKIP SLOW SEARCH TIME SLIP MANUAL SKIP or You can jump between set markers with SKIP Editing several elements You can process several chapter or titles at the same time Functions such as Copy Set up Protection or Delete are marked with...

Page 36: ...onfirm with ENTER Working with List Names In the case of recurring programmes save time entering the title by saving it in the title list Enter a title using the number buttons e g the letter R Press 7 to switch to the 7th line Press 7 twice to select R and confirm with ENTER Use the RED and GREEN button to switch between Standard Characters and Other Characters The title or the playlist was recor...

Page 37: ...e called if the VHS drive is selected RED button Title View GREEN button Album View JPEG Select a title with and start playback with ENTER Press FUNCTIONS Confirm Playback with ENTER The DIRECT NAVIGATOR menu appears Launching the DIRECT NAVIGATOR menu Press SUB MENU to edit a title Select the desired option with and confirm with ENTER Playback Edit Album View Title View VIDEO RED button PICTURE G...

Page 38: ... thumbnail is displayed in the title view You cannot use this function if the resulting sections are extremely short or if you have saved more than 99 titles to DVD RAM 500 titles to HDD You may not be able to identify a start and end point if they are less than 3 seconds apart or if recorded image is a still picture The unit switches to PAUSE mode at the end of the title The available recording t...

Page 39: ...irm with ENTER Press FUNCTIONS Confirm Playback with ENTER Select the desired title with in the Title View menu Press SUB MENU Select Chapter View with and confirm with ENTER Editing chapters in the SUB MENU Edit Delete Properties Chapter View Table Display Album View DVD RAM 001 002 003 004 DIRECTNAVIGATOR ChapterView Previous Next Page 01 01 01 EUROSPORT 11 3 SAT 0 00 58 0 00 58 0 01 30 0 01 45 ...

Page 40: ...it After you have played an encrypted title for the first time a new registration code appears in the DivX Registration menu Do not use this new registration code to purchase other encrypted titles If you obtain and play titles with this second code the registration for the first code will expire The titles obtained with it can no longer be played If you acquire a registration code which does not ...

Page 41: ...oups TOTAL includes all pieces in all groups on the disc Confirm the message with ENTER Press FUNCTIONS and confirm Menu with ENTER Select the desired file type with and confirm with ENTER After a disc is inserted a message appears regarding the preset playback mode MP3 playback 001 Folder Group 001 track mp3 File Track 002 Group Playback sequence MP3 folder structure Press DIRECT NAVIGATOR to lau...

Page 42: ...R To switch back to the original size confirm Zoom out with ENTER The rotation and zooming of pictures is not saved Rotate pictures Press SUB MENU during playback Select the desired setting with and confirm with ENTER Display picture properties During playback press twice to launch the display Press again to exit the display JPEG Joint Photographic Experts Group a system for compressing decoding c...

Page 43: ... Slide Show Select Display interval with for each picture For Repeat Play of the Slide Show select Repeat Play with and change the setting with Press ENTER to confirm Album View Slide Show from the Album View Select the required Album from the Album View with Press PLAY HDD SD RAM 36 HDD Step Step Step Step 3 4 2 1 3 4 2 1 Step Step Step Step Select the required album with and press ENTER to confi...

Page 44: ...JPEG View The number 0 resets the setting Settings previously made with other units are reset SD Album View Return to Album View DIRECTNAVIGATOR Picture JPEG View 0002 0004 0003 0001 DVD RAM Album Name Date 12 9 2005 Previous Nächste ENTER RETURN Page 001 001 VIDEO PICTURE Seite 01 01 Set up Protection Delete Picture Cancel Protection DPOF Seite 01 01 Album View Editing several elements Select the...

Page 45: ...TER to start playback Stop picture playback with STOP or DIRECT NAVIGATOR 0 9 Select Folder with Press SUB MENU Select the required option with and press ENTER to confirm Folder DIRECT NAVIGATOR FUNCTIONS Playback FUNCTIONS DVD HDD L CK O SD Root P0000006 jpg P0000007 jpg P0000008 jpg P0000003 jpg P0000004 jpg P0000005 jpg P0000001 jpg P0000002 jpg JPEG folder structure 002 Folder 003 Folder Playb...

Page 46: ...ditional information about a programme The selected programme appears in the title bar Press to see additional information about a programme You will then see at these programmes in the title bar You can have this information displayed The contents of the information depends on the particular station and cannot be influenced by the unit Press The information about the programme appears Scroll thro...

Page 47: ...ile 2 Profile 3 Profile 4 Press ENTER to confirm You can sort your programme preview according to categories using the Category function for this purpose You can limit the view for example to All Services TV Radio or a Profile which you have put together yourself You can put together your favourite stations and sort them in a Profile The sub points Profile 1 to 4 can only be selected if these have...

Page 48: ...uide Press ENTER to confirm the programming After the message This programme has been stored the new TV Guide appears again The set programme is marked with a Timer Recording starts automatically at the set time Changing the preset data Change Programme Name Select the required programme in the programme preview Press ENTER to confirm The Timer Recording screen now appears The TV Guide does not co...

Page 49: ...res Deleting albums Select an album in the Album View menu with and press SUB MENU Press ENTER to confirm Delete Album Select Delete with and press ENTER to confirm Set up Protection Cancel Protection of titles Select Edit with and confirm with ENTER Select the desired option with and confirm with ENTER Select Yes with and confirm with ENTER Set up Protection Cancel Protection of pictures or album...

Page 50: ...our changes save the programming with ENTER To enter other programmes select New Timer Programme To enter the title of the recording select Programme Name with and confirm with ENTER Enter the desired name in the Programme Name menu Press STOP to apply the name A Timer Recording does not start while a disc is being formatted deleted or d The recording begins afterwards finalize The unit automatica...

Page 51: ...not need to delete and re enter it later on The recording is suspended just once You can stop a current Timer Recording Select the current Timer Recording with Press SUB MENU Select Stop Recording and confirm with ENTER The Timer Recording ends and is thereby deleted If you stop a regular Timer programming e g a weekly recording it is marked as stopped and not deleted The programming is retained f...

Page 52: ...s ENTER Select Connection with and AV2 Settings with and press ENTER Select Ext Link with and confirm with ENTER Select Ext Link 1 or Ext Link 2 with and confirm with ENTER Press RETURN several times in order to return to the television picture Press EXT LINK to switch off recording standby mode EXT L disappears from the display Select recording drive DVD or VHS with DRIVE SELECT Press EXT LINK Re...

Page 53: ...Speed 8 min 35 4 min 10 2 min 25 7x 14x 25x 2 4x High Speed compatible R DL Time needed Speed 25 min 12 min 30 6 min 15 2 4x 4 8x 7 2x 4x High Speed compatible RW V Time needed Speed 15 min 7 min 30 3 min 45 4x 8x 16x HDD R RW V R R DL R DL RW R R DL RW HDD RAM If the disc does not have sufficient storage space the unit switches to the FR Mode If the unit is not copying in the High Speed Mode titl...

Page 54: ...sed if titles pictures etc were recorded or erased from the copy source the unit was switched off or the disc tray was opened the copy direction was changed 1 Copy Direction Select Source with and press ENTER to confirm Select the corresponding source drive with and press ENTER to confirm Select Destination with and press ENTER to confirm Return to Copy Direction with and select Copy Mode with Sel...

Page 55: ... Select Yes with and confirm with ENTER Add Add new items to the copy list Select the desired title with and confirm with ENTER Delete Erase the selected items Select Yes with and confirm with ENTER Move The selected items are moved in the dubbing list and the order is changed Select the desired position with and confirm with ENTER Start Copying Finalize the disc to play it on other DVD players Th...

Page 56: ... on the destination drive Return to Copy Time with and select Start Copying with Recording mode FR and time setting Off Copying starts after the tape rewinds to the beginning Titles are automatically created for each index signal Finalizing Before copying starts you can select whether you want to finalize the disc after copying Confirm Copy Only with ENTER if the disc just needs to be copied Selec...

Page 57: ...t Source with and press ENTER to confirm Select the source drive with and press ENTER to confirm Select Destination with and press ENTER to confirm Select the destination drive with and press ENTER to confirm Return to Copy Direction with and select Copy Mode with 2 Copy Mode Select Format with and confirm with ENTER Confirm PICTURE with ENTER Return to Copy Mode with and select Create List with P...

Page 58: ...or use to select To Others ENTER PLAYLISTS ENTER Use to select the desired title and confirm with ENTER Press STOP to activate the title for the COPYING Press RETURN to leave the menu When copying from HDD DVD to VHS or VHS to HDD DVD use DISPLAY to select the desired audio channel for dual channel sound Start COPYING Switch HDD DVD and VHS to STOP mode Press HDD VHS or DVD COPYING for the desired...

Page 59: ...3 to add another chapter Return to the Playlist View with RETURN Creating a Source Chapter Select the chapter section with ENTER The length of the chapter sections is displayed as a time entry Stop playback with PAUSE Locate the position for an exact chapter marker with Select Exit with and confirm with ENTER Use this function to edit your movies recordings made by a recorder or camcorder You can ...

Page 60: ...e Please read Creating a playlist Select Edit with and confirm with ENTER Select the desired option in the sub menu Properties Information on the playlist such as chapter date and time is displayed Select Properties with and confirm with ENTER Delete This procedure deletes the playlist and it cannot be restored The source titles are retained Confirm Delete with ENTER Select Delete with and confirm...

Page 61: ...apter at another location Select Exit with and confirm with ENTER A short section of the recording right before the separation point may be lost Move Chapter Select the position where the chapter is to be moved to with and confirm with ENTER Select the desired chapter with and press SUB MENU again Select the desired option in the sub menu with confirm with ENTER Press FUNCTIONS Use To Others with ...

Page 62: ...e maximum then the copying process is stopped prematurely If the copying source folder has no name this folder may be given another name on the copying target Give the folder a name before copying 42 Copy Video MPEG2 Copy Video MPEG2 only available when saved on the SD Card All videos in MPEG2 format on the SD Card are copied You cannot use this unit to play MPEG2 videos directly from the SD Card ...

Page 63: ...layback on your external DV unit Press Pause at the desired start position Select the DV channel with INPUT SELECT Select the recording mode with REC MODE Press REC on the DVD Recorder Start playback on the external DV unit End the recording on the DVD Recorder with STOP End playback on the DV unit Recording cannot be cancelled with PAUSE The programmes e g via a digital video unit are recorded as...

Page 64: ...egins To cancel the process select No with and confirm with ENTER or press RETURN Press RETURN to prematurely end the station search All station settings and all adjusted profiles are deleted Signal Condition The display in the Signal Condition menu shows the quality and strength of the selected digital station Signal Strength The display for signal strength is grey 0 means signal strength 0 10 me...

Page 65: ...t positions 901 to 999 Changing the name of the television station Select the name of the station with and confirm with Select with and the name field with The cursor jumps to the first letter Change the letter with Select the next letter with A Press The new name is saved in the station table ENTER Name RD1 D1 ENTER A R Deleting television stations Select the station that you want to delete with ...

Page 66: ...want to play DVD Video content from a DVD Audio If you change the disc or switch off the unit the setting is reset to Off Select the language for audio subtitles and disc menus Under Other enter the language code for another language Select the maximum number of hours for recording in EP mode EP 6 Hours Recording time on a 4 7 GB disc EP 8 Hours Recording time on a 4 7 GB disc The sound quality is...

Page 67: ...ya 8473 Afrikaans 6570 Cambodian 7577 German 6869 Kazakh 7575 Nauru 7865 Shona 8378 Tonga 8479 Albanian 8381 Catalan 6765 Greek 6976 Kirghiz 7589 Nepali 7869 Sindhi 8368 Turkish 8482 Ameharic 6577 Chinese 9072 Greenlandic 7576 Korean 7579 Norwegian 7879 Singhalese 8373 Turkmen 8475 Arabic 6582 Corsican 6779 Guarani 7178 Kurdish 7585 Oriya 7982 Slovak 8375 Twi 8487 Armenian 7289 Croatian 7282 Gujar...

Page 68: ...kHz or 88 2 kHz or if the disc is copy protected On The connected unit cannot process signals with a scan frequency of 96 kHz or 88 2 kHz Signals are converted with 48 kHz or 44 1 kHz Off The connected unit can process signals with a scan frequency of 96 kHz or 88 2 kHz Signals are output as 96 kHz or 88 2 kHz Dolby Digital DTS MPEG Audio Mode for DV Input Bitstream PCM Stereo 1 Stereo 2 Mix Bitst...

Page 69: ...s unit is on RGB 2 without component RGB output is available only during playback or on screen display If RGB 1 or 2 is set there is no signal available on COMPONENT VIDEO OUT Video with component Factory default settings AV Link function Switching between television reception and the signal from the DVD Recorder This function is only possible if the AV1 Output is set to Video with component or RG...

Page 70: ...t via HDMI Q Link Only If your TV set is equipped with the Q Link function select this setting for the link Select the screen resolution of your connected television set HDMI Optical Both outputs are activated with one signal Optical Only Only the optical output is activated with one signal Power on link Power off link Download from TV Direct TV recording Easy Playback HDMI and Q Link only Q Link ...

Page 71: ...sed or borrowed DivX files on this unit you need the individual registration code for the unit The code is displayed here Please write it down On Clock Automatic Please set the clock ENTER access RETURN leave ENTER CHANGE RETURN Time Date 10 52 04 20 03 2006 Under adverse reception conditions etc the Automatic time correction function may not work In this case the indication for Clock setting is a...

Page 72: ...ot affected If you want to prevent the automatic updates select the setting Software Update in Standby Off On EPG data are loaded in standby mode Automatic the unit searches for new software once within 24 hours 02 00 06 00 and others the software search only starts within the set time period If the setting EPG Download in Standby and Software Update in Standby is set to Off then the EPG Software ...

Page 73: ...ect Yes with and confirm with ENTER In the security question select Start with and confirm with ENTER All titles and playlists are deleted and cannot be restored Protected discs or titles cannot be deleted If at least one title is protected it cannot be deleted L CK O SD FUNCTIONS To Others SD CARD ENTER SELECT RETURN Card Management Format Card Remain 943 MB Yes No Format Card All folders and fil...

Page 74: ...onfirm with ENTER Disc Protection On The padlock is closed To deactivate write protection select Yes with and confirm with ENTER Disc Protection Off The padlock is opened Disc Name Enter the name The name is displayed in the DVD Management window You cannot name a disc after it has been finalized If you activated write protection deactivate it Yes No Delete all titles All titles and playlists will...

Page 75: ... A finalized DVD RW V can be recorded again after it is reformatted RW With a RW you have the option of creating a Top Menu The Top Menu created can be used for playback on another DVD Player Select Create Top Menu with and confirm with ENTER In the following menu select Yes with and confirm with ENTER Select Start with and confirm with ENTER The Top Menu is created The procedure concludes with th...

Page 76: ...CM PPCM Dolby Digital DTS and MPEG signal type ch channel number of channals k kHz scan frequency b bit number of bits Switch subtitles on or off select the language Select another recording angle Return to the standard page Select Return and press ENTER Change audio during playback PBC shows whether the menu playback control is on off Press DISPLAY to launch the menu Press DISPLAY again to exist ...

Page 77: ... setting Auto 1 Film and video content is detected and converted appropriately Auto 2 Movies with different picture frequencies are converted Video If content does not display correct with the Auto 1 or Auto 2 settings Reduces noise during tape recording Only for AV1 AV2 AV3 or DV Only with picture input from a video cassette Noise reduction is activated for video input The input signal can be rec...

Page 78: ... the display Error code U61 î The connected unit is not suitable for connection to HDMI î The HDMI connection does not work perfectly The connected unit is not suitable for connection to HDMI The HDMI cable is too long î The HDMI cable is broken î î î The unit has found an error during recording or playback without an inserted disc The unit proceeds with the recovery procedure This procedure resto...

Page 79: ...nits with audio cables even if you use a digital connection î You can change the sound type when using DVD RAM or HDD There is picture interference î The sound cannot be switched on some discs î Check the connection to the TV e g AV1 î The TV System setting does not match that on the disc In STOP mode press and hold STOP and OPEN CLOSE on the unit for more than 5 seconds This switches the unit fro...

Page 80: ... is write protected î Check whether the inserted disc is suitable for recording î The disc is not formatted Format the disc î The write protection device on the cartridge is set to PROTECT Deactivate the write protection î Deactivate the write protection in the DVD Management menu î The material that you want to record is copy protected The number of possible copies is limited with some programmes...

Page 81: ... Shipping Condition was performed or the unit was in the delivery status The auto setup was then started and interrupted Do an auto setup again and let it continue right through to the end The data are only saved after this has been completed EPG database empty or incomplete after switching on No current data in spite of active EPG download function The displayed information is wrong No or incompl...

Page 82: ...me of the time when using the output COMPONENT VIDEO OUT î Do not connect this unit to the television set with an HDMI cable î In the Setup menu set the Progressive setting to Off No sound Low volume Sound with interference The required audio type cannot be heard î The amplifier connected via HDMI does not support CPPM and the HDMI Ver 1 1 Standard No Multi Audio Disc can be played back î The soun...

Page 83: ...m S VIDEO Y 1 0 Vpp C 0 3 Vpp PAL 75Ohm ComponentVideoOutput CPN RCA Y 1 0Vpp P 0 7Vpp P 0 7Vpp 75Ohm B R PAL NTSC 625i 625p 525i 525p Audio system Recording system for DVD Dolby Digital 2ch Linear PCM XP mode 2ch Analog Input AV1 SCART Reference 6dBV at 1kHz AV2 SCART Full scale 6dBV at 1kHz AV3 RCA Input Impedance 10kOhm Analog Output AV1 SCART Reference 6dBV at 1kHz AV2 SCART Full scale 6dBV at...

Page 84: ...ace 19 Software Update in Standby 72 COMPONENT VIDEO OUT 19 69 Software Update Search Now 72 Copy Direction 54 56 57 JET REW 30 Sort 37 54 Copy Mode 54 56 57 JET SEARCH 30 Sound properties 76 Copy NR 77 JPEG 42 Soundtrack 66 76 Copy Time 56 Soundtrack lang 76 COPYING 58 Landscape View 46 Source Chapter 59 CPRM 32 Language 68 Source select 76 Create List 54 57 Language codes 67 Source Title 59 LASE...

Reviews: