background image

16

RQT9193

Watching digital broadcasts

After performing step 1 (

>

15, right column)

Press [OPTION] and press the 

corresponding colour button.

[Note]

The Teletext data received may not be displayed appropriately.

If a lot of Teletext information is available, then it may take a while 

to be displayed.

Characters of the Teletext can be changed with “Teletext Character 

Set” in “Display” of the Setup menu. (

>

64)

When there are multiple audio or subtitle in the current channel, you 

can select a language.

1

Press [DISPLAY].

2

Press [

3

,

4

] to select the “Sound” 

menu or “Other” menu and press [

1

].

3

Press [

3

,

4

] to select “DVB Multi 

Audio” or “DVB Subtitle” and press 

[

1

].

e.g., DVB Multi Audio

4

Press [

3

,

4

] to select the language 

and press [OK].

While stopped

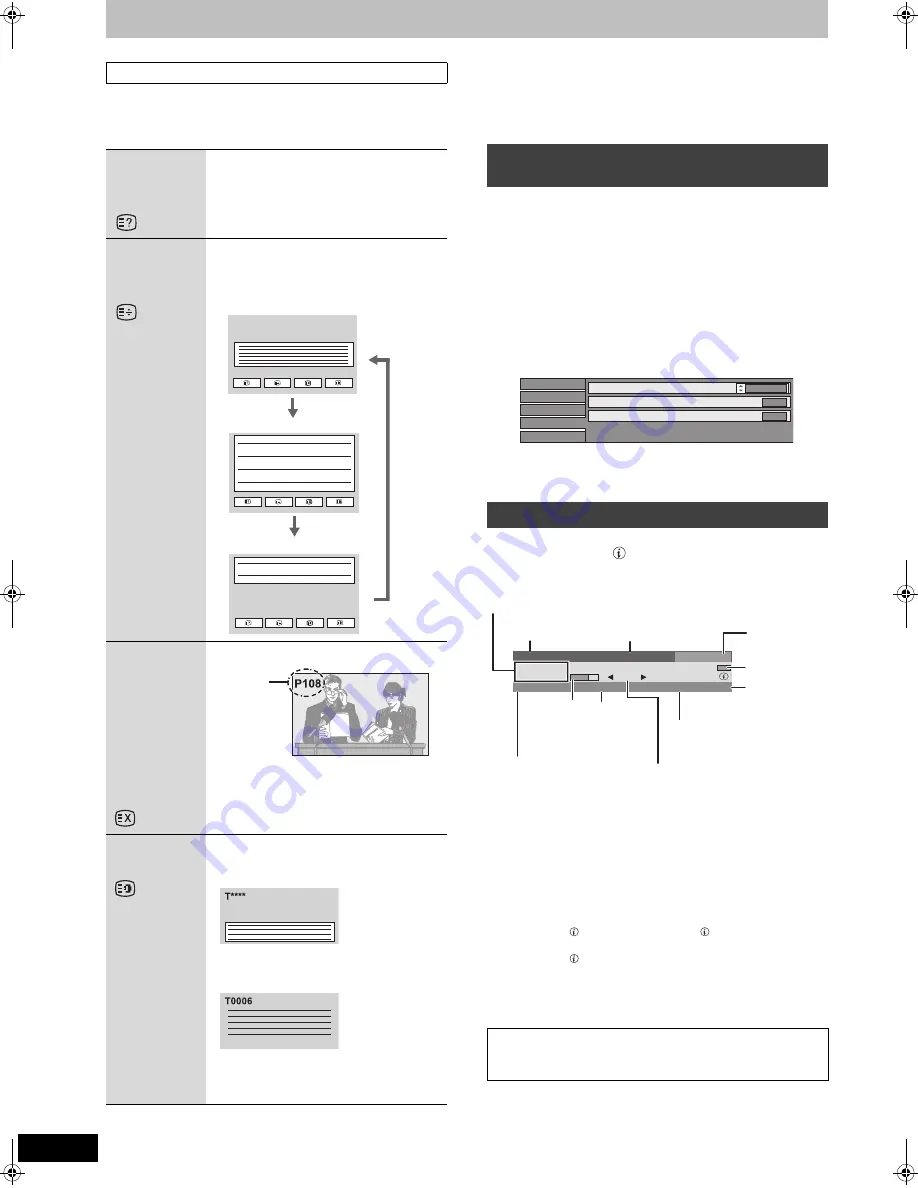
Press [STATUS  ] to show the information 

screen.

To switch information of the current programme and the next 

programme

Press [

2

,

1

].

To show detailed information about the programme

Press [STATUS  ]


again (only when “info ” is displayed).

To hide the information screen

Press [STATUS  ] once or twice.

Signal Quality

[Note]

You can also select the other channel when the information screen is 

displayed by pressing [

3

,

4

] and [OK].

Using Teletext conveniently

Reveal 

hidden 

data

Displays the hidden messages. (e.g., quiz 

page answers)

Press the “Red” button.

Press the “Red” button again to hide 

messages.

Change 

the screen 

size

You can change the Teletext screen size.

Press the “Green” button.

Each press of the “Green” button changes 

the display.

View 

temporarily 

a TV 

programme 

while the 

Teletext 

screen is 

being 

displayed

Press the “Yellow” button.

Press the “Yellow” button again to return to 

the update page.

View sub 

page

If there are one or more sub pages, then the 

corresponding sub pages can be displayed.

1

Press the “Blue” button.

2

Enter a 4-digit number of the desired 
sub page with the numbered buttons.
Sub page is displayed.

You can also select the sub page with 

[

2

,

1

].

It may take some time for searching, during 

which time you can watch TV (

>

above).

DO 15. 05. 08 18:00:00

P100   101   ZDFtext

(Normal)

(Top)

(Bottom)

Appears 

when updating 

is completed.

Broadcast

To select a language for DVB multi 

audio or DVB subtitle

Digital channel information

No Signal: 

The digital broadcast signal is not being received.

No Service:

No broadcasts are currently available.

If “No Signal” is displayed:

Adjust the position and direction of the satellite dish.

Check that the current digital broadcast channel is correctly 

broadcasting.

Disc
Play
Picture
Sound

DVB Multi Audio

Dialogue Enhancer

V.S.S.

English

Off

Off

Other

1 Das Erste


No Signal 

All Services     

18:53 

Change Profile     

info 

ZDF-Mor

19:00 - 19:30 

NOW 

Multi Audio

Encrypted 

Subtitle 

TXT

During scrambled 

broadcasting (pay-TV etc.)

This is indicated in:

White: Can view

Yellow: Cannot view

Insert CAM with a 

certified Smart Card 

(

>

7).

Programme is broadcast in 

multi-channel sound 

(

>

above)

Profile

Channel and 

Station Name

Programme name and Broadcast time

Change the 

profile (

>

60).

Signal Quality 

(

>

below)

 Subtitle 

(

>

15)

Progress of 

the current 

programme

Teletext 

(

>

15)

NOW: 

Information about the current 

programme

NEXT: 

Information about the following 

programme

DMR-EX81SEG_RQT9193.book  16 ページ  2008年7月28日 月曜日 午後5時29分

Summary of Contents for DMR-EX71S

Page 1: ...ding to where they are sold The region number of this unit is 2 The unit will play DVD Video marked with labels containing 2 or ALL Example This DVD recorder is equipped with a Common Interface It can receive encrypted and free to air DVB S services Trademark of the DVB Digital Video Broadcasting Project 1991 to 1996 Declaration of Conformity No 5158 16th November 2007 DMR EX81S Declaration of Con...

Page 2: ... THAT CURTAINS AND ANY OTHER MATERIALS DO NOT OBSTRUCT THE VENTILATION VENTS DO NOT OBSTRUCT THE UNIT S VENTILATION OPENINGS WITH NEWSPAPERS TABLECLOTHS CURTAINS AND SIMILAR ITEMS DO NOT PLACE SOURCES OF NAKED FLAMES SUCH AS LIGHTED CANDLES ON THE UNIT DISPOSE OF BATTERIES IN AN ENVIRONMENTALLY FRIENDLY MANNER CAUTION Danger of explosion if battery is incorrectly replaced Replace only with the sam...

Page 3: ...enu screen 32 Playing DivX video contents 32 Playing MP3 files 34 Playing still pictures 34 Useful functions during still picture play 35 Linked operations with the TV VIERA Link HDAVI ControlTM Q Link 36 Easy control only with VIERA remote control 37 Convenient functions 38 FUNCTION MENU window 38 To pause the TV programme you are watching Pause Live TV 38 Entering text 39 Editing titles chapters...

Page 4: ... REC MODE Change recording mode 18 EXT LINK Linked timer recordings with external equipment 24 DIRECT TV REC Direct TV recording 36 Show Teletext information 15 Show DVB Subtitle 15 Transmit the remote control signal Television operations 68 Channel select Change pages in the TV Guide system 18 28 AShow Service List 15 BInput select AV1 AV2 AV3 or DV 25 CShow Timer Recording screen 26 DExit the me...

Page 5: ... time to stop recording 18 Remote control signal sensor Rear panel terminals 6 7 69 70 71 5Timer recording indicator 6Disc indicator 7Drive HDD or DVD indicator 8Main display section indicator 9Recording mode indicator Main unit OPEN CLOSE REC OPEN CLOSE REC Pull to flip down the front panel The unit s display PLAY PLAY REC REC PLAY REC 1 Digital broadcast indicator Lights when the unit is receivi...

Page 6: ...a television AV2 EXT AV1 TV OPTICAL DIGI DIGITAL AL AUDIO OU UDIO OUT PCM BITSTREAM PCM BITSTREAM COMPONENT COMPONENT VIDEO OUT VIDEO OUT S VIDEO VIDEO R AUDIO L PR PB Y OUT OUT A AV OU V OUT T LNB OUT LNB IN COMMON INTERFACE COMMON INTERFACE AC IN AV 3 2 1 Satellite dish Television s rear panel Aerial cable This unit s rear panel To household mains socket AC 220 to 240 V 50 Hz Fully wired 21 pin ...

Page 7: ...up side down For more details see the manual of the CAM and Smart Card or check with the broadcaster The Common Interface supports the modules according to DVB Specification for encryption systems as for example Cryptoworks Viaccess Nagravision Conax or Irdeto Connecting to a TV with an HDMI High Definition Multimedia Interface cable Regarding VIERA Link HDAVI ControlTM function When connecting wi...

Page 8: ...d press OK 16 9 When connected to a 16 9 widescreen television Pan Scan When connected to a 4 3 aspect television side picture is trimmed for 16 9 picture 84 Letterbox When connected to a 4 3 aspect television 16 9 picture is shown in the letterbox style 84 When television picture appears set up is complete To stop partway Press RETURN STATUS MANUAL SKIP CREATE CHAPTER F U N C T I O N M E N U D I ...

Page 9: ...ase contact your service provider Note Other settings on the card e g changing the password can be adjusted in the Setup menu Depending on the card in some cases its use together with this unit may be limited or not possible STATUS MANUAL SKIP CREATE CHAPTER F U N C T I O N M E N U D I R E C T N A V I G A T O R GUIDE RETURN PLAY x1 3 PAUSE STOP SLOW SEARCH SKIP CH PAGE SELECT INPUT 0 9 8 7 6 5 4 3...

Page 10: ...g the top menu you can play the disc on DVD players and other equipment Note R discs recorded with this unit and R discs recorded with another Panasonic DVD Recorder may be incompatible However discs that are finalised are compatible and can be played This unit cannot record NTSC signals to discs that already have PAL signal recordings However both types of programmes can be recorded onto the HDD ...

Page 11: ...u can play programmes that allow One time only recording if they have been recorded onto a CPRM compatible disc By formatting 58 the disc you can record onto it in DVD Video format It may be necessary to finalise the disc on the equipment used for recording DVD R DVD R DL DivX MP3 JPEG DVD R and DVD R DL with video recorded in DivX DVD R and DVD R DL with music recorded in MP3 DVD R and DVD R DL w...

Page 12: ...ays benzine thinner static electricity prevention liquids or any other solvent Do not use scratch proof protectors or covers Do not drop stack or impact discs Do not place objects on them Do not use the following discs Discs with exposed adhesive from removed stickers or labels rental discs etc Discs that are badly warped or cracked Irregularly shaped discs such as heart shapes Do not place in the...

Page 13: ...m Up to 1 Codec DIV3 DIV4 DIVX DV50 Picture size 32 x 32 to 720 x 576 FPS Frame Per Second Up to 30 fps Audio Number of stream Up to 8 Format MP3 MPEG AC3 Multi channel AC3 is possible MPEG multi is 2 ch conversion Playable media HDD R R DL CD USB File format MP3 Files must have the extension mp3 or MP3 Number of folders groups Maximum number of folders groups recognizable 300 folders groups inclu...

Page 14: ...g on frequency of use and the operating environment Carefully read the lens cleaner s instructions before use Note Do not obstruct the rear panel s internal cooling fan Setup precautions Do not place in an enclosed area where the rear cooling fan and the cooling vents on the side are covered up Place the unit on a surface that is flat and not subject to vibration or impact Do not place on anything...

Page 15: ...digital channel information 16 Press STTL Press again to hide the subtitle Note Programmes are recorded with subtitle when you record them with the subtitle displayed 18 Language of the DVB Subtitle can be changed 16 You can enjoy Teletext broadcasting including news weather forecasts and subtitles if this service is provided by the broadcasters You can check if the programme has Teletext informat...

Page 16: ...y View temporarily a TV programme while the Teletext screen is being displayed Press the Yellow button Press the Yellow button again to return to the update page View sub page If there are one or more sub pages then the corresponding sub pages can be displayed 1 Press the Blue button 2 Enter a 4 digit number of the desired sub page with the numbered buttons Sub page is displayed You can also selec...

Page 17: ...s carefully When playing back a title recorded on the HDD ensure that you match the TV System setting to the recorded title 65 When a menu screen appears on the television DVD V Press 3 4 2 1 to select the item and press OK Some items can also be selected using the numbered buttons If you are instructed to press the ENTER button by the menu screen or the disc s instruction document press OK VCD Pr...

Page 18: ...fter recording finishes In order to play DVD R DVD RW DVD Video format and R recorded with this unit on other DVD players it is necessary to finalise them 59 In order to play RW on other players we recommend you to create a top menu 59 USB It is not possible to record on a USB memory If a programme to record has subtitle or multiple audio you can record with subtitle or selected audio To record wi...

Page 19: ... 3 3 Press OK The timer programme is stored and the timer icon is displayed F lights on the unit s display to indicate timer recording standby has been activated Repeat steps 2 3 to programme other recordings Press Í DVD to turn the unit off Note If NTSC has been selected for TV System 65 the TV Guide system cannot be used To cancel a timer recording on the TV Guide screen 1 Press 3 4 2 1 to selec...

Page 20: ...when the last recorded title is deleted This space become available for recording after all the later recorded titles are deleted R R DL R R DL Available space does not increase even after the contents are deleted TIME SLIP TIME SLIP DISPLAY DISPLAY DIRECTTVREC DIRECTTVREC EXT LINK EXT LINK REC MODE REC MODE REC REC MANUAL SKIP MANUAL SKIP CREATE CREATE CHAPTER CHAPTER F U N C T I O N M E N U D I ...

Page 21: ...s recorded in 16 9 aspect R R DL RW V Titles recorded in 16 9 aspect using EP mode or FR recordings 5 hours or longer mode When recording the One time only recording broadcasts It is not possible to record the broadcasts that allow One time only recording onto DVD R DVD RW R RW or 8 cm DVD RAM discs Use the HDD or CPRM 84 compatible DVD RAM One time only recording titles can only be transferred fr...

Page 22: ...her equipment a format confirmation screen is displayed Format the disc to use it However all the recorded contents are deleted Press 2 1 to select Yes and press OK To format a disc Deleting all the contents Format 58 R R DL RW V R R DL The following screen appears when you have not processed the disc for play on other equipment To finalise the disc Press REC on the main unit You cannot stop this ...

Page 23: ...u can also change the drive and play while recording Press DRIVE SELECT 1 Press DIRECT NAVIGATOR during recording 2 Press 3 4 2 1 to select a title and press OK There is no sound output while searching forward or backward To stop play Press To exit the Direct Navigator screen Press DIRECT NAVIGATOR To stop recording After play stops 1 Press DIRECT NAVIGATOR to exit screen 2 If the recording is on ...

Page 24: ...timer recording standby has been activated To cancel the external control Press EXT LINK to stop recording or to cancel linked timer recording standby In order to prevent accidental operation press EXT LINK to cancel the setting after recording is finished Note This function does not work when TV System is set to NTSC in the Setup menu 65 This function does not work with some equipment Refer to th...

Page 25: ...re recorded as a title while at the same time chapters are created at each break in the images and the playlist is created automatically Preparation 1 Turn off the main unit and DV equipment then connect the equipment with the unit s DV input terminal left 2 Turn on the main unit When the output signal from the external equipment is NTSC change the TV System to NTSC in the Setup menu 65 1 Turn on ...

Page 26: ...elect the programme and press the Red button The timer icon F 27 disappears from the timer recording list You cannot cancel timer recording standby mode as long as even one timer icon F 27 remains in the timer recording list Press the Red button again to activate timer recording standby When the recording drive is DVD and there is not enough remaining space recording automatically switches to the ...

Page 27: ...mal speed mode 46 If the unit is turned on when timer recording begins it remains turned on after recording finishes It does not turn off automatically You can turn the unit off during timer recording If the unit is not put in the timer recording standby mode at the last 10 minutes before the programmed timer recording starting time the F flashes on the unit s display When you programme successive...

Page 28: ... one day Jump back 24 hours Press the Red button You can only jump back to the current date Past information cannot be viewed To browse through the TV Guide list Press W X CH To see programme information Programmes with the symbol Press STATUS Additional information programme name programme duration broadcast time description is available for these programmes Press 3 4 to scroll up and down To sho...

Page 29: ...evision you can cancel PBC Elapsed play time appears on the unit s display Quick View HDD RAM Press and hold 1 PLAY a1 3 Play speed is quicker than normal Press again to return to normal speed Slow motion HDD RAM R R DL RW V R R DL RW DVD V RW VR VCD While paused press 6 or 5 The speed increases up to 5 steps Press 1 PLAY to restart play VCD Forward direction 5 only The unit will pause if slow mot...

Page 30: ...n and press OK Create Group Press 2 1 to select Create and press OK Selected titles are bundled to form a group Release Grouping Press 2 1 to select Release and press OK When a group of titles has been selected all the titles in the group are released When a title in a group has been selected the title is released from the group Regarding the group name The name of the first title in the group is ...

Page 31: ...5 0 5 15 1 5 To play music recorded on HDD e g 5 0 0 5 15 0 1 5 115 1 1 5 e g 5 0 5 15 1 5 CD OK RETURN SELECT Play Music Copy Music P O W E R E D B Y Play Music OK RETURN SELECT Play CD on HDD Please select music to play Play MP3 on HDD e g 5 0 0 0 5 115 0 1 1 5 15 0 0 1 5 1115 1 1 1 5 Useful functions during music play Stop Press The stopped position is memorized Press 1 PLAY to restart from thi...

Page 32: ...just the aspect through the TV Successive play is not possible Playback is not possible if recording is performed on the HDD drive or the DVD drive 1 While the file list is displayed Press 1 while a title is highlighted to display the tree screen 2 Press 3 4 to select a folder and press OK The file list for the folder appears To return to the previous screen Press RETURN Showing the menu screen 1P...

Page 33: ... 3 4 to select On and press 1 5 Press 3 4 to select Text or the subtitle number If the subtitles text are not displayed correctly try changing the language settings below DivX Subtitle Text language settings After playing back a DivX video file containing subtitles text 1 While stopped Press FUNCTION MENU 2 Press 3 4 to select To Others and press OK 3 Press 3 4 to select Setup and press OK 4 Press...

Page 34: ...DD RAM Grouped by date Number of pictures Shooting date HDD RAM R R DL CD USB Album Shooting date Number of pictures Album name Depending on the digital camera the editing software on the PC etc the information about the recording date may not be displayed In this case the date will appear as Playing MP3 files e g 5 0 0 0 5 15 0 0 1 5 Using the tree screen to find a group Playing still pictures Wh...

Page 35: ...n or Off and press OK Rotate While playing 1 Press OPTION 2 Press 3 4 to select Rotate RIGHT or Rotate LEFT and press OK Rotation information will not be stored R R DL CD USB Still pictures When disc or album is protected When played on other equipment When copying pictures When changing date Zoom in Zoom out While playing 1 Press OPTION 2 Press 3 4 to select Zoom in and press OK To return the pic...

Page 36: ...ctions provided by HDMI which is an industry standard known as HDMI CEC Consumer Electronics Control is a unique function that we have developed and added As such its operation with other manufacturers equipment that supports HDMI CEC cannot be guaranteed This unit supports HDAVI Control 3 function HDAVI Control 3 is the newest standard current as of December 2007 for Panasonic s HDAVI Control com...

Page 37: ...to the TV operating instructions for operating the TV 1 When you want to pause the TV programme Turn on the Pause Live TV function using the TV remote control This unit turns on automatically 2 When you want to resume Display the Control Panel below and press OK The TV programme resumes To stop Pause Live TV Press 4 while the Control Panel is displayed Refer to Note 38 To pause the TV programme yo...

Page 38: ...ed every 30 minutes after the HDD is full or the saving lasts 8 hours The Pause Live TV function stops automatically 24 hours after started DVB Multi Audio and DVB Subtitle of on screen menu cannot be switched during Pause Live TV FUNCTION MENU window Playback You can select and play recorded programmes 17 30 change the Play Mode DivX JPEG MP3 32 etc Recording You can easily find programmes you wa...

Page 39: ...ect Programme Name 26 right column step 3 Title Select Enter Name 40 step 4 Playlist Select Enter Name 43 step 5 Disc Select Disc Name 57 Providing a name for a disc step 1 Album CD HDD Select Enter Album Name 45 Editing music step 4 Group MP3 HDD Select Enter Group Name 45 Editing music step 4 Track CD MP3 HDD Select Enter Track Name 45 Editing music step 4 Artist CD MP3 HDD Select Enter Artist N...

Page 40: ...n and press OK If you select Chapter View 5 Press 3 4 2 1 to select the chapter To start play Press OK To edit Step 6 To show other pages Multiple editing above 6 Press OPTION then 3 4 to select the operation and press OK You can go back to Title View To return to the previous screen Press RETURN To exit the screen Press DIRECT NAVIGATOR Title Chapter Programmes are recorded as a single title cons...

Page 41: ...Press OK at the point you want to divide the title 2Press 3 4 to select Finish and press OK 3Press 2 1 to select Divide and press OK To confirm the division point Press 3 4 to select Preview and press OK The unit plays 10 seconds before and after the division point To change the division point Restart play and press 3 4 to select Divide then press OK at the point where you want to divide the title...

Page 42: ... position to insert the chapter and press OK Press 3 to select other source titles Repeat steps 6 7 to add other chapters 8 Press RETURN All the selected scenes become the playlist To return to the previous screen Press RETURN To exit the screen Press EXIT You can arrange the chapters 40 to create a playlist Copying 46 a playlist will create a title Playlists are not recorded separately so this do...

Page 43: ... Playlist operations Playlists Chapter View 01 ARD 12 10 SUN 0 30 001 002 HDD 0 19 36 0 10 24 Chapter View screen Move Chapter Create Chapter Combine Chapters Delete Chapter Playlist View Add Chapter Refer to Chapter operations Playlist operations Delete HDD RAM Press 2 1 to select Delete and press OK Once deleted the playlists are lost and cannot be restored Make certain before proceeding Propert...

Page 44: ...Album still picture and picture operation Delete Picture Delete Album HDD RAM Press 2 1 to select Delete and press OK Once deleted the recorded contents are lost and cannot be restored Make certain before proceeding When deleting an album files other than the still picture files inside the album will also be deleted This does not apply to folders under the album concerned Change Date HDD RAM You c...

Page 45: ...ss OK The item is deleted To return to the previous screen Press RETURN To exit the screen Press EXIT Note You cannot delete a track CD individually Editing music 1Press 3 4 to select the album group and press OK 2Press 3 4 to select the track and press OPTION Album CD group MP3 and track CD MP3 operation Delete Album CD Delete Group MP3 Delete Track MP3 Press 2 1 to select Delete and press OK Onc...

Page 46: ... performed at the same speed as 4X Speed DVD RW disc takes 4 In this unit copying with 16X Speed R disc will be performed at the same speed as 8X Speed R disc takes Note When recording or playing while copying the unit may not use the maximum recording speed Depending on the condition of the disc the unit may not copy using the maximum speed Copy Advanced Copy Features Easy copying from HDD to DVD...

Page 47: ... item and press OK This changes the way that titles are displayed You can select to display titles by No recording date day channel recording start time and title name You cannot select a title if it has a check mark If you close the COPY Navigator screen the display order is cancelled Note When copying titles in high speed mode to high speed recording compatible DVD RAM 5X DVD R 8X R 8X or RW 4X ...

Page 48: ... or RW 4X the sound of the disc rotating becomes louder than normal If you want copy to perform more quietly select Normal Silent in DVD Speed for High Speed Copy in the Setup menu 63 8 Press 2 1 to select Yes and press OK to start copying HDD R R DL RW V R R DL Press 2 1 to select Copy Finalise or Copy Only and press OK If Copy Finalise is selected After finalising the discs become play only and ...

Page 49: ...Copying to the HDD continues for the set time even after the content being played finishes Set a few minutes longer than the source title in order to include the operation time before play begins You can also set the recording time with the numbered buttons 2 Press 3 4 to select Start Copying and press OK Press 2 1 to select Yes and press OK to start copying The disc top menu is displayed Disc pla...

Page 50: ...conds to stop copying If stopped partway copying will be up to that point Note The screen on the right is recorded at the beginning The content is recorded as 1 title from the start of copy to the end If play does not begin automatically or if the top menu does not display automatically press 1 PLAY to start Even if you copy a high quality video audio DVD the original picture and audio quality can...

Page 51: ...7 You can register still pictures or still picture folders Still pictures and folders cannot be registered on the same list To register individual still pictures 1 Press 3 4 to select Create List and press 1 2 Press 3 4 to select New item and press OK 3 Press 3 4 2 1 to select the still picture and press A check mark is displayed Repeat this step until you select all necessary items Press again to...

Page 52: ...rk is displayed Repeat this step until you select all necessary items Press again to cancel 2 Press OK Delete Delete the selected items Press 2 1 to select Yes and press OK To cancel all registered copying settings and lists After performing steps 1 3 51 Copying using the copying list 1 Press 3 4 to select Cancel All and press OK 2 Press 2 1 to select Yes and press OK The settings and lists may be...

Page 53: ...ed then no tracks on the CD will be recorded To return to the previous screen Press RETURN Note While recording no other operations can be performed Timer recordings will not proceed Tracks recorded on the HDD cannot be transferred to a disc or USB memory CDs which have SCMS Serial Copy Management System restrictions cannot be recorded to the HDD CD MP3 USB HDD You can copy MP3 files recorded on U...

Page 54: ... to select Yes and press OK The settings and lists may be cancelled in the following situations When a file has been recorded or deleted at the copy source When steps have been taken for instance to turn off the unit remove the USB memory open the tray change the copy direction etc To update the database with information on CDs that were recently released follow the instructions below Preparing th...

Page 55: ...ive Select when the disc contents were recorded using progressive PBC Playback control 84 VCD Indicates whether menu play playback control is on or off Disc Play Picture Sound Soundtrack Subtitle 1 Audio channel Off L R Digital 2 0 ch Other Menu Item Setting LPCM ÎDigital DTS MPEG k kHz b bit ch channel Signal type Sampling frequency Number of bits Number of channels ENG FRA DEU ITA ESP NLD SVE NO...

Page 56: ...l is raised to make dialogue easier to hear Other menu Change the DVB subtitle and display position DVB Subtitle You can set the desired subtitles if more than one subtitle track can be selected DVB Subtitle cannot be selected during playback or recording Depending on the broadcast the items that can be selected will differ English Italian Polish German Czech Original French Hungarian Original is ...

Page 57: ...n above Setting the protection After performing steps 1 3 left Press 3 4 to select Disc Name and press OK 39 Entering text The disc name is displayed in the DVD Management window R R DL RW V R R DL With a finalised disc the name is displayed on the Top Menu RW The disc name is displayed only if you play the disc on other equipment after creating top menu To return to the previous screen Press RETU...

Page 58: ...forming steps 1 3 57 Common procedures 1 Press 3 4 to select Format HDD or Format Disc and press OK 2 Press 2 1 to select Yes and press OK 3 Press 2 1 to select Start and press OK A message appears when formatting is finished Note Formatting normally takes a few minutes however it may take up to a maximum of 70 minutes RAM Do not disconnect the AC mains lead while formatting This can render the di...

Page 59: ...www panasonic europe com RW RW discs contain no Top Menu data Top Menu is a convenient function We recommend you create the menu before playing a RW disc on other equipment You cannot use the Top Menu for playing on this unit Make selections from Top Menu and Auto Play Select left before creating top menu Preparation Press DRIVE SELECT to select the DVD drive After performing steps 1 3 57 Common p...

Page 60: ... Press the Red button 39 Entering text When the station name of the left column is highlighted You can check the quality and strength of digital broadcast signals Realign the aerial if you are receiving a poor signal Press 3 4 to select Signal Condition and press OK The quality and strength of the signal are shown Press W X CH to select the channel Signal Quality Below 2 display red The signal qua...

Page 61: ...ponding LNB frequency for LNB Freq Low and press OK 3 Press 3 4 to select LNB Freq High and press 1 and then press OK 4 Press 3 4 2 1 to select the corresponding LNB frequency for LNB Freq High and press OK If you cannot find the LNB frequency corresponding to your system select MHz User Def and enter value with numbered buttons and then press OK The LNB converts the signals from the satellite int...

Page 62: ...s OK 4 Press 3 4 to select Add Service and press OK The search for the required station begins Delete Transponder 1 Press 3 4 to select Advanced Setup and press OK 2 Press 3 4 to select Delete Transponder and press OK 3 Press 3 4 to select the satellite and press OK 4 Press 2 1 to select Yes The transponder is deleted Together with the transponder the EPG data are also deleted Polarisation Horizon...

Page 63: ...or DVD RAM with Rec for High Speed Copy set to Off programme will be recorded in the original aspect ratio In the following cases even when set to 16 9 recordings will be made or copied in 4 3 R R DL RW V When the recording mode is set to EP or FR recordings 5 hours or longer mode When recording or copying to a R R DL and RW High speed copy does not work for the titles recorded in 16 9 even if the...

Page 64: ...ment not displaying the DTS logo MPEG Select how to output the signal Select Bitstream if the connected equipment decodes the signal Select PCM if this unit decodes the signal and outputs it as 2 channels Not making the proper settings may result in noise Bitstream When connected to equipment with a built in MPEG decoder PCM When connected to equipment without a built in MPEG decoder Audio Mode fo...

Page 65: ... unit at the same time for 5 or more seconds HDMI Settings Press OK to show the following settings HDMI Video Format You can only select items compatible with the connected equipment This setting normally does not need to be changed However if you are concerned about output picture quality it may be improved by changing the setting To enjoy High Quality Video up converted to 1080p you need to conn...

Page 66: ...ng Remote Control Press and OK together for more than 5 seconds on the remote control Disc Picture Clock This unit usually obtains time and date information from digital broadcasts and automatically corrects the time several times a day However if the time is not set correctly use the settings listed in the method below In the case of a power failure the clock setting remains in memory for approxi...

Page 67: ...tware search period Selects the time to automatically perform TV Guide download and updates when the unit is set to standby mode This can only be set when TV Guide Download in Standby and Software Update in Standby is set to On If there is a programmed recording set for the time you have selected the programmed recording will be given priority Automatic 02 00 06 00 06 00 10 00 10 00 14 00 14 00 18...

Page 68: ...mpossible To cancel the Child Lock Press and hold OK and RETURN simultaneously until X HOLD disappears Television operation e g 01 0 1 10 1 0 Brand Code Brand Code Panasonic 01 02 03 04 METZ 05 28 AIWA 35 MITSUBISHI 05 19 20 47 AKAI 27 30 MIVAR 24 BEJING 33 NEC 36 BEKO 05 71 72 73 74 NOBLEX 33 BENQ 58 59 NOKIA 25 26 27 60 61 BP 09 NORDMENDE 10 BRANDT 10 15 OLEVIA 45 BUSH 05 ONWA 30 39 70 CENTREX 6...

Page 69: ...EO IN S VIDEO VIDEO R AUDIO L OUT OUT A S VIDEO IN AUDIO IN R L VIDEO IN S VIDEO VIDEO R AUDIO L OUT OUT COMMON INTERFACE COMMON INTERFACE Red White Yellow Red White Yellow This unit s rear panel Audio Video cable included Television s rear panel Television s rear panel Red White S Video cable Red White This unit s rear panel R L AUDIO OUT VIDEO OUT S VIDEO OUT R L AUDIO OUT VIDEO OUT S VIDEO OUT ...

Page 70: ...tion copyright protection that are equipped with a digital DVI input terminal PC monitors etc Depending on the unit images may not display properly or at all when connecting with a DVI HDMI switching cable Audio cannot be output Connecting an amplifier with a digital input terminal AV2 EXT AV1 TV OPTICAL DIGI DIGITAL AL AUDIO OU UDIO OUT PCM BITSTREAM PCM BITSTREAM COMPONENT COMPONENT VIDEO OUT VI...

Page 71: ...ooling fan This unit s rear panel To household mains socket AC 220 to 240 V 50 Hz Television s rear panel VCR s rear panel or Set Top Box AC mains lead included Connect only after all other connections are complete Connecting a terminal other than the 21 pin Scart terminal 7 69 Fully wired 21 pin Scart cable 21 pin Scart cable Required setting AV2 Input setting in the Setup menu 66 Common Interfac...

Page 72: ... Refer to the disc s jacket for more information Cover Can a DVD Video that does not have a region number be played The DVD Video region number indicates the disc conforms to a standard You cannot play discs that do not have a region number You also cannot play discs that do not conform to a standard Please tell me about disc compatibility with this unit This unit records and plays DVD R DVD RW DV...

Page 73: ... I transfer the music tracks from HDD to the disc or USB memory No you cannot Abkhazian 6566 Afar 6565 Afrikaans 6570 Albanian 8381 Amharic 6577 Arabic 6582 Armenian 7289 Assamese 6583 Aymara 6589 Azerbaijani 6590 Bashkir 6665 Basque 6985 Bengali Bangla 6678 Bhutani 6890 Bihari 6672 Breton 6682 Bulgarian 6671 Burmese 7789 Byelorussian 6669 Cambodian 7577 Catalan 6765 Chinese 9072 Corsican 6779 Cro...

Page 74: ... Use a new disc 20 41 58 Cannot record Maximum number of titles exceeded No Disc The disc may be upside down No folders There is no compatible folder in this unit 13 Not enough space in the copy destination Create space by deleting any unnecessary items Delete one or more items registered on the copy list to ensure that the Destination Capacity is not exceeded 20 41 45 58 49 52 54 This is a non re...

Page 75: ...ed a disc the unit cannot play or record on You tried to operate with a non compatible USB memory 10 11 12 F74 The HDMI connection could not be authenticated due to a transfer malfunction Consult the dealer where the unit was purchased F75 The HDMI connection could not be authenticated due to an internal data malfunction Consult the dealer where the unit was purchased U50 A short circuit was detec...

Page 76: ...rrect Under adverse reception conditions etc the automatic time correction function may not work In this case Automatic is automatically turned to Off If re setting the Auto Clock Setting does not work set the time manually 66 Compared to the actual recorded time the elapsed time displayed is less Only when recording in NTSC The displayed recording play time is converted from the number of frames ...

Page 77: ...th this unit s TV system Picture may not be seen when more than 4 devices are connected with HDMI cables Reduce the number of connected devices 6 7 69 70 71 65 The picture is distorted during play or video will not play correctly You may be playing a TV programme recorded with poor reception or unfavorable weather conditions The picture may be distorted or a black screen may appear briefly between...

Page 78: ...e unit is hot U59 appears on the display Wait for U59 to disappear One of the unit s safety devices may have been activated Reset the unit as follows 1 Press Í I on the main unit to switch the unit to standby If the unit doesn t switch to standby press and hold Í I on the main unit for about 10 seconds The unit is forcibly switched to standby Alternatively disconnect the AC mains lead wait one min...

Page 79: ...he linked timer recording with external equipment press EXT LINK EXT L disappears If you start recording immediately after turning on the unit while Quick Start is set to On you cannot then stop recording for a few seconds 26 24 The timer programme remains even after recording finishes The timer programme remains if set to daily or weekly 26 A part or whole of a recorded title has been lost If the...

Page 80: ... is in XP or FR mode The resume play function does not work Memorized positions are cancelled when press several times open the disc tray CD VCD USB turn off the power if a recording or timer recording was executed The Video CD picture does not display properly When connecting to Multi system TV select NTSC in TV System in the Setup menu When connecting to PAL TV the lower part of the picture cann...

Page 81: ...ts up in the display then the data update may also not work Make sure that the time is set correctly Check whether Off is set under TV Guide Download in Standby and change the setting in the Setup menu 67 There are stations that are not displayed on the TV Guide It may be displayed by changing the TV Guide Type in the Setup menu 67 Digital broadcasts cannot be received The dish may not be pointing...

Page 82: ... remote control that do not work for VIERA Link functions To reset this unit To return all the settings other than the main ones to the factory preset Select Yes in Shipping Condition in the Setup menu All the settings except for the ratings level ratings password and clock settings return to the factory preset The timer recording programmes are also cancelled Select Yes in Default Settings in the...

Page 83: ...put Impedance Less than 1 k Digital Audio Out Optical terminal PCM Dolby Digital DTS MPEG HDMI Output 19 pin type A 1 pc HDMITM V 1 3 with Deep Colour This unit supports HDAVI Control 3 function Video Video system SECAM only input PAL colour signal 625 lines 50 fields NTSC colour signal 525 lines 60 fields Recording system MPEG2 Hybrid VBR Video In PAL SECAM NTSC AV1 AV2 21 pin AV3 pin jack 1 Vp p...

Page 84: ... RW only as DVD Video format RW and the HDD or unused R and R DL on this unit Formatting permanently deletes all contents Frames and fields Frames refer to the single images that constitute the video you see on your television Each frame consists of two fields A frame still shows two fields so there may be some blurring but picture quality is generally better A field still shows less picture infor...

Page 85: ...to the aerial etc Thumbnail This refers to a miniature representation of a picture used to display multiple pictures in the form of a list Transponder The signals of a broadcasting station are received by a transponder on a satellite The transponder converts them to frequencies and sends them to satellite dishes near the ground A transponder can broadcast several TV and radio programmes or data in...

Page 86: ... and the Directives 2002 96 EC and 2006 66 EC By disposing of these products and batteries correctly you will help to save valuable resources and prevent any potential negative effects on human health and the environment which could otherwise arise from inappropriate waste handling For more information about collection and recycling of old products and batteries please contact your local municipal...

Page 87: ...Gracenote Data the Gracenote Software and Gracenote Servers will terminate if you violate these restrictions If your license terminates you agree to cease any and all use of the Gracenote Data the Gracenote Software and Gracenote Servers Gracenote reserves all rights in Gracenote Data the Gracenote Software and the Gracenote Servers including all ownership rights Under no circumstances will Gracen...

Page 88: ...4 84 Language Code list 73 Disc menu 63 On screen 64 Soundtrack 55 63 Subtitle 55 63 LNB 61 84 LPCM 64 84 Manual Skip 29 Menu DivX 32 33 MP3 34 Setup 60 Mode Recording 22 Still Mode 63 MP3 13 34 84 Copy 53 Edit 45 Play 31 34 Music on HDD Copy 53 Edit 45 Play 31 Name Album CD 45 Album Still picture 44 Disc 57 Entering text 39 Group MP3 45 Playlist 43 Profile 60 Title 26 41 On screen Language 64 Par...

Reviews: