background image

RQT9053

30

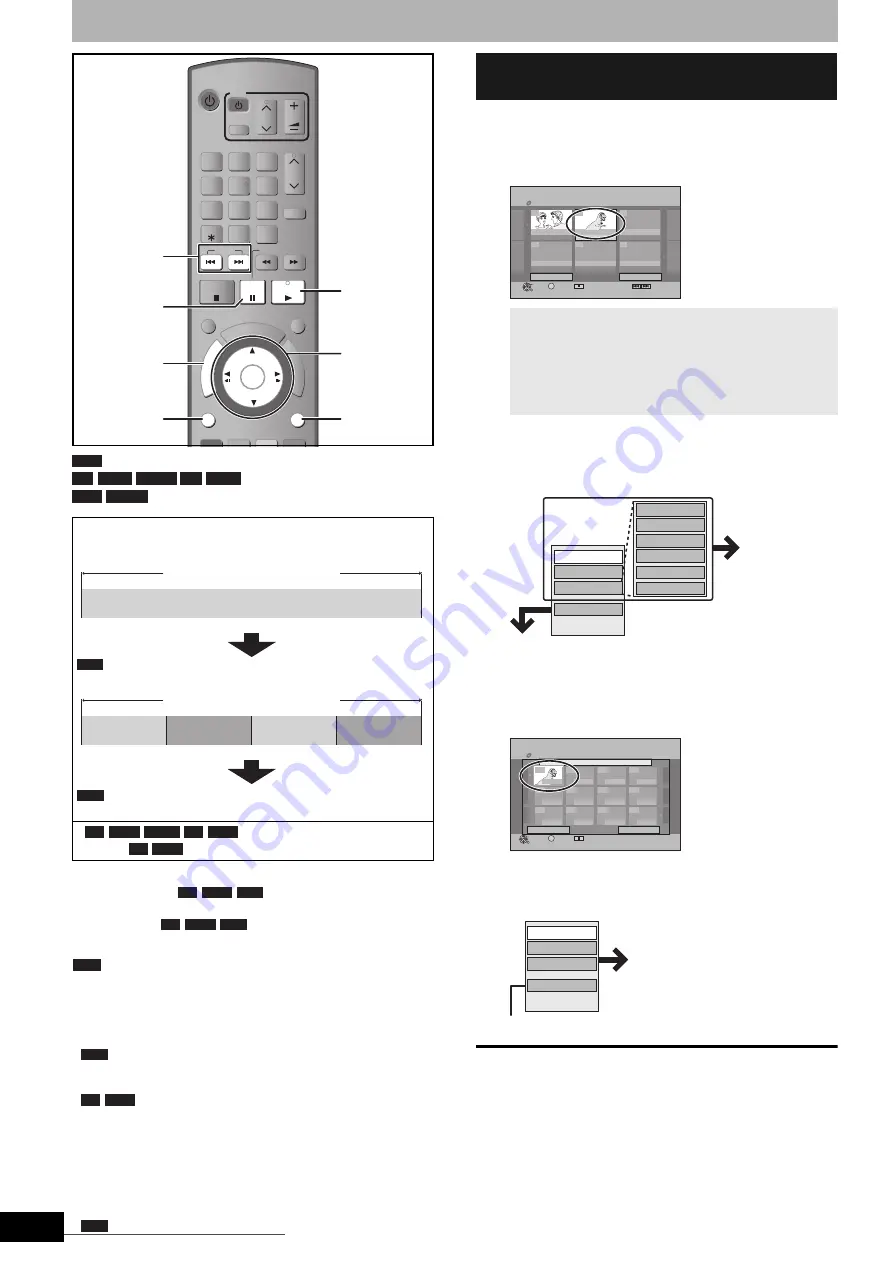
Editing titles/chapters


 (You cannot edit finalised discs.)


• The maximum number of items on a disc:

Note

• Once deleted or partially deleted, title/chapters cannot be restored 

to their original state. Make certain before proceeding.

• You cannot edit during recording or copying, etc.
• Restricted recording information remains even after editing (e.g. 

dividing a title etc).

 You can create a Top Menu using “Create Top Menu” (

Ô

36). 

Recording or editing on the disc may delete the menu. In that case, 
create the menu again.


 Management information is recorded in unused 

sections when you edit discs. The available space on these discs 
decreases each time you edit their contents.

Preparation

• Turn on the television and select the appropriate AV input to suit 

the connections to this unit.

• Turn the unit on.
• Insert the disc with the title to edit (

Ô

16).

 Release protection (

Ô

35, Setting the protection).

1

During play or while stopped

Press [DIRECT NAVIGATOR].

2

Press [

e

r

w

q

] to select the title.

3

Press [OPTION], then press [

e

r

] to 

select the operation and press [OK].

• If you select “Edit”, press [

e

r

] to select the operation and 

press [OK].

4

Press [

e

r

w

q

] to select the 

chapter.

To start play 

Ô

 Press [OK].

To edit 

Ô

 Step 5.

• To show other pages/Multiple editing (

Ô

above)

5

Press [OPTION], then press [

e

r

] to 

select the operation and press [OK].

To return to the previous screen

Press [RETURN].

To exit the screen 

Press [DIRECT NAVIGATOR].

Title/Chapter

Programmes are recorded as a single title consisting of one 
chapter.

 You can change the order of chapters and create a playlist 

(

Ô

32).


 Titles are divided into about 5-

minute (


 8-minute) chapters after finalising (

Ô

36).

–Titles:

99 (


 49 titles)

–Chapters:

Approximately 1000
(


 Approximately 254)

(Depends on the state of recording.)

TV

DVD

CH

AV

VOL

INPUT SELECT

CH

9

8

7

6

5

4

3

2

1

-/--

0

DELETE

SLOW/SEARCH

SKIP

EXIT

TIME SLIP

RETURN

OK

PRO

G/CHECK

FU

NC

TIO

N M

EN

U

DI

RE

CT

 N

AV

IG

AT

OR

OPTION

AUDIO

DISPLAY

CREATE

CHAPTER MANUAL SKIP

PLAY/ x1.3

PAUSE

STOP

RETURN

e

r

w

q

OK

DIRECT

NAVIGATOR

OPTION

h

q

u

 , 

i

RAM

-R

-R DL -RW(V) +R +R DL

+RW -RW(VR)

Title

Chapter

Start

End

 You can divide a title into multiple chapters.

(

Ô

21, 31, “Create Chapter”)

RAM

Title

Chapter

Chapter

Chapter

Chapter

RAM

-R

-R DL -RW(V) +R +R DL

+R +R DL

+R +R DL +RW

+R +R DL +RW

+RW

+R +R DL

RAM

Editing titles/chapters and playing 

chapters

To show other pages

Press [

e

r

w

q

] to select “Previous” or “Next” and press 

[OK].
• You can also press [

u

i

] to show other pages.

Multiple editing

Select with [

e

r

w

q

] and press [

h

]. (Repeat.)

• A check mark appears. Press [

h

] again to cancel.

No.

--

0

9

DIRECT NAVIGATOR   Title View

     DVD-RAM

Page      02/02

Previous

ARD

5.  7.  SAT

Next

OK

RETURN

07

ARD

5.  7.  SAT

08

--

--

--

--

OPTION

Select

Next

Previous

Divide Title

Set up Protection

Cancel Protection

Partial Delete

Change Thumbnail

Enter Name

Properties

Edit

Chapter View

Delete

Refer to “Title 
operations” 
(

Ô

31).

If you select “Chapter View” (

Ô

 step 4)

No.

--

0

9

08   ARD   5. 7. SAT

Page      01/01

Previous

Next

OK
RETURN

001

---

---

---

---

---

---

---

---

---

---

---

OPTION

Select

DIRECT NAVIGATOR   Chapter View
     DVD-RAM

0:00.15

Create Chapter

Combine Chapters

Title View

Delete Chapter

Refer to “Chapter operations” 
(

Ô

31).

• You can go back to the Title View. 

RQT9053-L.book  30 ページ  2008年6月30日 月曜日 午後1時23分

Downloaded From Disc-Player.com Panasonic Manuals

Summary of Contents for DMR-ES18

Page 1: ...e read the instructions completely Please keep this manual for future reference Region number supported by this unit Region numbers are allocated to DVD Recorders and DVD Video according to where they are sold For Asia The region number of this unit is 3 The unit will play DVD Video marked with labels containing 3 or ALL Example For Middle East and South Africa The region number of this unit is 2 ...

Page 2: ...DURES OTHER THAN THOSE SPECIFIED HEREIN MAY RESULT IN HAZARDOUS RADIATION EXPOSURE DO NOT OPEN COVERS AND DO NOT REPAIR YOURSELF REFER SERVICING TO QUALIFIED PERSONNEL WARNING TO REDUCE THE RISK OF FIRE ELECTRIC SHOCK OR PRODUCT DAMAGE DO NOT EXPOSE THIS APPARATUS TO RAIN MOISTURE DRIPPING OR SPLASHING AND THAT NO OBJECTS FILLED WITH LIQUIDS SUCH AS VASES SHALL BE PLACED ON THE APPARATUS USE ONLY ...

Page 3: ...s 30 Editing titles chapters and playing chapters 30 Title operations 31 Chapter operations 31 Creating editing and playing playlists 32 Creating playlists 32 Editing and playing playlists chapters 33 Playlist operations 33 Chapter operations 33 Copying from a video cassette recorder 34 DV automatic recording DV Auto Rec 34 Manual recording 34 DVD Management 35 Common procedures 35 Providing a nam...

Page 4: ...not use batteries if the covering has been peeled off Mishandling of batteries can cause electrolyte leakage which can damage items the fluid contacts and may cause a fire Remove if the remote control is not going to be used for a long period of time Store in a cool dark place n Use 1 Remote control N2QAYB000237 2 Batteries for remote control 1 Audio video cable 1 RF coaxial cable For use with thi...

Page 5: ...enance To clean the unit Wipe with a soft dry cloth Never use alcohol paint thinner or benzine to clean this unit Before using chemically treated cloth carefully read the instructions that came with the cloth To clean the DVD lens Dust and dirt may adhere to the unit s lens over time making it impossible to record or play discs Use the DVD lens cleaner about once every year depending on frequency ...

Page 6: ...is the same as commercially available DVD Video The broadcasts that allow One time only recording cannot be recorded even if using a CPRM compatible disc After finalising the disc you can play the disc on DVD players and other equipment VR R RW Video Recording format This is a method for recording moving pictures to R RW discs You can playback such discs recorded in this method in a similar way as...

Page 7: ... to handle PAL 525 60 signals the picture will not be shown correctly 2 Select NTSC in TV System Ô 39 Play only discs Disc type Logo Standard symbol Uses DVD Video High quality movie and music discs DVD RW DVD Video Recording format DVD RW video recorded on another DVD recorder You can play programmes that allow One time only recording if they have been recorded onto a CPRM compatible disc By form...

Page 8: ...me by frame Ô 13 21 8 Show OPTION menu Ô 24 30 33 This menu is used when playing titles and still pictures or editing titles etc 9 Show on screen menu Ô 26 bk Manual tuning settings Ô 37 bl Select audio Ô 20 bm Start recording Ô 16 bn Change recording mode Ô 16 bo Transmit the remote control signal bp Television operations Ô 41 bq Channel select Ô 16 br Input select AV1 AV2 AV3 AV4 or DV Ô 34 bs E...

Page 9: ...CR camcorder etc Ô 34 5 Channel select Ô 16 6 Open close disc tray Ô 16 7 Display Ô below 8 Stop Ô 16 21 9 Start play Ô 20 bk Start recording Ô 16 Specify the time to stop recording Ô 17 bl Remote control signal sensor PLAY REC 1 3 5 6 4 2 1 Main display section indicator 2 Recording mode indicator 3 Recording indicator 4 Timer recording indicator 5 Disc indicator This indicator lights up when a d...

Page 10: ...it using the 21 pin Scart cable If your television is equipped with RGB input capability by connecting with a fully wired 21 pin Scart cable you can see video using RGB output on this unit AV1 Output in the Setup menu Ô 39 For Middle East and South Africa VHF UHF RF IN AUDIO IN R L VIDEO IN 4 4 4 1 2 3 Television s rear panel This unit s rear panel Audio video cable included RF coaxial cable inclu...

Page 11: ...tly to the television Video signals fed through video cassette recorders will be affected by copyright protection systems and the picture will not be shown correctly on the television When connecting to a television with a built in VCR Connect to the input terminals on the television side if there are both television and VCR input terminals Television VCR This unit DO NOT Audio video cable include...

Page 12: ...cable check the terminal shape of the connected equipment You cannot use DTS Digital Surround decoders not suited to DVD n Connecting a stereo amplifier Other connections Connecting a television with S VIDEO terminals AUDIO IN R L VIDEO IN COMPONENT VIDEO IN S VIDEO IN Television s rear panel Audio video cable included S Video cable This unit s rear panel Red White Red White Connecting a televisio...

Page 13: ...ct television side picture is trimmed for 16 9 picture Ô 50 Letterbox When connected to a 4 3 aspect television 16 9 picture is shown in the letterbox style Ô 50 To stop partway Press RETURN TV DVD CH AV VOL INPUTSELECT CH 9 8 7 6 5 4 3 2 1 0 DELETE SLOW SEARCH SKIP EXIT TIME SLIP RETURN OK PROG CHECK F U N C T I O N M E N U D I R E C T N A V I G A T O R OPTION AUDIO DISPLAY CREATE CHAPTER MANUALS...

Page 14: ... DVD players The disc must be finalised after recording Ô 36 It is necessary to finalise DVD R etc on this unit after recording titles to them You can then play them as a commercially sold DVD Video However the discs become play only and you can no longer record or copy You can record and copy again if you format DVD RW If the disc failed to play on other equipment we recommend you create top menu...

Page 15: ... Disc Name Ô 35 or Auto Play Select Ô 36 in DVD Management before finalising n When opening the tray without disc finalisation Press OPEN CLOSE on the main unit Recording modes and approximate recording times Recording Mode DVD RAM DVD R DVD RW R RW 4 7 GB 4 7 GB 9 4 GB Double sided 1 XP High quality 1 h 2 h 1 h SP Standard 2 h 4 h 2 h LP Long play 4 h 8 h 4 h EP Extra long play 8 h 6 h 2 16 h 12 ...

Page 16: ...pause recording Press h Press again to restart recording You can also press REC to restart Recorded title is not split into separate titles n To stop recording Press g From the start to the end of the recording is called one title It takes about 30 seconds for the unit to complete recording management information after recording finishes In order to play DVD R DVD R DL DVD RW DVD Video format R an...

Page 17: ...rd To stop play Press g To stop recording 1 Press g to stop playing 2 Press g after 2 seconds To stop timer recording 1 Press g to stop playing 2 Press g after 2 seconds 3 Press w q to select Stop Recording and press OK 1 Press DIRECT NAVIGATOR during recording 2 Press e r w q to select a title and press OK There is no sound output while searching forward or backward To stop play Press g To exit t...

Page 18: ...nit s display to indicate timer recording standby has been activated Repeat steps 2 4 to programme other recordings To exit the timer recording list Press PROG CHECK TV DVD CH AV VOL INPUTSELECT CH 9 8 7 6 5 4 3 2 1 0 DELETE SLOW SEARCH SKIP EXIT TIME SLIP RETURN OK PROG CHECK F U N C T I O N M E N U D I R E C T N A V I G A T O R STATUS OPTION F Rec RECMODE REC AUDIO DISPLAY CREATE CHAPTER MANUALS...

Page 19: ...s finished Even when the unit is turned off you can display the timer recording list by pressing PROG CHECK Press PROG CHECK n To change a programme Press e r to select the programme and press OK Ô 18 step 3 n To delete a programme Press e r to select the programme and press DELETE You can also delete a programme with the following steps 1 Press e r to select the programme and press OPTION 2 Press...

Page 20: ...AY when you wish to start playing the disc while recording Ô 17 Chasing playback Press AUDIO and DivX You can change the audio channel number each time you press the button This allows you to change things like the soundtrack language e g English is the selected language Ô 26 Soundtrack Menu operation for other type of contents DivX Ô 22 MP3 Ô 23 Still pictures JPEG Ô 23 e g 5 0 Ô 5 15 1 Ô 5 TV DV...

Page 21: ... Press again to return to normal speed Slow motion While paused press t or y The speed increases up to 5 steps Press q PLAY to restart play Forward direction y only The unit will pause if slow motion play is continued for approximately 5 minutes excluding Frame by frame While paused press w h or h q Each press shows the next frame Press and hold to change in succession forward or backward Press q ...

Page 22: ...the folder appears To return to the previous screen Press RETURN Showing the menu screen TV DVD CH AV VOL INPUTSELECT CH 9 8 7 6 5 4 3 2 1 0 DELETE SLOW SEARCH SKIP EXIT TIME SLIP RETURN OK PROG CHECK F U N C T I O N M E N U D I R E C T N A V I G A T O R STATUS OPTION F Rec RECMODE REC AUDIO DISPLAY CREATE CHAPTER MANUALSKIP PLAY x1 3 PAUSE STOP Numbered buttons RETURN DIRECT NAVIGATOR FUNCTION ME...

Page 23: ... 0 Ô 0 Ô 5 15 0 Ô 0 Ô 1 Ô 5 Using the tree screen to find a group CD Tree Track Total 001 Baby 1 1 101 002 Simple 2 003 Aganju 3 004 Around 4 005 River 5 006 Every 6 007 Cada 7 008 O 8 009 Winter 9 010 Distante 10 Group No MP3 Menu Page 001 019 G 1 T 1 TOTAL 1 91 Number 0 9 Next Prev OK SELECT RETURN Selected group G Group no T Track no in the group TOTAL Track No Total tracks in all groups Next P...

Page 24: ...w Setting in step 2 and press OK 2 Press e r to select Repeat Play 3 Press w q to select On or Off and press OK Rotate While playing 1 Press OPTION 2 Press e r to select Rotate RIGHT or Rotate LEFT and press OK Rotation information will not be stored Zoom in Zoom out While playing 1 Press OPTION 2 Press e r to select Zoom in and press OK To return the picture to its original size press e r to sele...

Page 25: ... Still pictures JPEG 2 1 Total number of recognizable file including MP3 JPEG DivX and other type of files is 4000 2 It may take a few moments for still pictures to display You can play MP3 and still pictures JPEG on this unit by making folders as shown below However depending on how you create the disc writing software play may not be in the order you numbered the folders When the highest level f...

Page 26: ... displayed even when there is only one audio type Subtitle Turn the subtitle on off and select the language Ô below Language Only discs that contain subtitle on off information Turn the subtitle on off Subtitle on off information cannot be recorded using this unit DivX Turn the subtitle on off and select the subtitle number Subtitle numbers are displayed even if there are not multiple subtitles Au...

Page 27: ...d Input NR Only when AV1 AV2 AV3 AV4 or DV is selected Reduces video tape noise while copying Automatic Noise reduction only works on picture input from a video tape On Noise reduction works for any input video Off Noise reduction is off You can record the input signal as it is Sound menu Change the sound effect V S S Dolby Digital MPEG 2 channel or over only Enjoy a surround like effect if you ar...

Page 28: ...tart programming timer recording Ô 18 Delete You can delete items using DELETE Navigator Ô 29 Playlists You can create playlists by grouping your favourite chapters Ô 32 Flexible Rec The unit sets the best possible picture quality that fits the recording within the remaining disc space Ô 17 DV Auto Rec DV automatic recording function Ô 34 Setup You can change the unit s settings using Setup menu Ô...

Page 29: ...le is deleted TV DVD CH AV VOL INPUTSELECT CH 9 8 7 6 5 4 3 2 1 0 DELETE SLOW SEARCH SKIP EXIT TIME SLIP RETURN OK PROG CHECK F U N C T I O N M E N U D I R E C T N A V I G A T O R STATUS OPTION F Rec RECMODE REC AUDIO DISPLAY CREATE CHAPTER MANUALSKIP PLAY x1 3 PAUSE STOP e r w q OK FUNCTION MENU DELETE RETURN h u i EXIT RAM R R DL RW V R R DL RW RAM Title1 Title2 The last recorded title The avail...

Page 30: ...chapter You can change the order of chapters and create a playlist Ô 32 Titles are divided into about 5 minute 8 minute chapters after finalising Ô 36 Titles 99 49 titles Chapters Approximately 1000 Approximately 254 Depends on the state of recording TV DVD CH AV VOL INPUTSELECT CH 9 8 7 6 5 4 3 2 1 0 DELETE SLOW SEARCH SKIP EXIT TIME SLIP RETURN OK PROG CHECK F U N C T I O N M E N U D I R E C T N...

Page 31: ...itle Video and audio just before and after the dividing point may momentarily be cut out Carry out the title division after checking it with Preview Ô above Chapter operations Delete Chapter Press w q to select Delete and press OK Once deleted the recorded contents are lost and cannot be restored Make certain before proceeding Select Combine Chapters Ô below when you only want to delete the divisi...

Page 32: ...data Playlists are not recorded separately so this doesn t use much capacity You cannot create or edit a playlist while recording or copying Playlists 99 Chapters in playlists Approximately 1000 Depends on the state of recording Creating playlists INPUTSELECT CH 9 8 7 6 5 4 0 DELETE SLOW SEARCH SKIP EXIT TIME SLIP RETURN OK PROG CHECK F U N C T I O N M E N U D I R E C T N A V I G A T O R STATUS OP...

Page 33: ...1 Previous Next OK RETURN 001 002 OPTION Select Playlists DVD RAM Chapter View 0 00 15 0 00 24 01 5 7 SAT 0 30 Move Chapter Create Chapter Combine Chapters Delete Chapter Playlist View Add Chapter Refer to Chapter operations Ô right You can go back to the Playlist View Playlist operations Delete Press w q to select Delete and press OK Once deleted the playlists are lost and cannot be restored Make...

Page 34: ... appears Press OK Note Only one piece of DV equipment e g digital video camcorder can be connected to the unit via the DV IN terminal It is not possible to operate the unit from the connected DV equipment The DV IN terminal on this unit is for use with DV equipment only It cannot be connected to a computer etc The DV equipment name may not be shown correctly Depending on the DV equipment the image...

Page 35: ...d press OK 5 Press w q to select Yes and press OK 6 Press w q to select Start and press OK A message appears when formatting is finished Do not disconnect the AC mains lead while formatting This can render the disc unusable Formatting normally takes a few minutes however it may take up to a maximum of 70 minutes 7 Press OK Note Formatting cannot be performed on the disc You can format only as DVD ...

Page 36: ...and R DL discs have two layers of recording surface on one side This unit does not offer seamless recording on two layers Recording stops when space on the first layer becomes full You must close the first layer to start recording on the second layer Closing makes the first layer unavailable for recording editing is still available You cannot cancel closing Make certain before proceeding After per...

Page 37: ...estart TAB OK SELECT RETURN Manual Tuning Pos Name Ch Pos Name Ch Delete Add Move 1 2 3 4 4 2 5 8 10 5 6 7 8 9 10 11 12 13 14 15 16 17 18 19 20 OK RETURN SELECT ARD ZDF N3 HR3 BR3 Pos To change the programme position in which the TV stations are assigned Press e r or numbered buttons to select the number of the desired programme position and press OK Name To enter or change the name of a TV statio...

Page 38: ...b Filter Select the picture sharpness when recording The setting is fixed with On if you set TV System to NTSC Ô 39 On Pictures become clear and vivid Normally use this setting Off Select it when recording noisy pictures Still Mode Select the type of picture shown when you pause play Ô 50 Frames and fields Automatic Field Select if jittering occurs when Automatic is selected The picture is coarser...

Page 39: ...r RGB 2 without component On Off Note When connected to a regular television CRT Cathode ray tube or a multi system television using PAL mode even if it is progressive compatible progressive output can cause some flickering Turn off Progressive if you are concerned about it Ô 27 Picture will not be displayed correctly if connected to an incompatible television TV System Change the setting to match...

Page 40: ... seconds on the remote control OK RETURN The unit s remote control code Clock 2008 7 5 45 Time Date 39 15 Please set clock manually OK store RETURN leave Number 0 9 SELECT OK CHANGE RETURN Hour Minute Second Day Month Year Quick Start The Quick Start feature enables this unit to be ready to start recording as quick as approx 1 second after turning it on You can start recording soon after deciding ...

Page 41: ...ible To cancel the Child Lock Press and hold OK and RETURN simultaneously until X HOLD disappears Television operation Brand Code Brand Code Panasonic 01 02 03 04 METZ 05 28 AIWA 35 MITSUBISHI 05 19 20 47 AKAI 27 30 MIVAR 24 BEJING 33 NEC 36 BEKO 05 71 72 73 74 NOBLEX 33 BENQ 58 59 NOKIA 25 26 27 60 61 BP 09 NORDMENDE 10 BRANDT 10 15 OLEVIA 45 BUSH 05 ONWA 30 39 70 CENTREX 66 ORION 05 CHANGHONG 69...

Page 42: ...ectual property rights Use of this copyright protection technology must be authorized by Macrovision and is intended for home and other limited viewing uses only unless otherwise authorized by Macrovision Reverse engineering or disassembly is prohibited U S Patent Nos 6 836 549 6 381 747 7 050 698 6 516 132 and 5 583 936 Official DivX Certified product Plays all versions of DivX video including Di...

Page 43: ...25 Cannot record Disc is full Create space by deleting any unnecessary titles Even if you delete recorded content from DVD R DVD R DL R or R DL there is no increase in disc space Available space on DVD RW DVD Video format and RW increases only when the last recorded title is deleted Use a new disc 29 31 35 Cannot record Maximum number of titles exceeded No Disc The disc may be upside down No folde...

Page 44: ...ou have inserted a disc the unit cannot play or record on 6 7 U59 The unit is hot The unit switches to standby for safety reasons Wait for about 30 minutes until the message disappears Select a position with good ventilation when installing the unit Do not block the cooling fan on the rear of the unit U61 The unit detected an error while recording or playing with no disc in the disc tray The unit ...

Page 45: ...deo region number indicates the disc conforms to a standard You cannot play discs that do not have a region number Please tell me about DVD R DVD R DL DVD RW R R DL and RW compatibility with this unit This unit records and plays DVD R DVD R DL DVD RW DVD Video format R R DL and RW and plays DVD RW DVD Video Recording format This unit also records and plays high speed recording compatible discs Aft...

Page 46: ...ere is no operation for 5 minutes or more Press OK to return to the previous screen The recorded title is stretched vertically 16 9 aspect programmes are recorded in 4 3 aspect in the following cases If you recorded using EP or FR recordings 5 hours or longer recording mode If you recorded to a R R DL or RW If you recorded with the Aspect for Recording set to 4 3 in the Setup menu When you want to...

Page 47: ...these disc types is in use the audio of broadcast programme cannot be changed When connecting an amplifier using an optical digital audio cable you cannot switch the audio if Dolby Digital is set to Bitstream Set Dolby Digital to PCM or connect using audio cables There are discs which audio cannot be changed because of how the disc was created 12 38 Operation Cannot operate the television The remo...

Page 48: ...on the television Recording may not be performed as desired if the time codes on the tape in the DV equipment are not successive Depending on the equipment the DV automatic recording may not operate properly You can only record audio video images on a DV tape 34 34 Play Play fails to start even when q PLAY is pressed Play starts but then stops immediately Insert the disc correctly with the label f...

Page 49: ...ndividually Still pictures Cannot display Direct Navigator screen This screen cannot be displayed during recording or copying Still pictures JPEG are not played back properly The images that were edited on the PC such as Motion JPEG Progressive JPEG etc may not be played back 25 To reset this unit To return all the settings other than the main ones to the factory preset Select Yes in Shipping Cond...

Page 50: ... stored Formatting Formatting is the process of making media such as DVD RAM recordable on recording equipment You can format DVD RAM DVD RW only as DVD Video format R R DL or RW on this unit When you use a new DVD RW R R DL or RW it must be formatted Formatting deletes irrevocably all contents Frames and fields Frames refer to the single images that constitute the video you see on your television...

Page 51: ...ot provided RF converter output Not provided Optical pick up System with 1 lens 2 integration units 662 nm wavelength for DVDs 780 nm wavelength for CDs LASER Specification Class 1 LASER Product DV Input IEEE 1394 Standard 4 pin 1 pc Others Region Code 2 3 Operating temperature 5 C to 40 C Operating humidity range 10 to 80 RH no condensation Power supply AC 220 V to 240 V 50 60 Hz Power consumptio...

Page 52: ...w 28 Initialize 40 JPEG 25 50 Language Code list 42 Disc menu 38 Soundtrack 26 38 Subtitle 26 38 Manual Skip 21 Menu DivX 22 25 MP3 23 Setup 37 Mode Recording 15 Still Mode 38 MP3 23 25 Play 23 Name Disc 35 Entering text 28 Playlist 33 Title 18 31 Partial Delete 31 Playlist 32 Power Save 40 Progressive 27 39 50 Properties Playlist 33 Still picture 24 Title 31 Protection Cartridge 35 Disc 35 Title ...

Reviews: