background image

11

SQT1189 (ENG)

Preparations

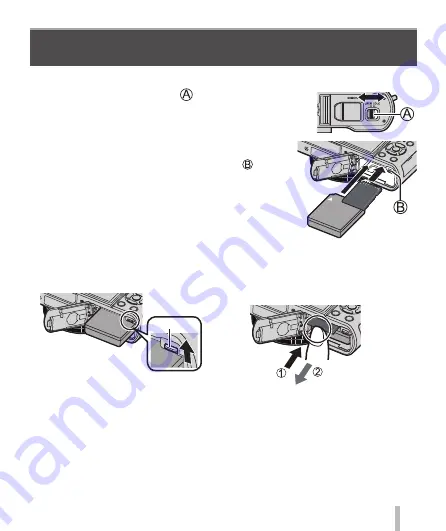
  Inserting and removing the battery or SD memory 

card (optional)

 Make sure that the camera is turned off.

 1

 Slide the release lever ( ) to the [OPEN] 
position and open the card/battery door


 2

 Insert the battery and card, making sure 
that their orientation is correct


•  Battery:  Insert the battery all the way firmly and 

check that it is locked by lever ( ).


•  Card:  Insert the card all the way firmly until it 

clicks. Do not touch the terminals on the 
back of the card.

 3

 Close the door

 Slide the release lever to the [LOCK] position.


 To remove


 To remove battery:

 Move lever in direction of arrow.


 Lever


 To remove card:

 Push the card until it clicks, then pull 
the card out.


 Press

 Pull out


 Always use genuine Panasonic batteries (DMW-BLG10E).


 If you use other batteries, we cannot guarantee the quality of this product.


 Keep the Memory Card out of reach of children to prevent swallowing.


 We recommend using a Panasonic card.

Summary of Contents for DMC-TZ80

Page 1: ...C TZ80 DMC TZ110 DMC TZ80 Please read these instructions carefully before using this product and save this manual for future use More detailed operating instructions are available in Operating Instructions for advanced features PDF format To read it download it from the website 44 GN ...

Page 2: ...pes or discs or other published or broadcast material for purposes other than your own private use may infringe copyright laws Even for the purpose of private use recording of certain material may be restricted Information for Your Safety WARNING To reduce the risk of fire electric shock or product damage Do not expose this unit to rain moisture dripping or splashing Use only the recommended acces...

Page 3: ...he AC adaptor is connected to an electrical outlet About the battery pack CAUTION Danger of explosion if battery is incorrectly replaced Replace only with the type recommended by the manufacturer When disposing of the batteries please contact your local authorities or dealer and ask for the correct method of disposal Do not heat or expose to flame Do not leave the battery ies in a car exposed to d...

Page 4: ...oise adversely affecting the pictures and or sound Recorded data may be damaged or pictures may be distorted by strong magnetic fields created by speakers or large motors Electromagnetic wave radiation may adversely affect this unit disturbing the pictures and or sound If this unit is adversely affected by electromagnetic equipment and stops functioning properly turn this unit off and remove the b...

Page 5: ...your pictures 35 Light Composition 36 Wi Fi What you can do with the Wi Fi function 38 Operating the camera by connecting it to a smartphone 39 Others Downloading software 42 Reading the Operating Instructions PDF format 44 List of monitor viewfinder displays 45 Menu list 49 Q A Troubleshooting 52 Specifications 54 Digital Camera Accessory System 60 Limited Warranty ONLY FOR AUSTRALIA 61 In this m...

Page 6: ...the DC coupler DMW DCC11 optional or a card or disconnect the power plug from the outlet and wipe with a soft dry cloth Do not press the monitor with excessive force Do not press the lens with excessive force Do not keep rubber or plastic products in contact with the camera for a long period of time Do not use solvents such as benzine thinner alcohol kitchen detergents etc to clean the camera sinc...

Page 7: ...C Memory Card and SDXC Memory Card are indicated as card in the text This unit is compatible with UHS UHS Speed Class 3 standard SDHC SDXC memory cards The following SD standard based cards Panasonic brand recommended can be used Operation has been confirmed when using a Panasonic brand card SD Memory Card 512 MB to 2 GB SDHC Memory Card 4 GB to 32 GB SDXC Memory Card 48 GB to 128 GB Depending on ...

Page 8: ...8 Preparations SQT1189 ENG Names and Functions of Main Parts 1 2 3 4 5 6 9 10 11 8 12 13 15 17 7 16 25 22 24 26 29 27 28 21 18 19 20 13 30 31 33 34 35 36 37 32 TZ110 ...

Page 9: ...9 SQT1189 ENG Preparations TZ80 1 2 5 4 9 10 11 13 16 17 8 7 12 14 15 3 25 22 24 26 29 27 28 21 30 31 18 34 35 36 37 23 13 32 ...

Page 10: ...NU Cancel button Delete button 35 Fn3 button You can easily call some of the menu items and set them during recording 25 4K photo mode button 24 Fn1 button 26 Playback button 35 27 Cursor button 18 28 MENU SET button 29 DISP button Use this to change display 30 HDMI socket 31 CHARGE socket 12 32 Touch screen 21 monitor 45 33 TZ110 Speaker 34 Tripod mount Do not attach this unit to tripods that hav...

Page 11: ...d by lever Card Insert the card all the way firmly until it clicks Do not touch the terminals on the back of the card 3 Close the door Slide the release lever to the LOCK position To remove To remove battery Move lever in direction of arrow Lever To remove card Push the card until it clicks then pull the card out Press Pull out Always use genuine Panasonic batteries DMW BLG10E If you use other bat...

Page 12: ...ct this unit to the AC adaptor supplied or a PC Computer Getting ready Turn on the computer To the electrical outlet USB connection cable supplied Charging lamp CHARGE socket This terminal is located at the bottom when the camera is in an upright position Always check the direction of the pins and hold the plug straight to insert or remove it If the cable is inserted in the wrong direction the pin...

Page 13: ...es warm during use This is not a malfunction Do not leave any metal items such as clips near the contact areas of the power plug or near the batteries Store the battery in a cool and dry place with a relatively stable temperature Recommended temperature 15 C to 25 C Recommended humidity 40 RH to 60 RH Do not store the battery for a long time while fully charged When storing the battery for a long ...

Page 14: ... the items year month day hour minute and press to set 4 Press MENU SET 5 When The clock setting has been completed is displayed press MENU SET 6 When Please set the home area is displayed press MENU SET 7 Press to set your home area and press MENU SET You can change the clock setting with Clock Set in Setup menu Setting the clock ...

Page 15: ...om ratio than optical zoom without degrading the picture quality Maximum magnification TZ110 20x TZ80 61 2x Including the optical zoom ratio The maximum zoom ratio varies depending on the picture size i Zoom You can use the camera s intelligent resolution technology to increase the zoom ratio up to 2x higher than the original zoom ratio with limited deterioration of picture quality Digital Zoom Zo...

Page 16: ...hing Shutter speed Aperture value 2 Press the shutter button fully push the button all the way and take the picture Pictures can be taken only when the image is correctly focused as long as the Focus Release Priority is set to FOCUS Even during menu operation or picture playback if you press the shutter button halfway you can instantly set the camera ready for recording Estimated number of recorda...

Page 17: ...e value settings Aperture Priority AE Mode Determine aperture then take pictures Shutter Priority AE Mode Determine shutter speed then take pictures Manual Exposure Mode Determine aperture and shutter speed then take pictures Creative Video Mode Determine aperture and shutter speed then record motion pictures You cannot take still pictures Custom Mode Take pictures using pre registered settings Pa...

Page 18: ...perations while recording Some items or settings can not be selected depending on the mode or display style the camera is in Exposure compensation Corrects the exposure when there is a backlight or when the subject is too dark or too bright TZ110 White balance Adjusts the colour depending on the light source to ensure natural colour TZ80 Flash mode Changes flash mode Drive mode Burst 1 Records a b...

Page 19: ...p to 3x while maintaining the distance to the subject for the extreme Wide position 5 cm 2 3 cm 3 MF Manual focus is convenient when you want to lock the focus to take pictures or when it is difficult to adjust focus using auto focus 2 TZ110 3 TZ80 LVF button 1 Press LVF button Automatic switching between viewfinder and monitor Eye sensor Viewfinder display Monitor display The eye sensor automatic...

Page 20: ...ment 2 Shutter speed adjustment 2 Picture effects change Aperture adjustment 3 Shutter speed adjustment 4 1 When Manual Focus is set the control ring is assigned to focus adjustment 2 Press to switch between shutter speed adjustment and aperture adjustment 3 The operation is possible only when the Scene Guide Mode is set to Appetizing Food 4 The operation is possible only when the Scene Guide Mode...

Page 21: ...To touch and release the touch screen Be sure to touch the centre of the desired icon Drag To touch and slide your finger across the touch screen This can also be used to forward or rewind a picture during playback etc Pinch spread pinch On the touch screen spread pinch out your 2 fingers to zoom in and pinch pinch in your 2 fingers to zoom out ...

Page 22: ...the menu 2 Press to select the menu item and press MENU SET 3 Press to select the setting and press MENU SET 4 Press Q MENU button repeatedly until the recording or playback screen reappears During recording the menu screen can also be exited by pressing the shutter button halfway Switching menu type Press after performing step 1 above Press to select a tab such as Press MENU SET Menu types 49 Rec...

Page 23: ...o either the most recently used of Intelligent Auto Mode or Intelligent Auto Plus Mode 2 Point the camera at the subject When the camera identifies the optimal scene the icon for each scene turns blue for 2 seconds and then changes to the normal red indication 50p Switching between Intelligent Auto Plus Mode and Intelligent Auto Mode Press MENU SET Press Press to select the or tab Use to select or...

Page 24: ...ss button The same operation can be performed by pressing the button using to select a 4K photo icon etc and pressing 2 Press to select the recording method and press MENU SET The recording method can also be set from 4K PHOTO in the Rec menu 4K Burst For capturing the best shot of a fast moving subject Burst recording is performed while the shutter button is pressed and held The shutter sound wil...

Page 25: ...s Burst recording is performed for approximately 1 second before and after the moment that the shutter button is pressed The shutter sound will be heard only once Audio recording None Approximately 1 second Recording is performed Recording length Approximately 2 seconds Audio is not played back when you perform playback with the camera 3 Record a 4K photo When you perform 4K burst photo recording ...

Page 26: ...way through to protect the camera Wait until the camera cools down When 4K Pre Burst is set the battery drains faster and the camera temperature rises Select 4K Pre Burst only when recording Selecting pictures from 4K burst file and saving The picture will be saved in JPEG format For details refer to Operating Instructions for advanced features PDF format or Quick Guide for 4K Photo supplied ...

Page 27: ...or Post Focus Post Focus icon 3 Determine the composition and press the shutter button halfway Auto Focus activates and automatically detects the focus point on the screen If there is no focus point on the screen the Focus indicator green blinks and you cannot record From halfway pressing the shutter button to completion of recording Do not change the distance to subject or the composition 4 Press...

Page 28: ...save the picture 1 On the playback screen select the image with the icon and press The same operation can be performed by touching 2 Select the focus point by touching it The picture will be displayed with the focus on the selected point The edge of the screen cannot be selected If there are no pictures with the focus on the selected point a red frame will be displayed and pictures cannot be saved...

Page 29: ...to focus The same operation can be performed using Touch to save the picture The screen returns to step Highlight in focus portion with colour Peaking Touch Each time the icon is touched the setting is switched in order of Detect Level LOW Detect Level HIGH OFF The display colour will be the same as set in Peaking under the Custom menu ...

Page 30: ...n TVs MP4 This data format is suited for playing back motion pictures on a computer and other such devices Motion Picture Rec Quality When AVCHD is selected Item Picture size fps Bit rate approx FHD 28M 50p 1 1920 1080 50p 28 Mbps FHD 17M 50i 1920 1080 50i 17 Mbps FHD 24M 25p 1920 1080 50i 24 Mbps FHD 24M 24p 2 1920 1080 24p 24 Mbps When MP4 is selected Item Picture size fps Bit rate approx 4K 100...

Page 31: ...ng temperature is high or a motion picture is recorded continuously is displayed and recording may be stopped halfway through to protect the camera Wait until the camera cools down With recording in a quiet environment the sound of aperture focus and other actions may be recorded in motion pictures This is not a malfunction The focus operation during recording of motion pictures can be set to OFF ...

Page 32: ...f the size is greater than 4 GB Recording 4K motion pictures Recording mode You can record high resolution 4K motion pictures by setting Rec Quality to 4K To record 4K motion pictures use a UHS Speed Class 3 card When you record 4K motion pictures the angle of view will be narrower than motion pictures of other sizes To record 4K motion pictures Select the recording mode 17 Set the Rec Format in t...

Page 33: ...1920 1080 by capturing the subject at a wide angle of view and setting a crop start frame and crop end frame Hold the camera firmly in place while recording A motion picture will be recorded at FHD 20M 25p under MP4 Example of panning while recording Setting crop frames at 4K angle of view Screen moves from left to right without moving the camera 1 Set mode dial to 2 Set the menu Motion Picture 4K...

Page 34: ... the position and size of a crop frame Press Fn1 button 6 Press the motion picture button to start recording The display switches to the angle of view set in step 4 and the panning or zoom operation is displayed Immediately release the motion picture button after pressing it When the set operating time has elapsed recording automatically ends Zoom operation is not available To end 4K Live Cropping...

Page 35: ...lows you to play back motion pictures If you press MENU SET during a pause you can create a picture from a motion picture Sending pictures to the WEB services If you press while a single picture is being displayed you can send the picture to the WEB service quickly For details refer to Operating Instructions for advanced features PDF format Deleting pictures Deleted pictures cannot be recovered Pr...

Page 36: ...he frames into one picture 1 Set the menu Playback Light Composition 2 Using select the 4K photo burst files and press MENU SET 3 Choose the combining method and press MENU SET When Composite Merging is selected Select the frames you wish to combine and then camera superimposes brighter parts of the image Select the frames Images displayed cannot be enlarged or shrunk or shown as in slide view in ...

Page 37: ...ames to combine You can select up to 40 frames Press to select Save and press MENU SET When Range Merging is selected Select the first and last frames and the brighter parts of frames within that range will be superimposed Select the frame of the first picture The selection method is the same as in step when selecting Composite Merging Press MENU SET The position of the first picture will be remem...

Page 38: ...al networking services Adding location information to pictures in the camera from a smartphone Combining motion pictures recorded with Snap Movie according to your preference on a smartphone Displaying still pictures on a TV Wireless printing Sending pictures to AV device Sending pictures to a PC Using WEB services This manual uses the term smartphone for both smartphones and tablets unless it is ...

Page 39: ...ne being used For the latest information on the Image App refer to the support site below http panasonic jp support global cs dsc This site is available in English only When downloading the app on a mobile network high packet communication fees may be incurred depending on the details of your contract For details about the operating procedure etc refer to Help in the Image App menu If you connect ...

Page 40: ...function is assigned At the time of purchase Wi Fi is assigned to Fn5 touch icon 2 Turn on the Wi Fi function in the setting menu of the smartphone 3 Select the SSID displayed on the screen of the camera 4 On the smartphone start Image App When the connection confirmation screen appears on the camera select Yes and press MENU SET Only when making a connection for the first time Wi Fi Password is s...

Page 41: ...ith 4K Pre Burst with the smartphone terminate the connection only after switching to 4K Burst recording by pressing Q MENU button on the camera Taking pictures via a smartphone remote recording 1 Connect to a smartphone 40 2 Operate the smartphone Select Take pictures The recorded images are saved in the camera Some settings are not available Playing back pictures in the camera on a smartphone 1 ...

Page 42: ...n pictures or write to DVD Check the website below to download install the software The software is available for download until the end of March 2021 http panasonic jp support global cs soft download d_pfs98pe html Operating environment Supported OS Windows 10 32 bit 64 bit Windows 8 1 32 bit 64 bit Windows 8 32 bit 64 bit Windows 7 32 bit 64 bit SP1 CPU Windows 10 Pentium 4 2 8 GHz or higher Win...

Page 43: ... 10 8 1 8 7 Mac OS X v10 6 v10 11 For details on the operating environment and how to use the SILKYPIX Developer Studio SE refer to the Help or the Ichikawa Soft Laboratory s support website LoiLoScope 30 day full trial version Motion pictures can be edited easily Check the website below to download install the software http loilo tv product 20 Supported OS Windows 10 8 1 8 7 For more information ...

Page 44: ...ex html model DMC TZ80 dest GN DMC TZ110 DMC TZ80 Click the desired language Confirming URLs and QR codes with the camera Set the menu Setup Online Manual Use to select URL display or QR Code display and press MENU SET The URL or QR code will be displayed on the camera monitor You will need Adobe Reader to browse or print the Operating Instructions PDF format You can download and install a version...

Page 45: ...justment display EXPS Types of picture effects Filter Card displayed only during recording XXhXXmXXs Elapsed recording time 1 Simultaneous recording indicator Automatic switching between viewfinder and monitor 19 Peaking TZ110 Highlight Shadow HDR iHDR TZ110 Multi Exp Electronic shutter Overheat indicator 26 28 The following images are examples of when the display screen is set to monitor style in...

Page 46: ...ed 31 Focus Lights green 16 Focus Under low illumination TZ110 Focus Starlight AF Wi Fi connection status Histogram Name 2 Travel elapsed days 3 Age in years months 2 Location 3 Current date time 3 Travel destination setting 3 Exposure meter Zoom 15 AF area Spot metering target Self Timer 4 Silent Mode AEL AE Lock Metering Mode Programme Shift 2 8 5 Aperture value 60 Shutter speed Exposure compens...

Page 47: ...RXXmXXs Available recording time 1 6 Touch tab Touch zoom Touch Shutter Touch AE Peaking Function buttons 18 Colouring Defocus control function Brightness exposure Type of defocus Miniature Effect One Point Color Sunshine Picture effect Filter adjustment display Picture effects ON or OFF Picture effects Filter Aperture value Shutter speed ISO sensitivity ...

Page 48: ...nd after switching from Playback Mode to Recording mode 4 This is displayed during countdown 5 Values given are examples for DMC TZ110 The values you can set may vary depending on the model 6 It is possible to switch the display between the number of recordable pictures and available recording time with the Remaining Disp setting in the Custom menu The information displayed such as histograms magn...

Page 49: ... automatically Rec Photo Style Filter Settings Aspect Ratio Picture Size Quality Sensitivity TZ80 White Balance AF Mode AFS AFF AFC Metering Mode Burst Rate 4K PHOTO Auto Bracket Self Timer TZ110 Highlight Shadow i Dynamic i Resolution Post Focus iHandheld Night Shot iHDR HDR TZ110 Multi Exp Time Lapse Shot Stop Motion Animation Panorama Settings Shutter Type TZ110 Flash TZ80 Flash Adjust Red Eye ...

Page 50: ...ase Quick AF Eye Sensor AF TZ110 Pinpoint AF Time TZ110 Pinpoint AF Display AF Assist Lamp Direct Focus Area Focus Release Priority AF MF MF Assist MF Assist Display MF Guide Peaking Histogram Guide Line Highlight Zebra Pattern Monochrome Live View TZ110 Constant Preview Expo Meter Dial Guide LVF Disp Style Monitor Disp Style Rec Area Remaining Disp Auto Review Fn Button Set Zoom lever Zoom Resume...

Page 51: ...round Menu Information Language Version Disp Exposure Comp Reset Self Timer Auto Off No Reset Reset Reset Wi Fi Settings Demo Mode Format Slide Show Playback Mode Location Logging TZ110 RAW Processing Light Composition Clear Retouch Title Edit Text Stamp Video Divide Time Lapse Video Stop Motion Video Resize Cropping Rotate Rotate Disp Favorite Print Set Protect Face Rec Edit Picture Sort Playback...

Page 52: ...s not possible if the power supply capacity of the computer is low This unit is turned off automatically Economy is activated The linked operation of VIERA Link HDMI is enabled If you are not using VIERA Link HDMI set VIERA Link to OFF Sometimes focus adjustment with auto focus mode is difficult while recording 4K motion pictures This may occur when taking a picture by reducing the auto focus spee...

Page 53: ...camera may not display or connect to a wireless access point depending on the radio wave condition Perform the connection closer to the wireless access point Remove the obstacles between this unit and the wireless access point Change the direction of this unit Move the location or change the angle of the wireless access point Perform the Manual Input It may not display even if the radio waves exis...

Page 54: ...or 1 5 W When playing back with viewfinder TZ80 2 2 W When recording with monitor 2 6 W When recording with viewfinder 1 5 W When playing back with monitor 1 5 W When playing back with viewfinder Camera effective pixels TZ110 20 100 000 pixels TZ80 18 100 000 pixels Image sensor TZ110 1 MOS sensor total pixel number 20 900 000 pixels Primary colour filter TZ80 1 2 3 MOS sensor total pixel number 1...

Page 55: ...lm camera equivalent 24 mm to 720 mm Max Wide F3 3 to F8 0 Max Tele F6 4 to F8 0 Image Stabiliser Optical method Focus range TZ110 AF 50 cm Max Wide 70 cm Max Tele to AF Macro MF Intelligent Auto Motion picture 5 cm Max Wide 70 cm Max Tele to TZ80 AF 50 cm Max Wide 2 m Max Tele to AF Macro MF Intelligent Auto Motion picture 3 cm Max Wide 2 m Max Tele to Shutter system Electronic shutter Mechanical...

Page 56: ...e 1 2 second to 1 16000th of a second When M is selected in Creative Video Mode MF 1 25th of a second to 1 16000th of a second Other than the above TZ80 Still picture 60 seconds to 1 2000th of a second When the mechanical shutter is used and Artistic Nightscape is selected as the Scene Guide Mode 4 seconds to 1 2000th of a second When the mechanical shutter is used in cases other than the above 1 ...

Page 57: ...agnification approx 2 59x 0 46x 35 mm film camera equivalent with 50 mm lens at infinity 1 0 m 1 with diopter adjustment 4 0 to 4 0 diopter Flash TZ110 Built in pop up flash TZ80 Built in flash AUTO AUTO Red Eye Reduction Forced ON Forced ON Red Eye Reduction Slow Sync Slow Sync Red Eye Reduction Forced OFF Microphones Stereo Speaker Monaural Recording media SD Memory Card SDHC Memory Card SDXC Me...

Page 58: ...ions TZ110 Approx 110 5 mm W x 64 5 mm H x 44 3 mm D excluding the projection part TZ80 Approx 112 0 mm W x 64 0 mm H x 38 0 mm D excluding the projection part Mass TZ110 With card and battery Approx 310 Excluding card and battery Approx 268 TZ80 With card and battery Approx 282 Excluding card and battery Approx 240 Operating temperature 0 C to 40 C Operating humidity 10 RH to 80 RH ...

Page 59: ...ructure mode AC adaptor Panasonic SAE0012G Information for your safety Input 110 V 240 V 50 60 Hz 0 2 A Output 5 V 1 0 A Battery Pack lithium ion Panasonic DMW BLG10E Information for your safety Voltage capacity 7 2 V 1025 mAh The symbols on this product including the accessories represent the following AC DC Class II equipment The construction of the product is double insulated Specifications are...

Page 60: ...you can record and play back without worrying about the remaining battery charge The AC adaptor optional can only be used with the designated Panasonic DC coupler optional The AC adaptor optional cannot be used by itself When using an AC adaptor optional use the AC cable supplied with the AC adaptor DC coupler DMW DCC11 Part numbers are as of January 2016 These may be subject to change Some option...

Page 61: ...pes f Video Audio Heads from wear and tear in normal use c SD cards or USB devices g Information stored on Hard Disk Drive USB stick or SD card d User replaceable Batteries h DTV reception issues caused by TV Aerial Cabling Wall socket s etc 5 Some products may be supplied with Ethernet connection hardware The warranty is limited on such products and will not cover a Internet and or DLNA connectio...

Page 62: ...red or replaced if the product fails to be of acceptable quality and the failure does not amount to a major failure If there is a major failure in regard to the product which cannot be remedied then you must notify us within a reasonable period by contacting the Panasonic Customer Care Centre If the failure in the product is not a major failure then Panasonic may choose to repair or replace the pr...

Page 63: ...e U S and other countries iPad iPhone iPod and iPod touch are trademarks of Apple Inc registered in the U S and other countries App Store is a service mark of Apple Inc Android and Google Play are trademarks or registered trademarks of Google Inc The Wi Fi CERTIFIED Logo is a certification mark of Wi Fi Alliance The Wi Fi Protected Setup Identifier mark is a certification mark of Wi Fi Alliance Wi...

Page 64: ... and Batteries Only for European Union and countries with recycle systems These symbols are only valid in the European Union and countries with recycle systems If you wish to discard this product please contact your local authorities or dealer and ask for the correct method of disposal ...

Reviews: