background image

66

Basic

Using the Viewfinder

About the eye sensor automatic switching

When [LVF/Monitor Auto] of [Eye Sensor] 

(P62)

 in 

the [Custom] menu is set to [ON] and your eye or an 
object is brought close to the viewfinder, the display 
automatically switches to the viewfinder display.
Sensitivity of the eye sensor can be set to [HIGH] or 
[LOW] with [Sensitivity].
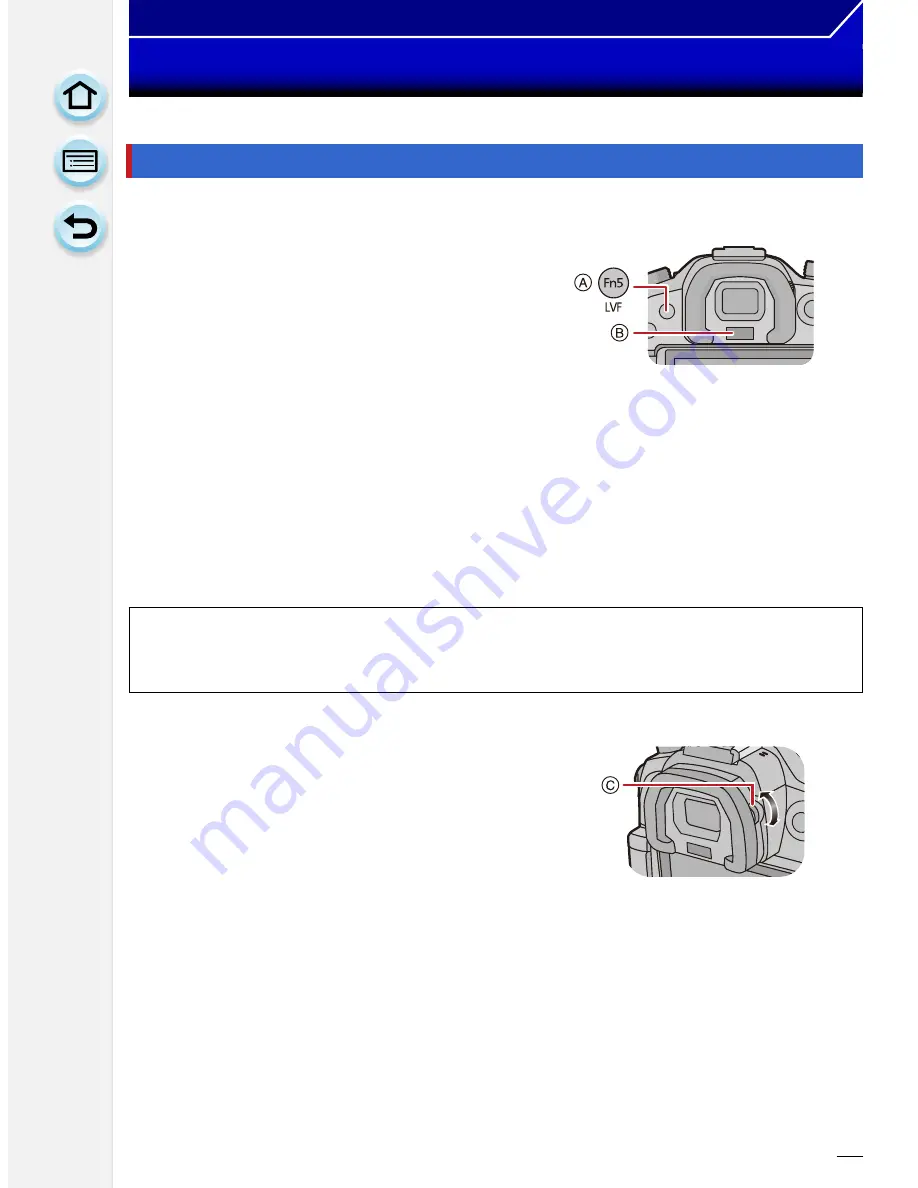
A

[LVF]/[Fn5] button

B

Eye sensor

Eye sensor might not work properly depending on the shape of your eyeglasses, the way you 
hold the camera, or bright light shining around the eyepiece. Switch manually in that case.

The eye sensor is disabled during motion picture playback and slide show.

Switching the Monitor/Viewfinder manually

Press [LVF].

Diopter adjustment

Adjust the diopter to suit your vision so that you 
can see the characters displayed in the 
viewfinder clearly.

C

Diopter adjustment dial

Switching the Monitor/Viewfinder

[LVF]/[Fn5] button can be used in two ways, as [LVF] or as [Fn5] (function 5). At the 
time of purchase, it is initially set to [LVF/Monitor Switch].

Refer to 

P42

 for details about the function button.

Summary of Contents for DMC-GH3KBODY

Page 1: ...d features Digital Camera Model No DMC GH3 Please read these instructions carefully before using this product and save this manual for future use VQT4M60 F1012MC0 Register online at www panasonic com register U S customers only ...

Page 2: ... to the linked page and quickly find the information Search from Contents Search from Names and Functions of Components Search from Monitor Display Viewfinder Display Search from the list of on screen messages Message Display Search from the menu list Menu list Rec P278 Motion Picture P280 Custom P281 Setup P283 Playback P285 Search from Troubleshooting P3 P11 P270 P274 P278 P286 ...

Page 3: ...Setting 36 Setting the Menu 37 Setting menu items 37 Calling frequently used menus instantly Quick Menu 39 Change the Quick Menu to your preferred item 41 Assigning frequently used functions to the buttons function buttons 42 Configuring basic settings of this unit Setup Menu 45 Setting your preferred operation methods Custom Menu 53 Entering Text 64 Basic Tips for taking good pictures 65 Detects ...

Page 4: ...1 Taking Pictures that match the Scene being recorded Scene Guide Mode 92 Clear Portrait 93 Silky Skin 93 Backlit Softness 93 Clear in Backlight 94 Relaxing Tone 94 Sweet Child s Face 94 Distinct Scenery 95 Bright Blue Sky 95 Romantic Sunset Glow 95 Vivid Sunset Glow 95 Glistening Water 96 Clear Nightscape 96 Cool Night Sky 96 Warm Glowing Nightscape 97 Artistic Nightscape 97 Glittering Illuminati...

Page 5: ...s 120 Zooming using touch operations 122 Taking pictures by using the flash 123 Changing Flash Mode 125 Setting to the 2nd Curtain Synchro 127 Adjust the flash output 128 Synchronising the output of the built in flash to the Exposure Compensation 128 Changing the firing mode Manual flash wireless flash 129 Compensating the Exposure 133 Setting the Light Sensitivity 134 Adjusting the White Balance ...

Page 6: ...on picture Continuous AF 180 Recording Motion Picture 180 Recording while monitoring camera images 182 Checking the sound while recording motion pictures 182 Recording still pictures while recording motion pictures 183 Recording motion pictures with manually set aperture value shutter speed Creative Video Mode 184 Motion pictures in slow and fast motion 185 Minimizing operational sounds during mot...

Page 7: ...tablet 211 Taking pictures via a smartphone tablet remote recording 213 Playing back pictures in the camera 213 Sending location information to the camera from a smartphone tablet 213 Select a destination from History 214 Select a destination from Favorite 215 Selecting the connection method 217 Connecting via a wireless access point 217 Connecting directly 219 Playback on TV 220 Displaying the pi...

Page 8: ...l AV device settings 243 How to Use the Wi Fi Setup Menu 244 Connecting to other equipment Enjoying 3D pictures 246 Playing Back Pictures on a TV Screen 250 Using VIERA Link HDMI 252 Saving still pictures and motion pictures on your PC 254 About the supplied software 255 Saving still pictures and motion pictures on a Recorder 259 Printing the Pictures 260 Others Optional accessories 265 Monitor Di...

Page 9: ...s disabled Use with the built in flash closed Securely close each door part socket cap and terminal cover of this unit When you attach detach the lens or cap or open close the door make sure to prevent sand dust and water droplets from entering the interior of this unit If this unit is exposed to water or other liquids wipe off the liquid with soft dry cloths after use Do not place your hands insi...

Page 10: ...in the text Battery Charger is indicated as battery charger or charger in the text SD Memory Card SDHC Memory Card and SDXC Memory Card are indicated as card in the text The card is optional Description in this Owner s Manual is based on the interchangeable lens H HS12035 If any accessories are lost customers in the USA and Puerto Rico should contact Panasonic s parts department at 1 800 833 9626 ...

Page 11: ...us mode lever P141 18 Rear dial P17 19 Motion picture button P180 20 Speaker P47 Be careful not to cover the speaker with your finger Doing so may make sound difficult to hear 21 Touch screen monitor P15 22 Q MENU button P39 Fn2 button P42 23 Auto Focus Mode button P141 Fn3 button P42 24 Delete Cancel button P82 Fn4 button P42 25 MENU SET button P18 37 26 Control dial P18 Cursor buttons P18 27 DIS...

Page 12: ...eful not to cover the microphone with your finger Doing so may make sound difficult to record 38 Status indicator P35 39 Camera ON OFF switch P35 40 Wi Fi connection lamp P208 41 Focus distance reference mark P150 42 MIC socket P267 43 Headphone socket P47 182 44 HDMI socket P250 45 AV OUT DIGITAL socket P250 257 259 260 46 REMOTE socket P268 47 Shoulder strap eyelet P22 Be sure to attach the shou...

Page 13: ...nsure that the Panasonic DC coupler optional and AC adaptor optional are used P269 If you lost the terminal cover VKF5104 please contact the dealer where you purchased the camera or Panasonic Lens H HS12035 LUMIX G X VARIO 12 35 mm F2 8 ASPH POWER O I S H VS014140 LUMIX G VARIO HD 14 140 mm F4 0 5 8 ASPH MEGA O I S 1 Lens surface 2 Focus ring P148 3 Zoom ring P119 4 O I S switch P117 5 Contact poi...

Page 14: ...nough and be careful not to use excessive force as it may be damaged Free angle shooting The monitor can be rotated to suit your needs This is convenient as it allows you to take pictures from various angles by adjusting the monitor Do not cover the AF Assist Lamp with your fingers or other objects When not using the monitor it is recommended that you close it with the screen facing inward to prev...

Page 15: ...g the touch screen be sure to touch the center of the desired icon Drag A movement without releasing the touch screen This is used to move the AF area operate the slide bar etc This can also be used to move to the next image during playback etc Pinch enlarge reduce Pinch the touch panel apart enlarge or together reduce with two fingers Use to enlarge reduce the played back images or AF area Touch ...

Page 16: ...n is unavailable If you use a commercially available monitor protection sheet please follow the instructions that accompany the sheet Some monitor protection sheets may impair visibility or operability Do not press on the monitor with hard pointed tips such as ball point pens Do not operate with your fingernails Wipe the monitor with dry soft cloth when it gets dirty with finger prints and others ...

Page 17: ...ion setting after either button or is pressed Rear Dial Front Dial Mode dial Rear Dial Front dial P85 Program Shift Program Shift P87 Aperture value Aperture value P88 Shutter speed Shutter speed P89 Shutter speed Aperture value Press Rear Dial Front dial P136 White Balance selection White Balance selection P134 ISO sensitivity selection ISO sensitivity max limit setting P133 Exposure Compensation...

Page 18: ...s 3 4 2 1 Even when the camera is operated using the touch screen it is possible to operate with the cursor button and MENU SET button if a guide like the one shown on the right is displayed Even on menu screens etc on which the guide is not displayed you can make settings and selections by operating the buttons Rotating the control dial Selection of items or setting of values etc is performed Cur...

Page 19: ...ting Eye Sensor AF P67 Defocus control function P112 Stabilizer P117 Touch zoom P122 Shading Comp P170 Quick AF P54 Power Zoom Lens P61 The interchangeable lens H HS12035 or H VS014140 is compatible with the Auto Focus and automatic Aperture operation during the recording of motion pictures You can record motion pictures smoother and quieter with the interchangeable lens H VS014140 which is design...

Page 20: ...ection of the arrow to detach them Do not put your hands inside the mount 2 Align the lens fitting marks C red marks on the camera body and the lens and then rotate the lens in the direction of the arrow until it clicks Do not press the lens release button D when you attach a lens Do not try to attach the lens when holding it at an angle to the camera body as the lens mount may get scratched 3 Det...

Page 21: ...may occur within the lens The lens hood reduces the inclusion of unwanted light in the recorded images and lowers the drop in contrast The lens hood cuts off excess lighting and improves the picture quality To attach the lens hood flower shape that came with the interchangeable lens H HS12035 H VS014140 When temporarily detaching and carrying the lens hood attach the lens hood to the lens in the r...

Page 22: ... camera body A Shoulder strap eyelet 2 Pass the end of the shoulder strap through the ring in the direction of the arrow and then pass it through the stopper 3 Pass the end of the shoulder strap through the hole on the other side of the stopper 4 Pull the other side of the shoulder strap and then check that it will not come out Perform steps 1 to 4 and then attach the other side of the shoulder st...

Page 23: ...r strap around your shoulder Do not wrap the strap around your neck It may result in injury or accident Do not leave the shoulder strap where an infant can reach it It may result in an accident by mistakenly wrapping around the neck ...

Page 24: ...se battery packs are not adequately protected with internal protection to meet the requirements of appropriate safety standards There is a possibility that these battery packs may lead to fire or explosion Please be advised that we are not liable for any accident or failure occurring as a result of use of a counterfeit battery pack To ensure that safe products are used we recommend that a genuine ...

Page 25: ...scharged completely The charging time may vary depending on how the battery has been used The charging time for the battery in hot cold environments or a battery that has not been used for a long time may be longer than normal Battery indication The battery indication is displayed on the screen The indication turns red and blinks if the remaining battery power is exhausted The status indicator als...

Page 26: ...rning the camera off every 10 recordings and leaving it until the temperature of the battery decreases The number of recordable pictures varies depending on the recording interval time If the recording interval time becomes longer the number of recordable pictures decreases For example if you were to take one picture every two minutes then the number of pictures would be reduced to approximately o...

Page 27: ...ordable time Approx 240 min Actual recordable time Approx 120 min When the interchangeable lens H VS014140 is used Recordable time Approx 220 min Actual recordable time Approx 110 min When the interchangeable lens H HS12035 is used Recordable time Approx 240 min Actual recordable time Approx 120 min When the interchangeable lens H VS014140 is used Recordable time Approx 220 min Actual recordable t...

Page 28: ...ng times and number of recordable pictures will differ according to the environment and the operating conditions For example in the following cases the operating times shorten and the number of recordable pictures is reduced In low temperature environments such as on ski slopes When flash is used repeatedly When the operating time of the camera becomes extremely short even after properly charging ...

Page 29: ...ery 3 1 Close the battery door 2 Slide the release lever in the direction of the arrow Confirm that there is no foreign matter adhered on the inner side rubber seal of the battery door Remove the battery after use The battery will be exhausted if left for a long period of time after being charged The battery becomes warm after using it and during and after charging The camera also becomes warm dur...

Page 30: ...ch you insert it To remove the card push the card until it clicks then pull the card out upright A Do not touch the connection terminals of the card 3 1 Close the card door 2 Slide the card door to the end and then close it firmly Before removing the card turn the camera off and wait until the status indicator has gone off completely Otherwise this unit may no longer operate normally and the card ...

Page 31: ...g and use Class 10 for MOV Please confirm the latest information on the following website http panasonic jp support global cs dsc This Site is English only About cards that can be used with this unit Remarks SD Memory Card 8 MB to 2 GB SDXC Memory Card can only be used with SDXC Memory Card compatible equipment Check that the PC and other equipment are compatible when using the SDXC Memory Cards h...

Page 32: ...er data writing deletion or formatting is possible The ability to write delete and format data is restored when the switch is returned to its original position The data on the card may be damaged or lost due to electromagnetic waves static electricity or breakdown of the camera or the card We recommend storing important data on a PC etc Do not format the card on your PC or other equipment Format i...

Page 33: ...B Available recording time Number of recordable pictures 9999i is displayed if there are more than 10000 pictures remaining Aspect ratio X Quality A Aspect ratio X Quality Approximate number of recordable pictures and available recording time Picture Size 2 GB 8 GB 32 GB 64 GB L 16M 220 900 3670 7160 M 8M 410 1650 6690 13000 S 4M 680 2750 11130 21490 Picture Size 2 GB 8 GB 32 GB 64 GB L 16M 69 270...

Page 34: ...icture can be recorded continuously without a pause even when its file size exceeds 4 GB the recorded content is played back with multiple files The maximum available continuous recording time is displayed on the screen Rec Quality 2 GB 8 GB 32 GB 64 GB FHD 60p 8m00s 36m00s 2h31m 5h6m FHD 60i 13m00s 1h00m 4h8m 8h25m FHD 30p FHD 24p 9m00s 42m00s 2h56m 5h58m Rec Quality 2 GB 8 GB 32 GB 64 GB FHD 30p...

Page 35: ...2 Touch Language Set 3 Select the language 4 Press MENU SET 5 Press 2 1 to select the items year month day hour minute and press 3 4 to set A Time at the home area B Time at the travel destination You can cancel without setting the clock by pressing To set the display order and the time display format To display the setting screen of the order time select Style and then press MENU SET 6 Press MENU...

Page 36: ...the battery Leave the charged battery in the unit for 24 hours to charge the built in battery If the clock is not set the correct date cannot be printed when you stamp the date on the pictures with Text Stamp or order a photo studio to print the pictures If the clock is set the correct date can be printed even if the date is not displayed on the screen of the camera Changing the Clock Setting ...

Page 37: ... Rec menu change Quality from A to 1 Press MENU SET Setting menu items Menu Description of settings Rec P158 to 176 This menu lets you set the aspect ratio number of pixels and other aspects of the pictures you are recording Motion Picture P188 to 191 This menu lets you set the Rec Mode Rec Quality and other aspects for motion picture recording Custom P53 to 63 Operation of the unit such as displa...

Page 38: ...Press 3 4 of the cursor button to select the setting and press MENU SET You can also select the setting by rotating the rear dial or control dial Depending on the menu item its setting may not appear or it may be displayed in a different ways Close the menu Press or press the shutter button halfway Switching to other menus e g Switching to the Setup menu from Rec menu 1 Press 2 2 Press 3 4 to sele...

Page 39: ... select the menu item A Item Setting can also be performed by rotating the control dial 3 Rotate the rear dial to select the setting B Settings 4 Press Q MENU to exit the menu once the setting is complete You can close the menu by pressing the shutter button halfway Q MENU Fn2 button can be used in two ways as Q MENU or as Fn2 function 2 At the time of purchase it is initially set to Q MENU Refer ...

Page 40: ...al and then select the setting by rotating the front rear dial You can also set with 3 4 2 1 and MENU SET When operating the touch screen 1 Press Q MENU to display the Quick Menu 2 Touch the menu item 3 Touch the setting 4 Touch Exit to exit menu once the setting is completed You can close the menu by pressing the shutter button halfway AFS AFS 98 AWB 0 0 0 Fn ISO AUTO Wi Fi AUTO 60 2 8 0 AWB AFS ...

Page 41: ...ing item To cancel the setting move to the bottom row by pressing 4 and select an item to cancel and then press MENU SET Items that can be set are as follows 4 Press It will return to screen of above step 1 Press MENU SET to switch to the recording screen Change the Quick Menu to your preferred item Rec menu Recording functions Photo Style P158 Aspect Ratio P160 Picture Size P160 Quality P161 Mete...

Page 42: ...ding functions etc to specific buttons and icons To use those functions press Fn1 Fn2 Fn3 Fn4 or Fn5 or touch Fn6 or Fn7 1 Select the function buttons you want to assign the function from the Fn Button Set in the Custom menu P37 ロヷョ ョㄏブ ヲハヮユワヶ ョㄏビ ョㄏフ ョㄏピ Fn6 Fn7 Fn6 Fn6 Fn6 Fn6 Fn7 Fn7 Fn7 Fn7 ョㄏヒ ヸㄊノョㄊ ...

Page 43: ... P74 Fn6 Focus Area Set Zoom Control P120 1 Shot RAW JPG 1 Shot Spot Metering Cursor Button Lock Photo Style P158 Aspect Ratio P160 Picture Size P160 Quality P161 Metering Mode P162 Burst Rate P153 Auto Bracket P155 Self Timer P157 i Dynamic P163 i Resolution P163 HDR P164 Electronic Shutter P167 Flash Mode P125 Ex Tele Conv still pictures motion pictures P119 Digital Zoom P119 Stabilizer P117 Res...

Page 44: ...ously once only It will return to original quality after recording When 1 Shot Spot Metering is set it will record with Metering Mode set to spot once only It will return to original Metering Mode after recording Operations of the cursor button MENU SET and the control dial are disabled when Cursor Button Lock is set Press the function button again to enable them When Restore to Default is set fun...

Page 45: ...displayed on the screen set by the time difference from the home area Clock Set World Time Set the time in your home area and travel destination You can display the local times at the travel destinations and record them on the pictures you take Set Home first thing after purchasing Destination can be set after setting up Home After selecting Destination or Home press 2 1 to select an area and pres...

Page 46: ... to ON Travel Date Departure date and return date of the trip as well as the name of the travel destination can be set You can display the number of days that have passed when playing back the pictures and stamp it on the recorded pictures with Text Stamp P197 Travel Setup SET Departure date and return date are set Elapsed days how many days after of the trip are recorded OFF The travel date is au...

Page 47: ...ional is MODE1 Speaker Volume Adjust the volume of the speaker to any of the 7 levels Headphone Volume Adjust the volume of when connected headphone optional from 16 levels Monitor Display Viewfinder Brightness color or red or blue tint of the Monitor viewfinder is adjusted Brightness Adjust the brightness Contrast Saturation Adjust the contrast or clarity of colors Red Tint Adjust the red tint Bl...

Page 48: ... viewfinder automatically when not in use to prevent discharge of the battery Sleep Mode The camera is automatically turned off if the camera has not been used for the time selected on the setting 10MIN 5MIN 2MIN 1MIN OFF Auto LVF Monitor Off The monitor viewfinder is automatically turned off if the camera has not been used for the time selected on the setting 5MIN 2MIN 1MIN Battery Use Priority B...

Page 49: ...back on the HDMI compatible high definition TV connected with this unit using the HDMI mini cable optional AUTO The output resolution is automatically set based on the information from the connected TV 1080p The progressive method with 1080 available scan lines is used for output 1080i The interlace method with 1080 available scan lines is used for output 720p The progressive method with 720 avail...

Page 50: ... picture recording on TV etc ON OFF This will work when the HDMI mini cable optional is connected Refer to P182 for details VIERA Link Settings that allow this unit to be controlled by the remote control of the VIERA equipment by automatically coupling this unit with the VIERA Link compatible equipment using HDMI mini cable optional ON Remote control operation of the VIERA Link compatible equipmen...

Page 51: ...function to reset the file number A reset screen for the folder number will then appear Select Yes to reset the folder number When the recording setting is reset the content of the following settings is also reset The Face Recog setting The Profile Setup setting When Setup Custom menu settings are reset the following settings are also reset The World Time setting The settings of Travel Date depart...

Page 52: ...ting Do not turn the camera off during formatting If the card has been formatted on a PC or other equipment format it on the camera again If the card cannot be formatted consult Panasonic Reset Wi Fi Settings Reset all settings in the Wi Fi menu to factory default settings Pixel Refresh It will perform optimisation of imaging device and image processing Sensor Cleaning Dust reduction to blow off t...

Page 53: ...re with fixed focus or exposure ON The focus and the exposure remain fixed even if you release AF AE LOCK after pressing it If you press AF AE LOCK again AF AE Lock is canceled OFF The focus and the exposure are fixed only while you are pressing AF AE LOCK P151 If you release AF AE LOCK AF AE Lock is canceled Shutter AF Set whether or not the focus is adjusted automatically when the shutter button...

Page 54: ...etails AFS AFF The AFS AFF of the focus mode lever P142 can be used for either AFS or AFF AFS AFF Quick AF As long as the camera is held steady the camera will automatically adjust the focus and focus adjustment will then be quicker when the shutter is pressed This is useful when you do not want to miss a picture taking opportunity ON OFF Eye Sensor AF ON OFF Pinpoint AF Time Sets the time for whi...

Page 55: ...ocus when a lens with large diameter is used The setting for the AF Assist Lamp is fixed to OFF in the following cases Distinct Scenery Bright Blue Sky Romantic Sunset Glow Vivid Sunset Glow Glistening Water Clear Nightscape Cool Night Sky Warm Glowing Nightscape Artistic Nightscape Scene Guide Mode Refer to P147 149 for details When set to RELEASE please be aware that focus may not be achieved ev...

Page 56: ...the Focus Mode set to AFS or set AF Lock using AF AE Lock you can make fine adjustments to the focus manually OFF MF Assist Sets the display method of MF Assist enlarged screen Enlarge by rotating the lens focus ring lever or by pressing Enlarge by rotating the lens focus ring lever Enlarge by pressing OFF MF Assist is not displayed Press the function button to which AF Mode in Fn Button Set P42 h...

Page 57: ...the horizontal and vertical guidelines or the cross point of these lines you can take pictures with well designed composition by viewing the size the slope and the balance of the subject Histogram This allows you to set either to display or not display the histogram ON You can set the position by pressing 3 4 2 1 Direct touch operation is also possible from the recording screen OFF A histogram is ...

Page 58: ...saturated areas appear blinking in black and white This does not affect the recorded image ON OFF If there are any white saturated areas we recommend compensating the exposure towards negative P133 referring to the histogram P57 and then taking the picture again It may result in a better quality picture This does not work while in Multi Playback Calendar Playback or Playback Zoom ON OFF Constant P...

Page 59: ...cture Motion picture Remaining Disp This will switch display between the number of recordable pictures and available recording time Remaining Shots This will display the number of recordable pictures for still pictures Remaining Time This will display the available recording time for motion pictures Auto Review Set the length of time that the picture is displayed after taking the still picture HOL...

Page 60: ...ial and the shutter speed to the rear dial SS F Assigns the shutter speed to the front dial and the aperture value to the rear dial Rotation F SS Changes the rotation direction of the dials for adjusting the aperture value and shutter speed Exposure Comp Assigns the Exposure Compensation to the front dial or rear dial so that you can directly adjust it Front Dial Rear Dial OFF Video Button Enables...

Page 61: ...p at positions corresponding to predetermined distances C Step zoom indication Step Zoom is disabled during motion picture recording ON OFF Zoom Resume When you turn this unit on the zoom positions when you last turned this unit off are automatically restored ON OFF Zoom Speed You can set the zoom speed for zoom operations If you set Step Zoom to ON the zoom speed will not change Photo H High spee...

Page 62: ...s disables the Touch operation When set to OFF no corresponding touch tab or touch icon is displayed on the screen Touch Screen All touch operations When set to OFF only button and dial operations can be used ON OFF Touch Tab Operation to display the touch icons by touching tabs such as displayed on the right of the screen ON OFF Touch AF Operation to focus on the touched subject ON OFF Touch Pad ...

Page 63: ... the Scene Guide or the Creative Control Mode OFF Displays the recording screen of the Scene Guide or the Creative Control Mode Shoot w o Lens Sets whether or not the shutter can be released when no lens is attached to the main body ON Shutter will operate regardless of the lens on the unit OFF You cannot press the shutter button when a lens is not attached to the camera body or is not attached co...

Page 64: ...e Wi Fi Setup P244 menu 2 Press 3 4 2 1 to select text and then press MENU SET to register Move the cursor to and then press MENU SET to switch text between A capitals a lower case 1 numbers and special characters To enter the same character again rotate the control dial right to move the cursor The following operations can be performed by moving the cursor to the item and pressing MENU SET Enter ...

Page 65: ...n when you record with the camera vertically orientated When you play back the recording the recording is automatically displayed in vertical orientation Only available when Rotate Disp P202 is set to ON When recording with this unit Direction Detection can be performed even if you are using a lens that is not compatible with the Direction Detection Function When the camera is held vertically and ...

Page 66: ...shape of your eyeglasses the way you hold the camera or bright light shining around the eyepiece Switch manually in that case The eye sensor is disabled during motion picture playback and slide show Switching the Monitor Viewfinder manually Press LVF Diopter adjustment Adjust the diopter to suit your vision so that you can see the characters displayed in the viewfinder clearly C Diopter adjustment...

Page 67: ...onitor as a touch pad when displaying the Viewfinder Press the shutter button halfway to determine the focus position If you press DISP before determining the focus position the AF area frame returns to the center position To cancel the AF area frame when the Auto Focus Mode P141 is set to š Face Detection AF Tracking or 23 Area press MENU SET The Touch Shutter function P70 is disabled when using ...

Page 68: ...eved may be displayed momentarily while pressing halfway 2 A beep will be emitted when focus is first achieved during the pressing halfway When the brightness is insufficient for AFF or AFC the camera will operate as if AFS has been set In this case the display will change to the yellow AFS 3 Press the shutter button fully push it in further and take the picture Focus Mode AFS Focus When the subje...

Page 69: ... 25 m 0 82 feet to When the interchangeable lens H VS014140 is used 0 5 m 1 6 feet to Subjects and recording conditions which are difficult to focus Fast moving subjects extremely bright subjects or subjects without contrast When recording subjects through windows or near shiny objects When it is dark or when jitter occurs When the camera is too close to the subject or when taking a picture of bot...

Page 70: ... the Metering Mode P162 is set to At the edge of the screen the metering may be affected by the brightness around the touched location Taking pictures using the Touch Shutter function 1 Touch 2 Touch Icon will change to and taking a picture with the Touch Shutter function becomes possible 3 Touch the subject you wish to focus on and then take a picture The picture is taken when the focus is achiev...

Page 71: ...ropriate for each mode is possible The recording state indicator red C will flash while recording motion pictures If approximately 10 seconds elapses without an operation being performed part of the display will disappear Press DISP or touch the monitor to make the display reappear When recording a motion picture do not cover the microphone with your fingers or other objects Release the motion pic...

Page 72: ...ormation C With information tilt sensor display 1 D Without information tilt sensor display E On monitor recording information 2 F Turned off 1 Histograms are displayed when the Histogram of the Custom menu is set to ON It is also possible to display the Exposure meter by setting the Expo Meter of the Custom menu to ON P58 2 It is displayed when the Monitor Info Disp of the Custom menu is set to O...

Page 73: ...mation tilt sensor display 1 Histograms are displayed when the Histogram of the Custom menu is set to ON It is also possible to display the Exposure meter by setting the Expo Meter of the Custom menu to ON P58 If approximately 10 seconds elapses without an operation being performed part of the display will disappear Press DISP or touch the monitor to make the display reappear 98 98 0 AFS AFS 98 98...

Page 74: ...ing with a vertical orientation the display automatically switches to a vertically orientated display Even after correcting the tilt there may still be an error of approximately 1 When Fn Button Set of the Custom menu is set to Level Gauge you can switch the tilt sensor display on off by pressing function button Tilt sensor display may not be displayed correctly when this unit is in motion When ti...

Page 75: ...displayed reduced in size Speed of picture forwarding rewinding changes depending on the playback status To finish playback Press again press the motion picture button or press the shutter button halfway This camera complies with the DCF standard Design rule for Camera File system established by JEITA Japan Electronics and Information Technology Industries Association and with Exif Exchangeable Im...

Page 76: ...rewind the image while maintaining the same zoom magnification and zoom position for the Playback Zoom by rotating the control dial during Playback Zoom Displaying multiple screens Multi Playback Rotate the rear dial left 1 screen 12 screens 30 screens Calendar screen display It is possible to switch the playback screen by touching the following icons 1 screen 12 screens 30 screens Calendar screen...

Page 77: ... in World Time the pictures are displayed by the dates at the travel destination in Calendar Playback Displaying Pictures by Recording Date Calendar Playback 1 Rotate the rear dial left to display the Calendar screen 2 Press 3 4 2 1 to select the date to be played back If there were no pictures recorded during a month that month is not displayed 3 Press MENU SET to display the images that are reco...

Page 78: ...nds to 3 4 2 1 on the cursor button When using a high capacity card it is possible that fast rewinding may be slower than usual To play back the motion pictures recorded by this unit on a PC use the PHOTOfunSTUDIO software on the CD ROM supplied Motion pictures recorded with other camera may not be able to play back on this unit Motion pictures recorded with Miniature Effect in Creative Control Mo...

Page 79: ...of still pictures created from motion pictures A picture group consists of multiple pictures You can play back pictures in a group either continuously or one by one You can edit or delete all pictures in a group at once For example if you delete a picture group all pictures in the group are deleted Pictures recorded after the number of pictures has exceeded 50000 will not be grouped Pictures recor...

Page 80: ...3 Continuous playback Pause 4 Stop 2 Fast rewind 1 Fast forward Rewind while pausing Forward while pausing Playing back each Group Pictures 1 Select a picture with the group picture icon and then press 4 You can also start playing back by touching or 2 Press 2 1 to flip through images Touch or press 4 again to return to the normal playback screen Each picture in a group can be treated same as norm...

Page 81: ...itor to make the display reappear 2 It is not displayed during the Playback Zoom while playing back a motion picture or during slide show 3 This is displayed if Highlight P58 in the Custom menu is set to ON 4 If no operation is performed for a number of seconds and other touch icons will disappear Histogram is displayed in R red G green B blue and Y luminance during the playback Changing the infor...

Page 82: ...rotected cannot be deleted To delete a single picture 1 In Playback Mode select the picture to delete and then press The same operation can be performed by touching 2 Press 3 to select Delete Single and then press MENU SET Confirmation screen is displayed Pictures are deleted by selecting Yes ョㄏフ HOHWH 6LQJOH HOHWH 0XOWL HOHWH OO ...

Page 83: ...te Multi or Delete All and then press MENU SET Delete All Confirmation screen is displayed Pictures are deleted by selecting Yes It is possible to delete all pictures except the ones set as favorite when All Delete Except Favorite is selected with the Delete All set 3 When Delete Multi is selected Press 3 4 2 1 to select the picture and then press MENU SET to set Repeat this step appears on the se...

Page 84: ...the aperture value and the shutter speed which are manually adjusted Creative Video Mode P184 Allows you to set the aperture value and shutter speed and record motion pictures with slow and quick effects You cannot take still pictures Custom Mode P115 Use this mode to take pictures with previously registered settings Scene Guide Mode P92 This allows you to take pictures that match the scene being ...

Page 85: ...ng cases When the Sensitivity is set to ISO200 When the aperture value is set to F2 8 when the interchangeable lens H HS12035 is attached When the aperture value is set to F4 0 when the interchangeable lens H VS014140 is attached 3 While the values are displayed about 10 seconds perform Program Shift by rotating the rear dial or front dial Rotate the front rear dial to display Expo Meter B P58 The...

Page 86: ...reviation of Exposure Value The EV changes with the aperture value or the shutter speed If the exposure is not adequate when the shutter button is pressed halfway the aperture value and shutter speed turn red and blink Program Shift is canceled and the camera returns to normal Program AE Mode if more than 10 seconds pass after Program Shift is activated However the Program Shift setting is memoriz...

Page 87: ...creen and the recorded pictures may differ Check the pictures on the playback screen Rotate the front rear dial to display the Expo Meter Unsuitable areas of the range are displayed in red If the exposure is not adequate the aperture value and the shutter speed turn red and blink when the shutter button is pressed halfway When using a lens having an aperture ring set the position of the aperture r...

Page 88: ...he exposure is not adequate the aperture value and the shutter speed turn red and blink when the shutter button is pressed halfway Display of the shutter speed will count down when the shutter speed is set slow and the shutter button is pressed all the way We recommend using a tripod when the shutter speed is slow When the flash is activated the fastest shutter speed that can be selected is 1 160t...

Page 89: ...Exposure Assistance The Manual Exposure Assistance is an approximation We recommend checking the pictures on the playback screen Manual Exposure Mode Aperture value Reduces It becomes easier to defocus the background Increases It becomes easier to maintain focus as far as the background Shutter speed Slow It becomes easier to express movement Fast It becomes easier to freeze movement The exposure ...

Page 90: ...ant preview In Manual Exposure Mode when Constant Preview in the Custom menu is ON you will be able to confirm the effects of aperture and shutter speed on the screen P91 Close the flash It can only be used with Manual Exposure Mode The brightness of the screen and the recorded pictures may differ Check the pictures on the playback screen Rotate the front rear dial to display the Expo Meter Unsuit...

Page 91: ...review P42 The following step is an example in which Preview is assigned to Fn4 2 Switch to confirmation screen by pressing Fn4 Screen is switched every time Fn4 is pressed Depth of field properties 1 Recording conditions 2 Example When you want to take a picture with a blurred background etc 3 Example When you want to take a picture with everything in focus including the background etc It is poss...

Page 92: ...ations etc for picture effects to suit the scene To take full advantage of the picture effects we recommend that you read the explanations and try recording pictures To change Scene Guide Mode select the tab on the menu screen select Scene Switch and then press MENU SET You can return to step 2 above The following items cannot be set in Scene Guide Mode because the camera automatically adjusts the...

Page 93: ...subject Silky Skin Brighter face and softer skin color creates a healthy younger look If you are using a lens with the zoom function you can enhance the effect by zooming in as much as possible and closing the distance between the camera and the subject The smoothing effect is applied to the part that has a similar tone to the complexion of a subject as well This mode may not be effective under in...

Page 94: ...oo bright or too dark Relaxing Tone The warm color tone creates an image with a relaxing mood Sweet Child s Face Moderate background defocusing and skin tone highlighted draws attention to the child s face Touch the face A still picture is recorded with the focus and exposure set for the touched location If you are using a lens with the zoom function you can enhance the effect by zooming in as muc...

Page 95: ... Bright Blue Sky On a sunny day the overall screen brightness is increased to create a vibrant image of the blue sky Romantic Sunset Glow The enhanced purple tone creates a romantic image of the sky just after sunset Vivid Sunset Glow Red is enhanced to create a vivid image of the sunset ...

Page 96: ... to accentuate the nightscape We recommend using a tripod and the self timer The shutter may remain closed after taking the picture This is due to signal processing and is not a malfunction Noise may become visible when you take pictures in dark places Cool Night Sky Blue tones are enhanced to create a cool and sophisticated image of the night sky after sunset We recommend using a tripod and the s...

Page 97: ...recommend using a tripod and the self timer The shutter may remain closed after taking the picture This is due to signal processing and is not a malfunction Noise may become visible when you take pictures in dark places Glittering Illuminations The star filter enhances pinpoints of light We recommend using a tripod and the self timer Display of the recording screen will be delayed more than usual ...

Page 98: ...avoid using it Display of the recording screen will be delayed more than usual and the screen will look as if frames are dropping The focus range is different depending on lens used Refer to About the focus distance reference mark on P150 for the focus range When a subject is close to the camera the effective focus range is significantly narrowed Therefore if the distance between the camera and th...

Page 99: ...ripod and the self timer For close up recording we recommend that you close the flash and avoid using it Cute Dessert The overall screen brightness is set higher to enhance the cuteness of the dessert If you are using a lens with the zoom function you can enhance the effect by zooming in as much as possible and closing the distance between the camera and the subject We recommend using a tripod and...

Page 100: ...e faster shutter speed prevents blur and captures a clear image of the fast moving animal Clear Sports Shot The faster shutter speed prevents blur for example at sporting events Monochrome A monochrome image captures the mood of the moment ...

Page 101: ...sted to fit your preferences 1 Set the mode dial to 2 Press 3 4 to select the image effects filters The image effect of the selected example image will be applied in a preview display A You can also select the image effects filters by touching the example images Press DISP or touch to display the explanation for the selected image effect 3 Press MENU SET to set Adjust the effect to fit your prefer...

Page 102: ...ss Fn4 Change the settings by using the touch panel 1 Touch 2 Touch the item you want to set Image effects Defocus level Brightness 3 Drag the slide bar to set If you press MENU SET you can return to the recording screen To end the Defocus Control function press Fn4 Taking a picture with a blurred background Defocus Control Setting brightness 1 Press 2 Rotate the rear dial to adjust brightness Pre...

Page 103: ...rt picture This effect gives a faded image This effect adds a bright airy and soft feel to the overall image Expressive Items that can be set Freshness Understated colors Pop colors Retro Items that can be set Color Yellow emphasized Red emphasized High Key Items that can be set Color Pink emphasized Aquamarine emphasized ...

Page 104: ...reate an impressive black and white picture This effect gives your photo a dramatic contrast look Low Key Items that can be set Color Red emphasized Blue emphasized Sepia Items that can be set Contrast Low contrast High contrast Dynamic Monochrome Items that can be set Contrast Low contrast High contrast Impressive Art Items that can be set Freshness Black and white Pop colors ...

Page 105: ...ripheral brightness to give the impression of a toy camera High Dynamic Items that can be set Freshness Black and white Pop colors Cross Process Items that can be set Color Green tone Blue emphasized Yellow tone Red tone Select the desired color tone by rotating the rear dial and then press Toy Effect Items that can be set Color Orange emphasized Blue emphasized ...

Page 106: ...e size of in focus portion The area size can also be changed by pinching out pinching in P15 on the screen If you press DISP or touch Reset settings for the non blurred portions are restored to the initial settings 4 Press MENU SET to set You can also set by touching Set Display of the recording screen will be delayed more than usual and the screen will look as if frames are dropping No sound is r...

Page 107: ... that can be set Extent of defocus Weak defocus Strong defocus Display of the recording screen will be delayed more than usual and the screen will look as if frames are dropping Star Filter Items that can be set Length of shine Short Long Display of the recording screen will be delayed more than usual and the screen will look as if frames are dropping ...

Page 108: ...2 Select the color you want to leave by moving the frame with 3 4 2 1 You can also select the color you want to leave by touching the screen Press DISP or touch Reset to reset the frame position 3 Press MENU SET to set You can also set by touching Set Depending on the subject the set color may not be left in One Point Color Items that can be set Amount of color left Small amount of color Large amo...

Page 109: ...switch to either the most recently used of Intelligent Auto Mode or Intelligent Auto Plus Mode P113 At the time of purchase the mode is set to Intelligent Auto Plus Mode 2 Align the screen with the subject When the camera identifies the optimum scene the icon of the scene concerned is displayed in blue for 2 seconds after which its color changes to the usual red When the subject is touched AF Trac...

Page 110: ...o move the camera while taking pictures An optimum scene for the specified subject will be chosen when set to AF tracking When Face Recog is set to ON and the face similar to the registered face is detected R is displayed in the top right of and Due to conditions such as the ones below a different scene may be identified for the same subject Subject conditions When the face is bright or dark the s...

Page 111: ... Compensation Face Detection Auto White Balance Intelligent ISO sensitivity control Red Eye Removal i Resolution i Dynamic Long Shtr NR Shading Comp Quick AF AF Assist Lamp Because the camera makes the optimal settings automatically the following menus are disabled For the Rec menu see Using the Rec Menu in P158 For the Motion Picture menu see Using the Motion Picture Menu P188 Cust Set Mem Expo M...

Page 112: ...o or Mode the AF Mode is Ø You can set the location of the AF area by touching the screen Size cannot be changed Depending on the lens used you may hear a sound from the lens when the Defocus Control is used but this is due to operation of the aperture of the lens and it is not a malfunction Depending on the lens used operational sound of the Defocus Control may be recorded during the recording of...

Page 113: ...ng the brightness or color tone Intelligent Auto Plus Mode 1 Press MENU SET when in Intelligent Auto Mode 2 Press 1 to select and then press MENU SET Press DISP or touch to display the description of the selected mode When the menu does not appear select the tab on the menu screen Setting brightness 1 Press 2 Rotate the rear dial to adjust brightness Press again to return to the recording screen D...

Page 114: ... by using the touch panel 1 Touch 2 Touch the item you want to set Color tone Defocus level Brightness 3 Drag the slide bar to set If you press MENU SET you can return to the recording screen To end the Defocus Control function press Fn4 The brightness and color settings will return to the default center point when this unit is turned off or the camera is switched to another Recording Mode Setting...

Page 115: ...Custom menu P37 2 Press 3 4 to select the custom set to register and then press MENU SET Confirmation screen is displayed It is executed when Yes is selected Exit the menu after it is executed Registering Personal Menu Settings Registering custom settings Preparations Set in advance the Recording Mode you wish to save and select the desired menu settings on the camera Custom set Description of set...

Page 116: ... selected custom settings is displayed on the screen A Custom settings display Changing the settings Registered contents do not change when the menu setting is changed temporarily with the mode dial set to or To change the registered settings overwrite the registered content using Cust Set Mem on the Custom menu The following menu settings are not registered in the custom set since they are reflec...

Page 117: ...ter DMW RSL1 optional P268 Shutter speed will be slower particularly in the following cases Keep the camera still from the moment the shutter button is pressed until the picture appears on the screen We recommend using a tripod Slow Sync Slow Sync Red Eye Reduction Clear Nightscape Cool Night Sky Warm Glowing Nightscape Artistic Nightscape Glittering Illuminations Clear Night Portrait Scene Guide ...

Page 118: ...ing pictures while following a moving subject When the shutter speed becomes slower to take pictures indoors or in dark places The panning effect in is more difficult to achieve in the following cases In brightly lit places such as in broad daylight on a summer s day When the shutter speed is faster than 1 100th of a second When you move the camera too slowly because the subject is moving slowly T...

Page 119: ...is set to or Toy Effect Creative Control Mode When using the Digital Zoom we recommend using a tripod and the self timer P157 for taking pictures Digital Zoom cannot be used in the following cases Intelligent Auto Mode or Scene Guide Mode Toy Effect Miniature Effect Creative Control Mode Multi Exp Feature Optical Zoom Extended Tele Conversion EX Digital Zoom Recording magnification Different depen...

Page 120: ...of settings ZOOM With the operations below you can manually zoom in to the maximum magnification of the Extended Tele Conversion 1 Press one of the function buttons Press the function button to which you have assigned Zoom Control in Fn Button Set P42 2 Press 2 1 or 3 4 2 1 Zoom slow 3 4 Zoom fast If you press the function button again or wait for a fixed amount of time to pass the zoom operation ...

Page 121: ...e Conversion is used angle of view for still pictures will be different from the angle of view for motion pictures because the zoom factor is different between them Angle of view for recording can be checked beforehand by matching the Rec Area P59 setting to the mode you wish to record in Extended Tele Conversion is not available in the following cases Toy Effect Creative Control Mode When Quality...

Page 122: ...4140 you can only operate the Extended Tele Conversion for pictures by setting Ex Tele Conv P120 to ZOOM 1 Touch 2 Touch The slide bar is displayed 3 Perform zoom operations by dragging the slide bar The zoom speed varies depending on the touched position Touch again to end touch zoom operations When Step Zoom P61 is set to ON the slide bar for step zoom is displayed Zooming using touch operations...

Page 123: ...s close when taking a picture using a flash part of the recorded image becomes dark because the light of flash is blocked by the lens or it becomes out of flash range Check the distance to the subject when taking a picture The distance at which light from the flash is blocked by lens and the distance to which light from the flash is delivered vary depending on the lens used The available flash ran...

Page 124: ... wait a moment to take the next picture while the flash icon is blinking RED indicating the flash is charging If recording a subject without sufficient flash the White Balance may not be properly adjusted When you use certain lenses light from the flash may be blocked or fail to cover the lens field of view causing dark areas to appear in the resulting pictures When taking pictures with flash with...

Page 125: ...h Mode Item Description of settings Forced Flash On The flash is activated every time regardless of the recording conditions Use this when your subject is back lit or under fluorescent light Forced On Red Eye 1 Slow Sync When taking pictures against a dark background landscape this feature will slow the shutter speed when the flash is activated Dark background landscape will appear brighter Use th...

Page 126: ...ode Manual Exposure Mode Creative Video Mode Creative Control Mode Scene Guide Mode Clear Portrait Silky Skin Backlit Softness Clear in Backlight Relaxing Tone Sweet Child s Face Distinct Scenery Bright Blue Sky Romantic Sunset Glow Vivid Sunset Glow Glistening Water Clear Nightscape Cool Night Sky Warm Glowing Nightscape Artistic Nightscape Glittering Illuminations Clear Night Portrait Soft Image...

Page 127: ... shutter speed 1 Select Flash in the Rec menu P37 2 Press 3 4 to select Flash Synchro and then press MENU SET 3 Press 3 4 to select an item and then press MENU SET Set it to 1ST for normal use 2nd is displayed in the flash icon on the screen if you set Flash Synchro to 2ND Only available when Firing Mode in Flash is set to TTL or MANUAL P129 The Flash Synchro settings also apply to an external fla...

Page 128: ...d It can be set only when Firing Mode in Flash is set to TTL P129 You can also adjust the flash output by pressing and rotating the front dial P133 The Flash Adjust setting also applies to an external flash excluding the wireless flash P265 Applicable modes When Auto Exposure Comp in Flash in the Rec menu is set to ON the brightness of the built in flash will automatically be set to the level appr...

Page 129: ...2 1 to select an item and then press MENU SET You can set from 1 1 full brightness to 1 128 in steps of 1 3 Changing the firing mode Manual flash wireless flash Item Description of settings TTL The camera automatically sets the flash output MANUAL Set the luminosity ratio of the flash manually In TTL you can shoot the photograph you want even when shooting dark scenes that may otherwise be too bri...

Page 130: ...ress MENU SET 4 Press 3 4 to select the item and then press MENU SET Wireless Channel Select the channel that corresponds to the channel of the external flash you want to control Settings 1CH 2CH 3CH 4CH Wireless FP During wireless recording an external flash fires an FP flash high speed repetition of flash firing This firing allows recording with the flash at a fast shutter speed Settings ON OFF ...

Page 131: ...e built in flash is set manually A Group B Group C Group Firing Mode TTL The camera automatically sets the output of the external flash AUTO Flash output is set by the external flash MANUAL Set the luminosity ratio of the external flash manually OFF The external flashes in the specified group will not fire Flash Adjust Set the output of the external flash manually when Firing Mode is set to TTL Ma...

Page 132: ...ontrollable range differs depending on the surrounding environment The recommended number of wireless flashes for each group is three or less If the subject is too close to the camera signal flashing may affect the exposure The effect can be reduced by lowering the output of the built in flash with a diffuser etc Placement example 16 0 feet 23 0 feet 5m 5m 7m 7m 50 50 50 50 30 30 30 30 A B C ...

Page 133: ...28 in Flash in the Rec menu is set to ON and Firing Mode P129 in Flash is set to TTL or WIRELESS Flash brightness can also be adjusted using Flash Adjust in Flash in the Rec Menu P128 4 Press to set You can also press the shutter button halfway to set When Auto Exposure Comp in Flash in the Rec menu is set to ON the brightness of the built in flash will automatically be set to the level appropriat...

Page 134: ...he rear dial to select the ISO sensitivity A ISO sensitivity B ISO Limit Set You can switch the functions between the rear dial and the front dial by pressing DISP 3 Rotate the front dial to set the upper limit of ISO sensitivity It will work when the Sensitivity is set to AUTO or 4 Press to set You can also set by pressing the shutter button halfway ISO ISO LIMIT LIMIT OFF OFF AUTO AUTO 200 200 4...

Page 135: ...n pictures ISO sensitivity Settings AUTO The ISO sensitivity is automatically adjusted according to the brightness Maximum ISO3200 With the flash on ISO1600 1 Intelligent The ISO sensitivity is adjusted according to the movement of the subject and the brightness Maximum ISO3200 With the flash on ISO1600 1 The shutter speed is not fixed when the shutter button is pressed halfway It is continuously ...

Page 136: ... the eye in accordance with the light source 1 Press 2 Rotate the rear dial or front dial to select the White Balance Setting can also be performed by rotating the control dial 3 Press 4 and then press 2 1 or 3 4 to make fine adjustments to the White Balance You can also make fine adjustments by touching the White Balance graph To reset press DISP 2 A AMBER ORANGE 1 B BLUE BLUISH 3 G GREEN GREENIS...

Page 137: ...like this set the White Balance to a mode other than AWB 1 Auto White Balance will work within this range 2 Blue sky 3 Cloudy sky Rain 4 Shade 5 Sunlight 6 White fluorescent light 7 Incandescent light bulb 8 Sunrise and sunset 9 Candlelight KlKelvin Color Temperature Item Recording conditions AWB Automatic adjustment V When taking pictures outdoors under a clear sky Ð When taking pictures outdoors...

Page 138: ...lance fine adjustment level returns to the standard setting center point in the following cases When you reset the White Balance in or When you reset the color temperature manually in Under fluorescent lighting LED lighting fixture etc the appropriate White Balance will vary depending on the lighting type so use AWB or The White Balance is only calculated for subjects within the range of the camer...

Page 139: ...tating the control dial to the left Vertical G to M You can also set the bracket by touching To reset press DISP 4 Press MENU SET is displayed in White Balance icon in the screen when the White Balance Bracket is set The White Balance Bracket setting is released when this unit has been turned off including Sleep Mode You will only hear the shutter sound once The White Balance Bracket does not work...

Page 140: ...after adjusting to appropriate brightness You can set the color temperature manually for taking natural pictures in different lighting conditions The color of light is measured as a number in degrees Kelvin As the color temperature increases the picture becomes more bluish As the color temperature decreases the picture becomes more reddish 1 Press 2 Rotate the rear or front dial to select and then...

Page 141: ...n 4 is pressed while š Ø or is selected For operation in the AF area selection screen refer to P146 It cannot be set to š in the following conditions Clear Nightscape Cool Night Sky Warm Glowing Nightscape Artistic Nightscape Glittering Illuminations Appetizing Food Cute Dessert Scene Guide Mode The is disabled in the following cases AFF AFC Focus Mode The AF Mode is fixed to Ø in the following ca...

Page 142: ...y anniversary photograph etc AFS is an abbreviation of Auto Focus Single Focus is set automatically when the shutter button is pressed halfway Focus will be fixed while it is pressed halfway AFF Movement cannot be predicted Children pets etc AFF is an abbreviation of Auto Focus Flexible In this mode focusing is performed automatically when the shutter button is pressed halfway If the subject moves...

Page 143: ...area can be changed P146 When š is selected and Metering Mode is set to multiple the camera will adjust the exposure to suit the person s face P162 Under certain picture taking conditions including the following cases the Face Detection Function may fail to work making it impossible to detect faces The AF Mode is switched to When the face is not facing the camera When the face is at an angle When ...

Page 144: ...he subject is locked Lock is canceled when is touched Exposure is adjusted in accordance with the locked subject when Metering Mode is set to P162 If it fails to lock AF area will flash in red and disappear Try to lock again AF Tracking may be disabled in certain picture conditions such as when it is very dark AF Mode will be switched to Ø in that case In the following cases operates as Ø Glisteni...

Page 145: ...he shutter button halfway move the camera to the composition you want with the shutter button pressed halfway and then take the picture Only when the Focus Mode is set to AFS You can achieve a more precise focus on a point that is smaller than Ø The focus position can be set on an enlarged screen P147 Pressing the shutter button halfway displays the screen for checking the focus position enlarged ...

Page 146: ...ut pinching in P15 on the screen 4 Press MENU SET to set AF area with the same function as Ø is displayed when the š is selected Setting of the AF area is cleared when MENU SET is pressed or is touched When selecting The 23 AF areas can be divided into 9 areas and the area to be focused can be set 1 Select and press 4 AF area setting screen is displayed 2 Press 3 4 2 1 to select the AF area frame ...

Page 147: ...screen Press DISP to return the focus position to the center of the screen On the assist screen it is also possible to record a picture by touching Move the AF area easily with Direct Focus Area function When the Direct Focus Area in the Custom menu is set to ON while š or Ø is selected it is possible to move the AF area directly with the cursor button With you can move the enlarged position The s...

Page 148: ...ens to focus on the subject A Approximate indicator of infinity When the focus ring is rotated display is switched to the assist screen and the image is enlarged MF Assist B You can change the display method of the MF Assist at MF Assist in the Custom menu MF guide C is displayed on the screen when the focus ring is rotated if the MF Guide in the Custom menu is set to ON You can check the directio...

Page 149: ...screen is magnified To change the magnification rotate the rear dial or touch Moving the enlarged area The enlarged area can be moved by dragging the screen P15 or pressing the cursor button The following will return the MF assistance to the original position When the Focus Mode is set to other than MF Changing Aspect Ratio or Picture Size Turning the camera off Pressing DISP when the setting scre...

Page 150: ...rrowed Therefore if the distance between the camera and the subject is changed after focusing on the subject it may become difficult to focus on it again The resolution of the periphery of the picture may decrease slightly This is not a malfunction Technique for Manual Focus About the focus distance reference mark The focus distance reference mark is a mark used to measure the focus distance Use t...

Page 151: ... press shutter button fully A AE Lock indication When AE LOCK is set after pressing the shutter button halfway to focus press the shutter button fully AF AE Lock Locking of the focus and exposure can be set in AF AE Lock in the Custom menu Item Settings AE LOCK Only the exposure is locked AEL aperture value the shutter speed light when the exposure is set AF LOCK Only the focus is locked AFL the f...

Page 152: ...AF Lock only is effective when taking pictures in Manual Exposure Mode AE Lock only is effective when taking pictures with Manual Focus Only the AF lock is active during motion picture recording Once you cancel the AF lock during the recording the AF lock cannot be reactivated The exposure is set even if the brightness of the subject changes The subject can be focused again by pressing the shutter...

Page 153: ... Burst Mode None None Available Available 1 With RAW files 18 2 3 Without RAW files Max 80 Depends on the capacity of the card 3 1 Number of recordable pictures 2 Depending on the recording conditions the number of frames in a burst may be reduced For example when i Resolution of the recording menu is set to EXTENDED the number of frames in a burst may be reduced 3 Pictures can be taken until the ...

Page 154: ...en Focus Mode is AFF or AFC M or L they are adjusted each time you take a picture Since the shutter speed becomes slower in dark places the burst speed pictures second may become slower Depending on the operating conditions it may take time to take the next picture if you repeat the recording of pictures It may take time to save pictures taken in Burst Mode on the card If you take pictures continu...

Page 155: ... the drive mode dial to 2 Focus on the subject and take a picture A Auto Bracket indication If you press and hold the shutter button the number of pictures that you set is taken The Auto Bracket indication blinks until the number of pictures that you set is taken The picture count is reset to 0 if you change the Auto Bracket setting or turn the camera off before all the pictures that you set are t...

Page 156: ...re may be compensated incorrectly depending on the brightness of the subject When taking pictures continuously using Auto Bracket with i Resolution set to EXTENDED it may take time to record all the set number of pictures Auto Bracket is disabled in the following cases Glistening Water Glittering Illuminations Soft Image of a Flower Scene Guide Mode Miniature Effect Soft Focus Star Filter Creative...

Page 157: ...ated 2 seconds after it blinks Changing the time setting for the self timer 1 Select Self Timer in the Rec menu P37 2 Press 3 4 to select the mode and then press MENU SET Exit the menu after it is set We recommend using a tripod when recording with the self timer Depending on the recording conditions the recording interval may become more than 2 seconds when is selected The flash output may vary s...

Page 158: ...nt Auto or Mode is selected In Intelligent Auto or Mode the setting will be reset to Standard when the camera is switched to another Recording Mode or this unit is turned on and off In Scene Guide Mode a photo style which matches each scene is fixed Photo Style Settings Description of settings Standard This is the standard setting Vivid Brilliant effect with high saturation and contrast Natural So...

Page 159: ...etting and then press MENU SET Confirmation screen is displayed It is executed when Yes is selected Setting can be registered in Custom Item Effect Contrast r Increases the difference between the brightness and the darkness in the picture s Decreases the difference between the brightness and the darkness in the picture Sharpness r The picture is sharply defined s The picture is softly focused Satu...

Page 160: ...re sizes of each aspect ratio except for L The picture size will be fixed to S when Burst Rate is set to SH Aspect Ratio Settings Description of settings X Aspect Ratio of a 4 3 TV Y Aspect Ratio of a 35 mm film camera W Aspect Ratio of a high definition TV etc Square aspect ratio Picture Size When the aspect ratio is X When the aspect ratio is Y Settings Image size Settings Image size 16M 4608k34...

Page 161: ...software SILKYPIX Developer Studio by Ichikawa Soft Laboratory on the CD ROM supplied The following effects are not reflected in RAW images Photo Style i Dynamic Red Eye Removal i Resolution Color Space Rec menu Scene Guide Mode Creative Control Mode images are recorded with a smaller data volume than or Quality Settings File format Description of settings A JPEG A JPEG image in which image qualit...

Page 162: ...ings Description of settings Multiple This is the method in which the camera measures the most suitable exposure by judging the allocation of brightness on the whole screen automatically Usually we recommend using this method Center weighted This is the method used to focus on the subject on the center of the screen and measure the whole screen evenly Spot This is the method to measure the subject...

Page 163: ...OW represents the maximum range of effect In the following cases i Dynamic does not work When HDR is set to ON Applicable modes Pictures with sharp profile and resolution can be taken by using the Intelligent Resolution Technology Settings HIGH STANDARD LOW EXTENDED OFF EXTENDED allows you to take natural pictures with a higher resolution The speed of burst and continuous recording becomes slower ...

Page 164: ...ded with unnatural blurs The angle of view becomes narrow slightly when Auto Align is set to ON Flash is fixed to ΠForced Flash Off HDR does not work for the pictures taken during a motion picture recording HDR is not available in the following cases When Quality is set to or When using Time Lapse Shot HDR Settings Description of settings ON Records HDR pictures OFF Does not record HDR pictures S...

Page 165: ...rd On the screen shown in step 1 set Overlay to ON After Start Images in the card will be displayed Select the RAW images press MENU SET and continue recording Overlay is available only for RAW images taken with this unit Image is not recorded until completion The recording information displayed for pictures taken with multiple exposures is the recording information for the last picture taken Item...

Page 166: ...apse Shot Item Description of settings Start Time Now Starts the recording by fully pressing the shutter button StartTime Set You can set the time to start recording Any time up to 24 hours ahead can be set Press 3 4 2 1 to set the start time hour minute and then press MENU SET Shooting Interval Image Count You can set the second scale recording interval from 1 second to 99 minutes 59 seconds Pres...

Page 167: ...onger than the recording interval such as long time exposure We recommend to use a fully charged battery Time Lapse Shot is paused in the following cases During Time Lapse Shot you can replace the battery and the card and then restart by turning on this unit Turn off this unit when replacing the battery or the card When the charge on the battery runs out When the number of recordable pictures drop...

Page 168: ... Reduction is selected Digital Red Eye Correction is performed whenever the flash is used The camera automatically detects red eye and corrects the picture Settings ON OFF Only available when AF Mode is set to š and Face Detection is active Under certain circumstances red eye cannot be corrected is displayed on the icon when it is set to ON Shutter Delay Flash Settings Firing Mode Flash Mode Flash...

Page 169: ...es of night scenery etc so you can take beautiful pictures Settings ON OFF If you set ON the countdown screen is displayed when the shutter button is pressed Do not move the camera at this time After the countdown is finished Please wait is displayed for the same time as the selected shutter speed for signal processing We recommend using a tripod when the shutter speed is slowed to take pictures I...

Page 170: ...of the picture may stand out with higher ISO sensitivity Correction is not possible in the following cases When recording motion pictures Recording still pictures while recording a motion picture only when set to motion picture priorities When Burst Rate is set to SH Depending on the lens used Shading Comp may not operate Refer to the website for compatible lenses Settings ZOOM TELE CONV OFF Refer...

Page 171: ...eRGB The setting is fixed to sRGB when recording motion pictures Settings OFF Refer to P117 for details Color Space Settings Description of settings sRGB Color space is set to sRGB color space This is widely used in computer related equipment AdobeRGB Color space is set to AdobeRGB color space AdobeRGB is mainly used for business purposes such as professional printing because it has a greater rang...

Page 172: ...be attached to only the first picture You cannot use Face Recog in the following cases Clear Nightscape Cool Night Sky Warm Glowing Nightscape Artistic Nightscape Glittering Illuminations Appetizing Food Cute Dessert Scene Guide Mode Miniature Effect Creative Control Mode When recording motion pictures Similarity in facial features can result in one person being recognized as another Face Recognit...

Page 173: ...ot be registered To display the description of the face registration press 1 or touch Face Settings Point of recording when registering the face images Face front with eyes open and mouth closed making sure the outline of the face the eyes or the eyebrows are not covered with hair when registering Make sure there is no extreme shading on the face when registering Flash will not flash during regist...

Page 174: ...tered for and Age It is possible to register the birthday 1 Press 4 to select SET and then press MENU SET 2 Press 2 1 to select the items Year Month Day and then press 3 4 to set and then press MENU SET Add Images To add additional face images Add Images 1 Select the unregistered face recognition frame and then press MENU SET 2 Perform steps 3 in Face Settings To delete one of the face images Dele...

Page 175: ...em and then press MENU SET Exit the menu after it is set Change or delete the information for a registered person Item Description of settings Info Edit Changing the information of an already registered person Perform step 4 in Face Settings Priority The focus and exposure are preferentially adjusted for higher priority faces Press 3 4 2 1 to select the priority and then press MENU SET Delete Dele...

Page 176: ...en press MENU SET 4 Press 3 4 to select SET and then press MENU SET 5 Press 4 to select Exit and then press MENU SET to finish To cancel Age and Name Select the OFF setting in step 1 Still pictures recorded during motion picture recording motion picture priorities P183 will not record age or name The age and name can be printed out using the PHOTOfunSTUDIO bundled software on the CD ROM supplied P...

Page 177: ...ils 1 Select Rec Mode in the Motion Picture menu P37 2 Press 3 4 to select the item and then press MENU SET When MOV is selected confirmation screen is displayed Select Yes to execute 3 Press 3 4 to select Rec Quality and then press 1 4 Press 3 4 to select the item and then press MENU SET Exit the menu after it is set Setting the format size and frame rate Item Format AVCHD Select this format to r...

Page 178: ...080 60i 17 Mbps FHD 30p 1920k1080 60i 2 24 Mbps FHD 24p 1920k1080 24p 24 Mbps Item Size Frame rate Bit rate FHD 30p 1920k1080 30 20 Mbps HD 30p 1280k720 10 Mbps VGA 30p 640k480 4 Mbps Item Size Frame rate Bit rate FHD 60p 1920k1080 60p 50 Mbps FHD 30p ALL lntra 1920k1080 30p 72 Mbps FHD 30p 1920k1080 30p 50 Mbps FHD 24p ALL lntra 1920k1080 24p 72 Mbps FHD 24p 1920k1080 24p 50 Mbps HD 60p ALL lntra...

Page 179: ...red Please check the following website about the compatible devices for details http panasonic jp support global cs dsc This Site is English only Indication of the icon A Format B ALL lntra C Size D Frame rate sensor output ALL Intra refers to a data compression method in which each frame is compressed The file size of motion pictures recorded in this method becomes larger but this method can prev...

Page 180: ... Elapsed recording time B Available recording time Recording of motion picture appropriate for each mode is possible The recording state indicator red C will flash while recording motion pictures If approximately 10 seconds elapses without an operation being performed part of the display will disappear Press DISP or touch the monitor to make the display reappear When recording a motion picture do ...

Page 181: ...on pictures when recording motion pictures Also the ISO Limit Set will not operate When recording a motion picture Stabilizer will be fixed to even if it is set to It is recommended to use a fully charged battery or AC adaptor optional when recording motion pictures P269 If while recording motion pictures using the AC adaptor optional the power supply is cut off due to a power cut or if the AC ada...

Page 182: ...n pictures while hearing the sounds that are being recorded by connecting a commercially available headphones to this unit Switch the sound output method Sound output method can be changed at Headphone Sound in the Motion Picture menu Do not use the headphone cables with the length of 3 m 9 8 feet or more Recording while monitoring camera images ON The camera display is output as is OFF Only image...

Page 183: ...icator A is displayed while recording still pictures Recording with the Touch Shutter function P70 is also available Item Settings Motion picture priorities Pictures will be recorded with a picture size of S 2 M The picture quality may be different to S 2 M of standard pictures Only JPEG images are recorded when Quality is set to or When set to still pictures will be recorded in Quality of A Up to...

Page 184: ...e Set the aperture value to a higher number when you want a sharp focus background Set the aperture value to a lower number when you want a soft focus background Shutter speed When you want to take a sharp picture of a fast moving subject set with a faster shutter speed When you want to create a trail effect set to a slower shutter speed Manually setting a higher shutter speed may increase the noi...

Page 185: ...low and fast motion on equipment other than this unit a compatible Blu ray disc recorder or PHOTOfunSTUDIO is required Audio is not recorded Wind Cut Mic Level Disp and Mic Level Adj in the Motion Picture menu cannot be used We recommend using a tripod The recording time display used for playing back motion pictures recorded in slow and fast motion at the top right of the screen is different from ...

Page 186: ...ON 1 Start recording 2 Touch 3 Touch icon to display the setting screen 4 Drag the slide bar to set The speed of the zoom operation varies depending on the position you touch 5 Stop recording Minimizing operational sounds during motion picture recording Zoom When an interchangeable lens compatible with power zoom is used Aperture value Shutter speed Exposure Compensation ISO sensitivity Mic level ...

Page 187: ...nt method REC RUN Counts the time code only when recording motion pictures FREE RUN Counts the time code even when not recording including when this unit is turned off Time Code Value Sets the start point starting time for the time code Reset Sets to 00 00 00 00 hour minute second frame Manual Input Manually input hour minute second and frame Current Time Sets hour minute and second to current tim...

Page 188: ...ion for the corresponding setting in the Rec menu Motion Picture menu is not displayed in the following cases Glistening Water Glittering Illuminations Soft Image of a Flower Scene Guide Mode Soft Focus Star Filter Creative Control Mode Refer to P177 for details Refer to P177 for details Settings P A S M Refer to P184 for details Settings OFF Refer to P185 for details Settings Motion picture prior...

Page 189: ...If there are any white saturated areas we recommend compensating the exposure towards negative P133 referring to the histogram P57 and then taking the picture It may result in a better quality picture Settings ON OFF Refer to P119 for details Applicable modes The shutter speed can be fixed to reduce the flicker or striping in the motion picture Settings 1 50 1 60 1 100 1 120 OFF Continuous AF Time...

Page 190: ...reen Settings ON OFF Not available with Miniature Effect in Creative Control Mode Applicable modes Adjust the sound input level to 19 different levels Not available with Miniature Effect in Creative Control Mode Applicable modes Settings STEREO SHOTGUN Refer to P267 for details Silent Operation Mic Level Disp Mic Level Adj Special Mic ...

Page 191: ... wind noise effectively if there is wind noise when recording sound Settings AUTO HIGH STANDARD LOW OFF Setting Wind Cut may alter the usual sound quality Not available with Miniature Effect in Creative Control Mode When an external microphone is connected AUTO is not available Headphone Sound Wind Cut ...

Page 192: ...er to P248 for details You can play back the pictures you have taken in synchronisation with music and you can do this in sequence while leaving a fixed interval between each of the pictures You can also put together a slide show composed of only still pictures only motion pictures only 3D pictures etc We recommend this feature when you view your pictures by connecting the camera to a TV 1 Select ...

Page 193: ...ategory Selection Even if Effect is set it does not work during a slide show of Group Pictures Some Effect will not operate when playing back pictures displayed vertically Setup Duration or Repeat can be set Duration can be set only when OFF has been selected as the Effect setting Even if Duration is set it does not work during a slide show of motion pictures only or slide show of Group Pictures 3...

Page 194: ...laxing Tone Sweet Child s Face Clear Night Portrait Scene Guide Mode i Scenery i Sunset in Scene Detection Distinct Scenery Bright Blue Sky Romantic Sunset Glow Vivid Sunset Glow Glistening Water Scene Guide Mode i Night Portrait i Night Scenery in Scene Detection Clear Nightscape Cool Night Sky Warm Glowing Nightscape Artistic Nightscape Glittering Illuminations Clear Night Portrait Scene Guide M...

Page 195: ...aking place During a suspended period is displayed Select the period with to restart the recording process from the picture you left off To delete the received location information 1 Select Location Logging on the Playback menu P37 2 Press 3 4 to select Delete Location Data and then press MENU SET 3 Press 3 4 to select the period you want to delete then press MENU SET Confirmation screen is displa...

Page 196: ...out texts comments using the PHOTOfunSTUDIO bundled software on the CD ROM supplied You can set up to 100 pictures at one time with Multi You cannot use Title Edit for the following pictures Motion pictures Pictures taken with or Pictures recorded with other equipment Title Edit 3 Select the picture and then press MENU SET to set is displayed for pictures with titles already registered Multi setti...

Page 197: ...ess MENU SET 5 Press 3 4 to select text stamp items and then press MENU SET Text Stamp 3 Select the picture and then press MENU SET to set appears on screen if the picture is stamped with text Multi setting 1 Select the picture and then press MENU SET to set repeat The setting is canceled when MENU SET is pressed again 2 Press 2 to select OK and then press MENU SET to execute Single Multi Press 2 ...

Page 198: ... before printing When you stamp pictures in a group the stamped ones are saved separately from the original ones in the group You cannot use Text Stamp for the following pictures Motion pictures Pictures recorded without setting the clock and title Pictures stamped with Text Stamp Pictures taken with or Pictures recorded with other equipment Item Description of settings Shooting Date W O TIME Stam...

Page 199: ...f you divide a MP4 or MOV motion picture the display order of images changes It is recommended to search these motion pictures by using Calendar Playback P77 or Video Only in the Playback Mode You cannot use Video Divide for the following pictures Motion pictures with a short recording time Video Divide 3 Press 3 at the location to divide Motion picture is played back from the same location when 3...

Page 200: ...amped with Text Stamp Pictures taken with or Resize 3 Select the picture and size Single setting 1 Press 2 1 to select the picture and then press MENU SET 2 Press 3 4 to select the size and then press MENU SET Confirmation screen is displayed It is executed when Yes is selected Exit the menu after it is executed Multi setting 1 Press 3 4 to select the size and then press MENU SET 2 Press 3 4 2 1 S...

Page 201: ...ter it is executed The picture quality of the cropped picture will deteriorate Crop one picture at a time You cannot edit all pictures in a group at once When you crop pictures in a group the cropped ones are saved separately from the original ones in the group It may not be possible to crop pictures recorded with other equipment You cannot use Cropping for the following pictures Motion pictures P...

Page 202: ...after it is set 1 Select Rotate Disp on the Playback Mode menu P37 2 Press 4 to select ON and then press MENU SET The pictures are displayed without being rotated when you select OFF Exit the menu after it is set When you play back pictures on a PC they cannot be displayed in the rotated direction unless the OS or software is compatible with Exif Exif is a file format for still pictures which allo...

Page 203: ...T Confirmation screen is displayed It is executed when Yes is selected Exit the menu after it is executed In Playback Mode the Cancel Mode is disabled You can set up to 999 pictures as favorites When you set pictures in a group as Favorite the number of your Favorite pictures is displayed on the Favorite icon of the group s top picture You may not be able to set pictures taken with other equipment...

Page 204: ...g for a multiple number of pictures 999 is displayed on the screen if the total number of prints you set for a group pictures is more than 1000 pictures Exit the menu after it is set Canceling all the Print Set settings 1 Select Print Set on the Playback menu 2 Press 3 4 to select Cancel and then press MENU SET Confirmation screen is displayed It is executed when Yes is selected Exit the menu afte...

Page 205: ...yback menu P37 2 Press 3 4 to select Single or Multi and then press MENU SET Canceling all the Protect settings 1 Select Protect on the Playback menu 2 Press 3 4 to select Cancel and then press MENU SET Confirmation screen is displayed It is executed when Yes is selected Exit the menu after it is executed The Protect feature is only designed to work with this camera Even if you protect pictures on...

Page 206: ... When REPLACE is selected Press 3 4 2 1 to select the person to replace and then press MENU SET Confirmation screen is displayed It is executed when Yes is selected Exit the menu after it is executed Cleared information regarding the Face Recog cannot be restored When all Face Recognition information in a picture has been canceled the picture will not be categorized using Face Recognition in Categ...

Page 207: ...re is the risk that data sent and received via radio waves may be intercepted by a third party Do not use the camera in areas with magnetic fields static electricity or interference Do not use the camera in areas with magnetic fields static electricity or interference such as near microwave ovens Radio waves may not reach the camera Using the camera near devices such as microwave ovens or cordless...

Page 208: ... how to playback pictures About the Wi Fi connection lamp Before Use To use the Wi Fi function on this unit a wireless access point or a destination device equipped with the wireless LAN function is required Images to send Destination Smart phone PC Cloud Sync Service Web service AV device Printer 1 Home External JPEG RAWiJPEG RAW MP4 1 AVCHD 1 2 MOV 1 3D A Wi Fi connection lamp Lit blue The Wi Fi...

Page 209: ...t or the connection may be disrupted A message such as Communication error is displayed When sending images on a mobile network high packet communication fees may be incurred depending on the details of your contract Pictures may not be completely sent depending on radio wave conditions If the connection is terminated while sending pictures pictures with missing sections may be sent Do not remove ...

Page 210: ...em to WEB services P213 Sending the acquired location information to the camera P213 By linking with the DLNA compatible TV you can display pictures on TV right after taking them or display them on TV later by playing them back on the camera Send Images While Recording P222 Send Images Stored in the Camera P231 Every time you take a picture the picture can be automatically sent to a specified loca...

Page 211: ...s unit with Wi Fi Direct Android OS 4 0 or above is required 1 Press Wi Fi Installing the smartphone tablet app LUMIX LINK For AndroidTM apps For iOS apps Version 2 1 As of October 2012 OS Android 2 2 Android 4 0 iOS 4 3 iOS 6 0 Installation procedure 1 Connect your Android device to a network 2 Select Google PlayTM Store 3 Enter LUMIX LINK into the search box 4 Select LUMIX LINK and install it Th...

Page 212: ...t and set Refer to P217 for details On your smartphone tablet 3 On the setting menu of your smartphone tablet turn on the Wi Fi function 4 Select the wireless access point you want to connect to and set 5 Start LUMIX LINK on your smartphone tablet P211 When connecting with Wi Fi Direct or WPS Connection On the camera 1 Press 3 4 to select Direct and then press MENU SET For details on the connectio...

Page 213: ...iffers depending on the operating system Select on a smartphone tablet You can save pictures on the smartphone tablet You can send pictures to a WEB service etc The screen differs depending on the operating system You can acquire location information from a smartphone tablet and write it on images afterwards Refer to P195 for how to write the location information on the images recorded by this uni...

Page 214: ... for iOS If you press the Home or On Off button of a smartphone tablet while Rec loc Info is working location information recording is stopped If you want to make a Wi Fi connection with the setting you used before you can select it from the history and connect The number of settings that can be saved in the history is limited It is recommended that you save frequently used Wi Fi connection settin...

Page 215: ... enter characters refer to Entering Text section on P64 A maximum of 30 characters can be entered Up to 15 characters can be entered for and 1 Press Wi Fi 2 Press 3 4 to select Select a destination from Favorite and then press MENU SET 3 Select the desired connection setting with 3 4 and then press MENU SET To display the connection detail press DISP To edit the items saved in Select a destination...

Page 216: ...e item and press MENU SET Editing the items registered to favorites Item Description of settings Remove from Favorite Change the Order in Favorite Select the destination with 3 4 and then press MENU SET Change the Registered Name For details on how to enter characters refer to Entering Text section on P64 A maximum of 30 characters can be entered Up to 15 characters can be entered for and ョㄏヒ ヸㄊノョ...

Page 217: ...ss access point 3 Press MENU SET Refer to the wireless access point instruction manual for details Connecting via a wireless access point Connection method Description of settings WPS Push Button Save push button type wireless access point that is compatible with Wi Fi Protected SetupTM with a WPS mark P217 WPS PIN code Save PIN code type wireless access point that is compatible with Wi Fi Protect...

Page 218: ...of If you are not sure about the WPS compatibility connecting by Manual Connection select Manual Input by pressing 3 4 then press MENU SET 2 Enter the SSID of the wireless access point you are connecting to then select Set For details on how to enter characters refer to Entering Text section on P64 3 Press 3 4 to select the network authentication type and press MENU SET For information on network ...

Page 219: ... MENU SET Connecting directly Connection method Description of settings Wi Fi Direct TM 1 Set the device to Wi Fi Direct mode 2 Press 3 4 to select Wi Fi Direct and then press MENU SET 3 Press 3 4 to select the device to connect to and then press MENU SET Read the operating instructions of your device for details WPS Connection WPS Push Button 1 Press 3 4 to select WPS Push Button and then press M...

Page 220: ...ct a device you want to connect and then press MENU SET When the connection is established the screen is displayed 6 Take or play back pictures on this unit To change the setting or disconnect press Wi Fi P221 Displaying the picture on TV right after taking it Displaying the picture on TV by playing it back on the camera Preparations Set the TV to DLNA waiting Mode Read the operating instructions ...

Page 221: ...Press Wi Fi when connected to Wi Fi 2 Press 3 4 to select the item and press MENU SET What you can do with the Wi Fi button when connected to Wi Fi Item Description of settings Terminate the Connection Terminates the Wi Fi connection Change the Destination Terminates the Wi Fi connection and allows you to select a different Wi Fi connection Change Settings for Sending Images Refer to P224 for deta...

Page 222: ...nd then press MENU SET When connecting with the setting you used before you can select the connection destination from Select a destination from History P214 or Select a destination from Favorite P215 3 Press 3 4 to select Send Images While Recording and then press MENU SET 4 Press 3 4 to select Smartphone and then press MENU SET 5 Select the connection method P223 6 Press 3 4 to select a device y...

Page 223: ...irect and then press MENU SET For details on the connection methods refer to P219 On your smartphone tablet 2 Start LUMIX LINK on your smartphone tablet P211 When connecting with Manual Connection On the camera 1 Press 3 4 to select Direct and then press MENU SET 2 Press 3 4 to select Manual Connection and then press MENU SET On your smartphone tablet 3 On the setting menu of your smartphone table...

Page 224: ...tion information then send OFF Keep the location information and send This operation only deletes the location information from the images that are set to be sent The location information will not be deleted from the original images stored in this unit Cloud Limit 3 You can select whether to send images when the Cloud Folder runs out of free space ON Do not send images OFF Delete images from the o...

Page 225: ...the connection is complete the screen is displayed To change the send setting press DISP P224 8 Take pictures To change the setting or disconnect press Wi Fi P221 You cannot change the settings while sending pictures Wait until sending is complete Folders sorted by the sent date are created in the specified folder and pictures are saved in those folders If the screen for a user account and passwor...

Page 226: ...rd to the folder select Create manually For details refer to the operating instructions of PHOTOfunSTUDIO PDF When not using PHOTOfunSTUDIO For Windows Supported OS Windows 7 Windows Vista Windows XP Example Windows 7 1 Select a folder you intend to use for receiving then right click 2 Select Properties then enable sharing of the folder For details refer to the operating instructions of your PC or...

Page 227: ...er to LUMIX CLUB P239 and configure the Cloud Sync setting to send a picture to a Cloud Folder About the images sent to a Cloud Folder by the use of Cloud Sync Service As of October 2012 To send images to a PC Cloud Sync setting is required Configure the settings on a PC with PHOTOfunSTUDIO or on a smartphone tablet with LUMIX LINK If you set the picture destination to Cloud Sync Service sent pict...

Page 228: ...4 2 1 to select a WEB service you want to connect and then press MENU SET When the connection is complete the screen is displayed To change the send setting press DISP P224 7 Take pictures To change the setting or disconnect press Wi Fi P221 You cannot change the settings while sending pictures Wait until sending is complete When sending images to WEB Service Preparations You need to register to L...

Page 229: ... title the time and date when the images was taken and the location where the image was taken Check this information before uploading images to WEB services Panasonic assumes no responsibility for the damages resulting from the leakage loss etc of images uploaded on WEB services When uploading images to the WEB Service do not delete images from this camera even after they have finished sending unt...

Page 230: ...connect and then press MENU SET When the connection is complete the screen is displayed To change the send setting press DISP P224 8 Take pictures To change the setting or disconnect press Wi Fi P221 You cannot change the settings while sending pictures Wait until sending is complete When sending images to AV device Preparations When sending a picture to Home set your device to DLNA waiting mode R...

Page 231: ...lect the connection method below 6 Press 3 4 to select a device you want to connect and then press MENU SET When the connection is complete the screen is displayed To change the send setting press DISP P224 7 Press 3 4 to select Single Select or Multi Select and then press MENU SET To change the setting or disconnect press Wi Fi P221 8 Select and send the images P232 When you want to connect to th...

Page 232: ...it and then enter the password 5 Start LUMIX LINK on your smartphone tablet P211 A window indicating that the smartphone tablet is connecting to the camera is displayed If you are using an Android device press the back key If you are using an iOS device close the window The number of pictures that can be sent by Multi Select is limited Select and send the images Single Select setting 1 Press 2 1 t...

Page 233: ...onnection is complete the screen is displayed To change the send setting press DISP P224 8 Press 3 4 to select Single Select or Multi Select and then press MENU SET To change the setting or disconnect press Wi Fi P221 9 Select and send the images P232 Folders sorted by the sent date are created in the specified folder and pictures are saved in those folders If the screen for a user account and pas...

Page 234: ...nc Service and then press MENU SET 5 Press 3 4 to select connection method and then press MENU SET P217 6 Check the send setting When the connection is complete the screen is displayed To change the send setting press DISP P224 7 Press 3 4 to select Single Select or Multi Select and then press MENU SET To change the setting or disconnect press Wi Fi P221 8 Select and send the images P232 When send...

Page 235: ...2 1 to select a WEB service you want to connect and then press MENU SET When the connection is complete the screen is displayed To change the send setting press DISP P224 7 Press 3 4 to select Single Select or Multi Select and then press MENU SET To change the setting or disconnect press Wi Fi P221 8 Select and send the images P232 When sending images to WEB Service Preparations You need to regist...

Page 236: ... title the time and date when the images was taken and the location where the image was taken Check this information before uploading images to WEB services Panasonic assumes no responsibility for the damages resulting from the leakage loss etc of images uploaded on WEB services When uploading images to the WEB Service do not delete images from this camera even after they have finished sending unt...

Page 237: ...nnect and then press MENU SET When the connection is complete the screen is displayed To change the send setting press DISP P224 8 Press 3 4 to select Single Select or Multi Select and then press MENU SET To change the setting or disconnect press Wi Fi P221 9 Select and send the images P232 When sending images to AV device Preparations When sending a picture to Home set your device to DLNA waiting...

Page 238: ...and then press MENU SET 7 Select pictures and then print P261 To change the setting or disconnect press Wi Fi P221 Motion pictures cannot be printed out When sending images to Printer Preparations You can print out recorded pictures wirelessly from a PictBridge wireless LAN compatible printer Compliant with the DPS over IP standards See the following website for information on the PictBridge wirel...

Page 239: ...e displayed if a login ID has already been acquired for the camera Select Yes to acquire a new login ID or No if you do not need to acquire a new login ID 6 Select the method for connecting to a wireless access point and set Refer to P217 for details 7 Read through the LUMIX CLUB terms of use and press MENU SET You can switch pages by 3 4 You can enlarge 2k the display by rotating the rear dial to...

Page 240: ...MENU SET 4 Press 3 4 to select Add Change Account and press MENU SET 5 Press 3 4 to select Change Login ID and press MENU SET The login ID and password are displayed The password is displayed as Close the menu if only checking the login ID 6 Press 3 4 to select the login ID or password you want to change and press MENU SET The confirmation screen is displayed when changing the login ID Select Yes ...

Page 241: ...ect this unit to the smartphone tablet P211 2 From the LUMIX LINK menu set the common login ID The login IDs for this unit and the smartphone tablet become the same After connecting this unit to the smartphone tablet the setup screen for a common login ID may appear when you display the playback screen You can also set a common login ID by following the on screen instructions This operation is not...

Page 242: ...U SET Exit the menu after it is executed Changes and other actions to login IDs can only be made to the login ID acquired with the camera When sending images to WEB services such as Facebook or YouTube the WEB service being used must be registered with the LUMIX CLUB Registering multiple WEB services will send images to all services simultaneously Check the FAQ Contact us on the following site for...

Page 243: ...that has already been saved can be changed or deleted 1 Select Wi Fi in the Setup menu P37 2 Select Wi Fi Setup in the Wi Fi menu 3 Press 3 4 to select External AV device and press MENU SET 4 Press 3 4 to select the AV device you want to change or delete and press MENU SET 5 Select Edit or Delete and press MENU SET Exit the menu after it is executed Configuring the external AV device settings Prep...

Page 244: ...Wi Fi Setup in the Wi Fi menu 3 Press 3 4 to select item and press MENU SET Refer to P239 for details Refer to Entering Text P64 for information on how to enter text Up to 32 characters can be entered for A a 1 and Refer to P243 for details LUMIX CLUB Acquires or changes the LUMIX CLUB login ID Device Name You can change the name of this unit 1 Press DISP 2 Enter the desired device name External A...

Page 245: ...Example 192 168 0 87 Approved Regulations is only available on the version DMC GH3P Wi Fi Password To prevent incorrect operation or use of the Wi Fi function by a third party and to protect saved personal information it is recommended that you protect the Wi Fi function with a password Setting a password will automatically display the password input screen when the Wi Fi function is used Setup En...

Page 246: ...rientation It is recommended to use a tripod or a flash to record steady pictures When a distance to the subject is 0 6 m 2 0 feet to approximately 1 m 3 3 feet horizontal disparity becomes too great and you may not see the 3D effect at the edges of the image Up to approx 500 3D pictures can be recorded on a 2 GB card When the aspect ratio is set to X and the quality is set to Read the operating i...

Page 247: ... or unusable Rec menu Picture Size 2 Quality 3 HDR i Dynamic Red Eye Removal i Resolution Shading Comp Ex Tele Conv Digital Zoom SH of Burst Rate Stabilizer 2 The setting is fixed as shown below 3 When attaching 3D interchangeable lens the following icons are displayed Custom menu AF AE Lock Quick AF Eye Sensor AF Direct Focus Area Focus Release Priority Shutter AF Pinpoint AF Time AF Assist Lamp ...

Page 248: ...g only the still pictures recorded in 3D Select 3D in Slide Show in the Playback menu P192 Switch the playback method for the still pictures recorded in 3D 1 Select the picture recorded in 3D 2 Select 2D 3D Settings on the Playback menu P37 Playback method will switch to 3D if it is playing back in 2D conventional image or it will switch to 2D if it is playing back in 3D If you feel tired uncomfor...

Page 249: ...a 3D picture thumbnail it may take a few seconds for playback to start After playback the thumbnail display may take a few seconds to reappear When viewing 3D pictures your eyes may become tired if you are too close to the television screen If your television does not switch to a 3D picture make the necessary settings on the TV For details refer to the operating instructions of the TV 3D pictures ...

Page 250: ... with an HDMI mini cable optional Always use a genuine Panasonic HDMI mini cable RP CDHM15 RP CDHM30 optional Part numbers RP CDHM15 1 5 m 5 feet RP CDHM30 3 0 m 10 feet Check the HDMI Mode P49 During 24P motion picture playback please set HDMI Mode to AUTO For settings other than AUTO it cannot output at 24 frames second Audio will be played back as stereo 2ch No picture is displayed on the scree...

Page 251: ...ority when both AV cable optional and HDMI mini cable optional are connected The connection with the USB connection cable supplied will take priority when you connect the USB connection cable supplied simultaneously with the HDMI mini cable optional When you play back a picture vertically it may be blurry Proper playback will be dependent on the TV used for viewing No sound is output from the came...

Page 252: ...e for EZ Sync This function allows you to use your remote control for the Panasonic TV for easy operations when this unit has been connected to a VIERA Link compatible device using a HDMI mini cable optional for automatic linked operations Not all operations are possible VIERA Link is a unique Panasonic function built on a HDMI control function using the standard HDMI CEC Consumer Electronics Cont...

Page 253: ...control for the TV to switch the input channel For details on how to switch input please read the operating instructions for the TV If VIERA Link does not work properly refer to page 298 If you are unsure whether or not the TV you are using is compatible with VIERA Link read the operating instructions for the TV Available linked operations between this unit and a Panasonic TV are different dependi...

Page 254: ...t recognized please refer to the below support site http panasonic net avc sdcard information SDXC html PC that can be used The unit can be connected to any PC capable of recognising a mass storage device Windows support Windows 7 Windows Vista Windows XP Mac support OS X v10 1 v10 8 AVCHD motion pictures may not be imported correctly when copied as files or folder With Windows always import AVCHD...

Page 255: ...0 8 This is software to edit RAW format images Using RAW files recorded on this camera allows images to be edited with a higher quality Edited images can be saved in a format JPEG TIFF etc that can be displayed on a personal computer LoiLoScope 30 day full trial version Windows XP Vista 7 LoiLoScope is a video editing software where that draws out the full power of your PC Creating videos is as ea...

Page 256: ... WindowsR 7 64bit Free hard disk space 450 MB or more for installing software Refer to the operating instructions of PHOTOfunSTUDIO PDF for further operating environment For details on SILKYPIX Developer Studio 3 1 SE please read the support site given on P255 2 Insert the CD ROM with the supplied software When you insert the supplied CD ROM the install menu will start 3 Click on the Recommended I...

Page 257: ...screen When the camera is connected to a PC while USB Mode is set to PictBridge PTP a message may appear on the PC screen In that case close the message and remove the USB connection cable safely P258 and then set the USB Mode to PC 3 Copy the images to a PC using PHOTOfunSTUDIO Do not delete or move copied files or folders in Windows Explorer When viewing in PHOTOfunSTUDIO you will not be able to...

Page 258: ... USB connection cable safely Select the icon in the task tray displayed on the PC and then click Eject DMC XXX XXX varies by model Depending on your PC s settings this icon may not be displayed If the icon is not displayed check that Access is not displayed on the monitor of the digital camera before removing the hardware Connection in the PTP Mode Set USB Mode to PictBridge PTP Data can now be re...

Page 259: ...ather than high definition picture quality When you play back motion pictures on 4 3 aspect ratio TV you must set TV Aspect P49 on this unit to 4 3 before starting a copy The image will be vertically long if you play back motion pictures copied with 16 9 setting on a 4 3 aspect TV Always use a genuine Panasonic AV cable DMW AVC1 optional See the operating instructions for the recording equipment f...

Page 260: ...ion cable DMW USBC1 optional A USB connection cable supplied B Align the marks and insert 2 Press 3 4 to select PictBridge PTP and then press MENU SET Use a battery with sufficient battery power or the AC adaptor optional If the remaining battery power becomes low while the camera and the printer are connected the status indicator blinks and the alarm beeps If this happens during printing stop pri...

Page 261: ...res are printed at one time Press 3 4 2 1 to select the pictures and then press MENU SET When MENU SET is pressed again the setting is canceled After the pictures have been selected press 2 to select OK and then press MENU SET Select All Prints all the stored pictures Print Set DPOF Prints the pictures set in Print Set only P204 Favorite Prints the pictures set as favorites only P203 3 Press 3 to ...

Page 262: ...oes not support date printing the date cannot be printed on the picture Depending on the printer the date print settings of the printer may take precedence so check if this is the case When printing images with a text stamp please remember to set print with date to OFF or the date will print on top In some printers the picture date for pictures taken with the aspect ratio set to will be printed ve...

Page 263: ...printing different pictures on 1 sheet of paper For example if you want to print 4 different pictures on 1 sheet of paper set Page Layout to ä and then set Num of prints to 1 for each of the 4 pictures Item Description of settings Settings on the printer are prioritized L 3 5qk5q 89 mmk127 mm 2L 5qk7q 127 mmk178 mm POSTCARD 100 mmk148 mm 16 9 101 6 mmk180 6 mm A4 210 mmk297 mm A3 297 mmk420 mm 10k...

Page 264: ...no problems with the printer If the number of prints is high the pictures may be printed several times In this case the remaining number of prints indicated may differ from the number set Only pictures taken in JPEG format can be printed Those taken in RAW will use the JPEG pictures that were simultaneously created If an equivalent JPEG picture is not available no print will take place ...

Page 265: ... 3 Press 3 4 to select Flash Mode and then press MENU SET 4 Press 3 4 to select an item and then press MENU SET While the external flash is connected the following icons are displayed External Flash optional Removing the Hot Shoe Cover The camera comes with a hot shoe cover attached to the hot shoe Remove the hot shoe cover by pulling it in the direction indicated by arrow 2 while pressing it in t...

Page 266: ... the synchro cables with the length of 3 m 9 8 feet or more You can set the aperture value the shutter speed and the ISO sensitivity on the camera even when attaching the external flash Some commercial external flashes have synchro terminals with high voltage or reversed polarity Using such extra flashes may cause a malfunction or the camera may not operate normally If you use commercially availab...

Page 267: ...ophone is connected is displayed on the screen When the external microphone is connected Mic Level Disp P190 is automatically set to ON and the mic level is displayed on the screen When attaching the stereo shotgun microphone do not hold only the stereo shotgun microphone because it may detach from the camera Wind Cut in the Motion Picture can reduce the wind noise effectively Do not open the buil...

Page 268: ...nal cover is hard to remove flip the cover s corner by the camera s recess toward the center Read the operating instructions of the battery grip for details If you use the remote shutter DMW RSL1 optional you can avoid jitter camera shake when using a tripod and you can keep the shutter pressed fully when taking pictures with B Bulb or Burst Mode The remote shutter works similar to the shutter but...

Page 269: ...pler cover and close it firmly Also read the operating instructions for the AC adaptor and DC coupler The MC protector is a transparent filter which affects neither the colors nor the amount of light so it can always be used to protect the camera s lens The ND filter reduces the amount of light to approximately 1 8th equal to adjusting the aperture value 3 increments without affecting the color ba...

Page 270: ...h Shutter 3 P70 16 Fn6 Function button 3 P44 17 Fn7 Function button 3 P44 18 Number of recordable pictures 4 P33 19 Extended Tele Conversion when taking still pictures P120 20 ISO sensitivity P134 21 Exposure compensation value P133 Brightness P113 Manual Exposure Assistance P89 22 Shutter speed P68 23 Aperture value P68 24 Metering Mode P162 25 Exposure meter P58 Focal distance display P61 Step z...

Page 271: ...nt Color 3 P108 45 Creative control adjustment 3 P101 46 Touch tab 3 P62 101 47 Touch tab 3 P62 186 48 Microphone level adjustment P190 49 White Balance Bracket P139 50 Available recording time 4 P34 5 51 White Balance Fine Adjustment P138 52 White Balance P136 Color P114 53 Spot metering target P162 54 Self timer 6 P157 Time Lapse Shot P166 55 Current date and time Travel destination setting 7 P4...

Page 272: ...tion is attached 3 Only displayed in the monitor 4 It is possible to switch the display between the number of recordable pictures and available recording time with the Remaining Disp setting in the Custom menu 5 h is an abbreviation for hour m for minute and s for second 6 This is displayed during countdown 7 This is displayed for about 5 seconds when the camera is turned on after setting the cloc...

Page 273: ...e 3 P174 176 Location 3 P46 Title 3 P196 17 Number of days that have passed since the departure date P46 18 Currently retrieving information icon P276 19 Stamped with text indication P197 Elapsed playback time P78 1 20 Favorites P203 Cable disconnection prohibit icon P260 21 Folder File number 2 P258 22 Color space 4 P171 23 Recorded date and time World Time P45 24 Histogram P81 1 h is an abbrevia...

Page 274: ...data on a PC etc P52 Data will be deleted Lens not found or shoot w o lens in Custom menu is set to off When using a Leica lens mount adaptor DMW MA2M DMW MA3R optional set Shoot w o Lens P63 to ON in the custom menu The lens is not attached properly Do not push lens release button while lens is attached Detach the lens once and then attach it again without pressing the lens release button P20 Tur...

Page 275: ... due to the limitation of the writing speed of the card Use a card with SD Speed Class with Class 4 or more for AVCHD MP4 motion picture recording and use Class 10 for MOV If recording stops even by using a card of the above specified SD Speed Class the data writing speed is decreasing We recommend you make a backup and then format P52 Depending on the type of the card motion picture recording may...

Page 276: ...No destination found Check following regarding the wireless access point The wireless access point information set on this unit is wrong Check the authentication type encryption type and encryption key P218 Power of the wireless access point is not turned on Setting of the wireless access point is not supported by this unit Check the network setting of the destination Radio waves from other device...

Page 277: ...rd there is information in the login screen of the LUMIX CLUB website Some files cannot be sent because of destination limit Transfer completed Some files are left because of destination limit Check the file format of the image to send P208 Sending motion pictures may fail if the file size is too large Split the motion picture using Video Divide P199 Unavailable Please set Login settings on LUMIX ...

Page 278: ... of the image P160 Picture Size Set the number of pixels P160 Quality Set the compression rate at which the pictures are to be stored P161 Metering Mode Sets the light metering method for measuring brightness P162 Burst Rate Sets the burst speed for burst recording P153 Auto Bracket Sets single burst recording compensation range and recording sequence for Auto Bracket recording P156 Self Timer Set...

Page 279: ... NR You can eliminate the noise caused by recording with a slower shutter speed P169 Shading Comp If the screen periphery darkens as a result of lens characteristics the brightness in this region will be corrected P170 Ex Tele Conv When the number of pixels is set to anything other than L the Tele effect is increased without degradation in image quality P120 Digital Zoom Increases the Tele effect ...

Page 280: ...ecording method for still pictures during motion picture recording P183 Continuous AF Continues to focus on the subject for which focus has been achieved P180 Time Code Sets the time code P187 Rec Highlight White saturated areas appear blinking in black and white P189 Ex Tele Conv Increases the Tele effect P119 Flkr Decrease The shutter speed can be fixed to reduce the flicker or striping in the m...

Page 281: ... Assigns AFS or AFF to AFS AFF of the focus mode lever P54 Quick AF Speeds up the focusing that takes place when you press the shutter button P54 Eye Sensor AF The camera automatically adjusts the focus when the eye sensor is active P67 Pinpoint AF Time Sets the time for which the screen is enlarged when the shutter button is pressed halfway with Auto Focus Mode set to P54 AF Assist Lamp AF assist...

Page 282: ...wfinder P73 Monitor Disp Style This will set the display style of the monitor P72 Monitor Info Disp Display the recording information screen P72 P59 Rec Area This changes the angle of view during motion picture recording and still picture recording P59 Remaining Disp This will switch display between the number of recordable pictures and available recording time P59 Auto Review Set the length of ti...

Page 283: ...r not the shutter can be released when no lens is attached to the main body P63 Setup Clock Set Setting Date Time P35 World Time Sets the times for the region where you live and your holiday destination P45 Travel Date Departure date and return date of the trip as well as the name of the travel destination can be set P46 Wi Fi Configure the each setting for Wi Fi functions P244 Beep Set the volume...

Page 284: ...ch menu P51 Menu Background Set the background color for the menu screen P51 Menu Information Descriptions of menu items or their settings are displayed on the menu screen P51 Language Set the language displayed on the screen P51 Version Disp This enables the firmware versions of the camera and lens to be checked P51 No Reset Returns the image file number to 0001 P51 Reset The Rec or Setup Custom ...

Page 285: ...pictures P196 Text Stamp Stamps the recorded pictures with recording date and time names travel destination travel date etc P197 Video Divide Splits the recorded motion picture in two P199 Resize Reduces the image size number of pixels P200 Cropping Crops the recorded image P201 Rotate Rotate pictures manually in 90o steps P202 Rotate Disp This mode allows you to display pictures vertically if the...

Page 286: ... the camera off frequently by using the Economy etc P48 Is the subject focused Focus Release Priority is set to FOCUS at the time of purchase and so you cannot take pictures until the subject is in focus If you want to be able to take a picture when you press the shutter button fully even if the subject is not focused set Focus Release Priority in the Custom menu to RELEASE P55 If the problem is n...

Page 287: ...focused even if AFS AFF or AFC in Focus Mode is set Is Shutter AF in the Custom menu set to OFF P53 Is the AF Lock P151 applied incorrectly The shutter speed will become slower and the Optical Image Stabilizer function may not work properly when taking pictures especially in dark places We recommend holding the camera firmly with both hands when taking pictures P65 We recommend using a tripod and ...

Page 288: ...ndicate a malfunction When recording subjects in extremely bright locations or recording under fluorescent lighting LED lighting fixture mercury lamp sodium lighting etc the colors and screen brightness may change or horizontal striping may appear on the screen The recorded picture looks rough Noise appears on the picture Striping or flicker may appear under lighting such as fluorescent lighting a...

Page 289: ...ding and deletion were repeated many times or a card formatted on a PC or another device the data writing speed is decreasing We recommend you make a backup and then format P52 When recording a motion picture the screen may go dark after a certain period to reduce battery consumption but this will not affect the recorded motion picture The screen may be blacked out momentarily or the unit may reco...

Page 290: ...rding or audio may not record at all Also be careful because the operation sound of lenses can easily be recorded at this time Depending on the lens used picture may be warped slightly or you may see colors along the edge depending on the zoom factor due to the characteristics of the lens Also the peripherals of the image might look warped because the perspective is enhanced when the wide angle is...

Page 291: ...n the camera is connected to a PC or printer This is not a malfunction These pixels do not affect the recorded pictures Monitor viewfinder of this unit adopts OLED Screen burn in may occur on the screen viewfinder when a same image is displayed for a long period of time but it does not affect the recorded images Change the on screen images frequently by using Economy P48 Eye Sensor function P66 or...

Page 292: ...Mode been set for playback Change to Normal Play P194 Is this a non standard picture a picture which has been edited using a PC or a picture which was taken by another make of digital camera Did you remove the battery immediately after picture taking or did you take the picture using a battery with a low remaining charge Format the data to delete the pictures mentioned above P52 Other pictures wil...

Page 293: ... OFF P168 The picture quality or sound quality of recorded motion pictures may be deteriorated even when these are played back with the compatible devices Also recording information may not be displayed correctly Playback sound or operation sound is too low Images with different date as recorded date are played back in the Calendar Playback White round spots like soap bubbles appear on the recorde...

Page 294: ...a if it is not compatible When the battery indicator is flashing red the connection with other equipment may not start or the connection may be disrupted A message such as Communication error is displayed Check if the wireless access point to connect is in operating state The camera may not display or connect to a wireless access point depending on the radio wave condition Perform the connection c...

Page 295: ...the site of the WEB service you are sending the image to Is the size of the image too large Reduce the image size at Size P224 and then send Transmit after dividing the motion picture with Video Divide P199 It may take longer time to transmit when distance to the wireless access point is far Transmit closer to the wireless access point It takes long time every time to connect to a smartphone table...

Page 296: ...mportant settings Is the size of the image too large Divide the motion picture using Video Divide P199 Reduce the image size at Size P224 and then send Capacity or number of images in the WEB service is full Login to LUMIX CLUB and check the status of the destination on the WEB service link settings Execute the Reset Wi Fi Settings in the Setup menu P52 However all the information you have set on ...

Page 297: ...t to external input mode Depending on the TV model the pictures may be extended horizontally or vertically or they may be displayed with their edges cut off Are you trying to play back the motion pictures by directly inserting the card in the card slot of the TV Connect the camera to the TV with the AV cable optional or with the HDMI mini cable optional and then play back the motion pictures on th...

Page 298: ...to PC in USB Mode P48 257 Turn this unit off and on Disconnect the USB connection cable Connect it again while the card is inserted in the camera If there are two or more USB terminal on a single PC try connecting the USB connection cable to another USB terminal Check if your PC is compatible with SDXC memory cards http panasonic net avc sdcard information SDXC html A message prompting to format t...

Page 299: ...ving the camera but there is no effect on recording The sound is caused by the automatic adjustment of the aperture This is not a malfunction Press MENU SET select the Setup menu icon and then select the icon to set the desired language P51 This is a highlight function showing the white saturated area P58 In dark places the AF Assist Lamp P55 lights red to make it easier to focus on a subject Is A...

Page 300: ...action the pictures may be recorded in folders with different numbers from the ones used prior to the operation If you insert or remove the battery before turning off this unit the folder and file numbers for the pictures taken will not be stored in the memory When this unit is turned on again and pictures are taken they may be stored under file numbers which should have been assigned to previous ...

Page 301: ...ely affected by electromagnetic equipment and stops functioning properly turn this unit off and remove the battery or disconnect AC adaptor optional Then reinsert the battery or reconnect AC adaptor and turn this unit on Do not use this unit near radio transmitters or high voltage lines If you record near radio transmitters or high voltage lines the recorded pictures and or sound may be adversely ...

Page 302: ...ring to internal parts of the body avoid changing the lens in a dusty environment and always fit the body cap or a lens when storing the camera Remove any dirt on the body cap before attaching it Removing dirt on the image sensor The image sensor is very precise and delicate so be sure to observe the following when you do have to clean it yourself Blow off the dust on the surface of the image sens...

Page 303: ...contacts 1 to become dirty To improve the dust and splash proof performance the mount of the interchangeable lens H HS12035 is embedded with the lens mount rubber If you change the lens repeatedly friction with the lens mount rubber may leave scratches on the camera s mount However those scratches do not affect the performance of this unit For the replacement of the lens mount rubber contact Panas...

Page 304: ...rge the battery in the country that you are traveling in Dispose of unusable battery The battery has a limited life Do not throw the battery into fire because it may cause an explosion The unusable battery should be discarded in accordance with battery recycling laws Call the RBRC hotline at 1 800 822 8837 for information Do not allow battery terminals to come into contact with metal objects such ...

Page 305: ...Doing may have an adverse affect on such medical conditions If you feel tired uncomfortable or otherwise strange when viewing 3D pictures stop viewing at once Continuing to view may cause illness Please rest appropriately after stopping the viewing When viewing 3D pictures we recommend taking a break every 30 to 60 minutes Viewing for extended periods may cause eye fatigue Short sighted or long si...

Page 306: ...ame or birthday is set for Profile Setup Face Recognition function this personal information is kept in the camera and recorded in the image Disclaimer Information including personal information may be altered or vanish due to erroneous operation effect of static electricity accident malfunction repair or other handlings Please note in advance that Panasonic is not liable in any way for any direct...

Page 307: ...n you use a tripod make sure the tripod is stable when this unit is attached to it You may not be able to remove the card or the battery when using a tripod or unipod Make sure that the screw on the tripod or unipod is not at an angle when attaching or detaching the camera You may damage the screw on the camera if you use excessive force when turning it Also the camera body and the rating label ma...

Page 308: ...e trademarks of Panasonic Corporation and Sony Corporation Manufactured under license from Dolby Laboratories Dolby and the double D symbol are trademarks of Dolby Laboratories HDMI the HDMI Logo and High Definition Multimedia Interface are trademarks or registered trademarks of HDMI Licensing LLC in the United States and other countries HDAVI Control is a trademark of Panasonic Corporation Adobe ...

Page 309: ...iving Network Alliance This product uses DynaFont from DynaComware Corporation DynaFont is a registered trademark of DynaComware Taiwan Inc Other names of systems and products mentioned in these instructions are usually the registered trademarks or trademarks of the manufacturers who developed the system or product concerned This product is licensed under the AVC patent portfolio license for the p...

Page 310: ...nd or other materials provided with the distribution 3 All advertising materials mentioning features or use of this software must display the following acknowledgment This product includes software developed by the OpenSSL Project for use in the OpenSSL Toolkit http www openssl org 4 The names OpenSSL Toolkit and OpenSSL Project must not be used to endorse or promote products derived from this sof...

Page 311: ...ary form must reproduce the above copyright notice this list of conditions and the following disclaimer in the documentation and or other materials provided with the distribution 3 All advertising materials mentioning features or use of this software must display the following acknowledgement This product includes cryptographic software written by Eric Young eay cryptsoft com The word cryptographi...

Page 312: ...bove copyright notice this list of conditions and the following disclaimer in the documentation and or other materials provided with the distribution 3 All advertising materials mentioning features or use of this software must display the following acknowledgement This product includes cryptographic software written by Eric Young eay cryptsoft com The word cryptographic can be left out if the rout...

Page 313: ...h the distribution 3 Neither the name of the University nor the names of its contributors may be used to endorse or promote products derived from this software without specific prior written permission THIS SOFTWARE IS PROVIDED BY THE REGENTS AND CONTRIBUTORS AS IS AND ANY EXPRESS OR IMPLIED WARRANTIES INCLUDING BUT NOT LIMITED TO THE IMPLIED WARRANTIES OF MERCHANTABILITY AND FITNESS FOR A PARTICU...

Page 314: ...mission please contact licensing OpenSSL org 5 Products derived from this software may not be called OpenSSL nor may OpenSSL appear in their names without prior written permission of the OpenSSL Project 6 Redistributions of any form whatsoever must retain the following acknowledgment This product includes software developed by the OpenSSL Project for use in the OpenSSL Toolkit http www OpenSSL org...

Page 315: ...bove copyright notice this list of conditions and the following disclaimer in the documentation and or other materials provided with the distribution 3 All advertising materials mentioning features or use of this software must display the following acknowledgement This product includes cryptographic software written by Eric Young eay cryptsoft com The word cryptographic can be left out if the rout...

Page 316: ...h the distribution 3 Neither the name of the University nor the names of its contributors may be used to endorse or promote products derived from this software without specific prior written permission THIS SOFTWARE IS PROVIDED BY THE REGENTS AND CONTRIBUTORS AS IS AND ANY EXPRESS OR IMPLIED WARRANTIES INCLUDING BUT NOT LIMITED TO THE IMPLIED WARRANTIES OF MERCHANTABILITY AND FITNESS FOR A PARTICU...

Page 317: ...ollowing acknowledgement This product includes software developed by the University of California Berkeley and its contributors 4 Neither the name of the University nor the names of its contributors may be used to endorse or promote products derived from this software without specific prior written permission THIS SOFTWARE IS PROVIDED BY THE REGENTS AND CONTRIBUTORS AS IS AND ANY EXPRESS OR IMPLIE...

Page 318: ...ith the distribution 3 Neither the name of the University nor the names of its contributors may be used to endorse or promote products derived from this software without specific prior written permission THIS SOFTWARE IS PROVIDED BY THE REGENTS AND CONTRIBUTORS AS IS AND ANY EXPRESS OR IMPLIED WARRANTIES INCLUDING BUT NOT LIMITED TO THE IMPLIED WARRANTIES OF MERCHANTABILITY AND FITNESS FOR A PARTI...

Page 319: ...e and to permit persons to whom the Software is furnished to do so subject to the following conditions The above copyright notice and this permission notice shall be included in all copies or substantial portions of the Software THE SOFTWARE IS PROVIDED AS IS WITHOUT WARRANTY OF ANY KIND EXPRESS OR IMPLIED INCLUDING BUT NOT LIMITED TO THE WARRANTIES OF MERCHANTABILITY FITNESS FOR A PARTICULAR PURP...

Reviews: