background image

Record mode

40

LSQT0862

Manual shutter speed/aperture 
adjustment

Shutter Speed

Adjust it when recording fast-moving subjects. 
When recording people outdoors at night, select a 
slow shutter speed and use a flash. Both the 
subject and the background will become brighter.

Aperture

Adjust it when the screen is too bright or too dark.

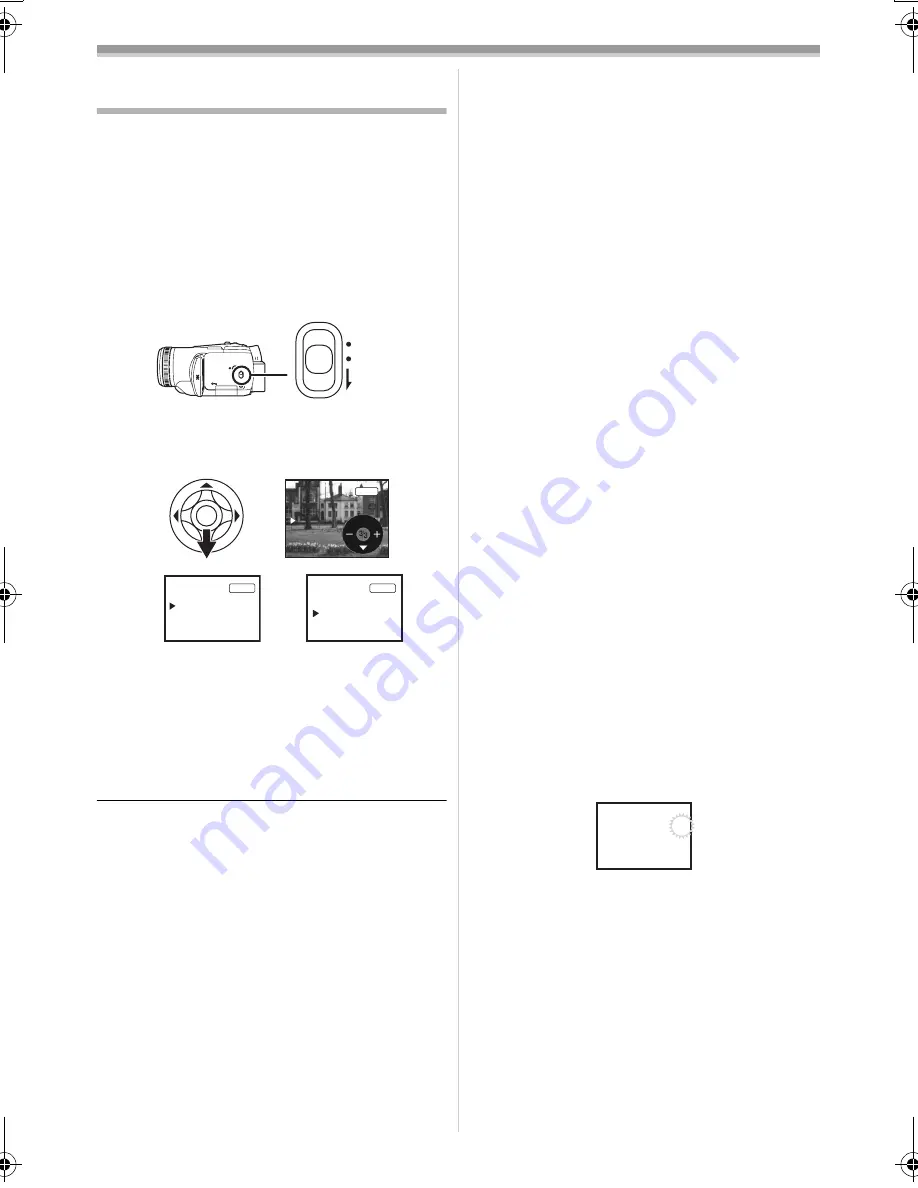
Set to Tape/Card Recording Mode.

1

Set the


[AUTO/MANUAL/FOCUS] switch to 

[MANUAL].

2

Move the joystick down until the shutter 
speed indication or aperture value 
indication appears.

1) Shutter speed
2) (Aperture) Iris/gain value

3

Move the joystick left or right in order to 
adjust the shutter speed or aperture.

ª

To restore to automatic adjustment

Set the [AUTO/MANUAL/FOCUS] switch to 
[AUTO].

Manual shutter speed adjustment

Avoid recording under fluorescent light, mercury 
light or sodium light because the color and 
brightness of the playback image may change.

If you increase the shutter speed manually, the 
sensitivity lowers and accordingly the gain value 
increases automatically, which may increase 
the noises on the screen.

You may see vertical lines of light in the 
playback image of a brightly shining subject or 
highly reflective subject, but this is not a 
malfunction.

During normal playback, image movement may 
not look smooth.

When recording in an extremely bright place, 
the color of the screen may change or flicker. If 
this happens adjust the shutter speed manually 
to 1/60 or 1/100.

Manual iris/gain adjustment

If the value does not become “OPEN”, you 
cannot adjust the gain value.

If the gain value is increased, the noise on the 
screen increases.

Depending on the zoom magnification, there are 
iris values that are not displayed.

ª

Shutter speed range

1/60–1/8000 seconds: Tape Recording Mode
1/2–1/2000 seconds: Card Recording Mode
The shutter speed closer to 1/8000 is faster.

ª

Iris/gain value range

CLOSE (Closed), F16, ..., F1.7,
OPEN (Opened) 0dB, ..., 18dB
Value closer to [CLOSE] darken the image. 
Value closer to [18dB] brighten the image.
Values with dB are gain values.

ª

Card slow shutter mode

If the shutter speed is set to 1/2, 1/4, 1/8, or 
1/15, then the card slow shutter mode will be 
activated.

If the [OFF/ON] switch or the mode dial is 
operated, then the slow shutter mode will be 
canceled.

In the slow shutter mode:

The white balance is fixed.

Focus in manually.

If the [AUTO/MANUAL/FOCUS] switch is set to 
[FOCUS], then the shutter speed will 
automatically be set to 1/60 and the subject is 
focused in on. After that the previous shutter 
speed will be restored. When the subject is 
focused on, [MF] flashes.

If the scene is low in brightness or contrast, the 
subject may not be focused in on.

While the Camcorder is focusing on the subject, 
you cannot operate any control on it with the 
exception of [OFF/ON] switch, mode dial, 
[AUTO/MANUAL/FOCUS] switch and 
[POWER LCD] button.

AUTO
MANUAL

FOCUS

1/1000

MNL

1)

1/60

F2.0

0dB

MNL

2)

1

/

60

OPEN

OdB

MNL

MF

LSQT0862ENG.book  40 ページ  2004年12月21日 火曜日 午後5時9分

Summary of Contents for Digital Palmcorder PV-GS250

Page 1: ...1 800 211 PANA 7262 or contact us via the web at http www panasonic com contactinfo For Canadian assistance please call 1 800 561 5505 or visit us at www panasonic ca Digital Video Camcorder Operating Instructions Model No PV GS250 Mini Before connecting operating or adjusting this product please read the instructions completely ...

Page 2: ...nded that only cassette tapes that have been tested and inspected for use in Camcorder with the mark be used AC Adaptor The rating plate is on the underside of the AC Adaptor Ò Ò CAUTION RISK OF ELECTRIC SHOCK DO NOT OPEN CAUTION TO REDUCETHE RISK OF ELECTRIC SHOCK DO NOT REMOVE COVER OR BACK NO USER SERVICEABLE PARTS INSIDE REFER SERVICINGTO QUALIFIED SERVICE PERSONNEL This symbol warns the user ...

Page 3: ...pliance follow the attached installation instructions and use only shielded interface cables with ferrite core when connecting to computer or peripheral devices Any changes or modifications not expressly approved by the party responsible for compliance could void the user s authority to operate this equipment CAUTION TO PREVENT FIRE OR SHOCK HAZARD AND ANNOYING INTERFERENCE USE THE RECOMMENDED ACC...

Page 4: ...et consult an electrician for replacement of the obsolete outlet 10 Protect the power cord from being walked on or pinched particularly at plugs convenience receptacles and the point where they exit from the apparatus 11 Only use attachments accessories specified by the manufacturer 12 Use only with the cart stand tripod bracket or the table specified by the manufacturer or sold with the apparatus...

Page 5: ...will not subject it to unnecessary movement avoid shaking and striking Your Camcorder contains a sensitive pick up device which could be damaged by improper handling or storage CARE TO CLEAN YOUR CAMCORDER Do not use strong or abrasive detergents when cleaning your Camcorder body TO PROTECT THE LENS Do not touch the surface of the lens with your hand Use a commercial Camcorder lens solution and le...

Page 6: ...censee is granted the right to use the software including the information recorded or described on the CD ROM instruction manuals and any other media provided to Licensee collectively Software but all applicable rights to patents copyrights trademarks and trade secrets in the Software are not transferred to Licensee Article 2 Use by a Third Party Licensee may not use copy modify transfer or allow ...

Page 7: ... fitness for a particular purpose Further Matsushita does not warrant that the operation of the Software will be uninterrupted or error free Matsushita or any of its distributors or dealers will not be liable for any damage suffered by Licensee arising from or in connection with Licensee s use of the Software Article 7 Export Control Licensee agrees not to export or re export to any country the So...

Page 8: ...Mic 26 Record mode Check before recording 27 Recording on a tape 28 Recording still pictures on a card while recording image onto a tape 29 Check the recording 29 Blank search function 29 Recording still pictures onto a card Photoshot 30 Zoom in out function 31 Recording yourself 32 Quick start 32 Backlight compensation function 33 MagicPix functions 33 Soft skin mode 33 Tele macro function 34 Fad...

Page 9: ... with a PC 52 Using USB Driver 52 Connecting Computer and Camcorder 53 Using as a Web camera 53 Using MotionDV STUDIO 56 To disconnect USB cable safely 59 If you no longer need software or driver Uninstall 60 Notes 60 Menu Menu list 62 Menus related to taking pictures 64 Menus related to playback 64 Other menus 65 Others Indications 66 Warning alarm indications 67 Functions cannot be used simultan...

Page 10: ...the cassette 3 Push the PUSH mark 1 in order to close the cassette holder 4 Only after the cassette holder is completely housed close the cassette cover ª Inserting removing a card 1 Open the LCD monitor and then open the card slot cover 2 Insert remove the card into from the card slot When inserting a card face the label side 1 towards you and push it straight in with one stroke as far as it goes...

Page 11: ...Photoshot Set to Card Recording Mode 1 Press the PHOTO SHOT button ª Playing back tape Set to Tape Playback Mode 1 Operate with joystick 1 Playback Pause 6 Rewind Review playback Reverts to playback with the 1 icon 5 Fast forward Cue playback Reverts to playback with the 1 icon Stop ª Playing back card Set to Picture Playback Mode 1 Operate with joystick E Plays back the previous picture D Plays b...

Page 12: ...eadphones only otherwise audio may not be played back normally Headphone terminal Ë 11 Terminal for Magic Wire Remote Control with Narration Mic REMOTE 26 Microphone terminal MIC A compatible plug in powered microphone can be used as an external microphone When the Camcorder is connected with AC Adaptor sometimes noise may be heard depending on microphone type In that case please switch to battery...

Page 13: ...er OPEN EJECT 18 37 Cassette cover 18 38 Zoom lever W T 31 Volume lever s VOLr 41 39 Photoshot button PHOTO SHOT 29 40 Smart accessory shoe The stereo zoom microphone VW VMH3 optional or the video DC light VW LDH3 optional should be mounted here When using an accessory for the smart accessory shoe the power is supplied from this product When mounting or removing the accessory extend the viewfinder...

Page 14: ... the tripod 42 Shoulder strap fixture Put the strap through the fixture 1 and through the stopper 2 so it will not come off Extend part 3 by at least 1 inch 2 cm Fit the other end of the belt similarly 43 Lens hood In order to remove the lens hood rotate it counter clockwise 1 In order to fit it put into slot 2 and then rotate it clockwise Fitting the lens cap Fit the lens cap to protect the surfa...

Page 15: ...he grip belt attachment press the lock cover 1 and check if the grip belt is securely locked ª To use as a grip belt Adjust the belt length so it fits your hand 1 Adjust the belt length and the pad position 1 Flip the belt 2 Adjust the length 3 Fix the belt Using the LCD monitor You can record the image while viewing it on the LCD monitor 1 Put a finger on the LCD monitor release and pull the LCD ...

Page 16: ...atteries If you use other batteries we cannot guarantee the quality of this product If the DC input lead is connected to the AC adaptor then the battery will not charge Remove the DC input lead from the AC adaptor 1 Connect the AC cable to the AC adaptor and the AC jack 2 Put the battery on the battery mount by aligning the mark and then securely plug it in ª Charging lamp Lights up Charging Goes ...

Page 17: ...in indicates 1 hour 10 minutes The battery CGA DU12 is supplied The times shown in the table are rough estimates The times indicate the recordable time when the viewfinder is used The times in parentheses indicate the recordable time when the LCD monitor is used We recommend the Battery Pack CGA DU12 and CGA DU21 for long recording time 2 hour or more for continuous recording 1 hour or more for in...

Page 18: ...assette holder does not come out Close the cassette cover completely and then open it again completely Check if the battery has run down ª When the cassette holder cannot be housed Set the OFF ON switch to OFF then to ON again Check if the battery has run down ª Inserting removing the cassette When the cassette holder is in motion do not touch anything except the PUSH mark When inserting a previou...

Page 19: ... card may damage or erase the data stored on the card We recommend saving important data on a personal computer by using a USB cable PC card adaptor or USB reader writer ª Card access lamp When the Camcorder accesses the card reading recording playback erasing etc the access lamp lights up If the following operations are performed when the access lamp is lit then the card or the recorded data may ...

Page 20: ...back mode Use this to play back the still pictures recorded on a card PC mode You can view or edit the images recorded on a card on your personal computer How to use the joystick ª Basic joystick operations Operations on the menu screen and selection of files to be played back on the multi image display Move the joystick up down left or right to select an item or file and then push in the center t...

Page 21: ... screen 1 Set LANGUAGE English 4 White balance Shutter speed Iris or gain value 38 1 Select Adjust 38 2 Select Adjust 38 3 Playback pause 41 4 Stop 41 2 Rewind review playback 41 1 Fast forward cue playback 41 3 Tele macro 34 4 Soft skin mode 33 1 Backlight compensation 33 Screen display OFF Screen display OFF Screen display OFF 4 White balance Shutter speed Iris or gain value 38 1 Select Adjust 3...

Page 22: ...ystick up or down in order to select the item to be set 7 Press the joystick to determine the setting ª To exit the menu screen Press the MENU button ª To get back to the previous screen Move the joystick left ª About the menu setting The menu screen does not appear during recording And you cannot record when the menu screen appears ª Operating with remote control The menu screen transition is the...

Page 23: ...to the Camcorder or place the battery on the Camcorder and the built in lithium battery will be recharged Leave the Camcorder as is for approx 24 hours and the battery will drive the date and time for approx 6 months Even if the OFF ON switch is set to OFF the battery is still being recharged Adjusting LCD monitor viewfinder ª Adjusting the brightness and color level 1 Set SETUP LCD SET or EVF SET...

Page 24: ...s of the LCD monitor is increased when the POWER LCD lamp lights up and cannot be set to NORMAL independently This will not affect the images to be recorded When the LCD monitor is rotated by 180 towards the lens the picture quality of the LCD monitor is temporarily adjusted as if the LCD AI is set to NORMAL Using the remote control ª Remote control Using the remote control supplied will enable co...

Page 25: ...CR2025 The battery is normally expected to last about 1 year but it depends on operation frequency Keep the button type battery out of the reach of children If the remote control mode of the Camcorder and that of the remote control do not match with each other REMOTE will appear When the remote control is operated for the first time after the Camcorder is turned on CHECK REMOTE MODE 67 will appear...

Page 26: ...e Magic Wire Remote Control with Narration Mic and the microphone on the remote control will be activated instead of that on the Camcorder While this button is being pressed appears and the microphone on the remote control is activated We recommend you talk with the microphone approx 4 inches 10 cm away from your mouth ª About the clip on the backside When you move with the clip fitted to your poc...

Page 27: ...UTO MANUAL FOCUS switch to AUTO and color balance white balance and focusing will be adjusted automatically Auto white balance 78 Auto focusing 78 Color balance and focus may not be adjusted depending on light sources or scenes If so manually adjust the white balance and focus Scene mode setting 37 White balance setting 38 Shutter speed setting 40 Iris gain value setting 40 Focus setting 39 ª Reco...

Page 28: ...ncerning the remaining tape time indication on the screen The remaining tape time is indicated in minutes When it reaches less than 3 minutes the indication starts flashing During a 15 second or shorter recording the remaining tape time indication may not be displayed or the remaining tape time may not be displayed correctly In some cases the remaining tape time indication may display remaining ta...

Page 29: ...e card The PHOTO SHOT button does not work if it is pressed halfway Check the recording The last image recorded is played back for 2 to 3 seconds After checking the Camcorder will be set to a recording pause Set to Tape Recording Mode 1 Press the joystick during the recording pause until the icon 1 appears 2 Move the joystick down to select the recording check icon Blank search function Searches f...

Page 30: ... recording still pictures hold the Camcorder firmly with your hands and keep your arms stationary at your side so as not to shake the Camcorder You can record stable pictures without shaking by using a tripod and the remote control For the number of still pictures to be recorded on a card refer to 80 The sound cannot be recorded While data is being recorded on a card do not operate the mode dial W...

Page 31: ...n the scene When the scene is filled with only horizontal lines When the scene lacks contrast ª Concerning the focusing area When there is a contrasting object ahead or behind the subject in the focus area the subject may not be focused Move the contrasting object out of the focus area Zoom in out function You can zoom in up to 10k optically Set to Tape Card Recording Mode 1 Wide angle recording z...

Page 32: ...ated in the following cases A tape or a card is inserted while the Tape Recording Mode is set A card is inserted while the Card Recording Mode is set 1 Press the QUICK START button The quick start recording lamp lights up Press the button again to cancel it 2 Set the OFF ON switch to OFF The quick start is now ready 3 Set the OFF ON switch to ON This Camcorder will be put into a recording pause in...

Page 33: ...gicPix function OFF 3 In the case of 0 Lux MagicPix function Rotate the LCD monitor towards the lens side When the LCD monitor is reversed the Power LCD Lamp turns on and the screen is lit in white Record the subject while viewing it on the viewfinder The light of the LCD monitor reaches approx 3 9 feet 1 2 m or less ª To cancel the MagicPix function Select the MagicPix icon until the MagicPix ind...

Page 34: ...ystick left to select the fade icon 3 Press the recording start stop button Start recording fade in When you start recording the image audio disappears completely and the image audio gradually appears Pause recording fade out The image audio gradually disappears After the image audio completely disappears recording stops ª To cancel fading Select the icon again ª To select the color for fade in ou...

Page 35: ... adjust the focus manually The picture may appear dark if flash is lit in front of a white background Set the flash to where using a flash is prohibited Do not block the flash by hand or any other means ª When the flash is not used Set ADVANCE FLASH ª To adjust the brightness of the flash 1 Set ADVANCE FLASH LEVEL select the desired brightness level ßj If the brightness is too high ßj or ßAj indic...

Page 36: ...n is activated the display such as the menu screen or the operation icon is expanded horizontally Images played back vary depending on the TV connected Please refer to the operating instructions for your TV This function does not widen the recording range When images are played back on a TV screen the date time indication may be erased in some cases Depending on the TV the picture quality may dete...

Page 37: ...um number of pictures recordable Intervals between recording pictures may become longer depending on the card We recommend using a Panasonic SD Memory Card When using a card formatted by other equipment or a card that was recorded and erased repeatedly the intervals between recording pictures may become longer If so back up your important data on a PC and format your card with this Camcorder Recor...

Page 38: ...rded image extremely dark Surf snow mode If the subject is extremely bright the recorded image may become whitish Recording in natural colors White balance The automatic white balance function may not reproduce natural colors depending on the scene or lighting conditions If so you can adjust the white balance manually Set to Tape Card Recording Mode 1 Set the AUTO MANUAL FOCUS switch to MANUAL 2 M...

Page 39: ...ance sensor during recording or it may not function properly ª About the black balance adjustment This is one of the 3CCD system functions that automatically adjusts the black when the white balance is set in the manual adjustment mode When the black balance is adjusted the screen will temporarily be black 1 Black balance adjustment Flashes 2 White balance adjustment Flashes 3 Adjustment completed...

Page 40: ...n may change or flicker If this happens adjust the shutter speed manually to 1 60 or 1 100 Manual iris gain adjustment If the value does not become OPEN you cannot adjust the gain value If the gain value is increased the noise on the screen increases Depending on the zoom magnification there are iris values that are not displayed ª Shutter speed range 1 60 1 8000 seconds Tape Recording Mode 1 2 1 ...

Page 41: ...trol press the T button to increase the volume or the W button to decrease it When the adjustment is completed the volume indication will disappear If you do not hear the sound check the settings of SETUP 12bit AUDIO ª Repeat playback When the tape end is reached the tape will be rewound and played back again 1 Set ADVANCE REPEAT PLAY ON The indication appears In order to cancel the repeat playbac...

Page 42: ...If you keep pushing the lever then the images will continuously be played back frame by frame ª To return to normal playback Press the 1 button on the remote control Slow motion playback In the reversed slow motion playback the time code indication may be unstable Frame by frame playback Press and hold the E or the D button in the playback pause and then the images will continuously be played back...

Page 43: ...the TV s input setting input switch For more information please read the operating instructions for the TV ª To display the on screen information on the TV The information displayed on the LCD monitor or the viewfinder operation icon time code and mode indication etc date and time can be displayed on the TV 1 Press the OSD button on the remote control Press the button again to erase the OSD inform...

Page 44: ...leting files recorded on a card The deleted files cannot be restored Set to Picture Playback Mode 1 Move the joystick left or right to select a file to delete You can select a file in the multi screen display After selecting the file press the joystick and display the operation icon 2 Move the joystick down to select 3 Move the joystick up or down in order to select DELETE 1 FILE and then press it...

Page 45: ... the selected file is locked Press the joystick again and the lock will be canceled 2 or more files can be locked in succession ª To complete the settings Press the MENU button Writing the printing data on a card DPOF setting You can write the data of pictures to be printed number of copies and other information DPOF data onto the card Set to Picture Playback Mode 1 Set ADVANCE DPOF SET SET 2 Move...

Page 46: ...corder or a VCR Dubbing Pictures recorded by the Camcorder can be stored on a DVD RAM or other such media Refer to the instructions for the recorder Place a recorded cassette in the Camcorder and an unrecorded DVD RAM or cassette in the DVD recorder or VCR 1 Connect the Camcorder and the recorder Connecting with the AV cable Connect the Camcorder and the recorder by using the AV cable 1 If the rec...

Page 47: ...e PHOTO SHOT button 6 Move the joystick of the Camcorder down or press the button on the remote controller to stop recording While analog input pictures are being recorded on a tape or when the Camcorder is in recording standby mode the photoshot recording is disabled 7 Stop playback Other equipment Do not plug or unplug the cable during recording or the recording may not be completed properly Car...

Page 48: ...log digital conversion the image may be disturbed or no image may be presented Normally set DV OUT OFF If set to ON the image may be disturbed Using the DV cable for Recording Digital Dubbing By connecting other digital video equipment with DV terminal and the Camcorder by using the DV cable PV DDC9 PV DDC9 K optional 1 high image quality dubbing can be done in digital format Set to Tape Playback ...

Page 49: ...nnected with the USB cable When wide images are input the display such as the menu screen or the operation icon is expanded horizontally While pictures are input from the DV terminal the operation icon blinks on instead of appearing from the side of the screen when you press the center of the joy stick Audio dubbing You can add music or narration to the recorded cassette Set to Tape Playback Mode ...

Page 50: ... taken during recording are erased after recording with audio dubbing Set BASIC REC SPEED SP to take pictures ª To play back the sound recorded with audio dubbing You can switch between the sound recorded with audio dubbing and the original sound Set SETUP 12bit AUDIO ST2 or MIX ST1 It only plays back the original sound ST2 It only plays back the sound added by audio dubbing MIX It simultaneously ...

Page 51: ...ng you cannot select DPOF PRINT When you select DPOF PRINT for printing set the number of prints in DPOF setting When DPOF PRINT is selected print after you determine the paper size 3 Move the joystick left and right to select a desired picture and then press it 4 Select the desired number of prints You can set up to 9 prints 5 Select the setting for date printing If the printer is not capable of ...

Page 52: ...desktop and then click Run When the Run Box is open type in D InstMenu exe and click OK D is used when the CD ROM drive is drive D Using USB Driver ª Operating environment Despite having the operating environment indicated it may not be possible to use the program with some types of personal computers A CD ROM drive is required to install this program When you connect to an USB 2 0 interface board...

Page 53: ...d on You can view images stored on the Memory Card and also save them to your hard disk Do not change file or folder names on the personal computer The images on the Memory Card may not be viewable on the Camcorder Appropriate driver to recognize Camcorder is automatically installed by Windows Plug and Play when connected for the first time After the USB Driver is installed and USB connection cabl...

Page 54: ...en DirectX 9 0b is installed applications supported by previous versions of DirectX may not run In this case consult the manufacturers of the disabled applications 1 Insert the supplied CD ROM into the personal computer s CD ROM drive Quit all applications Setup Menu appears 2 Click Video Stream Driver The set up program starts running 3 Depending on your system environment installation of DirectX...

Page 55: ...er When you use Windows XP the other parties via the network have to use Windows Messenger on Windows XP When you use an operating system other than Windows XP the other parties via the network have to use MSN Messenger on an OS other than Windows XP If the Camcorder is used as a Web Camera the quality of the video to be exchanged will depend on the Internet connection status In the WEB CAMERA mod...

Page 56: ... to Help When access is finished close MSN Messenger then turn off the Camcorder Finally disconnect the USB cable Using MotionDV STUDIO When the OS is Windows XP 2000 Me the Camcorder can be connected to the personal computer with the DV cable When the OS is Windows XP 2000 the Camcorder can be connected to the personal computer with the USB cable however Video Stream Driver must be installed Do n...

Page 57: ... Driver The set up program starts running 3 For Windows XP users Depending on your system environment installation of DirectX 9 0b may be required Click Yes and continue with installation After DirectX 9 0b is installed the computer will restart Do not remove the CD ROM Installation may take a little while 4 Finish installation by following the on screen instructions Click Next and proceed with in...

Page 58: ...is displayed 2 Click Hardware tab and then click Device Manager then Universal Serial Bus Controller 3 Right click Enhanced Host Controller and then select Properties The indication Enhanced Host Controller is changed as EHCI depending on the host controller you use 4 Click Driver tab to check the description on Driver Provider If Microsoft is displayed on Driver Provider the confirmation procedur...

Page 59: ...USB hubs or by using extension cables proper operation is not guaranteed When connected to the keyboard USB terminal normal function may not be possible To disconnect USB cable safely If USB cable is disconnected while computer is on error dialog box may appear In such a case click OK and close the dialog box By following the steps below you can disconnect the cable safely 1 Double click the icon ...

Page 60: ... refer to the Operating Instructions which accompany your personal computer Do not disconnect USB connection cable while the operation light of Camcorder is on It may freeze the software or destroy the data in transfer We recommend using the AC adaptor as the power source for the Camcorder when connecting to the personal computer Data may be lost If the battery power is lost while transferring dat...

Page 61: ...this Camcorder conform with DCF Design rule for Camera File system established by JEITA Japan Electronics and Information Technology Industries Association If you attempt to play back files recorded with this Camcorder on other equipment or to play back files recorded with other equipment on this Camcorder you may not be able to play them back Please check the compatibility with the other equipmen...

Page 62: ...CINEMA 36 USB FUNCTION 54 D ZOOM 31 ZOOM MIC 32 DATE TIME 64 INITIAL SET 65 3 SETUP FADE COLOR 34 AUDIO REC 64 REC LAMP 64 DISPLAY 64 REMOTE 25 BEEP SOUND 64 LCD AI 24 LCD SET 23 EVF SET 23 DEMO MODE 65 AV JACK 64 POWER SAVE 28 4 LANGUAGE 21 ª TAPE PLAYBACK MENU 1 BASIC DATE TIME 64 AV JACK 49 USB FUNCTION 54 2 ADVANCE BLANK SEARCH 29 REC SPEED 27 REC STDBY 48 AUDIO REC 64 A DUB INPUT 49 REC DATA ...

Page 63: ...FLASH LEVEL 35 EIS 36 SHTR EFFECT 31 DATE TIME 64 INITIAL SET 65 3 SETUP REC LAMP 64 DISPLAY 64 REMOTE 25 BEEP SOUND 64 LCD AI 24 LCD SET 23 EVF SET 23 POWER SAVE 28 4 LANGUAGE 21 ª PICTURE PLAYBACK MENU 1 BASIC DATE TIME 64 PROTECT 45 2 ADVANCE DPOF SET 45 CARD FORMAT 45 3 SETUP DISPLAY 64 REMOTE 25 LCD SET 23 EVF SET 23 LCD AI 24 POWER SAVE 28 4 LANGUAGE 21 2048 ...

Page 64: ... to ON and confirmation alarm beeps are issued as follows 1 Beep When you start recording When you turn on the power 2 Beeps When you pause recording 2 Beeps for 4 times When a cassette with its erasure prevention tab set to SAVE is inserted condensation occurs and at other times Check the sentence displayed on the screen Menus related to playback ª AV JACK This switches among the output settings ...

Page 65: ...dition ª DEMO MODE If you set to DEMO MODE ON without inserting a cassette and a card the Camcorder is automatically set to the demonstration mode for introducing its functions If any button is pressed or operated the demonstration mode is canceled If no operations take place for approx 10 minutes the demonstration mode automatically starts To terminate the demonstration mode insert a cassette or ...

Page 66: ...ion Mic is used 26 External microphone supporting the smart accessory shoe 13 External microphone supporting the smart accessory shoe LOW CUT 13 5 Sports mode Scene mode 37 Portrait mode Scene mode 37 Low light mode Scene mode 37 Spotlight mode Scene mode 37 Surf snow mode Scene mode 37 Auto white balance 38 Indoor mode recording under incandescent lamp 38 Outdoor mode 38 White balance adjustment ...

Page 67: ...self Turn the LCD monitor towards the viewfinder and check the warning alarm indication No card is inserted REMOTE An incorrect remote control mode has been selected 25 2END The tape came to the end during recording The video heads are dirty 74 Textual indications 3DEW DETECT 3EJECT TAPE Condensation has occurred Take out the cassette and wait for a while It takes some time until the cassette hold...

Page 68: ... An irregularity in the equipment has been detected Press the RESET button 13 This may solve the problem CHANGE MODE TO USE USB The USB cable is connected to the Camcorder in Card Recording Mode DISCONNECT USB CABLE You are attempting to turn the mode dial in PC mode with the USB cable connected to the Camcorder You are attempting to record pictures on a tape card with the USB cable connected to t...

Page 69: ...e When the Card Recording mode is used RapidFire Consecutive Photoshot When PICTURE SIZE is set to other than 640 When the shutter speed is 1 15 or slower Flash While recording to a tape During demo mode When RapidFire Consecutive Photoshot is used When the MagicPix function is used Zoom microphone Wind noise reduction When the microphone of the Magic Wire Remote Control with Narration Mic or an e...

Page 70: ... the power Then about 1 minute later turn on the power again Conducting the above operation when the access lamp is on may destroy the data on the card 6 The cassette cannot be removed Does the power lamp comes on when opening the cassette cover 20 Make sure that the battery and the AC adaptor are properly connected 16 Is the battery in use discharged Charge the battery and remove the cassette Clo...

Page 71: ...cation and adjust it 41 2 Different sounds are reproduced at the same time Have you set SETUP 12bit AUDIO MIX If you set AUDIO REC 12bit and dub audio to a recorded tape you can hear the sound on recording and the sound dubbed at a later time To hear the sounds separately set to ST1 or ST2 50 Have you set SETUP AUDIO OUT STEREO and reproduced a picture containing the main sound and sub sound Set t...

Page 72: ...he image was either recorded in a different format or data is damaged Others 1 The indication disappears the screen is frozen or no operation can be performed Turn off the power to the Camcorder If the power cannot be turned off press the RESET button or detach the battery or AC adaptor and then reattach it After that turn on the power again If normal operation is still not restored detach the pow...

Page 73: ...ed It takes about 20 seconds to open the cassette holder This is not a malfunction 2 Leave the Camcorder with the cassette cover closed to cool or warm it to the ambient temperature When 3 in yellow You cannot use the Tape Recording Playback Mode Leave the Camcorder for about 30 minutes However you can use the Card Recording Mode or Picture Playback Mode when a cassette is not inserted When 3 in r...

Page 74: ...gnetized equipment such as a cellular phones microwave ovens TVs and video game equipment If you use the Camcorder on or near a TV images or sounds may be disturbed due to electromagnetic wave radiation Recordings on the tape may be damaged or images may be distorted by strong magnetic fields created by speakers or large motors Electromagnetic wave radiation generated by digital circuits including...

Page 75: ...orget to bring an AC adaptor so that you can recharge the batteries at your destination If you drop the battery accidentally check to see if the terminals are deformed Attaching a deformed battery to the Camcorder or AC adaptor may damage the Camcorder or AC adaptor After use be sure to take the cassette out and detach the battery from the Camcorder or pull out the AC mains lead from AC mains sock...

Page 76: ...ing a magnetic force that is stronger than expected may erase the contents of a recording or may increase noise ª About the card When inserting or removing the card always set the OFF ON switch to OFF When the access lamp is illuminated During access to the card do not open the card slot cover to pull out the card turn off the power or cause any vibrations or impact Do not leave the card in places...

Page 77: ...lance adjustment However since the Camcorder only stores white color information under several light sources automatic white balance adjustment does not function normally under the other light sources Outside of the effective range of automatic white balance adjustment the image will become reddish or bluish Even within the effective range of automatic white balance adjustment the automatic white ...

Page 78: ...t work correctly in the following situations Record pictures in the manual focus mode Recording a subject with one end located closer to the Camcorder and the other end farther away from it As auto focus adjusts at the center of an image it may be impossible to focus on a subject that is located in both the foreground and background Recording a subject behind dirty or dusty glass The subject behin...

Page 79: ...vel Line 316 mV 10 kohm or more Mic input Mic sensitivity 50 dB 0 dB 1 V Pa 1 kHz Stereo mini jack USB Card reader writer function USB 2 0 compliant Hi Speed No copyright protection support PictBridge compliant Digital interface DV input output terminal IEEE1394 4 pin Video flash GN 5 5 Dimensions Approx 3 2 inch W k2 9 inch H k5 7 inch D Approx 81 mm W k73 mm H k144 mm D Weight Approx 1 1 lbs 500...

Page 80: ...umber of still pictures recordable on an SD Memory Card optional PICTURE SIZE 640 1280 1600 2048 PICTURE QUALITY 32 MB 220 440 47 76 30 47 18 29 64 MB 440 880 98 158 63 98 39 62 128 MB 880 1760 187 302 121 187 75 119 256 MB 1760 3520 390 628 252 390 158 248 512 MB 3520 7040 774 1246 502 774 314 493 1 GB 7040 14080 1550 2495 1006 1550 629 989 ...

Page 81: ...SA BN SDCAPU 1B For Canada BN SDABPE 1B For USA BN SDABPU 1B For Canada N2QCBD000030 1 GB SD Memory Card 512 MB SD Memory Card 256 MB SD Memory Card 128 MB SD Memory Card 64 MB SD Memory Card 32 MB SD Memory Card USB Reader Writer for SD Memory Card compatible with MultiMediaCard SD PCMCIA Adaptor compatible with MultiMediaCard Magic Wire Remote Control with Narration Mic VW LDC10 Video DC Light 1...

Page 82: ...R OFFICE 20421 84th Avenue South Kent WA 98032 Ship To Mr Mrs Ms First Last Street Address City State Zip Phone Day Night 4 Shipping information UPS delivery requires complete street address Please photocopy this form when placing an order 3 Method of payment check one Check of Money Order enclosed NO C O D SHIPMENTS VISA MasterCard Make Check or Money Order Payable to PANASONIC ACCESSORIES Please...

Page 83: ...in IL 60123 7847 Attn Camcorder Repair Request for Service Notice Please photocopy this form when making a request for service notice in the unlikely event this product needs service Please include your proof of purchase Failure to do so will delay your repair To further speed your repair please provide an explanation of what is wrong with the unit and any symptom it is exhibiting ...

Page 84: ...TV s or non expanded standard 4 3 pictures on wide screen TV s or onscreen data in a stationary and fixed location The warranty ALSO DOES NOT COVER damages which occurred in shipment or failures which are caused by products not supplied by the warrantor or failures which result from accidents misuse abuse neglect mishandling misapplication alteration faulty installation set up adjustments misadjus...

Page 85: ...n Camcorder Repair Product Repairs Centralized Factory Servicenter Please carefully pack and ship prepaid and insured to the Elgin Centralized Factory Servicenter Customer s in Puerto Rico please ship or carry in to location below Service in Puerto Rico Service in Puerto Rico Panasonic Puerto Rico Inc Ave 65 de Infantería Km 9 5 San Gabriel Industrial Park Carolina Puerto Rico 00985 Phone 787 750 ...

Page 86: ...PARTICULAR PURPOSE IN NO EVENT WILL PANASONIC CANADA INC BE LIABLE FOR ANY SPECIAL INDIRECT OR CONSEQUENTIAL DAMAGES In certain instances some jurisdictions do not allow the exclusion or limitation of incidental or consequential damages or the exclusion of implied warranties so the above limitations and exclusions may not be applicable WARRANTY SERVICE For product operation and information assista...

Page 87: ...Remote Control with Narration Mic 26 MagicPix Function 33 Manual Focus 39 Mode Dial 20 MotionDV STUDIO 56 ª P Photoshot 30 PictBridge 51 Portrait Mode 37 ª Q Quick Start 32 ª R RapidFire Consecutive Photoshot 37 Recording Check 29 Recording Speed 27 Red eye reduction function 35 Remaining Tape Time 66 Remote Control 24 Repeat Playback 41 Request for Service Notice USA Only 83 ª S Scene mode 37 SD ...

Page 88: ...sette 3 Apriete la marca PUSH 1 a fin de cerrar el compartimiento del cassette 4 Sólo cierre la tapa del cassette después de que el respectivo compartimiento esté cabalmente alojado ª Insertar quitar una tarjeta 1 Abra el monitor LCD luego abra la tapa de la ranura de la tarjeta 2 Inserte quite la tarjeta en de la ranura Cuando inserta una tarjeta con su lado etiquetado vuelto 1 hacia Ud la apriet...

Page 89: ...do de grabación de tarjeta 1 Oprima el botón PHOTO SHOT ª Reproducción de la cinta Ajuste al modo de reproducción de cinta 1 Actúe en la palanca de mando 1 Reproducción Pausa 6 Rebobinado Localización regresiva Vuelve para reproducir con el icono 1 5 Avance rápido Localización progresiva Vuelve para reproducir con el icono 1 Parada ª Reproducción de tarjeta Ajuste al modo de reproducción de imagen...

Page 90: ...Electronics Company Division of Panasonic Corporation of North America One Panasonic Way Secaucus NJ 07094 Panasonic Puerto Rico Inc Ave 65 de Infantería Km 9 5 San Gabriel Industrial Park Carolina Puerto Rico 00985 Panasonic Canada Inc 5770 Ambler Drive Mississauga Ontario L4W 2T3 P ...

Page 91: ...d utilisation Avant de raccorder régler ou utiliser l appareil il est recommandé de lire attentivement le manuel d utilisation Pour de I aide composez le 1 800 561 5505 ou visitez notre site Internet à www panasonic ca Modèle PV GS250 Mini ...

Page 92: ...rectives il vous apportera ainsi qu à votre famille des années de plaisir Veuillez prendre le temps de remplir la case ci dessous Le numéro de série se trouve sur l étiquette située sur le dessous de votre caméscope Conservez le présent manuel afin de pouvoir le consulter au besoin Date d achat Vendeur Adresse du vendeur Numéro de téléphone du vendeur Numéro de modèle Numéro de série ...

Page 93: ...s à moins qu une ventilation adéquate ne soit assurée Adaptateur secteur c a La plaque signalétique se trouve sur le dessous de l adaptateur c a COMME POUR TOUT PETIT OBJET LES CARTES SD PEUVENT ÊTRE AVALÉES PAR DE JEUNES ENFANTS NE JAMAIS LAISSER DES ENFANTS MANIPULER LA CARTE SD Ò Ò AVIS Risque de chocs électriques Ne pas ouvrir Attention Afin de prévenir des risques de chocs électriques ne pas ...

Page 94: ... de fiche ne peut être inséré dans une prise de courant communiquer avec un électricien pour remplacer la prise 10 S assurer que le cordon est placé dans un endroit où il ne risque pas d être écrasé piétiné ou coincé Faire particulièrement attention à ses extrémités de branchement y compris sa fiche 11 N utiliser que les accessoires ou périphériques recommandés par le fabricant 12 Ne placer l appa...

Page 95: ...n marche lorsqu il n est pas utilisé Rangement du caméscope Ranger et manipuler le caméscope de façon à éviter des mouvements inutiles chocs et vibrations Le caméscope est muni d un dispositif sensible qui pourrait être endommagé par une manutention ou un rangement inadéquat Entretien Nettoyage Ne pas utiliser de détersif fort ou abrasif pour nettoyer le caméscope Protection de l objectif Ne pas t...

Page 96: ...t notamment les informations enregistrées ou décrites sur le CD ROM dans les manuels d utilisation et sur les autres supports qui lui ont été fournis désignés collectivement par le terme Logiciel mais les droits sur les brevets droits d auteur marques de commerce et secrets de fabrication applicables contenus dans le Logiciel ne lui sont aucunement transférés Article 2 Utilisation par un tiers Le ...

Page 97: ...marchande et ou d aptitude à un usage particulier Matsushita ne garantit pas non plus que le fonctionnement du Logiciel sera ininterrompu ou sans erreur Matsushita ses distributeurs ou ses détaillants ne pourront pas être tenus responsables de dommages encourus par le Titulaire de licence du fait ou à l occasion de l utilisation du Logiciel par le Titulaire de licence Article 7 Contrôle d exportat...

Page 98: ...enregistrement 28 Enregistrement sur une bande 29 Enregistrement d images fixes sur une carte tout en enregistrant les images sur une bande 30 Contrôle de l enregistrement 30 Fonction de recherche des blancs 30 Enregistrement d images fixes sur une carte PhotoShot 31 Fonction zoom avant arrière 33 Enregistrement de vous même 33 Démarrage rapide 34 Fonction de compensation de contre jour 34 Fonctio...

Page 99: ... numérique 51 Doublage audio 52 Impression des images par branchement direct de l imprimante PictBridge 54 Ordinateur personnel Utilisation du logiciel avec un ordinateur 55 Utilisation du pilote de périphérique USB 55 Connexion du caméscope à un ordinateur 56 Utilisation comme caméra Web 57 Utilisation de MotionDV STUDIO 60 Déconnexion du câble USB 63 Désinstallation du pilote ou du logiciel 64 R...

Page 100: ...ur le symbole PUSH 1 pour fermer le support de la cassette 4 Seulement après que le support de la cassette soit complètement en place fermez le couvercle de la cassette ª Insertion retrait d une carte 1 Ouvrez l écran ACL puis ouvrez le couvercle de la fente de la carte 2 Insérez retirez la carte de la fente de la carte Pour insérer une carte mettez le côté étiquette 1 face à vous et poussez la di...

Page 101: ...istrement d images fixes sur une carte PhotoShot Sélectionnez le mode d enregistrement sur carte 1 Appuyez sur la touche PHOTO SHOT ª Lecture d une bande Sélectionnez le mode de lecture sur bande 1 Utilisez la manette 1 Lecture Pause 6 Rebobinage Repérage arrière Retour à la lecture avec l icône 1 5 Avance rapide Recherche avant rapide Retour à la lecture avec l icône 1 Arrêt ª Lecture sur carte S...

Page 102: ...ourni Sinon le son peut ne pas être lu normalement Prise de casque audio Ë 11 Prise pour télécommande câblée avec microphone de narration REMOTE 27 Prise de microphone MIC Un microphone à branchement compatible peut être utilisé comme un microphone externe Lorsque le caméscope est branché à un adaptateur CA des parasites sonores peuvent être générés selon le type de microphone utilisé Dans ce cas ...

Page 103: ...eur de sélection de mode AUTO MANUAL FOCUS 28 40 42 31 Voyant d accès de la carte 20 32 Prise DV DV 51 33 Couvercle de la fente de la carte 19 34 Fente de la carte 19 35 Support de la cassette 18 36 Levier d éjection de la cassette OPEN EJECT 18 37 Couvercle de la cassette 18 38 Levier du zoom W T 33 Levier du volume s VOLr 44 39 Touche PhotoShot PHOTO SHOT 30 À cause de la limitation de la techno...

Page 104: ...sque vous vous déplacez avec la télécommande accrochée à une poche etc prenez soin d éviter les chutes du trépied Vous ne pouvez pas ouvrir le couvercle de la fente de la carte lorsque le trépied est utilisé Insérez la carte d abord puis fixez le trépied 42 Attache de la dragonne Passez la dragonne à travers l attache 1 et à travers le taquet 2 ainsi elle ne se retirera pas Tirez la partie 3 sur a...

Page 105: ...e avec vos deux mains Après avoir enlevé la courroie de la poignée remettez le couvercle de verrouillage dans la position originale 2 Réglez la longueur de la courroie 1 Tournez la courroie 2 Faites glisser 1 dans la direction indiquée par la flèche 3 Fixez la courroie 3 Passez votre main à travers la courroie Utilisez la télécommande câblée avec microphone de narration pour plus de commodités Ten...

Page 106: ...manière forcée le caméscope peut s endommager ou tomber en panne Vérifiez que le couvercle de la fente de la carte est fermé Lorsque l écran ACL est pivoté à 180o vers l objectif pour vous enregistrer vous même l écran ACL et le viseur seront activés simultanément Utilisation du viseur ª Extraction du viseur 1 Tirez le viseur vers l extérieur et extrayez le en pinçant le bouton d extension ª Soulè...

Page 107: ...t la recharge normale commencera Lorsque la température de la batterie est excessivement haute ou basse le voyant CHARGE clignote et le temps de recharge sera plus long que d habitude ª Branchement à la prise CA 1 Branchez le câble CA à l adaptateur CA et à la prise secteur CA 2 Branchez le câble CC à l adaptateur CA 3 Branchez le câble CC à ce produit Relevez le viseur au préalable La prise du câ...

Page 108: ...caméscope tel qu un microphone stéréo directionnel et une lampe vidéo DC etc La batterie se réchauffe après l utilisation ou la recharge Le caméscope étant utilisé il se réchauffera également Ceci est normal Avec la réduction de la capacité de la batterie l affichage changera r s t u v Si la batterie se décharge alors u v clignotera Insertion retrait d une cassette 1 Faites glisser le levier OPEN ...

Page 109: ...r enregistrer fermez la languette de prévention d effacement accidentel de la cassette glissée dans la direction de la flèche REC Insertion retrait d une carte Avant l insertion retrait d une carte assurez vous de mettre l alimentation sur OFF Si la carte est insérée ou retirée avec l appareil en contact ce caméscope peut mal fonctionner ou les données enregistrées sur la carte peuvent être perdue...

Page 110: ... que mémoire conventionnelle pour un caméscope un ordinateur ou tout autre équipement ª À propos de la languette de protection d écriture sur la carte mémoire SD La carte mémoire SD possède une languette de protection d écriture Si la languette est placée sur LOCK vous ne pouvez pas écrire sur la carte y effacer les données ou la formater Si elle est déplacée en arrière vous pouvez le faire Mise s...

Page 111: ...tte Les opérations sur l écran menu et la sélection des fichiers peuvent être lues avec un affichage multi images Bougez la manette vers le haut le bas la gauche ou la droite pour sélectionner un élément ou un fichier puis appuyez au centre pour le sélectionner ª Manette et écran d affichage Appuyez sur le centre de la manette et les icônes seront affichées à l écran Chaque pression commute l affi...

Page 112: ...AGE Français 4 Balance des blancs Vitesse d obturation Diaphragme ou valeur du gain 41 1 Réglage sélection 41 2 Réglage sélection 41 3 Lecture pause 44 4 Arrêt 44 2 Rebobinage repérage arrière 44 1 Avance rapide recherche avant rapide 44 3 Télé macro 36 4 Mode de carnation 35 1 Compensation de contre jour 34 Écran d affichage désactivé Écran d affichage désactivé Écran d affichage désactivé 4 Bala...

Page 113: ...u appuyez la pour régler la sélection 6 Bougez la manette vers le haut ou le bas de façon à sélectionner l élément à régler 7 Appuyez sur la manette pour définir le réglage ª Pour sortir de l écran de menu Appuyez sur la touche MENU ª Pour revenir à l écran précédent Bougez la manette vers la gauche ª À propos du menu de configuration L écran de menu n apparaît pas durant l enregistrement et vous ...

Page 114: ...é alors la batterie au lithium incorporée s est déchargée Branchez l adaptateur CA au caméscope ou placez la batterie sur le caméscope et la batterie au lithium incorporée sera rechargée Laissez le caméscope ainsi pendant environ 24 heures et la batterie fera marcher l horloge pour environ 6 mois Même si l interrupteur OFF ON est placé sur OFF la batterie est rechargée Réglage de l écran ACL viseu...

Page 115: ... écran ACL est augmenté lorsque le voyant POWER LCD s allume et ne peut pas être réglé sur NORMAL indépendamment Ceci n affectera pas les images à être enregistrées Lorsque l écran ACL est pivoté à 180 vers l objectif la qualité d image de l écran ACL est temporairement réglée comme si ACL REG IA était réglé sur NORMAL Utilisation de la télécommande ª Télécommande L utilisation de la télécommande ...

Page 116: ...es deux appareils Le réglage par défaut est MAGNETO1 Lorsque la pile de type bouton est remplacée le réglage retournera au paramètre par défaut MAGNETO1 1 Réglage sur le caméscope Sélectionnez CONFIGURATION TELECOMMANDE MAGNETO1 ou MAGNETO2 2 Réglage sur la télécommande MAGNETO1 Appuyez sur D et sur simultanément 1 MAGNETO2 Appuyez sur E et sur simultanément 2 Avertissement Danger d explosion si l...

Page 117: ...pince à la courroie de la poignée Les gauchers peuvent utiliser ce caméscope plus facilement 1 Microphone MIC 2 Touche de marche arrêt d enregistrement REC 3 Levier du zoom W T 4 Touche PhotoShot PHOTO SHOT 5 Touche du microphone TALK ª Raccordement de la télécommande câblée avec microphone de narration au caméscope 1 Branchez la télécommande câblée avec microphone de narration à la prise REMOTE a...

Page 118: ...urs balance des blancs ainsi que la mise au point seront réglées automatiquement Balance des blancs automatique 84 Mise au point automatique 84 La balance des couleurs et la mise au point peuvent ne pas être ajustées selon la source de lumière ou la scène Si c est le cas réglez les manuellement Réglage du mode scène 40 Réglage de la balance des blancs 41 Réglage de la vitesse d obturation 42 Régla...

Page 119: ...indication clignote en rouge 5 Qualité des images fixes ª À propos de l indication à l écran du temps de bande restante Le temps de bande restante est indiqué en minutes Lorsqu il arrive à moins de 3 minutes l indicateur commence à clignoter Durant un enregistrement de 15 secondes ou moins l indication du temps de bande restante peut ne pas être affichée ou bien l indication du temps de bande rest...

Page 120: ...ur la carte La touche PHOTO SHOT ne fonctionne pas si elle est appuyée à mi course Contrôle de l enregistrement La dernière image enregistrée est lue pendant 2 à 3 secondes Après le contrôle le caméscope sera mis en pause d enregistrement Sélectionnez le mode d enregistrement sur bande 1 Appuyez sur la manette pendant la pause d enregistrement jusqu à ce que l icône 1 apparaisse 2 Bougez la manett...

Page 121: ...n zoome un sujet avec un agrandissement de 4k à 10k ou plus il est difficile de réduire la légère secousse du caméscope tenu à la main Nous recommandons la diminution de l agrandissement du zoom et l approche du sujet lors de l enregistrement Pour l enregistrement d images fixes tenez le caméscope fermement avec vos mains et gardez vos bras immobiles sur les cotés afin de ne pas secouer le camésco...

Page 122: ...ent avec un effet de fonctionnement d obturateur Vous pouvez ajouter un son de fonctionnement d obturateur simulé 1 Sélectionnez AVANCE EFFET OBTUR EN FONCT ª À propos du symbole d obturation Le symbole d obturation n apparaît pas en mode de mise au point manuelle Lorsqu il n est pas facile de mettre au point un sujet faites la mise au point manuellement Vous pouvez enregistrer des images fixes su...

Page 123: ...t sur carte est utilisé la fonction du zoom numérique ne peut pas être utilisée ª Pour utiliser la fonction du microphone zoom Enclenché avec les opérations de zoom le microphone collectera les sons lointains clairement avec la prise de vue télé ou les sons proches avec la prise de vue grand angle Sélectionnez le mode d enregistrement sur bande 1 Sélectionnez AVANCE ZOOM MIC EN FONCT ª À propos de...

Page 124: ...et que le mode d enregistrement sur bande carte est sélectionné le voyant s allumera et le mode de démarrage rapide sera restauré Lorsque le caméscope est démarré rapidement avec la balance des blancs automatique en fonction cela peut prendre un certain temps pour que la balance des blancs se règle si la scène qui doit être enregistrée a une source différente de lumière que la dernière scène enreg...

Page 125: ...nregistrez le sujet tout en le visualisant dans le viseur La lumière de l écran ACL atteint environ 1 2 m 3 9 pi ou moins ª Pour annuler la fonction MAGICPIX Sélectionnez l icône MAGICPIX jusqu à ce que l indicateur MAGICPIX disparaisse S il est placé dans un endroit brillant l écran peut devenir blanchâtre durant un moment La fonction MAGICPIX augmente le temps de recharge du signal CCD jusqu à 3...

Page 126: ... son apparaissent graduellement Fondu de fermeture L image et le son disparaissent graduellement Sélectionnez le mode d enregistrement sur bande 1 Appuyez sur la manette jusqu à ce que l icône 1 apparaisse 2 Bougez la manette vers la gauche pour sélectionner l indicateur de fondu 3 Appuyez sur la touche de marche arrêt d enregistrement Démarrez l enregistrement fondu d ouverture Lorsque vous démar...

Page 127: ...ateur clignote ou n est pas affiché le flash ne peut pas être allumé La portée utile du flash est de 1 à 2 5 m 3 à 7 5 pi dans un endroit sombre Les images apparaîtront obscure ou rougeâtre lorsqu elles sont enregistrées en utilisant le flash a une distance plus grande que 2 5 m 7 5 pi Lorsqu on sélectionne FLASH ßA et que la vitesse d obturation le diaphragme ou le gain est réglé l indicateur soi...

Page 128: ...interrupteur OFF ON ou la molette de sélection de mode le mode veille du retardateur est annulé Si l enregistrement avec prise de vues en rafale RapidFire est sélectionné le maximum d images enregistrables est enregistré Enregistrement d images pour téléviseur à grand écran Ceci vous permet d enregistrer des images compatibles avec un téléviseur à grand écran Fonction grand écran Les images sont e...

Page 129: ...LLE IMAGE 640 2 Sélectionnez AVANCE RAFALE EN FONCT 3 Appuyez et maintenez une pression sur la touche PHOTO SHOT ª Pour arrêter la prise de vue en rafale RapidFire en cours Relâchez la touche PHOTO SHOT Vous pouvez appuyer à mi course sur la touche PHOTO SHOT puis commencer la prise de vue en rafale RapidFire La mise au point est fixée Si la fonction de stabilisation de l image est allumée alors l...

Page 130: ...US sur AUTO Mode sport Pour la lecture au ralenti ou la pause à la lecture des images enregistrées ce mode est exempt de secousse Pendant la lecture normale le mouvement des images peut ne pas sembler régulier Évitez les enregistrements sous une lumière fluorescente lumière au mercure ou lumière au sodium parce que la couleur et la luminosité à la lecture de l image peut changer Si vous enregistre...

Page 131: ...alance des blancs pour un réglage correct ª Pour régler la balance des blancs manuellement Sélectionnez à l étape 3 Puis tout en visualisant un sujet blanc sur l écran entier bougez la manette vers le haut pour sélectionner l indicateur ª À propos du clignotement de l indicateur Lorsque le mode de réglage manuel est sélectionné Le clignotement indique que la balance des blancs précédemment réglée ...

Page 132: ...UTO MANUAL FOCUS sur AUTO ou sur FOCUS Réglage manuel de la vitesse d obturation ouverture Vitesse d obturation Réglez la pour enregistrer des sujets à mouvements rapides Pour enregistrer des personnes la nuit et en extérieur sélectionnez une vitesse d obturation lente et utilisez le flash Les personnes et le fond deviendront plus lumineux Ouverture Réglez la lorsque l écran est trop lumineux ou t...

Page 133: ...hragme qui ne sont pas affichées ª Plage de la vitesse d obturation 1 60 1 8000 seconde Mode d enregistrement sur bande 1 2 1 2000 seconde Mode Enregistrement sur carte La vitesse d obturation plus proche de 1 8000 est plus rapide ª Plage de la valeur du diaphragme gain FERME Fermé F16 F1 7 OUVERT Ouvert 0dB 18dB La valeur plus proche de CLOSE assombrit l image La valeur plus proche de 18dB éclair...

Page 134: ...ECT REPRISE EN FONCT L indicateur apparaît Pour annuler le mode de lecture en reprise sélectionnez LECT REPRISE HORS FONCT ou placez l interrupteur OFF ON sur OFF Lorsque vous sélectionnez FONCTION USB CAM WEB et que vous branchez un câble de connexion USB le mode de lecture en reprise est annulé ª Paramètres du son Si vous ne pouvez pas entendre les sons désirés lorsque vous lisez une bande vérif...

Page 135: ...vitesses de la recherche avant rapide repérage arrière rapide sont 1 5k uniquement en mode lecture au ralenti SP 1 3k uniquement en mode lecture au ralenti LP 2k 5k 10k 20k ª Pour revenir à la lecture normale Appuyez sur la touche VAR SEARCH ou sur la touche 1 de la télécommande Les images peuvent être montrées avec un effet de mosaïque Le son est coupé durant la recherche Cette fonction est annul...

Page 136: ...pour effacer les informations à l écran Lecture sur carte Sélectionnez le mode de lecture sur carte 1 Utilisez la manette E Lit l image précédente D Lit l image suivante 1 Amorce arrêt du diaporama Lit les images fixes sur la carte dans l ordre Pendant que les données d une carte sont lues n utilisez pas la molette de sélection de mode Lorsque le voyant d accès est allumé n insérez pas et ne retir...

Page 137: ...chage multi écran Après la sélection du fichier appuyez sur la manette et affichez l icône de l opération 2 Bougez la manette vers le bas pour sélectionner 3 Bougez la manette vers le haut ou vers le bas afin de sélectionner SUPP 1 FICH puis appuyez la 4 Lorsque le message de confirmation apparaît sélectionnez OUI et appuyez sur la manette Pour arrêter l effacement sélectionnez NON ª Pour effacer ...

Page 138: ...ur 1 apparaît et le fichier sélectionné est verrouillé Appuyez sur la manette à nouveau et le verrouillage sera annulé 2 fichiers ou plus peuvent être verrouillés à la suite ª Pour finir les réglages Appuyez sur la touche MENU Écriture des données d impression sur une carte Paramètres DPOF Vous pouvez écrire les données d une image à être imprimée le nombre de copie et autre information donnée DPO...

Page 139: ...re enregistrées sur une carte Copie avec un enregistreur DVD ou un magnétoscope Doublage Des images enregistrées par le caméscope peuvent être sauvegardées sur un DVD RAM ou autre type de support Référez vous aux instructions de l enregistreur Placez une cassette enregistrée dans le caméscope et un DVD RAM ou cassette vierge dans l enregistreur DVD ou le magnétoscope 1 Connectez le caméscope à l e...

Page 140: ... Cela vous permet d enregistrer des images plus nettes 2 Sélectionnez BASE PRISE AV ENTR SORTIE Caméscope 3 Mettez sous tension et démarrez la lecture Autre appareil 4 Démarrez l enregistrement Caméscope 5 Enregistrement sur une bande Sélectionnez AVANCE ATTENTE ENR OUI Caméscope Uniquement en mode enregistrement sur la bande L icône apparaît Bougez la manette vers le haut pour démarrer l enregist...

Page 141: ...z exporter la source vidéo d un appareil au format analogique vers un autre appareil vidéo numérique branché à la prise DV au format numérique 1 Insérez le câble DV PV DDC9 PV DDC9 K optionnel fortement dans la prise DV aussi à fond que possible 1 Autre appareil Équipement vidéo etc 2 Caméscope 3 Autre équipement vidéo numérique A Signal analogique Autre appareil Équipement vidéo etc Caméscope B S...

Page 142: ...age contenant un signal de protection du droit d auteur protection de copie est enregistrée par le caméscope l image est déformée par un effet mosaïque à la lecture Débranchez le câble US B puisque les signaux venant d une source externe ne peuvent pas être enregistrés quand il est branché avec un câble USB Lorsque des images panoramiques sont entrées l affichage tel que l écran de menu ou les icô...

Page 143: ...r prendre des images Lorsque 16 bits est sélectionné les sons pris durant l enregistrement seront effacés par le doublage audio Sélectionnez BASE VITESSE ENR SP pour prendre des images ª Lecture de la piste sonore enregistrée avec la fonction de doublage audio Vous pouvez choisir entre le son enregistré par doublage audio et le son original Sélectionnez CONFIGURATION AUDIO 12 bits ST2 ou COMBINE S...

Page 144: ... le nombre d impression dans les paramètres DPOF Lorsque IMPR DPOF est sélectionné les images seront imprimées aussitôt que vous aurez déterminé la taille du papier 3 Bougez la manette vers la gauche ou la droite pour sélectionner l image désirée puis appuyez la 4 Sélectionnez le nombre d impression désiré Vous pouvez sélectionner jusqu à 9 impressions 5 Sélectionnez le réglage de l impression de ...

Page 145: ...es sur l ordinateur personnel 4 Suivre les instructions sur l écran de l ordinateur jusqu à ce que l installation soit terminée La fenêtre de réglage disparaîtra lorsque l installation aura été complétée Nota Si une fenêtre n apparaît pas automatiquement cliquer sur le bouton Démarrer du bureau puis cliquer sur Exécuter Lorsque la boîte de dialogue Exécuter s ouvre saisir D InstMenu exe et cliquer...

Page 146: ...e pas raccorder le câble USB avant d installer le pilote de périphérique USB Avant de faire les raccordements mettre hors marche tous les appareils concernés Il est recommandé de faire fonctionner le caméscope sur le secteur adaptateur fourni ª Pour le lecteur SD intégré En raccordant le caméscope au PC avec le câble USB il est possible de transférer directement sur le PC les images fixes enregist...

Page 147: ...leurs ou casque d écoute Logiciel nécessaire Windows Messenger 5 0 ou ultérieur Windows XP MSN Messenger Windows 98 Deuxième Édition Me 2000 DirectX 9 0b ou ultérieur Windows XP Pour utiliser le caméscope comme caméra Web les conditions suivantes doivent être satisfaites Windows XP SP1 ou une version subséquente est nécessaire Pour mettre à jour Windows XP avec SP1 ou supérieur sélectionnez Démarr...

Page 148: ...la molette de sélection de mode sur la position de mode d enregistrement sur bande 3 Régler AVANCE FONCTION USB CAM WEB Pour envoyer des images enregistrées sur une bande à un autre ordinateur en utilisant Windows Messenger régler BASE FONCTION USB CAM WEB sur le mode lecture de bande avant de connecter le caméscope à l ordinateur Lorsque vous utilisez le caméscope en tant que Webcam en mode de le...

Page 149: ...té du signal vidéo à échanger dépend de l état de la connexion Internet En mode caméra Web le signal vidéo ne peut pas être enregistré sur une bande ou sur une carte Il n est pas possible de faire acheminer l entrée vidéo de la prise DV vers l écran de l ordinateur En mode caméra Web la transmission du signal audio peut être interrompue selon les conditions de communication et l ordinateur utilisé...

Page 150: ... caméscope à OFF Finalement débrancher le câble USB Utilisation de MotionDV STUDIO Avec le système d exploitation Windows XP 2000 Me il est possible de raccorder le caméscope à l ordinateur personnel à l aide du câble DV Avec le système d exploitation Windows XP 2000 il est possible de raccorder le caméscope à l ordinateur personnel à l aide du câble USB mais il faut que le pilote Video Stream soi...

Page 151: ... 2 Cliquer sur Video Stream Driver Pilote Video Stream Le programme d installation démarre 3 Avec Windows XP Il se peut qu il soit nécessaire d installer DirectX 9 0b selon la configuration de l ordinateur Cliquer sur Yes Oui et poursuivre l installation L installation de DirectX 9 0b terminée l ordinateur redémarre Ne pas retirer le CD ROM L installation peut prendre un certain temps 4 Suivre les...

Page 152: ...Controller etc puis sélectionner Propriétés La dénomination Enhanced Host Controller peut être remplacée par EHCI selon le type de contrôleur utilisé 4 Cliquer sur l onglet Pilote pour vérifier la description à Fournisseur du pilote Si Microsoft est affiché à Fournisseur du pilote cela complète la confirmation Si un autre nom que Microsoft est affiché Mettre à jour le pilote en procédant comme sui...

Page 153: ...rs de ports USB ou si vous utilisez des rallonges le bon fonctionnement n est pas assuré Lorsque vous vous connectez à la borne USB du clavier le fonctionnement normal n est pas possible Déconnexion du câble USB Si le câble USB est déconnecté alors que l ordinateur est en marche un message d erreur s affiche Dans un tel cas cliquer sur OK et fermer la boîte de dialogue Suivre les instructions ci a...

Page 154: ...nvironnement d exploitation et autres facteurs le contenu des écrans utilisés dans les présentes instructions peut différer de celui sur l écran Bien que les écrans des présentes instructions soient en anglais à titre d exemple d autres langues sont également possibles Ces instructions ne traitent pas des opérations de base de l ordinateur personnel ni ne définissent des termes Une telle informati...

Page 155: ... l ordinateur personnel et supprimer USB Video Device Périphérique vidéo USB ou Panasonic DVC DV Stream Device sous Gestionnaire de périphériques 2 Régler le caméscope en mode PC et supprimer Panasonic DVC USB Storage Windows 98 Deuxième Édition ª À propos de la carte mémoire SD Carte mémoire SD La carte mémoire SD est pratiquement de la même taille Il s agit d une carte mémoire externe disponible...

Page 156: ...n ne pas s en préoccuper En mode carte le caméscope sauvegarde automatiquement les images sous un fichier numéroté IMGA0001 JPG etc Les numéros de fichiers sont enregistrés avec chaque image numérotée séquentiellement Lorsque le logiciel est utilisé sans fonction d affichage les données d indication comme la date ne s affichent pas Selon le logiciel utilisé la date et l heure peuvent ne pas être a...

Page 157: ...A 38 FONCTION USB 58 ZOOM NUM 33 ZOOM MIC 33 DATE HEURE 69 REGLAGE INITIAL 70 3 CONFIGURATION FONDU 36 ENR AUDIO 69 TEMOIN ENR 69 AFFICHAGE 69 TELECOMMANDE 26 BIP 69 ACL REG IA 25 REGLAGE ACL 24 REG VISEUR 24 MODE DEMO 70 PRISE AV 70 ECO ENERGIE 29 4 LANGUAGE 22 ª MENU DE LECTURE SUR BANDE 1 BASE DATE HEURE 69 PRISE AV 52 FONCTION USB 58 2 AVANCE RECH BLANC 30 VITESSE ENR 28 ATTENTE ENR 51 ENR AUD...

Page 158: ... 39 EFFET OBTUR 32 DATE HEURE 69 REGLAGE INITIAL 70 3 CONFIGURATION TEMOIN ENR 69 AFFICHAGE 69 TELECOMMANDE 26 BIP 69 ACL REG IA 25 REGLAGE ACL 24 REG VISEUR 24 ECO ENERGIE 29 4 LANGUAGE 22 ª MENU DE LECTURE IMAGE 1 BASE DATE HEURE 69 PROTEGER 48 2 AVANCE PARAM DPOF 48 FORMAT CARTE 48 3 CONFIGURATION AFFICHAGE 69 TELECOMMANDE 26 REGLAGE ACL 24 REG VISEUR 24 ACL REG IA 25 ECO ENERGIE 29 4 LANGUAGE ...

Page 159: ...ments sonores en 16 bits 48 kHz 2 pistes Le son peut être enregistré en haute qualité Si les signaux sonores sont doublés alors les signaux sonores originaux seront effacés ª TEMOIN ENR Sélectionnez EN FONCT et cela allume le voyant d enregistrement pendant l enregistrement ce qui indique que l enregistrement est en cours Sélectionnez HORS FONCT et ainsi le voyant ne s allumera pas même si l enreg...

Page 160: ...scope sont lues par un autre appareil l information des paramètres n est quelquefois pas affichée normalement ª SORTIE AUDIO Ceci commute le son qui doit être lu STEREO Son stéréo son principal et son secondaire G Son canal gauche son principal D Son canal droit son secondaire Autres menus ª REGLAGE INITIAL Lorsqu un menu ne peut pas être sélectionné selon une combinaison de fonctions sélectionnez...

Page 161: ...sh réglé sur j 37 Réduction yeux rouges 37 Microphone directionnel 33 Réduction du bruit du vent 37 Lorsque le microphone de la télécommande câblée avec microphone de narration est utilisé 27 Microphone externe supportant la griffe porte accessoires intelligente 14 Microphone externe supportant la griffe porte accessoires intelligente LOW CUT 14 5 Mode sport Mode scène 40 Mode portrait Mode scène ...

Page 162: ...vec la languette de prévention d effacement accidentel placée sur SAVE est insérée Pas de cassette insérée 0 La batterie incorporée est faible 24 L indicateur d avertissement alarme apparaît lorsque vous vous enregistrez vous même Tournez l écran ACL vers le viseur et contrôlez l indicateur d avertissement alarme Aucune carte n est insérée REMOTE Un mode de télécommande incorrect est sélectionné 2...

Page 163: ...rotégés CARTE VERROUILLEE La languette de protection d écriture de la carte mémoire SD est placée sur LOCK NETTOYAGE TETES REQUIS Les têtes vidéo sont sales 80 APPUYER COMMUTATEUR RESET Une irrégularité de l équipement a été détectée Appuyez sur la touche RESET 13 Ceci permet de résoudre le problème UTILISATION USB IMPOSSIBLE CHANGER DE MODE Le câble USB est branché au caméscope en mode d enregist...

Page 164: ...Lorsque la fonction MAGICPIX est utilisée Mode de carnation Télé macro Vérification d enregistrement Pendant l enregistrement sur une bande MAGICPIX Pendant l enregistrement sur une bande Lorsque le mode d enregistrement sur carte est utilisé Prise de vues en rafale RapidFire Lorsque TAILLE IMAGE est réglé sur autre chose que 640 Lorsque la vitesse d obturation est de 1 15 ou plus bas Flash Pendan...

Page 165: ... elle apparue Lorsque vous transportez le caméscope d un endroit froid vers un endroit chaud de la condensation peut se créer à l intérieur Dans ce cas l alimentation se coupe automatiquement mettant hors service toutes les opérations sauf la sortie de la cassette Attendez jusqu à ce que l indicateur de condensation disparaisse 79 4 La batterie se décharge rapidement Est ce que la batterie est com...

Page 166: ...trement ne peut pas être effectué 28 Est ce que de la condensation est apparue Aucune opération autre que le retrait de la cassette ne peut être effectuée lorsque survient de la condensation Attendez jusqu à ce que l indicateur de condensation disparaisse 79 Est ce que le couvercle de la cassette est ouvert Si le couvercle est ouvert le caméscope peut ne pas fonctionner normalement Fermez le couve...

Page 167: ...ode LP ne permet pas le doublage audio 28 4 Le son original a été effacé lorsque le doublage a été effectué Si vous effectuez un doublage audio sur un enregistrement fait en mode 16 bits le son original sera effacé Si vous désirez préserver le son original assurez vous de sélectionner le mode 12 bits pendant l enregistrement 5 Les sons ne peuvent pas être lus Bien qu une cassette sans doublage aud...

Page 168: ...teur disparaît l écran est gelé ou aucune opération ne peut être effectuée Coupez l alimentation du caméscope Si l alimentation ne peut pas être coupée appuyez sur la touche RESET ou enlevez la batterie ou l adaptateur CA puis re fixez la Après cela mettez sous tension à nouveau Si les opérations normales ne sont toujours pas restaurées débranchez l alimentation connectée et consultez le revendeur...

Page 169: ... et le message 3DETECTION CONDENSATION ou 3EJECTION CASSETTE seulement lorsque la cassette est insérée apparaissent Dans ce cas suivez la procédure suivante 3 en jaune La condensation adhère légèrement sur la tête ou la bande 3 en rouge La condensation adhère sur la tête ou la bande 1 Enlevez la cassette si elle est insérée Cela prend environ 20 secondes pour ouvrir le support de la cassette Cela ...

Page 170: ...mentanément sur les têtes ª À propos du caméscope Lorsque le caméscope est utilisé pendant un long moment le boîtier de l appareil devient chaud mais ce n est pas un mauvais fonctionnement Tenez le caméscope loin d un équipement magnétisé tel qu un téléphone cellulaire four à micro onde téléviseur et console de jeux vidéo Si vous utilisez le caméscope sur ou près d un téléviseur les images et les ...

Page 171: ...laissée dans le caméscope environ une minute de courant est consommée même lorsque le caméscope est à OFF Si la batterie est laissée dans le caméscope pendant un long moment une décharge excessive survient La batterie peut devenir inutilisable après qu elle soit chargée Préparez des batteries de réserve lorsque vous partez pour enregistrer Préparez des batteries correspondant à 3 ou 4 fois la péri...

Page 172: ...a lumière directe du soleil rayons ultraviolet et l humidité peuvent endommager la bande Un tel usage peut causer des dommages au caméscope et aux têtes Après utilisation assurez vous de rebobiner la cassette jusqu à son début mettez la dans un coffret pour la protéger de la poussière et rangez la verticalement Gardez la cassette loin des fortes sources magnétiques Les appareils utilisant des aima...

Page 173: ...est appelé réglage de la balance des blancs automatique Cependant comme le caméscope enregistre seulement les informations de la couleur blanche sous plusieurs sources de lumière le réglage de la balance des blancs automatique ne fonctionne pas normalement sous d autres sources de lumière Hors de la plage de réglage de la balance des blancs automatique l image deviendra rougeâtre ou bleuâtre Même ...

Page 174: ...s correctement dans les situations suivantes Enregistrez les images en mode de mise au point manuelle Enregistrement d un sujet ayant une extrémité proche du caméscope et l autre extrémité loin de lui Comme la mise au point automatique se règle au centre d une image il peut être impossible de mettre au point un sujet qui est placé à la fois au premier plan et en arrière plan Enregistrement d un su...

Page 175: ... 316 mV 10 kohms ou plus Entrée micro Sensibilité du micro 50 dB 0 dB 1 V Pa 1 kHz mini prise stéréo USB Fonction d écriture lecture sur carte USB 2 0 Hi Speed Support de protection sans droit d auteur Comforme aux normes PictBridge Interface numérique Prise d entrée sortie DV IEEE1394 4 broches Flash GN 5 5 Dimensions Environ 81 mm W k73 mm H k144 mm D Environ 3 2 po W k2 9 po H k5 7 po D Poids E...

Page 176: ... d images fixes enregistrables sur une carte mémoire SD optionnelle TAILLE IMAGE 640 1280 1600 2048 QUALITÉ IMAGE 32 Mo 220 440 47 76 30 47 18 29 64 Mo 440 880 98 158 63 98 39 62 128 Mo 880 1760 187 302 121 187 75 119 256 Mo 1760 3520 390 628 252 390 158 248 512 Mo 3520 7040 774 1246 502 774 314 493 1 Go 7040 14080 1550 2495 1006 1550 629 989 ...

Page 177: ... RP SD128BU1A W RP SD064BPPA W RP SD032BPPA BN SDCAPU 1B BN SDABPU 1B N2QCBD000030 Carte mémoire SD de 1 Go Carte mémoire SD de 512 Mo Carte mémoire SD de 256 Mo Carte mémoire SD de 128 Mo Carte mémoire SD de 64 Mo Carte mémoire SD de 32 Mo Lecteur Enregistreur USB pour carte mémoie SD Adaptateur de carte SD PCMCIA Télécommande câblée avec microphone de narration VW LDC10 Lumière vidéo CC 10 W fon...

Page 178: ...DOMMAGE DIRECT INDIRECT OU CONSÉCUTIF Certaines juridictions ne reconnaissent pas les exclusions ou limitations de dommages indirects ou consécutifs ou les exclusions de garanties implicites Dans de tels cas les limitations stipulées ci dessus peuvent ne pas être applicables RÉPARATION SOUS GARANTIE Pour de l aide sur le fonctionnement de l appareil ou pour toute demande d information veuillez con...

Page 179: ...ie 88 ª L Languette de prévention d effacement 19 Lecture au ralenti 44 Lecture en reprise 44 Lecture image par image 44 Lecture sur carte 46 ª M Microphone zoom 33 Mise au point manuelle 42 Mode de carnation 35 Mode éclairage faible 40 Mode mer et neige 40 Mode portrait 40 Mode projecteur 40 Mode scène 40 Mode SP LP 28 Mode sport 40 Molette de sélection de mode 21 MotionDV STUDIO 60 ª O Obstructi...

Page 180: ...is A Amos Lachine Québec H8T 1C4 514 633 8684 Toronto 5770 Ambler Drive Mississauga Ontario L4W 2T3 905 238 2181 Calgary 6835 8th Street N E Calgary Alberta T2E 7H7 403 295 3922 Vancouver 12111 Riverside Way Richmond BC V6W 1K8 604 278 4211 K Imprimé au Japon LSQT0862 A R 2004 Matsushita Electric Industrial Co Ltd ...

Reviews: