Panasonic Diga DMR-E100 Operating Instructions Manual Download Page 17

17

RQT6986

Re

cor

d

in

g

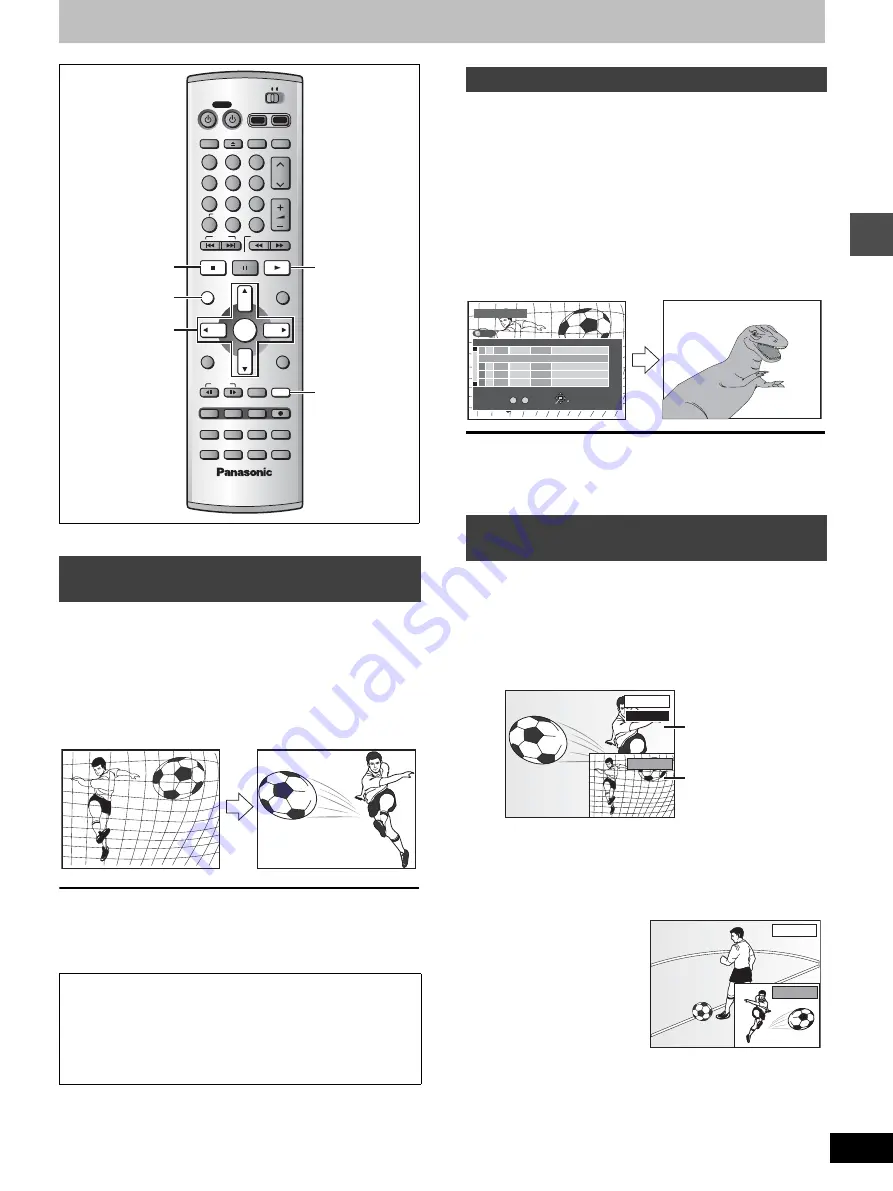
Playing while you are recording

[HDD]


[RAM]

During recording

Press [

1

] (PLAY).

Time slip indicator on the main unit lights.
Play starts from the beginning of the program being recorded. 

[Note]

Sound is not output while fast-forwarding.

While recording, you can play a program previously recorded.

1

During recording

Press [DIRECT NAVIGATOR].

Time slip indicator on the main unit lights.

2

Press [

3

4

] to select a program and

press [ENTER].

[Note]

Sound is not output while fast-forwarding.

You cannot edit programs (

page 36) during simultaneous rec

and play.

You can play the program being recorded to check that it is being
recorded correctly. You can also check parts that were recorded pre-
viously.

1

During recording

Press [TIME SLIP].

Time slip indicator on the main unit lights.

You will hear the playback audio.

Press [DIRECT NAVIGATOR] to select another program.

2

Press [

3

4

] to enter the time and

press [ENTER].

Press [

3

4

] to alter in 

one-minute units. Press 
and hold [

3

4

] to alter 

in 10-minute units.

Press [TIME SLIP] to show the play images in full. Press again to
show the play and recording images.

Playing from the beginning of the program 
while you are recording—Chasing Play

To stop play
Press [

].

To stop recording
Wait 2 seconds after stopping play, then press [

].

To stop timer recording, press [

], then [ENTER] within 5 sec-

onds.

DVD

TV

INPUT SELECT

VCR Plus+ OPEN/CLOSE

TV/VIDEO

CH

VOLUME

SKIP

DIRECT NAVIGATOR

PLAY LIST

TOP MENU

ENTER

MENU

FUNCTIONS

RETURN

STOP

PAUSE

PLAY/x1.3

SLOW/SEARCH

CANCEL

1

2

3

DVD

TV

4

5

6

7

8

9

0

100

FRAME

CM SKIP TIME SLIP

ERASE

REC

PROG/CHECK ADD/DLT

DUBBING REC MODE

STATUS

MARKER

AUDIO

SETUP

DISPLAY

POSITION

MEMORY

POWER

3

4

2

1


ENTER

DIRECT 

NAVIGATOR

1

TIME SLIP

HDD

DVD

e.g.,
You are recording a sports
program
 and you want to
watch it from the beginning.

The same sports program is 
played back from the begin-
ning. (Recording continues.) 

Simultaneous rec and play

Reviewing the recorded images while 
recording—Time Slip

DIRECT NAVIGATOR

No

DATE

CH

TIME

EDIT

TITLE

3

3

ENTER

RETURN

0   

~

   9

No

TOTAL 2

SELECT

01

4

Dinosaur

02

¥

6/20 THU

6

  9 : 00 PM

Soccer

1
1
1
1
1

6/19 WED 10 : 00 AM

TITLE

DVD

e.g.,
You want to watch the movie 
you recorded yesterday while 
recording a sport program.

The movie is played back 
while the sport program is 
being recorded.

0 min

PLAY 

REC 

Play starts from 30 
seconds previous.

The current recording 
images appear as a 
picture-in-picture.

PLAY 

REC 

Summary of Contents for Diga DMR-E100

Page 1: ...mbers are allocated to DVD players and software according to where they are sold The region number of this unit is 1 The unit will play DVDs marked with labels containing 1 or ALL 1 ALL 2 4 1 Example PC DVD VIDEO RECORDER Operating Instructions Model No DMR E100H For U S A only The warranty can be found on page 68 For Canada only The warranty can be found on page 69 En las páginas 70 y 71 hay una ...

Page 2: ...ipment does cause harmful interference to radio or televi sion reception which can be determined by turning the equipment off and on the user is encouraged to try to correct the interference by one or more of the following measures Reorient or relocate the receiving antenna Increase the separation between the equipment and receiver Connect the equipment into an outlet on a circuit different from t...

Page 3: ...l record the new program over the old one Relief Recording page 27 When timer recording to DVD RAM or DVD R the unit will compare the remaining space on the disc and the time necessary for record ing If space is insufficient the unit will record the program to HDD instead there is no relief recording function the other way i e from HDD to DVD RAM or DVD R Editing your recording HDD RAM You can div...

Page 4: ... play list or a play list scene during playback 33 Editing play lists 34 Editing programs 36 Editing still pictures 38 Editing SD VIDEO MPEG4 programs 42 HDD Disc setting 44 Entering text 46 On screen displays 47 Using on screen menus 48 Common procedures 48 Disc menu 48 Play menu 49 Audio menu 49 Video menu 49 Using the FUNCTIONS window 50 Changing the unit s settings 51 Summary of settings 51 Co...

Page 5: ...on To household AC outlet AC 120 V 60 Hz This unit Cooling fan Red White Yellow or S video cable not included Do not connect the unit through a video cassette recorder Video signals fed through video cassette recorders will be affected by copyright protection systems and the picture will not be shown correctly on the television Television Video cable not included 75 coaxial cable included below Te...

Page 6: ...n receive and sets the clock The unit automatically determines the type of transmission air waves or cable and puts them into channels as follows Batteries Use PUSH 1 2 PUSH 1 2 3 PUSH 4 5 R6 LR6 AA UM 3 Opening the rear cover Press with your finger Closing the rear cover Slide into place When the cover comes off Remote control signal sensor 7 m 23 feet directly in front of the unit 30x 30x 20x 20...

Page 7: ...RETURN When finished the Com plete screen or time display is shown Press ENTER To return to the previous screen Press RETURN To exit the SETUP screen Press SETUP Add or delete channels if necessary channels are not set or unnec essary channels are set While this unit is receiving the antenna signal but not during recording 1 Press the numbered buttons to select a channel e g 5 0 5 15 1 5 115 100 1...

Page 8: ...ETURN STOP PAUSE PLAY x1 3 SLOW SEARCH CANCEL 1 2 3 DVD TV 4 5 6 7 8 9 0 100 FRAME CM SKIP TIME SLIP ERASE REC PROG CHECK ADD DLT DUBBING RECMODE STATUS MARKER AUDIO SETUP DISPLAY POSITION MEMORY POWER 3 4 2 1 ENTER CANCEL RETURN SETUP HDD DVD Look up the guide channels for the stations in magazines Write down all the stations you can receive TAB SELECT Antenna System Auto Channel Setting Channel ...

Page 9: ... g 01 press 0 1 Code No and Manufacturer Test by turning on the television and changing channels Repeat the procedure until you find the code that allows correct operation Note If your television brand is not listed or if the code listed for your tele vision does not allow control of your television this remote control is not compatible with your television Operation Point the remote control at th...

Page 10: ...is in stereo only 2 Including discs recorded with MP3 The producer of the material can control how DVD Video and Video CDs are played This means that you may not be able to control play of a disc with some operations described in these operating instructions Read the disc s instructions carefully This unit can play CD R CD RW audio recording disc recorded with CD DA digital audio video CD video CD...

Page 11: ... Frame rate 6 fps to 15 fps The unit can handle a maximum of 999 files Follow the precautions indicated below to prevent damage to the internal HDD Not following precautions may result in a loss of recording stop of operation or recording of noise While operating Do not remove the AC power plug from the AC outlet or flip the power breaker switch Do not move the unit or subject to vibration or impa...

Page 12: ...TV switch DVD TV 9 D TV power on off button Í POWER TV 9 E Drive select buttons HDD DVD 14 F Television input mode selector TV VIDEO 9 G Input select button INPUT SELECT 16 H Channel buttons for recorder and TV W X CH 9 14 I TV volume buttons r s VOLUME 9 J Slow search buttons 6 5 SLOW SEARCH 20 K Play quick view button 1 PLAY a1 3 18 21 L Menu and Play list button MENU PLAY LIST 19 32 M Return bu...

Page 13: ...t off until it actually turns off F SD PC Card indicator On When a SD card or PC card is set in the unit page 22 Flashes When a SD card or PC card is being read written to G Down mix indicator On When multi channel recorded DVD Audio can be downmixed to 2 channels and output H MPEG4 indicator On SD VIDEO MPEG 4 format recordable page 14 I Channel J Main display section Recording and play counter a...

Page 14: ...cord lamp on the main unit lights up Recording will be made over unrecorded space on the HDD or on the disc Data will not be overwritten Program information e g time and date is registered in the program list page 19 Using the Direct Navigator To stop recording Press To pause recording Press Press again to continue recording Program is not split into a separate program Enjoying SD VIDEO MPEG4 prog...

Page 15: ...art of a simultaneously recorded SD VIDEO MPEG4 program may not be recorded when recording a program without recording limita tions right after recording a program with limitations 3 Excluding SD VIDEO MPEG4 programs 4 Only SD VIDEO MPEG4 programs 5 You cannot record or dub programs with limitations as SD VIDEO MPEG4 programs 6 Transfer All recorded content transferred to DVD RAM is deleted from t...

Page 16: ...appears 3 Press REC MODE to select the recording mode XP SP LP or EP 4 Press 2 1 to select Rec and then ENTER Recording starts When recording finishes The confirmation screen appears Press ENTER to finish DV auto recording To stop recording Press Note Select the type of audio recording from the Audio menu s Select Audio CH for DV input settings page 53 You cannot record SD VIDEO MPEG4 programs usi...

Page 17: ...ages Playing from the beginning of the program while you are recording Chasing Play To stop play Press To stop recording Wait 2 seconds after stopping play then press To stop timer recording press then ENTER within 5 sec onds DVD TV INPUTSELECT VCRPlus OPEN CLOSE TV VIDEO CH VOLUME SKIP DIRECTNAVIGATOR PLAY LIST TOP MENU ENTER MENU FUNCTIONS RETURN STOP PAUSE PLAY x1 3 SLOW SEARCH CANCEL 1 2 3 DVD...

Page 18: ...out The position is also cleared when you turn the unit off or open the disc tray The screen saver may appear when you stop play Press again and you can use this unit s tuner to watch television To pause play Press Press again to restart play Auto power off The unit switches to standby after about 6 hours in the stop mode You can turn this feature off or change the time to 2 hours page 51 Set Up O...

Page 19: ... this list to find programs to watch 1 Press DIRECT NAVIGATOR The highlighted program plays in the background 2 Press 3 4 to select the program and press ENTER To select with the numbered buttons e g HDD RAM DVD R 5 0 0 5 5 0 5 15 0 1 5 15 1 5 Play of the images that were playing in the background continues To stop play Press To clear the program list Press DIRECT NAVIGATOR And more Programs that ...

Page 20: ...audio off if you want to page 52 PLAY k1 3 Audio during Search HDD RAM DVD R DVD A DVD V VCD CD MP3 During play Press the numbered buttons to select the item e g 5 0 5 HDD MP3 5 0 0 5 15 1 5 15 0 1 5 Note This may not work with some discs This works only when stopped with some discs the screen saver is on the television A group DVD A or title DVD V number can be specified while the screen saver is...

Page 21: ... added 1 During play Press DISPLAY The on screen menus appear 2 Press 3 4 to select Play and press 1 e g DVD RAM 3 Press 3 4 to select Marker and press 1 to highlight the first aster isk HDD RAM DVD R DVD A DVD V VCD CD MP3 4 Press 2 1 to select an asterisk and press ENTER One marker is added To recall a marker Press 2 1 to select a marker number and press ENTER Play starts from the marked positio...

Page 22: ...num bered buttons e g 5 0 0 5 15 0 1 5 Inserting Removing the SD PC card Inserting the card Removing the card Inserting the card There are cards requiring adapters page 11 Removing the card If using the adapter remove the adapter and card together If the eject button does not come out To remove the card press the card in once more and then repeat steps 1 2 SD logo is a trademark Portions of this p...

Page 23: ...isplay still pictures one by one with constant interval Slide Show To play SD VIDEO MPEG4 programs RETURN 0 9 No SD VIDEO MPEG4 002 12 31 No CH DATE TITLE EDIT 3 3 START 5 00 PM 001 11 00 AM 12 24 SD Card ENTER SELECT Dinosaur Auto action 4 2 1 1 1 1 1 e g SD Card To erase a still picture or a SD VIDEO MPEG4 program Still pictures and programs are erased irretrievably by this pro cedure During pla...

Page 24: ... groups Using the tree screen to find a group Note Discs must conform to ISO9660 level 1 or 2 except for extended formats This unit is compatible with multi session but if there are a lot of sessions it takes more time for play to start Keep the num ber of sessions to a minimum to avoid this If you play a MP3 track that includes still picture data it will take some time before the music itself sta...

Page 25: ... DVD RAM or Video CD LR L R If it is a recording of an SAP broadcast each time you press AUDIO HDD RAM MAIN SAP For your reference You can change the audio for the full images being played with simultaneous rec and play and Time Slip HDD RAM While playing DVD Audio or DVD Video You can change the audio channel number each time you press the button This allows you to change things like the soundtra...

Page 26: ...ss 2 1 to select Enter Title and press ENTER page 46 Repeat steps 1 3 to program other recordings 4 Press RETURN The timer recording list disappears and the unit enters Timer Recording standby mode F appears on the unit display The unit is not off To save power turn the unit off by press ing Í DVD POWER Specify a time to stop recording DVD TV INPUTSELECT VCRPlus OPEN CLOSE TV VIDEO CH VOLUME SKIP ...

Page 27: ...ording programs using CANCEL page 29 To cancel recording when recording has already begun Press then ENTER within 5 seconds Recording stops Note When the program timer reaches the set time when in record ing standby mode timer recording will start even if the unit is playing or recording another program The actual time recorded may be longer than the program itself when television programs are rec...

Page 28: ...uto Renewal Recording indicator HDD The program will be automatically recorded over in succession Relief Recording indicator Programs that have been rerouted to the HDD because of insufficient space Recording drive indicator HDD DVD Message displayed in the CHECK line Some of the information shown in the CHECK line may not be cor rect while you are recording Enable Displayed if the recording can f...

Page 29: ...ms that are currently recording or press ENTER to change The timer recording setting screen appears 4 If you pressed ENTER in step 3 Move through the items with 2 1 and change the settings with 3 4 and press ENTER 5 Press PROG CHECK or RETURN The timer recording list disappears Note During timer recording you can change the end time as long as the recording mode is not FR Even when the power is of...

Page 30: ...bing Note that programs will not be transferred if they are protected Programs with recording limitations and play lists cannot be registered on the same dubbing list You cannot select play lists when the play list was created from a program containing a recording limitation Estimated destination storage Percentage of SD VIDEO MPEG4 program space for dubbing proportionate to the amount of blank sp...

Page 31: ... being displayed It is not possible to activate timer recording during dubbing Programs with recording limitations including play lists made from those programs cannot be dubbed The recording mode is set as follows High speed mode When dubbing to a DVD RAM When the programs recorded with Rec in DVD R high speed mode page 52 set to On and play lists created from that programs are being dubbed to a ...

Page 32: ...ecorded may be less than that specified in this manual You can high speed dub play lists created from recorded programs to a DVD R by switching Rec in DVD R high speed mode to On excluding the following cases Play lists created from programs using a variety of recording modes Play lists created from multiple programs using FR recording mode Play lists mixed with a variety of audio types Dolby Digi...

Page 33: ... To clear the scene list Press RETURN 1 Press ERASE A confirmation screen will be displayed 2 Press 2 1 to select Erase or Yes and press ENTER Note Even if you erase play lists or scenes the original program is not erased Playing play lists Playing play list scenes PLAY LIST USJ 006 02 10 26 0 07 3 3 1 1 1 1 1 1 002 003 004 001 No DATE TOTAL SCENE EDIT TITLE Auto action 03 10 21 004 0 06 0 9 No RE...

Page 34: ...y list appears at the bottom of the list RETURN 3 4 2 1 ENTER Numbered buttons PLAY LIST HDD DVD e g DVD RAM Once a play list has been erased it is irretrievable Check carefully before proceeding Play Scenes Operation While stopped Press PLAY LIST To clear the play list or scene list screen Press PLAY LIST To stop set up process Press RETURN For your reference You can only perform operations for P...

Page 35: ...1 to select the scene and press ENTER Press ENTER at the start point of the scene Note You can use basic functions like fast forwarding rewinding and slow motion play page 20 You can use the skip function to jump to another program page 20 You cannot specify an end point before a start point You may not be able to specify points within 3 seconds of each other Play pauses if the end of the last pro...

Page 36: ...4 to select the program To select with the numbered buttons e g 5 0 5 HDD 0 0 5 Press 1 so the submenu appears Press 3 4 to select the item and press ENTER To clear the program list Press DIRECT NAVIGATOR To stop set up process Press RETURN For your reference You can only perform operations for Properties if the disc is write protected Release protection cartridge page 10 disc page 44 to access ot...

Page 37: ...ke fast forwarding rewinding and slow motion play page 20 You can use the skip function to jump to another program page 20 The beginning and ending scenes cannot be set Repeat to enter other sections Press 3 4 to select Exit and press ENTER Press 2 1 to select Erase and press ENTER Press 3 4 to select Next and press ENTER then press 2 1 to select Erase and press ENTER Press 2 1 to select Erase and...

Page 38: ...will be entered It is recommended that the title is entered at the copying source After copying it may take some time to download the copying source information Print DPOF number setting page 40 is not transferred All copy of the card SD CARD HDD RAM maximum of 300 folders 3000 files Note A new folder will be created in the copying drive All compatible files in the folder are copied even if they a...

Page 39: ...screen is displayed 1 Press 3 4 to select Destination and press ENTER 2 Press 2 and 3 4 to select the drive 3 Press 1 and 3 4 to select the folder and press ENTER Some folders cannot be copied to page 23 Folder structure indicated by Press 3 4 to select still picture s folder and press ENTER Press 2 and 3 4 to select the drive and press 1 To enter the folder s title After selecting the still pictu...

Page 40: ... for Slide Show in Settings if the disc or card is write protected Release the protection cartridge or card page 10 folder right disc page 44 to access other items Settings SD CARD You can select a whole folder or individual pictures for printing and specify the number of prints to be made maximum 999 files Note Settings cannot be made for folders and files not in accordance with DCF standards Pri...

Page 41: ...elect all the still pictures in the folder Press 3 4 2 1 to select Folder and press ENTER A check mark appears on the folder s name check marks inputted separately will be erased To erase check marks Press 3 4 2 1 to select the still picture or Folder with the check mark and press ENTER To select all the still pictures in the folder Press 3 4 2 1 to select Whole and press ENTER A check mark appear...

Page 42: ...e SD PC card page 22 When the SD or CARD indicator in the unit display is flashing the card is being read from or written to Do not turn off the power or remove the card Such action may result in malfunction or loss of the card s contents To stop set up process Press RETURN You can also use 3 4 2 1 to select Cancel or No and press ENTER Note You can only perform operations for INPUT and Play if th...

Page 43: ...M SD Properties HDD RAM SD CARD Enter Title HDD RAM SD Once a a program has been erased it is irretrievable Check carefully before proceeding Program information e g time and date is shown Entering text page 46 If set this will protect the program from accidental erasure Note All content may be erased including files not supported by this unit Press 2 1 to select Erase and press ENTER The program ...

Page 44: ...nu 1 4 7 8 5 2 9 6 3 TOP MENU LIST To stop set up process Press RETURN Press 3 4 2 1 to select DISC SETTING and press ENTER Press 3 4 to select the item and press ENTER While stopped Press FUNCTIONS e g DVD RAM Preparation Press HDD or DVD to select the drive FUNCTIONS 3 4 2 1 ENTER HDD DVD RETURN RAM DVD R Enter Title RAM If set this will protect the disc from accidental erasure Disc Protection F...

Page 45: ... other equipment Visit Panasonic s homepage for more information about DVDs For U S A http www panasonic com playDVD R For Canada www panasonic ca Note Do not disconnect the AC power supply cord while the message Formatting the disc is on the television This can render the disc unusable Formatting normally takes a few minutes however it may take up to a maximum of 70 minutes The contents on the di...

Page 46: ...of it is shown in the pro gram list or play list screen If you enter a long title only part of it is shown in the TOP MENU page 44 after finalization DVD R When entering a program title the title that will appear in the TOP MENU can be previewed in Title on TOP MENU DVD R field Still picture folder titles Titles are saved in the TITLE DVD folder and can only be dis played on this unit Input is not...

Page 47: ...s the status of the disc tray when the HDD drive is selected a HDD Disc indication b Audio type page 25 Shows the selected audio type During reception Stereo Stereo is selected Mono Monaural is selected SAP Secondary audio program is selected appears when the type you have selected is actually being received During play LR R L a stereo program is recorded MAIN SAP an SAP program is recorded e g HD...

Page 48: ...OSE TV VIDEO CH VOLUME SKIP DIRECTNAVIGATOR PLAY LIST TOP MENU ENTER MENU FUNCTIONS RETURN STOP PAUSE PLAY x1 3 SLOW SEARCH CANCEL 1 2 3 DVD TV 4 5 6 7 8 9 0 100 FRAME CM SKIP TIME SLIP ERASE REC PROG CHECK ADD DLT DUBBING RECMODE STATUS MARKER AUDIO SETUP DISPLAY POSITION MEMORY POWER 3 4 2 1 ENTER DISPLAY HDD DVD Disc Video Audio Play Sound track Subtitle 1 Audio channel OFF L R Î Digital 2 0 ch...

Page 49: ...seems to come from virtual speakers on either side if the disc has surround signals recorded on it Natural Emphasis OFF J Turn off the surround effects on the other equipment V S S will not work or will have less effect with some discs Turn V S S off if it causes distortion V S S does not work for SAP recordings made on this unit s tuner Dialog Enhancer DVD A DVD V Dolby Digital 3 channel or over ...

Page 50: ...cture 0 to i3 Disc Video Audio Play Picture Video 1 2 Contrast Brightness Color Sharpness 0 0 0 0 i i i i Det 2 2 Disc Video Audio Play Picture Video 2 2 0 0 0 0 i i i i Gamma 3D NR Block NR Mosquito NR Det Icon Refer to DISC SETTING page 44 HDD Disc setting TIMER RECORDING page 26 Timer recording SETUP page 51 Changing the unit s settings JPEG page 22 Playing still pictures and SD VIDEO MPEG4 pro...

Page 51: ... the default settings Yes No Disc Audio Choose the audio language Some discs start in a certain language despite any changes you make here English French Spanish Original The original language of each disc will be selected Other Input a code back cover Subtitle Choose the subtitle language Automatic If the language selected for Audio is not available subtitles of that language will automatically a...

Page 52: ...sion is automated providing efficient recording Fixed Video compression is fixed when recording providing smooth video play Still Mode Select the type of picture shown when you pause play page 62 Frame still and field still Automatic Field Less blurred field stills are shown Select if jittering occurs when Automatic is selected Frame Sharper frame stills are shown Select if small text or fine pat ...

Page 53: ... than that of normal XP mode recordings Dolby Digital page 62 LPCM page 62 Select Audio CH for DV input page 54 You can select the kind of sound when recording from the unit s DV terminal Stereo 1 Stereo 2 Mix Display Status Messages Choose whether to show on screen messages automatically Automatic Off Language of Display Message Choose the language for these menus and the on screen messages Engli...

Page 54: ...has been set 6 Press SETUP The following display appears when you use a remote control with a different code If you are trying to use this unit s remote control change its code to match the unit s step 5 above Stereo 1 Records sound L1 R1 when DV recording is taking place Stereo 2 Records added sound such as narration L2 R2 subsequent to original recording Mix Records both Stereo 1 and Stereo 2 L1...

Page 55: ...elect ON the clock is advanced one hour starting at 2 a m on the first Sunday in April and ending at 2 a m on the last Sunday in October TIME ZONE left EST CST MST PST AST HST s5 s6 s7 s8 s9 s10 J 5 Press ENTER The clock starts Note When you change the time zone the recording times for programs recorded before the time zone was changed also change to corre spond to the new time zone Adjust the tim...

Page 56: ... You can choose from the following characters A Z 0 9 space To delete the caption press CANCEL Repeat step 5 to enter the other characters 6 Press 2 1 to return to the Channel Number column when you are finished Repeat steps 4 5 and 6 as necessary 7 Press ENTER The Channel screen reappears To return to the previous screen Press RETURN To exit the SETUP screen Press SETUP Other channel settings Pre...

Page 57: ...al connection Connect to an amplifier with built in decoders 59 A SETUP Audio Digital Audio Output Set PCM Down Conversion to suit the equipment Set Dolby Digital and DTS to suit the equipment 53 Change speaker settings on the amplifier Enjoying stereo or Dolby Pro Logic Analog connection Connect to an analog amplifier or system component 59 B SETUP Audio Digital Audio Output Set PCM Down Conversi...

Page 58: ...d and view both scrambled and unscrambled channels if connections are made as shown in the diagram below Change the video input on the television when you want to watch another program while recording You cannot do a timer recording unless the channel is first selected on the cable TV box Connecting a cable TV box satellite receiver One cable TV box satellite receiver RF IN RF OUT VHF UHF OPTICAL ...

Page 59: ...here are with digital signals Connecting an amplifier or system component RF IN RF OUT VHF UHF OPTICAL DIGITAL AUDIO OUT PCM BITSTREAM COMPONENT VIDEO OUT 480P 480I Y PB PR R AUDIO L R AUDIO L VIDEO VIDEO S VIDEO S VIDEO L3 L1 IN 1 IN 3 R AUDIO L R AUDIO L VIDEO VIDEO S VIDEO S VIDEO OUT 1 OUT 2 R AUDIO L A B OPTICAL IN AUX IN L R Digital connection Analog connection OPTICAL To enjoy multi channel...

Page 60: ...eo cable instead of the yellow video cable you may make recordings of higher picture quality Note If audio output on the other equipment is monaural use a stereo monaural conversion cable not included Connecting other video equipment Connecting to the L2 and DV input terminals on the front of the unit S VIDEO OUT AUDIO OUT VIDEO OUT L R DV OUT P C C A R D S D C A R D Í I POWER L2 S VIDEO IN VIDEO ...

Page 61: ...n change the television s setting as necessary Other antenna connection to the unit 300 75 transformer not included from the antenna Flat Twin lead 300 cable To this unit s RF IN terminal from the antenna Flat Twin lead 300 cable To this unit s RF IN terminal Round 75 coaxial cable VHF UHF band mixer not included from the antenna To this unit s RF IN terminal 300 75 transformer not included Flat T...

Page 62: ...icture types I Intra coded picture This picture has the best quality and is the best to use when adjusting the picture P Predictive coded picture This picture is calculated based on past I or P pictures B Bidirectionally predictive coded picture This picture is calculated by comparing past and future I and P pictures so it has the lowest volume of information JPEG Joint Photographic Experts Group ...

Page 63: ... played in your region You tried to play a disc with a region number different from this unit s region number This unit can only play discs with the region numbers compatible with this unit 1 All or including the number 1 Cover page Your selection exceeds the recorder s rating limit A ratings level has been set for DVD Video with this unit Unlock the unit with Ratings in Disc 51 Finalizing is nece...

Page 64: ...display 11 Cannot eject disc or card You cannot remove the disc while playing editing still pictures or SD VIDEO MPEG4 pro grams Press RETURN several times to exit the play edit screen The unit may have a problem With the power off press and hold and CHW at the same time on the main unit for about 5 seconds Remove the disc and consult the dealer The images from this unit do not appear on the telev...

Page 65: ...and subtitles cannot be selected The languages are not recorded on the disc You may have to use the disc s menus to select languages 19 No subtitles Subtitles are not recorded on the disc Turn the subtitles on 48 Angle cannot be changed This function depends on software availability Angles can only be changed during scenes where different angles are recorded You have forgotten your rat ings passwo...

Page 66: ... even when is pressed Press and then ENTER within 5 seconds to turn F off Recording stops The available recording time doesn t increase even after erasing recordings on the disc As this unit is unable to erase data written to DVD RAM with a computer the available record ing time does not increase The data will be erased if you reformat the disc If the disc is dirty wipe with the DVD RAM PD disc cl...

Page 67: ...cording system MPEG 4 conforming Number of pixels Super fine Fine 320 a 240 QVGA Normal Economy 176 a 144 QCIF Recording rate Max Super fine 1050 kbps Fine 430 kbps Normal 300 kbps Economy 100 kbps Including audio recording rate of 32 kbps Audio recording system G 726 conforming File format SD VIDEO specification compliant ASF 3 SD Video MPEG2 Card slot SD Memory Card PC Card Type II Compatible me...

Page 68: ...RE NO EXPRESS WARRANTIES EXCEPT AS LISTED UNDER LIMITED WARRANTY COVERAGE THE WARRANTOR IS NOT LIABLE FOR INCIDENTAL OR CONSEQUENTIAL DAMAGES RESULTING FROM THE USE OF THIS PRODUCT OR ARISING OUT OF ANY BREACH OF THIS WARRANTY As examples this excludes damages for lost time travel to and from the servicer loss of media or images data or other recorded content The items listed are not exclusive but...

Page 69: ...mer Care Centre at 905 624 5505 or www panasonic ca A Panasonic Factory Servicentre listed below IF YOU SHIP THE PRODUCT TO A SERVICENTRE Carefully pack and send prepaid adequately insured and preferably in the original carton Include details of the defect claimed and proof of date of original purchase 1 Damage requiring service The unit should be serviced by qualified service personnel if a The A...

Page 70: ...IDEO VIDEO S VIDEO S VIDEO L3 L1 IN 1 IN 3 R AUDIO L R AUDIO L VIDEO VIDEO S VIDEO S VIDEO OUT 1 OUT 2 AUDIO IN R L VIDEO IN VHF UHF RF IN A la antena Antena exterior Cable de TV Antena interior Televisor Cable de alimentación de CA incluido Conecte por último Conecte también los cables de alimentación de CA para el otro equipo Cable de audio vídeo incluido Cable de antena desconectado normalmente...

Page 71: ...DVD R DVD A DVD V VCD CD MP3 1 Pulse Í DVD POWER para encender el aparato 2 Pulse HDD o DVD para seleccionar la unidad de reproducción El botón HDD o DVD se enciende en la unidad No es posible reproducir simultáneamente en la unidad HDD unidad de disco duro y en la unidad DVD 3 Si seleccionó la unidad DVD Pulse OPEN CLOSE para abrir la bandeja e introducir un disco Vuelva a pulsar el botón para ce...

Page 72: ...r disassembly is prohibited Panasonic Consumer Electronics Company Division of Matsushita Electric Corporation of America One Panasonic Way Secaucus New Jersey 07094 http www panasonic com Panasonic Sales Company Division of Matsushita Electric of Puerto Rico Inc PSC Ave 65 de Infantería Km 9 5 San Gabriel Industrial Park Carolina Puerto Rico 00985 Panasonic Canada Inc 5770 Ambler Drive Mississaug...

Reviews: