background image

9

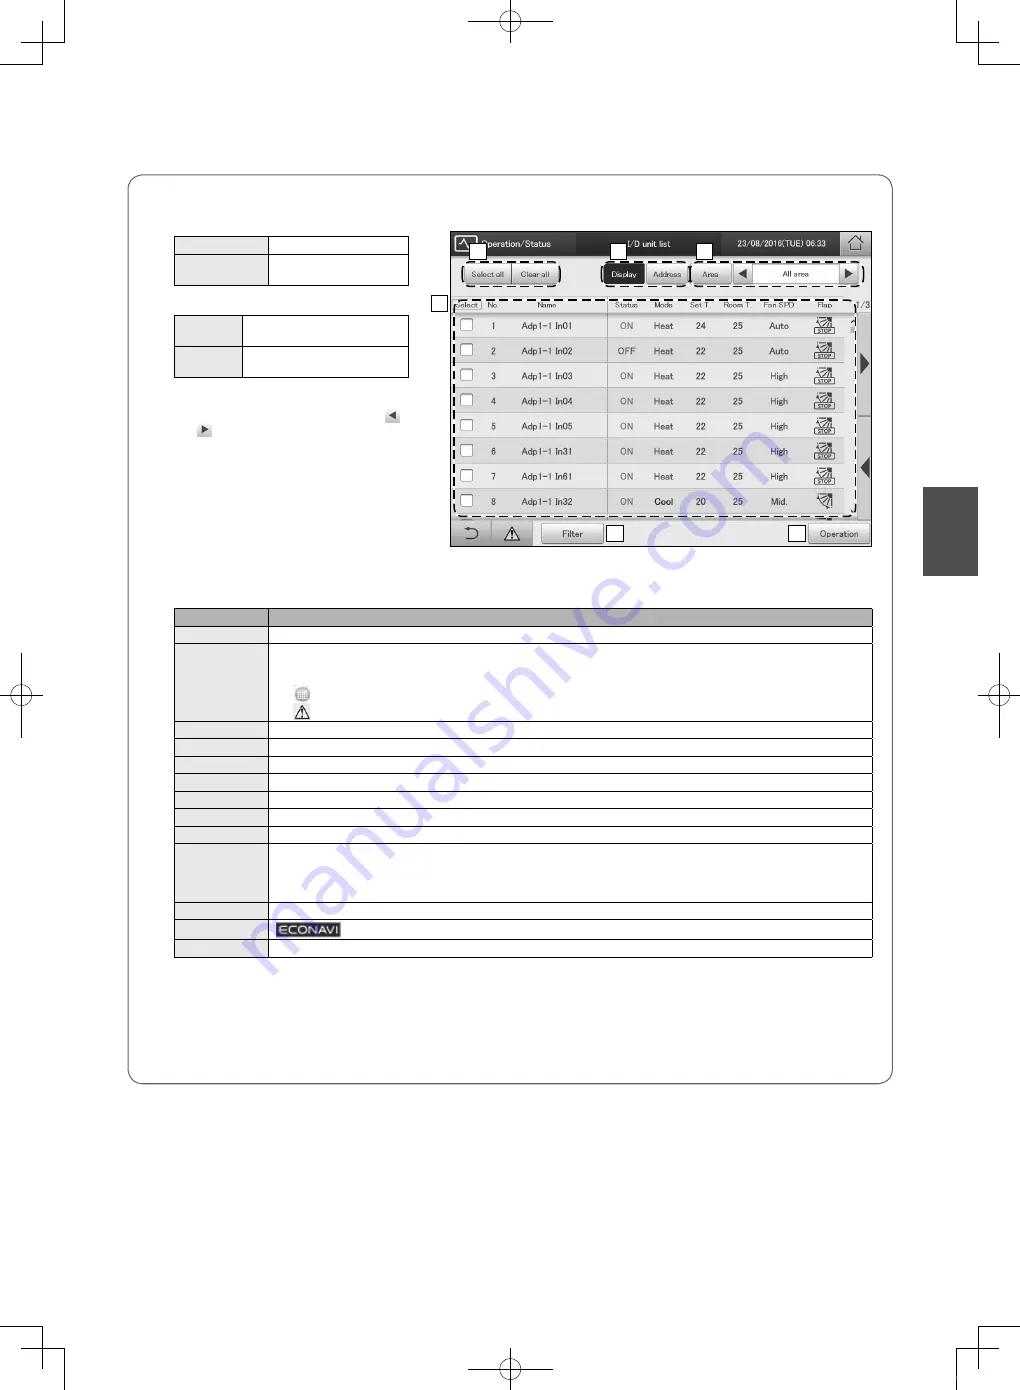
“I/D unit list” screen

A:   [Select all]/[Clear all] buttons

[Select all]

Select all indoor units.

[Clear all]

Cancel selection of all 

indoor units.

B:   Change list order.

Display

The display follows the order set 

in “I/D unit settings”.

Address

The display follows the address 

order set in “I/D unit settings”.

C:   Select the area to display in the list.  

The area changes each time you touch   

and  . Touch [Area] to display the “Select 

Area” dialogue.

(“All area” → “Area1” → “Area2” →…→ 

“AreaXXX*” → “All area”)

*  “XXX” stands for the number of the last of 

the registered areas.

D:   The settings of the indoor units are displayed 

in a list.

You can scroll up or down by swiping or 

flicking the screen.


y

Each time you touch the item name, the order switches between ascending (▲) and descending (▼).


y

Some items are not displayed for some models.

Item

Explanation

[Select]

Select the indoor units you want to operate.

Name

The names of the indoor units are displayed.

When an icon is displayed to the right of the name, this indicates that some situation has occurred.

(Alarm displays)

: The indoor unit filters need cleaning

: An alarm has occurred

Status

This indicates the current operating status (ON/OFF). (P.10)

Mode

The current operating mode (Heat, Dry, Cool, Fan, Auto) is displayed. (P.10)

Set T.

The current temperature setting is displayed. (P.11)

Room T.

The current room temperature is displayed.

Fan SPD

The current fan speed (High, Mid., Low, Auto) is displayed. (P.11)

Flap

The airflow direction is displayed. (P.11)

Prhbt.

This indicates the remote controller operation “Accept” or “Prhbt1” to “Prhbt4”. (P.11)

Sche.

This indicates the setting status of the schedule (Yes, --, OFF).

Yes:  This indicates that a schedule is set.

--: 

This indicates that a schedule is not set.

OFF:    This indicates that a schedule is set, but that the schedule has not started because indoor units are off or similar.

Eco

” is displayed when the energy saving setting is running. (P.11)

ECONAVI

” is displayed when the ECONAVI setting is running. (Only for models with ECONAVI) (P.11)

e-CUT

” is displayed when the e-CUT function is running.

E:   After cleaning the filters, touch to clear the filter icon from the display.

F:   The “Settings” dialogue of the indoor unit selected at D is displayed.

You can change the settings for the selected indoor unit in the “Settings” dialogue. (→ “Changing the settings on the indoor unit” 

(P.10))


y

There may be differences in the items you can set depending on the model of the indoor unit.


y

When you have selected multiple units, setting items in common are displayed in the “Settings” dialogue.

A

B

C

E

D

F

Operation

CZ-256ESMC3_QR_EU.indd   9

2016/09/12   17:13:19

Summary of Contents for CZ-256ESMC3

Page 1: ...he unit read these operating instructions thoroughly and keep them for future reference FRAN AIS Avant d utiliser l appareil lisez ce mode d emploi dans son int gralit et conservez le pour toute r f r...

Page 2: ...njury or death This symbol refers to a hazard or unsafe practice which can result in personal injury or product or property damage Matters to be observed Prohibited matters WARNING Do not use this app...

Page 3: ...t for remote control Browsers Internet Explorer 11 or later or Google Chrome Screen resolution 1280 1024 recommended USB memory devices that can be used Standard type USB2 0 Capacity 4 GB or more Caut...

Page 4: ...tallation precautions z z Do not install in locations with high humidity lots of oil vibrations where direct sunlight can reach the unit or near sources of heating This may cause malfunction z z Do no...

Page 5: ...k This is an operation where the finger on the touch panel is flicked in a direction up or down This is used to scroll quickly Flick Touch Buttons and boxes There are varieties of buttons and boxes on...

Page 6: ...owing way Gr 1 Gr 2 Gr 5 increases the numeric figure decreases the numeric figure The numbers will change continuously if you continue to touch the button The numbers cycle around in the following wa...

Page 7: ...left The display changes according to the direction you can scroll F Back icon Touch this to go back to the previous menu G Warning icon The Alarm list screen is displayed when you touch this z z In...

Page 8: ...fer to P 9 for details about the screen Note y y You can select indoor units to change their settings Changing the settings on the indoor unit P 10 Select the area to display 1 Touch Area z z The Sele...

Page 9: ...Heat Dry Cool Fan Auto is displayed P 10 Set T The current temperature setting is displayed P 11 Room T The current room temperature is displayed Fan SPD The current fan speed High Mid Low Auto is di...

Page 10: ...e displayed in the Settings dialogue 5 Change the settings of the items Common display area Operation display area Select an item from the common display area and set the operation in the operation di...

Page 11: ...rhbt1 Prhbt2 Prhbt3 or Prhbt4 Accept Allows operations with the remote controller Prhbt1 to Prhbt4 Operations on the remote controller are restricted Eco Enable or disable energy saving operation 1 To...

Page 12: ...on calculation Calendr sttngs for distr calc P 28 Setting finished Set up flow for different operating styles Settings required Settings may be required Settings not required Step Category step Settin...

Page 13: ...olume settings Identification number Initialize Initialise the days accumulated data 13 Initialize 1 Attention needs to be paid to administration divisions when devices such as systems controllers are...

Page 14: ...an set English US English UK German Italian French Spanish and Portuguese z z The settings are registered and the SlctLang dialogue closes 4 5 Touch Select time zone z z The Select time zone dialogue...

Page 15: ...gent controller and Coordinated Universal Time UTC If the former is 1 hour ahead of the latter for example select UTC 1 z z The settings are registered and the Select time zone dialogue closes 6 7 Tou...

Page 16: ...urs Minutes Seconds Set the time Use to set Hours Minutes and Seconds The time system for Hours is 24 hours 4 Touch Register z z To cancel the settings touch Cancel 4 1 Touch IntelContrlr maint in Set...

Page 17: ...1 Touch System Settings in Settings z z The System settings screen is displayed 1 2 Touch Check configuration z z The Check configuration screen is displayed 2 3 Touch Check configuration z z Confirma...

Page 18: ...n one 3 4 Touch Setng z z The Edit unit settings dialogue is displayed 4 5 Change the settings Item Explanation Name Change the name of the indoor unit Touch the text box and enter with the touchscree...

Page 19: ...indoor unit When interface adaptors are installed Touch the text box and enter with the touchscreen numeric keypad ElecHeatrCap Set the capacity of the electric heater if the model has an electric he...

Page 20: ...o manage 1 2 Touch CNTR adr AutSet 2 Note y y The central address is shared with other centralised controllers system controllers etc Do not change unless necessary y y After setting the central addre...

Page 21: ...an enter up to 16 letters or numbers Display Use to set the order when displayed in a list Continued on next page 1 Touch System Settings in Settings z z The System settings screen is displayed 1 2 To...

Page 22: ...area group settgs dialogue closes z z To cancel the settings touch Cancel 6 7 Put a check mark in the Valid column z z Put a check mark in the area group to use 7 8 Touch Register z z To cancel the s...

Page 23: ...oup You can enter up to 16 letters or numbers Display Use to set the order when displayed in a list Continued on next page 1 Touch System Settings in Settings z z The System settings screen is display...

Page 24: ...7 Put a check mark in the Valid column z z Put a check mark in the distribution group to use in distribution calculations 7 8 Touch Register z z To cancel the settings touch Cancel 8 Note y y Do not p...

Page 25: ...to be displayed for the pulse meter After decimal pt Use to set the number of decimal places to be displayed for the pulse meter 0 to 3 Display Use to set the order when displayed in a list Type Use t...

Page 26: ...t the distribution group to be measured and touch Select 6 Touch Register z z The Edit pulse meter sttgs dialogue closes z z To cancel the settings touch Cancel 6 7 Put a check mark in the Register co...

Page 27: ...set billing method Billing method Set the billing method for gas power generation Energy savng dist Set the range of energy savings effects for multi function air conditioners or ice thermal storage...

Page 28: ...ified days P 29 CtffDay Set the monthly cut off days 1 to 28 End Registering cut off days P 29 RglrHourRnge Set the distribution time slots for each day of the week Regular hour range settings possibl...

Page 29: ...e column changes when you touch this Touch again to return to the original You cannot set a date in the past however z z Touch the day of the week column to set the specified day by day of the week 1...

Page 30: ...Minutes 3 4 Touch Set z z The set time is displayed in the cell z z To delete the set time slot select the time slot to delete and touch Clear z z To copy the set time slot select the time slot to cop...

Page 31: ...re d unit s int rieures inclut l adaptateur d interface ESPA OL Precauciones de seguridad ADVERTENCIA PRECAUCI N Este s mbolo hace referencia a un peligro o pr ctica no segura que pueden producir da o...

Page 32: ...leine Innenger te 128 Au enger te 60 y y An die Bedieneinheit mit Kommunikationsadapter Innenger te 256 Au enger te 120 2 Die Anzahl der Innenger te schlie t den Schnittstellenadapter ein ITALIANO Pre...

Page 33: ...56 binneneenheden en 120 buiteneenheden 2 Het aantal binnenunits omvat ook de interface adaptor PORTUGU S Precau es de seguran a AVISO CUIDADO Este s mbolo refere se a um perigo ou a uma pr tica n o s...

Page 34: ...znych praktyk kt re mog skutkowa obra eniami lub uszkodzeniem produktu lub mienia Wskazania kt rych nale y przestrzega Zachowanie zabronione NIEBEZPIECZE STWO Nie u ywa tego urz dzenia w potencjalnie...

Page 35: ...Chrome 1280 1024 USB USB2 0 4 y y y y y y Panasonic 1 y y 128 60 y y 256 120 2 y y y y CZ 256ESMC3 240 280 20 65 mm 2 7 kg 0 C 40 C 20 80 100 240 50 60 20 30 25 C 100 25 C 8 1 64 2 30 Internet Explore...

Page 36: ...years from delivery of this product Panasonic will give to any third party who contacts us at the contact information provided below for a charge no more than our cost of physically performing source...

Reviews: