background image

PREPARING TO INSTALL THE INDOOR UNIT

  • 

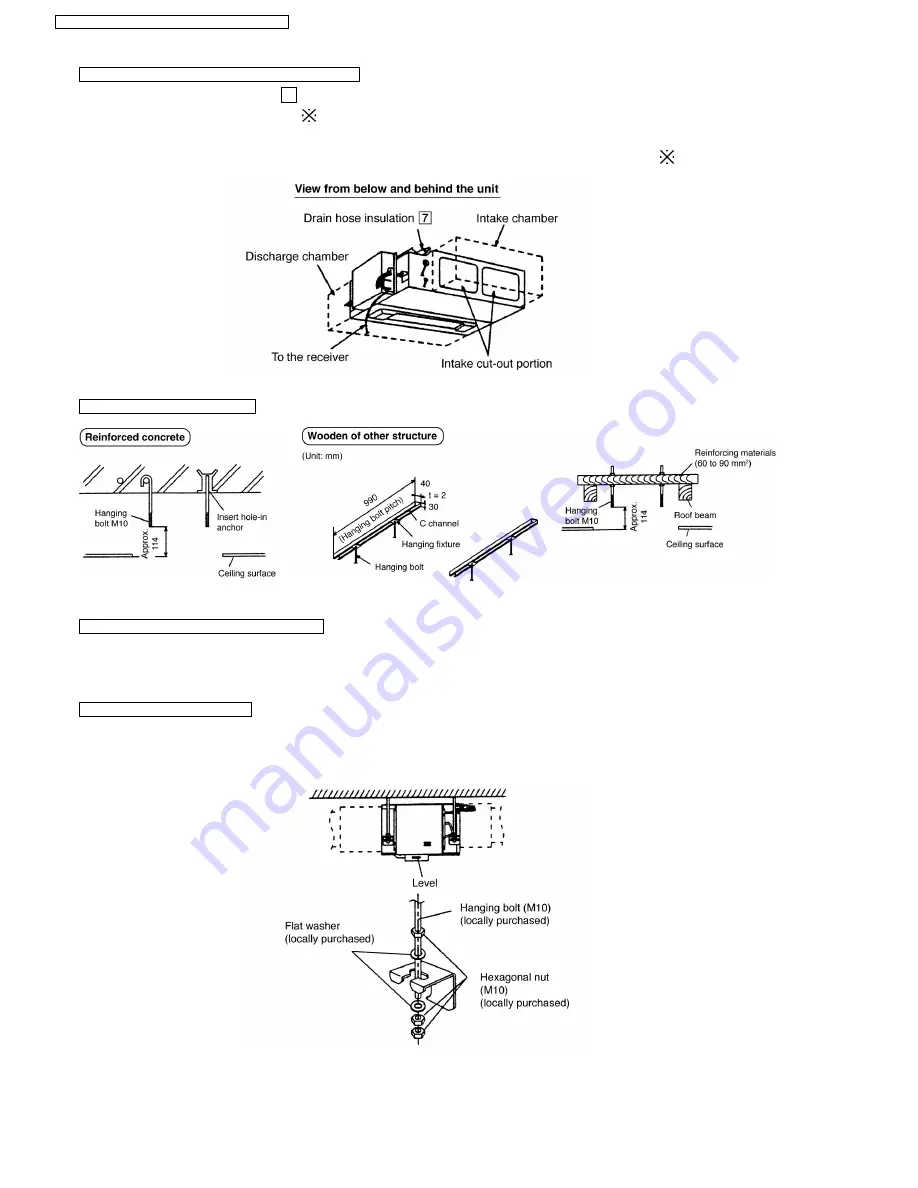
Fit the drain hose insulation 7

around the drain hose as shown in the diagram beside.

  • 

Attach the discharge chamber. (

) (10 screws)

  • 

Cut out the intake cut-out portions at the unit rear panel using a cutter or other tools to make openings.

  • 

Remove the two screws at the rear edge of the unit top panel and attach the intake chamber. (

) (8 screws)

Securing the Hanging Bolts

Switching the High State Switch (SW2)

  • 

To increase the air volume, open the control box and on the control board, switch the high state switch (SW2) to “HI”.

  • 

See the diagram for “Connecting the Indoor/Outdoor Connecting Cable”.

Installation into the Ceiling

  • 

Attach the nuts and washers to the hanging bolts, then lift up and hook the main unit onto the hanging fixtures.

  • 

Check if the unit is leveled using a level or a vinyl hose filled partially with water.

56

CS-E15DD3EW CU-E15DBE / CS-E18DD3EW CU-E18DBE

Summary of Contents for CS-E15DD3EW

Page 1: ...d Unauthorized copying and distribution is a violation of law CS E15DD3EW CU E15DBE CS E18DD3EW CU E18DBE 5 Refrigeration Cycle Diagram 13 6 Block Diagram 14 7 Wiring Diagram 15 8 Operation Details 16 8 1 Basic Operation 16 8 2 Protection Control Features 26 9 Operating Instructions 32 10 Installation And Servicing Air Conditioner Using R410A 40 10 1 Outline 40 10 2 Tools For Installing Servicing ...

Page 2: ...y Improvement Breakdown Self Diagnosis function 14 Exploded View Indoor Unit 75 14 1 CS E15DD3EW CS E18DD3EW 75 15 Replacement Parts List Indoor Unit 76 15 1 CS E15DD3EW CS E18DD3EW 76 16 Exploded View Outdoor Unit 77 16 1 CU E15DBE CU E18DBE 77 17 Replacement Parts List Outdoor Unit 78 17 1 CU E15DBE CU E18DBE 78 18 Electronic Circuit Diagram 79 18 1 Indoor Unit 79 18 2 Outdoor Unit 80 18 3 Remot...

Page 3: ... and OFF Timer setting and cancellation CLOCK Powerful Mode Operation POWERFUL Increase or decrease set temperature 16 C to 30 C Air Swing is not applicable FAN SPEED Check Point Reset Point RESET CHECK AIR SWING Breakdown self diagnosis function Clear memory data CANCEL OFF TIMER ON TIMER FAN SPEED AUTO HEAT DRY COOL OFF MODE TIMER ON 1 2 3 OFF CLOCK RESET SET CANCEL TEMP POWERFUL FANSPEED AIRSWI...

Page 4: ...matic Restart Control Operation is restarted after power failure at previous setting mode Low Pressure Control Gas Leakeage Detection Deodorizing Control Four Operation Modes Automatic Heating Cooling and Soft Dry Operation Operation Indication Lamps LED POWER Green Lights up in operation blinks in Automatic Operation Mode judging deice On Timer sampling and Hot Start operation TIMER Orange Lights...

Page 5: ...tion Standby Control Compressor Overheating Prevention Control IPM Power Transistor Overheating Protection Control Total Running Current Control Mininum Operation Frequency Protection Control Low Operation Frequency Protection Control Outdoor Air Temperature Control 5 CS E15DD3EW CU E15DBE CS E18DD3EW CU E18DBE ...

Page 6: ...1 250 Hi m3 min cfm Cooling 7 9 280 Cooling 48 5 1 710 Heating 8 9 315 Heating 48 5 1 710 dB A Cooling High 33 Low 27 Cooling 46 Heating High 35 Low 28 Heating 47 Noise Level Power level dB Cooling High 49 Cooling High 59 Heating High 51 Heating High 60 Electrical Data Input Power W Cooling 1 240 255 1 500 Heating 1 820 260 2 090 Running Current A Cooling 5 7 5 6 Heating 8 2 8 1 EER W W Cooling 3 ...

Page 7: ...tor 8 poles Transistor 8 poles Rate Output W 30 40 Fan Speed Lo Cool Heat rpm 900 980 Me Cool Heat rpm 1 100 1 170 Hi Cool Heat rpm 1 300 1 370 660 660 Heat Exchanger Description Evaporator Condenser Tube material Copper Copper Fin material Aluminium Pre Coat Aluminium Fin Type Louver Fin Corrugated Fin Row Stage Plate fin configuration forced draft 2 12 1 28 FPI 20 18 Size W H L mm 857 252 25 4 8...

Page 8: ...ating 13 0 460 dB A Cooling High 41 Low 30 Cooling 47 Heating High 41 Low 32 Heating 48 Noise Level Power level dB Cooling High 57 Cooling High 60 Heating High 57 Heating High 61 Electrical Data Input Power W Cooling 1 620 255 1 840 Heating 1 850 260 2 200 Running Current A Cooling 7 3 7 1 Heating 8 3 8 0 EER W W Cooling 3 15 3 53 3 10 BTU hW Cooling 10 7 12 0 10 5 COP W W Heating 3 30 3 46 3 23 B...

Page 9: ...an Speed Lo Cool Heat rpm 1 020 1 200 Me Cool Heat rpm 1 220 1 410 Hi Cool Heat rpm 1 430 1 630 660 660 Heat Exchanger Description Evaporator Condenser Tube material Copper Copper Fin material Aluminium Pre Coat Aluminium Fin Type Louver Fin Corrugated Fin Row Stage Plate fin configuration forced draft 2 12 2 34 FPI 20 16 Size W H L mm 857 252 25 4 849 3 878 714 36 4 Refrigerant Control Device Exp...

Page 10: ...4 Dimensions 4 1 Indoor Unit Remote Control 4 1 1 CS E15DD3EW 10 CS E15DD3EW CU E15DBE CS E18DD3EW CU E18DBE ...

Page 11: ...4 1 2 CS E18DD3EW 11 CS E15DD3EW CU E15DBE CS E18DD3EW CU E18DBE ...

Page 12: ...4 2 Outdoor Unit 4 2 1 CU E15DBE CU E18DBE 12 CS E15DD3EW CU E15DBE CS E18DD3EW CU E18DBE ...

Page 13: ...5 Refrigeration Cycle Diagram 13 CS E15DD3EW CU E15DBE CS E18DD3EW CU E18DBE ...

Page 14: ...6 Block Diagram 14 CS E15DD3EW CU E15DBE CS E18DD3EW CU E18DBE ...

Page 15: ...7 Wiring Diagram 15 CS E15DD3EW CU E15DBE CS E18DD3EW CU E18DBE ...

Page 16: ...o achieve the suitable operation mode the microcomputer maintains the set temperature by measuring the temperature of environment and performing temperature shifting 8 1 1 Temperature Shifting Flow The compressor at outdoor unit is operating following the frequency instructed by the microcomputer at indoor unit that judging the condition according to internal setting temperature 16 CS E15DD3EW CU ...

Page 17: ... Compressor is OFF when Intake Air Temperature Internal Setting Temperature 2 0 C Compressor is ON after waiting for 3 minutes if the Intake Air Temperature Internal Setting Temperature Compressor OFF point 8 1 4 Heating Operation 8 1 4 1 Thermostat control Compressor is OFF when Intake Air Temperature Internal Setting Temperature 2 0 C Compressor is ON after waiting for 3 minutes if the Intake Ai...

Page 18: ...tting is judged and performed based on the above operation mode chart every 30 minutes Remote Control Setting Temperature C T1 T2 T3 16 18 10 3 5 19 22 8 3 7 23 26 7 3 7 27 30 6 3 8 There is a temperature shifting on T1 T2 and T3 if the operation mode judged is changed from Cooling Soft Dry to Heating or vice verse Operation Mode change from Temperature shifts C Cooling Soft Dry Heating 2 Heating ...

Page 19: ... Lo Lo SLo SSLo E15D 1400 1400 1300 1200 1100 1000 900 800 750 750 E18D 1530 1530 1430 1320 1220 1120 1020 900 800 800 Heating Remote Control O O O O O Tab rpm PSHi SSHi SHi Me Me Me Lo Lo SLo SSLo E15D 1440 1440 1370 1270 1170 1070 980 900 750 750 E18D 1700 1700 1630 1520 1410 1300 1200 1080 800 800 B Indoor Fan Control i Indoor fan control operation outline 1 Cooling Dry 19 CS E15DD3EW CU E15DBE...

Page 20: ...2 Heating ii Auto Fan Speed 1 Cooling 20 CS E15DD3EW CU E15DBE CS E18DD3EW CU E18DBE ...

Page 21: ...Control i Control condition Control at cooling dry operation and auto fan speed No Deodorizing Control is performed during ON timer standby operation and during Anti freezing control prevention ii Operation The odor status is arranged as below and it is shifted as follow When COMP is ON 1 2 3 Shift to 4 when COMP is OFF When COMP is OFF 4 5 6 7 6 7 Shift to 1 when COMP is ON Start from 4 if the Th...

Page 22: ...provide quiet cooling operation compare to normal operation B Control condition a Quiet operation start condition When quiet button at remote control is pressed Quiet LED illuminates b Quiet operation stop condition 1 When one of the following conditions is satisfied quiet operation stops a Powerful button is pressed b Stop by OFF ON switch c Timer off activates d Quiet button is pressed again 2 W...

Page 23: ...s satisfied quiet operation stops a Powerful button is pressed b Stop by OFF ON switch c Timer off activates d Quiet button is pressed again 2 When quiet operation is stopped operation is shifted to normal operation with previous setting 3 When fan speed is changed quiet operation is shifted to quiet operation of the new fan speed 4 When operation mode is changed quiet operation is shifted to quie...

Page 24: ...hen sampling the outdoor indoor temperature with indoor fan at Lo for 30 seconds After detecting the indoor outdoor temperature the unit determines the operation starting time according to the load However when outdoor unit is operating the preparation starting time will be set to minimum OFF Timer When the OFF timer is set by using the remote control the unit stop operate according to the desired...

Page 25: ...le during ON OFF Timer setting 8 1 12 Indication Panel LED POWER TIMER QUIET POWERFUL Color Green Orange Orange Orange Light ON Operation ON Timer Setting ON Quiet Mode ON Powerful Mode ON Light OFF Operation OFF Timer Setting OFF Quiet Mode OFF Powerful Mode OFF Note If POWER LED is blinking the possible operations of the unit are Hot Start during Deice operation operation mode judgment or delay ...

Page 26: ... will be stopped immediately for 2 minutes Model E15D E18D Operation Mode X A Y A X A Y A Cooling Soft Dry A 7 20 17 8 74 17 Cooling Soft Dry B C 6 30 17 7 70 17 Heating 8 60 17 10 71 17 4 The first 30 minutes of cooling operation A will be applied 8 2 1 4 IPM Power transistor Prevention Control A Overheating Prevention Control 1 When the IPM temperature rises to 100 C compressor operation will st...

Page 27: ... temperature is below 4 C During of heating operation Indoor piping temperature indoor suction is under 5 C Control contents compressor stops restart after 3 minutes if happen 2 times within 20 minutes perform the following operation 1 Unit stop operation 2 Timer LED blink and F91 indicated 8 2 1 7 Low Frequency Protection Control 1 When the compressor operate at frequency lower than 25 Hz continu...

Page 28: ...on Detects the Outdoor pipe temperature and carry out below restriction limitation Limit the compressor Operation frequency The compressor stop if outdoor pipe temperature exceeds 63 C If the compressor stops 4 times in 20 minutes Timer LED blinking F95 outdoor high pressure rise protection ii Electrical part temperature rise protection control 1 Purpose To prevent electronic components temperatur...

Page 29: ...en indoor are ceiling floor duct and mini casette c Control contents Hz control is carried out according to the spray prevention status transmitted from indoor Spray prevention status transmitted indoor Control contents Relative control domain MAX domain 0 it usually controls Usually control Usually control 1 rise Relative change control priority On tap up 10 seconds 2 changeless Changeless Change...

Page 30: ...e control setting fan speed is lower Me 2 When the indoor intake air temperature is 35 C or above 8 2 3 2 Outdoor Air Temperature Control The Max current value is regulated in accordance to the outdoor air temperature as shown in the below figures 8 2 3 3 Overload Protection Control The compressor operating frequency is regulated in accordance to indoor heat exchanger temperature as shown in below...

Page 31: ...Deice operation detection commences after minimum 60 minutes of Heating Operation The outdoor heat exchanger temperature drops below 3 C for long period minimum 40 minutes during compressor is in operation the deice operation may starts 31 CS E15DD3EW CU E15DBE CS E18DD3EW CU E18DBE ...

Page 32: ...9 Operating Instructions 32 CS E15DD3EW CU E15DBE CS E18DD3EW CU E18DBE ...

Page 33: ...33 CS E15DD3EW CU E15DBE CS E18DD3EW CU E18DBE ...

Page 34: ...34 CS E15DD3EW CU E15DBE CS E18DD3EW CU E18DBE ...

Page 35: ...35 CS E15DD3EW CU E15DBE CS E18DD3EW CU E18DBE ...

Page 36: ...36 CS E15DD3EW CU E15DBE CS E18DD3EW CU E18DBE ...

Page 37: ...37 CS E15DD3EW CU E15DBE CS E18DD3EW CU E18DBE ...

Page 38: ...38 CS E15DD3EW CU E15DBE CS E18DD3EW CU E18DBE ...

Page 39: ...39 CS E15DD3EW CU E15DBE CS E18DD3EW CU E18DBE ...

Page 40: ... cause an oxygen deficiency if it leaks into a closed room since it collects in the lower area of the room It also generates toxic gas when it is directly exposed to a flame so it must be used in a well ventilated environment where it will not collect Table 1 Physical comparison of R410A and R22 R410A R22 Composition wt R32 R125 50 50 R22 100 Boiling point C 51 4 40 8 Vaporizing pressure 25 C 1 56...

Page 41: ...ne by a specialist Incorrect repairs can result in an water leakage electric shock fire etc 10 2 Tools For Installing Servicing Refrigerant Piping 10 2 1 Necessary Tools In order to prevent an R410A AC from mistakenly being charged with any other refrigerant the diameter of the 3 way valve service port on the outdoor unit has been changed Also to increase its ability to withstand pressure the oppo...

Page 42: ...es Table 5 Conventional wrenches R410A wrenches For 1 4 opposite side x torque 17 mm x 18 N m 180 kgf cm 17 mm x 18 N m 180 kgf cm For 3 8 opposite side x torque 22 mm x 42 N m 420 kgf cm 22 mm x 42 N m 420 kgf cm For 1 2 opposite side x torque 24 mm x 55 N m 550 kgf cm 26 mm x 55 N m 550 kgf cm Because the pressure is higher for the R410A type the conventional type cannot be used Table 6 Differen...

Page 43: ...e used with CFC and HCFC cannot be used with R410A because there is no chlorine in the refrigerant The present R134a leak detector can be used but the detection sensitivity will be lower setting the sensitivity for R134a at 1 the level for R410A will drop to 0 6 For detecting small amounts of gas leakage use the electric gas leak detector for HFC refrigerant Detection sensitivity with R410A is abo...

Page 44: ...e manually by opening and closing the valve 9 Refrigerant cylinders The R410A cylinders are labeled with the refrigerant name and the coating color of the cylinder protector is pink which is the color stipulated by ARI of the U S Cylinders equipped with a siphon tube are available to allow the cylinder to stand upright for liquid refrigerant charging 10 Charging orifice and packing for refrigerant...

Page 45: ...using When using a conventional flaring tool use the copper pipe gauge for clearance adjustment etc to ensure the correct A dimension see Fig 10 Fig 10 Flaring dimensions 10 3 1 Piping Materials It is recommended that you use copper and copper alloy jointless pipes with a maximum oil adherence of 40 mg 10m Do not use pipes that are crushed deformed or discolored especially the inside surface If th...

Page 46: ...e axial center of the union c Use a torque wrench and tighten to the specified torque The tightening torque for R410A is the same as the conventional torque value for R22 Be careful because if the torque is too weak it may lead to a gas leak If it is too strong it may split the flare nut or make it impossible to remove the flare nut Table 15 R410A tightening torque Nominal diameter Outside diamete...

Page 47: ... or dried with a vacuum pump 10 4 Installation Transferring Servicing 10 4 1 Inspecting Gas Leaks with a Vacuum Pump for New Installations Using New Refrigerant Piping 1 From the viewpoint of protecting the global environment please do not release refrigerant into the atmosphere a Connect the projecting side pin pushing side of the charging hose for the manifold gauge to the service port of the 3 ...

Page 48: ... re flare the refrigerant piping Even though the replacement AC unit uses the R410A problems occur when for example either the AC unit maker or the refrigerating machine oil is different When replacing an R22 AC unit with an R410A AC unit the following checks and cleaning procedures are necessary but are difficult to do because of the chemical characteristics of the refrigerating machine oil as de...

Page 49: ... port of the electronic scale 2 3 7 Open the valve of the refrigerant cylinder then open the charging valve slightly and close it Next press the check valve of the manifold gauge and purge the air 2 4 Watch the liquid refrigerant closely at this point 8 After adjusting the electronic scale to zero open the charging valve then open the valve Lo of the manifold gauge and charge with the liquid refri...

Page 50: ...uld occur from the brazed part 2 Prevention of Overheating Due to heating the interior and exterior surfaces of treated metal may oxidize Especially when the interior of the refrigerant circuit oxidizes due to overheating scale occurs and stays in the circuit as dust thus exerting a fatally adverse effect So make brazing at adequate brazing temperature and with minimum of heating area 3 Overheatin...

Page 51: ...tall at a strong and firm location which is able to withstand the set s weight If the strength is not enough or installation is not properly done unit will drop and cause injury 5 For electrical work please follow the local national wiring standard regulation and this installation instructions An independent circuit and single outlet must be used If electrical circuit capacity is not enough or def...

Page 52: ...ll be the place where there is ease for access for the power disconnection in case of emergency In some countries permanent connection of this room air conditioner to the power supply is prohibited 1 Power supply connection to the socket using a power plug Use an approved 15A power plug with earth pin for the connection to the socket 2 Power supply connection to a circuit breaker for the permanent...

Page 53: ... drain piping insulation foamed polyethylene with a thickness of 10 mm or more Indoor outdoor connecting cable 4 x 1 5 mm2 flexible cord designation type 245 IEC 57 H05RN F Hanging bolt related parts Hanging bolts M10 4 and nuts 12 Flat washers 8 when hanging the indoor unit Attached accessories Required Materials Read the catalog and other technical materials and prepare the required materials Ap...

Page 54: ... the following contents when creating the blueprint Indoor unit installation location The location should be strong enough to support the main unit without vibration There should not be any heat or steam source nearby Drainage should be easy Avoid locating the drain port close to ditches domestic wastewater Avoid locations above entrances and exits Do not block the air intake and discharge passage...

Page 55: ...for an extended period under the following conditions water droplets may form and drop Attach locally purchased insulation foamed polyethylene with a thickness of 5 mm or more to the outside of the indoor unit before installing into the ceiling to improve heat insulation Locations with a dew point inside the ceiling of 23 C or more Kitchens and other locations that produce large amounts of heat an...

Page 56: ...e intake chamber 8 screws Securing the Hanging Bolts Switching the High State Switch SW2 To increase the air volume open the control box and on the control board switch the high state switch SW2 to HI See the diagram for Connecting the Indoor Outdoor Connecting Cable Installation into the Ceiling Attach the nuts and washers to the hanging bolts then lift up and hook the main unit onto the hanging ...

Page 57: ...inage Use a locally purchased VP20 general rigid PVC pipe outer diameter ø26 for the drain piping and firmly connect the indoor unit and the drain piping using PVC adhesive to ensure that no leakage occurs Drain piping located indoor should always be insulated by wrapping with locally purchased insulation foamed polyethylene with a thickness of 10 mm or more The drain piping should have a downward...

Page 58: ...he right coloured wires as shown in the diagram Earth lead wire should be longer than the other lead wires as shown in the diagram for electrical safety purpose in case the cord slips out from the anchorage CHECK THE DRAINGAGE Check after connecting the power supply Pour approximately 600 cc of water into the drain pan of the main unit using a squeeze bottle etc Press the drain test run switch on ...

Page 59: ...ch Piping size Torque Liquid Side 1 4 18 N m Gas Side 1 2 55 N m 11 3 Outdoor Unit 11 3 1 SELECTING THE INSTALLATION LOCATION If an awning is built over the unit to prevent direct sunlight or rain be careful that heat radiation from the condenser is not obstructed There should not be any animal or plant which could be affected by hot air discharged Keep the spaces indicated by arrows from wall cei...

Page 60: ...ove after approximately five minutes Note BE SURE TO FOLLOW THIS PROCEDURE IN ORDER TO AVOID REFRIGERANT GAS LEAKAGE 5 Disconnect the charging hose from the vacuum pump and from the service port of the 3 way valve 6 Tighten the service port caps of the 3 way valve at torque of 18 N m with a torque wrench 7 Remove the valve caps of both of the 2 way valve and 3 way valve Position both of the valves...

Page 61: ... the holder clamper 4 Cable connection to the power supply 230 240V 50Hz through knife switch Disconnecting means Connect the approved polychloroprene sheathed power supply cable 3 x 2 5 mm2 type designation 245 IEC 57 or heavier cord to the terminal board and connect the other end of the cable to knife switch Disconnecting means Note Knife switch Disconnecting means should have minimum 3 5 mm con...

Page 62: ...emorized after which the new Remo Con No can be used REMO CON NO CHANGE IN REMOTE CONTROL 1 Remove the batteries from the battery compartment of the Remote Control 2 On the left side of the battery compartment there is a small opening in the centre in which Jumper J_A can be seen In the accepted Remo Con PCB shown beside Jumper J_B can be seen J_A J_B Remo Con No Short Open A Default Open Open B S...

Page 63: ...btained in order to check the specification and technical data Below are the methods used to obtain rated compressor operating specification a Cooling i Press the Auto button continuously for 5 seconds or less than 8 seconds the air conditioner starts operation at Cooling rated frequency beep will be heard at the 5th second ii Short the service terminal CN S of the outdoor printed circuit board Th...

Page 64: ...ting the refrigeration cycle Such problems include insufficient insulation problem with the power source malfunction of a compressor and a fan The normal outlet air temperature and pressure of the refrigeration cycle depends on various conditions the standard values for them are shown in the table to the right 64 CS E15DD3EW CU E15DBE CS E18DD3EW CU E18DBE ...

Page 65: ... unit will immediately stop its operation Timer LED is blinking and maximum of three error codes abnormality will be saved in memory The abnormality of the operation can be identified through the below breakdown diagnosis method Press CHECK button at remote control continuously for more than five seconds to turn on the diagnosis mode H11 will be displayed at remote control By pressing the TMER but...

Page 66: ...rotection Air filter dirty Air circulation short circuit H99 Indoor heat exchanger anti freezing protection Insufficient refrigerant Air filter dirty F11 Cooling Heating cycle changeover abnormality 4 times occurance within 30 minutes 4 way valve V coil F90 PFC control 4 times occurance within 10 minutes Voltage at PFC F91 Refrigeration cycle abnormality 7 times occurance continuously No refrigera...

Page 67: ...nsmission code could be selected The indoor unit will only operate when received signal with same transmission code from remote control This could prevent signal interference when there are 2 or more indoor unit installed nearby together To change remote control transmission code short or open jumpers at the remote control printed circuit board Under various setting mode after select the transmiss...

Page 68: ...y state the unit still operates with Forced Cooling Operation Press Timer Decrement button of remote control for 5 seconds to activate the standby mode where beep sound is heard In Various Setting Mode the unit captures remote control transmission code when Check button is pressed In Individual Correspondence Mode press Check button at remote control to enter remote control signal receiving sound ...

Page 69: ...screw the 2 screws on the Slide Guide 3 Pull the board down following the Slide Guide 4 Lift the Board up from the bottom disengage the Catch holding the Board and open it 12 5 Disassembly of Parts 12 5 1 Detaching the Upper and Inner Casing 12 5 2 Detaching the Control Board 69 CS E15DD3EW CU E15DBE CS E18DD3EW CU E18DBE ...

Page 70: ...n the screw holding the Fan and detach the Fan Fan Motor 1 First detach the Upper and Inner Casing 12 4 1 and the Fan 12 4 3 2 Unscrew the 4 screws holding the Fan Motor and detach it Drain Motor 1 First detach the Upper and Inner Casing 12 4 1 and the Fan 12 4 3 2 From the Fan Motor side undo the 2 hexagon bolts and detach the Drain Motor 12 5 3 Detaching the Fan 12 5 4 Detaching the Fan Motor an...

Page 71: ...lectrostatic discharge Be save to return the wiring to its original position There are many high voltage components within the heat sink cover so never touch the interior during operation Wait at least two minutes after power has been turned off Fig 10 12 5 5 Outdoor Electronic Controller Removal Procedure 71 CS E15DD3EW CU E15DBE CS E18DD3EW CU E18DBE ...

Page 72: ...13 Technical Data 13 1 Operation Characteristics 13 1 1 CS E15DD3EW CU E15DBE 72 CS E15DD3EW CU E15DBE CS E18DD3EW CU E18DBE ...

Page 73: ...13 1 2 CS E18DD3EW CU E18DBE 73 CS E15DD3EW CU E15DBE CS E18DD3EW CU E18DBE ...

Page 74: ... 1 27 4 23 3 11 1 36 3 85 2 96 1 46 CS E18DD3EW CU E18DBE Outdoor Temp C Indoor wet bulb temp 30 35 40 46 TC SHC IP TC SHC IP TC SHC IP TC SHC IP 17 0 C 5 06 3 83 1 48 4 73 3 68 1 60 4 40 3 53 1 71 4 00 3 36 1 84 19 0 C 5 10 1 62 19 5 C 5 55 4 02 1 51 5 19 3 86 1 63 4 83 3 71 1 74 4 39 3 53 1 88 22 0 C 6 05 4 16 1 54 5 66 4 00 1 66 5 26 3 86 1 77 4 78 3 68 1 91 TC Total Cooling Capacity kW Indoor ...

Page 75: ...nit 14 1 CS E15DD3EW CS E18DD3EW Note The above exploded view is for the purpose of parts disassembly and replacement The non numbered parts are not kept as standard service parts 75 CS E15DD3EW CU E15DBE CS E18DD3EW CU E18DBE ...

Page 76: ...WG07165 CWG07174 43 INSTALLATION SHEET 2 1 CWG07166 CWG07175 44 INSTALLATION SHEET 3 1 CWG07167 CWG07176 45 CROSS FLOW FAN COMPLETE 1 CWH01C005 47 CONTROL BOARD BOX 1 CWH10527 48 CONTROL COVER 1 CWH131144 O 49 HOLDER LEAD WIRE 2 1 CWH31044 50 HOLDER LEAD WIRE 3 1 CWH31030 51 HOLDER LEAD WIRE 4 1 CWD77013 53 DRAIN TRAY 1 CWH40C061 54 BELT 2 CWH4605008 55 BUSHING 1 1 CWH4610440 56 CAP 1 1 4 LIQUID S...

Page 77: ...r Unit 16 1 CU E15DBE CU E18DBE Note The above exploded view is for the purpose of parts disassembly and replacement The non numbered parts are not kept as standard service parts 77 CS E15DD3EW CU E15DBE CS E18DD3EW CU E18DBE ...

Page 78: ...OR COMPLETE COMP DISC 1 CWA50C2180 30 SENSOR COMPLETE 1 CWA50C2181 31 REACTOR 1 CWA421069 32 CONTROL BOARD CASING SIDE 1 CWH102273 33 TERMINAL BOARD ASSY 1 CWA28K1110 34 FUSE HOLDERS 1 K3GB1PH00016 35 FUSE 1 K5D303BBA002 36 CONTROL BOARD CASING TOP 1 CWH102204 37 CONTROL BOARD CASING BOTTOM 1 CWH102282 38 ELECTRONIC CONTROLLER MAIN 1 CWA73C1767R CWA73C1768R O 40 CONTROL BOARD COVER TOP 1 CWH131167...

Page 79: ...18 1 Indoor Unit 18 Electronic Circuit Diagram CS E15DD3EW CS E18DD3EW 79 CS E15DD3EW CU E15DBE CS E18DD3EW CU E18DBE ...

Page 80: ... R32 100k R89 10k R97 1k c b e Q1 2SC3852 R21 5 6k R20 20k 1 R26 47k 4 1 2 3 c e b Q2 RT1N432 10k 4 7k R29 680Ω R93 100k 1 4W R94 100k 1 4W R95 100k 1 4W 1 2 3 4 C E G 1 2 3 4 1 LJP2 LJP3 LJP4 LJP5 LJP6 LJP8 LJP9 LJP10 RY C R61 10k R65 47Ω Q5 2SC3441 Q6 2SA1366 R58 0 839Ωx2 5W 5W R60 10Ω R63 200Ω C30 1500p c b e e b c 4 1 2 3 4 3 2 PC5 TLP421 PC4 TLP421 R70 470Ω DB2 RBV 1506 DB1 Q3 IMRH50 60 C1 22...

Page 81: ... C60 10µ 50V FUSE2 T 3 15A L 250V C57 0 22µ 630V C61 22µ 35V C89 0 1µ 16V C48 0 01µ C35 10µ C39 0 047µ 25V C41 0 01µ C44 0 82µ 50V C32 10µ 50V C37 0 047µ 25V C40 0 82µ C55 0 01µ C68 0 01µ 400V C59 220P 2kV 3 2 1 6 5 4 ZD6 MAZ4047 C115 0 047µ C65 R126 R122 0 1Ω R47 39k 1 4W R136 4 7Ω 1 4W R158 C75 C67 680P C85 3900P 50V D36 4 1 2 3 PC6 PC817E7 IC5 MM1431 R141 1k R140 2 2k R144 27k R150 100Ω R64 4 7...

Page 82: ...8 58 19 57 20 56 42 84 43 83 44 82 45 81 21 55 22 54 23 53 24 52 25 51 46 80 47 79 48 78 49 77 50 76 D2 R7 1k C18 0 01µ C113 0 1µ C9 3900p C15 3900p D4 C21 0 1µ 16V D13 HRU0103A2 D3 R38 47k R44 10k R24 JX1 R25 R14 200k C117 0 1µ C12 C23 10µ 50V C24 0 047µ 25V R197 10k R50 1k R77 10k R78 30k R198 10k R196 10k R195 10k 1 2 CN S 2 1 3 CN DIS CN CPU R45 10k R55 1k R88 10k R96 10k R74 10k R81 1k R84 10...

Page 83: ...047µ 25V IC8 TL3472 IC8 TL3472 C70 47µ 25V C87 470p R138 33Ω 2W R127 20k ZD7 R192 R186 R187 R184 R185 R182 R183 R180 R181 R178 R179 R176 R177 R174 R175 R172 R173 R170 R171 R168 R169 R135 10k R129 4 99k R152 20k R142 2 49k R146 27 4k R132 4 99k R137 39 2k R143 1 40k R123 2k C58 1000P R166 200k R119 1k R124 39 2k R167 82 5Ω R205 8 0Ω 2 4 6 7 5 3 1 CN FM R189 4 7k 10k R164 10k R163 5 11k R162 5 11k R...

Page 84: ...mp sampling time 2 min 0 sec Self diagnosis display time 10 sec 0 sec Auto mode judgement sampling time 20 sec 0 sec 24 hours Real Timer 1 hour 1 min Heating SSHi fan speed shift 120 min 12 sec Cooling SHi fan speed shift 30 min 3 sec Hot start forced completion 4 min 0 4 sec Auto mode judgement interval 30 min 3 sec After Hot start Deice 2 min 12 sec TIMER TABLE OUTDOOR Test mode Name Time When t...

Page 85: ...18 3 Remote Control 85 CS E15DD3EW CU E15DBE CS E18DD3EW CU E18DBE ...

Page 86: ...18 4 Print Pattern Indoor Unit Printed Circuit Board 86 CS E15DD3EW CU E15DBE CS E18DD3EW CU E18DBE ...

Page 87: ...18 5 Print Pattern Outdoor Unit Printed Circuit Board View 87 CS E15DD3EW CU E15DBE CS E18DD3EW CU E18DBE PHAAM Printed in Malaysia ...

Page 88: ......

Reviews: