background image

14

CQ-CB9900U

CQ-CB9900U

15

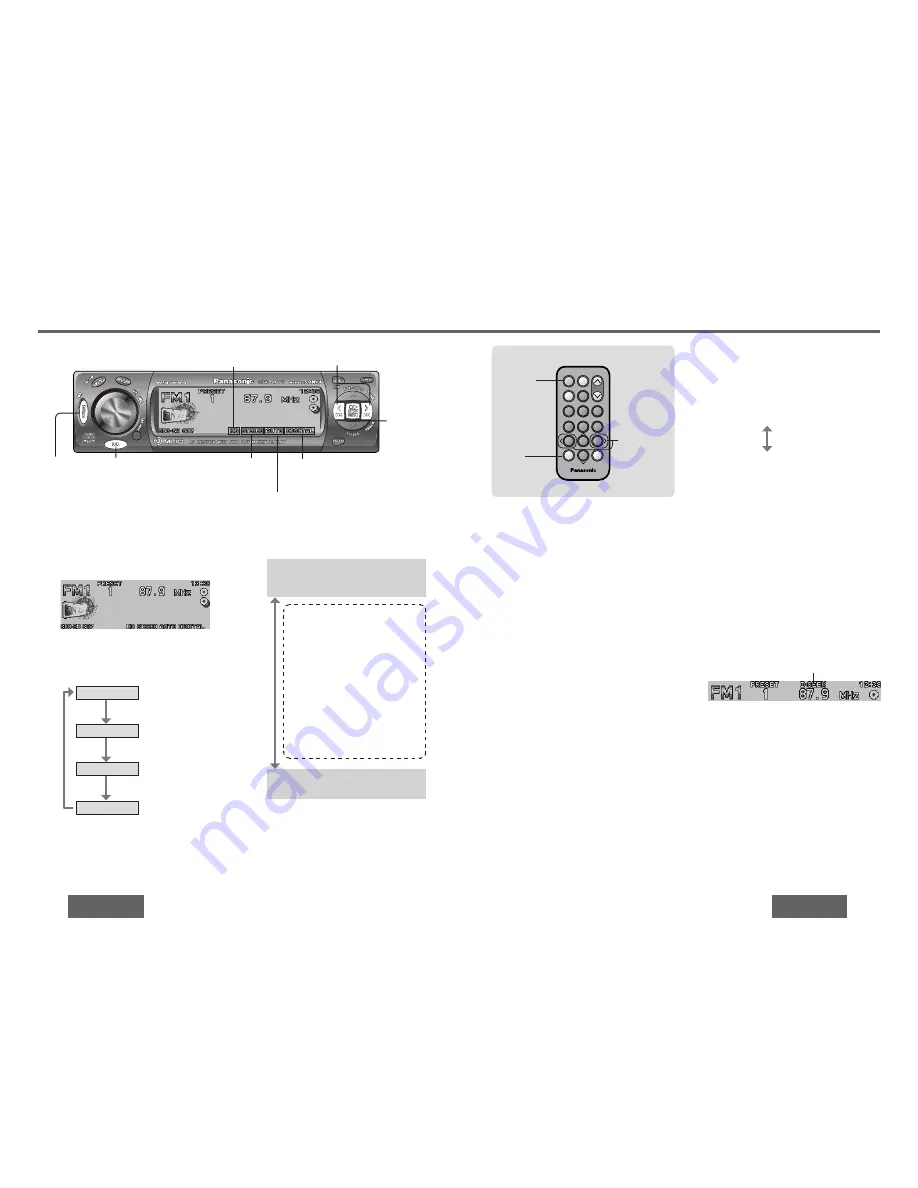
Radio

[

%

] [

$

(TUNE)

[D/A] (Digital*/Analog)
*This indicates HD Radio.

[SOURCE]

6

4

9

7

5

Car Audio

SOURCE

MUTE

POWER

RAND

VOL

3

1

2

DISP

BAND

REP

6

5

SET

SEL

#

SCAN

MENU

NUMBER

8

0

[SOURCE]

[

%

] [

$

]

(Tuning)

[BAND]

Stereo indicator

This lights 
when a stereo 
broadcast is 
received.

Radio Mode

Press

 [SOURCE]

 to select the radio mode.

Radio mode display

1

Reception Mode

Press

 [D/A]

 to select the reception mode.

3

Frequency

Band

Band

Press 

[BAND]

.

2

FM1

Tuning

[

$

]:

 Higher frequency

[

%

]:

 Lower frequency

4

AUTO mode

** (“AUTO” lights.)

Selects analog or digital reception 
(HD Radio) 

automatically

. (default)

Seeking

When the reception mode is “AUTO”:

1


Every time you press and hold 

[D/A]

 for more 

than 2 seconds, Seeking mode is switched as 
follows;

2

  Press and hold 

[

%

]

 or 

[

$

]

 for more than 

0.5 seconds, then release. Seeking will start.

When 

“Auto seeking”

 is selected:

The tuning automatically stops at the stations, 
whether analog or digital, whose signals can be 
received, and the signals from those stations are 
received.

When 

“Digital seeking”

 is selected:

The tuning automatically stops only at the 
stations which are airing digital broadcasts, and 
the signals from those stations are received.
The seeking operation is repeated if no digital 
broadcasts are being aired.

When the reception mode is “ANALOG”:

Press and hold 

[

%

]

 or 

[

$

]

 for more than 

0.5 seconds, then release. Seeking will start. 

Auto seeking (default)

Digital seeking 

This lights when the broadcast station now being received is 
an HD Radio station (one which is airing a digital broadcast).

ANALOG mode

Selects analog reception only.

**

  Identifying whether a broadcast 

is digital or analog in the AUTO 
mode

When 

“DIGITAL”

 is displayed: 

This means that digital sound is 
now being output.  (It is displayed 
while a digital broadcast is being 
received.)

When 

“ANALOG”

 is displayed: 

This means that analog sound is 
now being output.  (It is displayed 
while an analog broadcast is 
being received.)

Note:

  Even when the AUTO mode is established and the 

HD indicator is lighted:

 · 


The sound may not switch over to digital if the 
program concerned (such as a live baseball 
game) is being broadcast in real time.


·  

Analog sound will be output if the reception is 
poor.

 In the AUTO mode, analog sound is output 

immediately after the frequency has been tuned 
in.  When listening to analog sound, the sound 
quality will be better in the ANALOG mode.

FM2

FM3

AM

Note:

  Digital seeking may take some time.

 Seeking may not stop at stations which are 

scheduled to go all-digital broadcasts in the future.

D·SEEK indicator
This lights when digital 
seeking is selected.

This lights when reception 
mode is “AUTO”.

This lights when a digital broadcast is 
being received in AUTO mode. 

[BAND]

Summary of Contents for CQCB9900U - AUTO RADIO/CD DECK

Page 1: ...ont MP3 WMA CD Player Receiver with Full Dot Matrix Display and CD Changer Control CQ CB9900U Please read these instructions carefully before using this product and save this manual for future use Operating Instructions ...

Page 2: ...before switching the unit on Use the Proper Power Supply This product is designed to operate with a 12 V DC negative ground battery system the normal system in a North American car Disc Mechanism Do not insert coins or any small objects Keep screwdrivers and other metallic objects away from the disc mechanism and disc Use Authorized Servicenters This product is made of precision parts Do not attem...

Page 3: ...is can only be controlled through the remote control unit Before Reading these Instructions System Upgrade Note This unit does not support Sirius satellite radio You cannot connect CD changer and Sirius receiver using the dual CD changer selector CA CD55U option Today s AM and FM radio is broadcast in analog which has lower audio quality and is filled with static hiss pops and fades Radio stations...

Page 4: ...e of the battery may cause overheating an explosion or ignition resulting in injury or a fire Subwoofer Preparation Connect the subwoofer and the amplifier option page 60 Subwoofer level setting You can change the subwoofer level page 34 Subwoofer low pass filter setting You can select the upper limit frequency of the sound from subwoofer page 34 The 12 hour system is used for the clock Turn your ...

Page 5: ...2 Accessories 3 Features 4 What is HD RadioTM Before Reading these Instructions 5 Preparation 6 Remote control unit subwoofer Clock Setting 7 General 10 Power source volume mute attenuation dimmer rear speakers as sub woofers super bass control subwoofer SBC SW SQ Sound Quality display change Radio 14 Radio mode band reception mode tuning seeking station preset preset station calling text display ...

Page 6: ... Volume SOURCE PWR Power Press SOURCE to change the source MUTE Mute attenuation SBC SW VOLUME DISP Display Point the remote control unit at the remote control signal sensor Rear Speakers as Sub Woofers Super Bass Control Subwoofer SBC SW You can utilize the rear speaker connected to the built in amplifier as Sub Woofers that output only bass Default OFF Press and hold MUTE SBC SW for more than 2 ...

Page 7: ...ows SQ7 lights except FLAT Note Press DISP display to return to the regular mode If no operation takes place for more than 5 seconds the display returns to the regular mode Setting of SQ bass treble and volume are influenced one another If the influence mentioned above causes distortion to the audio signal readjust bass treble or volume page 32 After pressing SQ on the main unit you can also selec...

Page 8: ...ired When the reception mode is ANALOG Press and hold or for more than 0 5 seconds then release Seeking will start Auto seeking default Digital seeking This lights when the broadcast station now being received is an HD Radio station one which is airing a digital broadcast ANALOG mode Selects analog reception only Identifying whether a broadcast is digital or analog in the AUTO mode When DIGITAL is...

Page 9: ...eption first and starting with the highest preset number whereas the stations that broadcast only analog signals are stored in the memory in sequence starting with the lowest preset number AUTO mode Digital seeking The stations that broadcast digital signals are saved in sequence with the one featuring the best reception first This may take some time ANALOG mode The 6 stations with good reception ...

Page 10: ...Notes on Discs page 48 CD Player Do not watch the scroll display while driving OPEN 9 6 5 Track selection fast forward fast reverse SOURCE BAND 1 Pause SET 0 to 9 Track number 5 Scan play 6 5 Track selection fast forward fast reverse 6 4 9 7 5 Car Audio SOURCE MUTE POWER RAND VOL 3 1 2 DISP BAND REP 6 5 SET SEL SCAN MENU NUMBER 8 0 DISP Display SOURCE BAND Pause SET fl Number Available Discs CD DA ...

Page 11: ...MUTE POWER RAND VOL 3 1 2 DISP BAND REP 6 5 SET SEL SCAN MENU NUMBER 8 0 2Submenu Press or Select CD DA Repeat Play Default OFF Select RANDOM Select REPEAT All the available tracks play in a random sequence lights ON Cancel OFF Repeat the current track lights ON Cancel OFF Direct Operation Submenu SET MENU Press 4 Random play Press 6 Repeat play 6 4 9 7 5 Car Audio SOURCE MUTE POWER RAND VOL 3 1 2...

Page 12: ... 10 1Press fl 2Press 1 0 3Press BAND SET Direct Folder Selection Example folder number 10 1Press fl twice 2Press 1 0 3Press BAND SET Note To suspend direct selection press DISP display Random scan and repeat play are canceled once fl is pressed Operation returns to the start of the disc when a folder with no MP3 or WMA format files is selected 0 to 9 File selection folder number 5 Scan play 6 5 File ...

Page 13: ...y Press and hold 6 Folder repeat play 6 4 9 7 5 Car Audio SOURCE MUTE POWER RAND VOL 3 1 2 DISP BAND REP 6 5 SET SEL SCAN MENU NUMBER 8 0 SEL MENU BAND SET Repeat Play Default OFF Folder Repeat Play Default OFF Select REPEAT Select FOLDER REPEAT Random Play Repeat Play All the files on all folders play in a random sequence lights ON Cancel OFF All the available files on the current folder play in ...

Page 14: ...page Compression method Bit rate VBR Sampling frequency MPEG 1 audio layer 3 MP3 32 kbps 320 kbps Yes 32 44 1 48 kHz MPEG 2 audio layer 3 MP3 8 kbps 160 kbps Yes 16 22 05 24 kHz Windows Media Audio Ver 2 Ver 8 Ver 9 64 kbps 192 kbps No 32 44 1 48 kHz Copyright It is prohibited by copyright laws to copy distribute and deliver copyrighted materials such as music without the approval of copyright hol...

Page 15: ...ction Preparation Use the dual CD changer selector CA CD55U option to connect 2 CD changers page 58 Press BAND The selected changer number either 1 or 2 is displayed Direct Disc Selection Example disc number 5 1Press fl 2Press 5 3Press BAND SET Note To suspend direct disc selection press DISP display or fl Random scan and repeat play are canceled once fl is pressed 0 to 9 Disc number 5 Scan play 6 5 ...

Page 16: ... tracks on the current disc play in a random sequence lights ON Cancel OFF Direct Operation Submenu SET MENU Press 4 Random play Press and hold 4 Disc random play Press 6 Repeat play Press and hold 6 Disc repeat play 6 4 9 7 5 Car Audio SOURCE MUTE POWER RAND VOL 3 1 2 DISP BAND REP 6 5 SET SEL SCAN MENU NUMBER 8 0 SEL MENU Submenu BAND SET Repeat Play Default OFF Disc Repeat Play Default OFF Sele...

Page 17: ...ed VOLUME Increased VOLUME Decreased VOLUME VOLUME 6 4 9 7 5 Car Audio SOURCE MUTE POWER RAND VOL 3 1 2 DISP BAND REP 6 5 SET SEL SCAN MENU NUMBER 8 0 DISP Display SEL Select VOL VOL Adjust 1Press or to select a frequency Increased Decreased 2Turn VOLUME to adjust the equalizer level VOLUME Up VOLUME Down Memorize 3Press and hold or for more than 2 seconds to enter 4Press or to select a preset num...

Page 18: ... OFF 90 Hz 135 Hz 180 Hz 225 Hz Push Push Push Push Push Push Note Press DISP display to return to the regular mode If no operation takes place for more than 5 seconds in audio setting 2 seconds in the volume setting 10 seconds in SQ adjustment the display returns to the regular mode When SBC SW setting page 11 has been selected to ON the settings resulting from the adjustments performed at the su...

Page 19: ...g pattern A to E 1Menu 1Press MENU Press and hold MENU for more than 2 seconds 2Press or to select DISPLAY 3Set 1Press or 2Press SET Select DISPLAY ALL A Metropolis B Surfing C Tropical fish D Space scene E Spectrum analyzer display 25 bands S A Contrast Default 3 Setting range 1 to 5 Maximum difference in contrast Minimum difference in contrast CONTRAST 5 CONTRAST 1 Clock Adjustment See page 7 Se...

Page 20: ...udio SOURCE MUTE POWER RAND VOL 3 1 2 DISP BAND REP 6 5 SET SEL SCAN MENU NUMBER 8 0 DISP Display MENU BAND Set 6 4 9 7 5 Car Audio SOURCE MUTE POWER RAND VOL 3 1 2 DISP BAND REP 6 5 SET SEL SCAN MENU NUMBER 8 0 SEL MENU Submenu BAND SET 1Menu 1Press MENU Press and hold MENU for more than 2 seconds 2Press or to select FUNCTION Note Press MENU to return to the regular mode Note No settings can be p...

Page 21: ...oise is made in step with engine revolutions Alternator noise comes from the car Change the wiring position of the ground lead No sound from speaker s Balance fader setting is not appropriate Readjust balance fader There is a break a short circuit poor contact or wrong wiring regarding the speaker wiring Check the speaker wiring Some speakers are out of order Replace the speaker with new one The s...

Page 22: ... label is peeled off from the CD in the unit Refer repair to the dealer where you purchased the unit The microcontroller in the unit operates abnormally due to noise or other factors Unplug the power cord and plug it again In case the unit is still out of order consult the dealer Note Refer to the section on Notes on MP3 WMA page 26 No digital sound is output There are no HD radio broadcast statio...

Page 23: ...n Check the disc Display Possible cause Possible solution Disc has scratches Check the disc The player cannot read the file you are trying to play for some reasons File recorded in an unsupported file system compression scheme data format file name extension damaged data etc Select a file that the player can read Confirm the type of data recorded on the disc Create a new disc if necessary MP3 WMA ...

Page 24: ...essages in the action and display sections of the error chart vary with changers Refer to the operating instructions of the CD changer for details Disc is dirty or is upside down Check the disc The changer automatically switches to the next disc A disc other than a music CD CD DA type is loaded Display Possible cause Possible solution Disc has scratches Check the disc The changer automatically swi...

Page 25: ...proof Do not expose it to water or excessive moisture Do not remove the face plate while driving your car Do not place the face plate on the dashboard or nearby areas where the temperature rises to high level Do not touch the contacts on the face plate or on the main unit since this may result in poor electrical contacts If dirt or other foreign substances get on the contacts wipe them off with a ...

Page 26: ...t should be installed by a professional However if you plan to install this product yourself your first step is to decide where to install it The instructions in these pages will guide you through the remaining steps Please refer to the WARNING statement Identify and label the car wires Connect the car wires to the wires of the power connector Install the unit in the dashboard Check the operation ...

Page 27: ...g one at a time You will hear the antenna motor activate when you touch the correct wire Antenna The antenna lead is a thick black wire with a metal plug at the end Equipment Connect any optional equipment such as an amplifier according to the instructions furnished with the equipment Leave about 12q 30 cm of distance between the speaker leads amplifier unit and the antenna antenna extension cord ...

Page 28: ...ttery terminal Mounting holes Mounting springs 5Mounting bolt Mounting springs Mounting hole a Using the rear support strap 3 4Tapping screw Fire wall of car 2Hex nut 3 mm 3Rear support strap 5Mounting bolt 1Mounting collar Rubber cushion option Rear support bracket provided on the car 5Mounting bolt 1Mounting collar Tab First complete the electrical connections and then check them for correctness...

Page 29: ...nnected The power supply of a power amplifier will be activated when turning on the power of this unit Dual CD changer control lead Antenna control lead to motor antenna max 100 mA This lead is not intended for use with switch actuated power antenna ACC power lead To ACC power i12 V DC Battery lead To the car battery continuous i12 V DC Ground lead To a clean bare metallic part of the car chassis ...

Page 30: ...with CA CD55U Dual changer output cord Dual CD changer control lead Brown white stripe Dual CD changer selector CA CD55U option Changer 1 connecting cord RCA cord DIN extension cord supplied with CA CD55U Extension cord supplied with CX DP880U CD changer CX DP880U option Changer 2 connecting cord DIN cord L white Note For wiring carefully read the operating instructions for the devices connected T...

Page 31: ...r center frequency 60 Hz 160 Hz 400 Hz 1 kHz 3 kHz 6 kHz 16 kHz Variable range of equalizer j12 dB to 12 dB 2 dB step Speaker impedance 4 8 Pre amp output voltage 5 V CD mode 1 kHz 0 dB Subwoofer output voltage 5 V Pre amp output impedance 60 Subwoofer output impedance 60 Dimensions WkHkD 7qk115 16qk61 8q 178k50k155 mm Weight 3 lbs 5 oz 1 5 k HD Radio Frequency range FM 87 9 MHz 107 9 MHz AM 530 k...

Page 32: ...asonic Consumer Electronics Company Division of Matsushita Electric Corporation of America One Panasonic Way Secaucus New Jersey 07094 http www panasonic com YEFM284210 F0104 0 Printed in Japan CQ CB9900U ...

Reviews: