background image

13

Getting Started

Usef

ul Inform

ation

Troubleshooting

Appendix

„

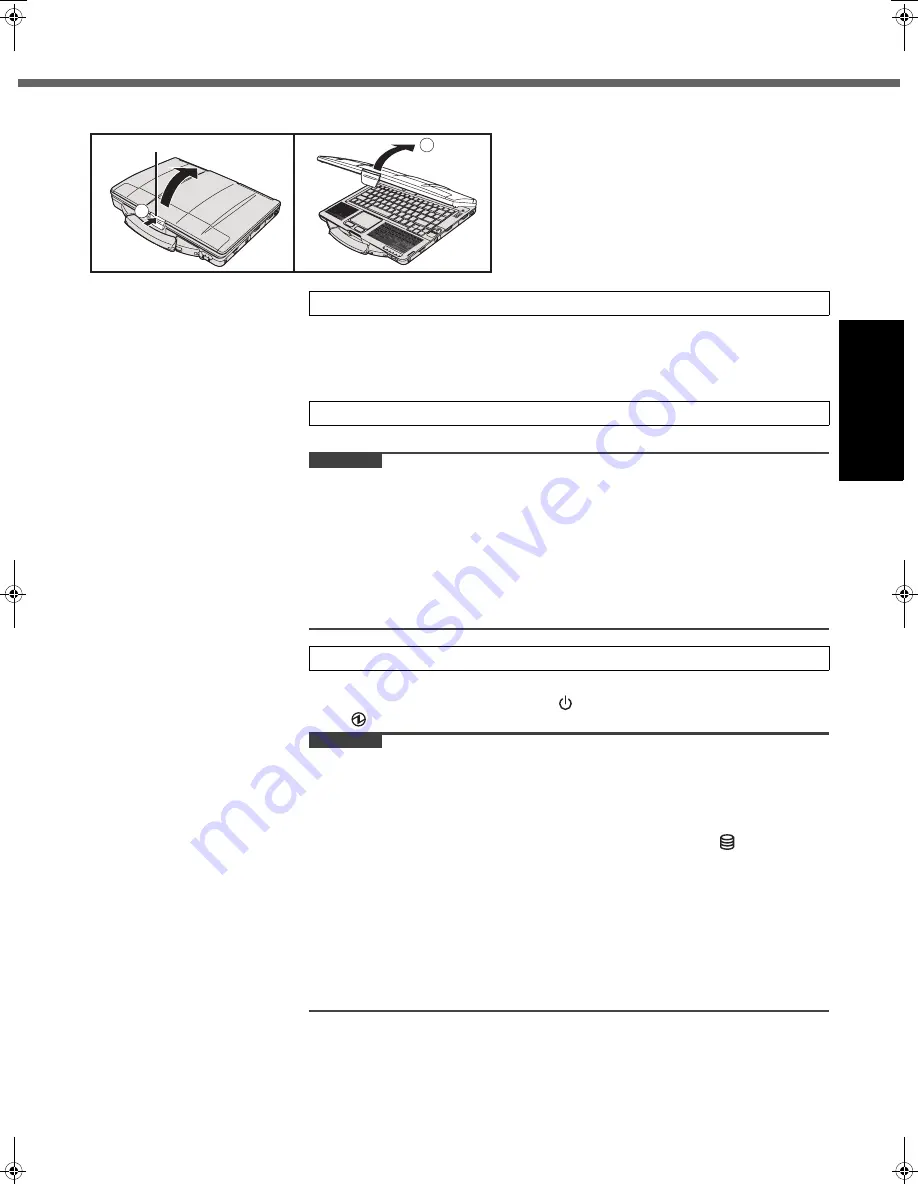
Opening the Display

z

Do not touch the terminals of the battery pack and the computer. Doing so can 
make the terminals dirty or damaged, and may cause malfunction of the battery 
pack and the computer.

z

Be sure to attach the cover for use.

The battery charging starts automatically.

CAUTION

z

Do not disconnect the AC adaptor and do not switch the wireless switch to on 
until the first-time operation procedure is completed.

z

When using the computer for the first time, do not connect any peripheral device 
except the battery pack and AC adaptor.

z

Handling the AC adaptor

Problems such as sudden voltage drops may arise during periods of thunder and 
lightning. Since this could adversely affect your computer, an uninterruptible 
power source (UPS) is highly recommended unless running from the battery 
pack alone.

A

Confirm the wireless switch (

Î

page 11) is OFF.

B

Press and hold the power switch 

 (

Î

page 10) until the power indicator 

 (

Î

page 10) lights.

CAUTION

z

Do not press the power switch repeatedly.

z

The computer will be forcibly turned off if you press and hold the power switch for 
four seconds or longer.

z

Once you turn off the computer, wait for ten seconds or more before you turn on 
the computer again.

z

Do not perform the following operation until the drive indicator 

 turns off.

• Connecting or disconnecting the AC adaptor
• Pressing the power switch
• Touching the keyboard, touch pad or external mouse
• Closing the display
• Turn on/off the wireless switch

z

When the CPU temperature is high, the computer may not start up to prevent 
overheating of the CPU. Wait until the computer cools down, and then turn the 
power on again. If the computer does not power on even after cooling down, 
contact Panasonic Technical Support (

Î

page 33).

A

Push the top of the latch (A) to release it.

B

Lift up the display to open.

A

1

2

1

Insert the battery pack.

2

Connect your computer to a power outlet.

3

Turn on the computer.

DFQW5496ZAT_CF-53mk1_XP7_OI_EN.book  13 ページ  2011年3月22日 火曜日 午後7時24分

Summary of Contents for CF-53AUGZK1M

Page 1: ...RUCTIONS Personal Computer Model No CF 53 series Introduction 2 Read Me First 3 Precautions Description of Parts 10 First time Operation 12 On screen Manual 16 Handling and Maintenance 17 Reinstalling...

Page 2: ...he Windows logo are registered trademarks of Microsoft Corporation of the United States and or other countries Intel Core Centrino and PROSet are either registered trademarks or trademarks of Intel Co...

Page 3: ...panels and committees of scientists who continually review and interpret the extensive research literature In some situations or environments the use of this prod uct may be restricted by the propriet...

Page 4: ...and transmits radio frequency energy while switched on Remember that interference can occur if it is used close to TV sets radios computers or inadequately shielded equipment Follow any special regul...

Page 5: ...gned to be connected to the telephone network or premises wiring using a compatible modular jack which is Part 68 compliant See Installation Instructions for details 3 The REN is used to determine the...

Page 6: ...e Numbers of all the devices does not exceed 5 REN See bottom of the computer RESTRICTIONS CONCERNANT LE RACCORDEMENT DE MAT RIEL AVIS L tiquette d Industrie Canada identifie le mat riel homologu Cett...

Page 7: ...f our above mentioned products please contact our web address http www doc panasonic de Authorised Representative Panasonic Testing Centre Panasonic Marketing Europe GmbH Winsbergring 15 22525 Hamburg...

Page 8: ...direct sunlight may deform the cabinet and or cause trouble in the inter nal parts Continued use in such a resulting condition may lead to short circuiting or insulation defects etc which may in turn...

Page 9: ...not be used for a long period of time a month or more charge or discharge use the battery pack until the remaining battery level becomes 30 to 40 and store it in a cool dry place z This computer preve...

Page 10: ...Numeric key NumLk Scroll lock ScrLk Drive status SD Memory Card status Blinking During access or a password is requested Reference Manual SD Memory Card Wireless ready This indicator lights when Wire...

Page 11: ...with the cable N SIM Card slot Only for model with Wireless WAN Reference Manual Wireless WAN O 2nd LAN Port 4 Modem Port 5 IEEE 1394 Interface Connector 6 4 Only for model with 2nd LAN Reference Man...

Page 12: ...Note that the computer consumes electricity even when the computer power is off If the battery pack is fully charged the battery will fully discharge in the fol lowing period of time When power is off...

Page 13: ...firm the wireless switch page 11 is OFF B Press and hold the power switch page 10 until the power indicator page 10 lights CAUTION z Do not press the power switch repeatedly z The computer will be for...

Page 14: ...ssword The user name or password is incorrect may be displayed and you will not be able to log on to Windows page 23 z You cannot choose the following words for user name and password CON PRN AUX CLOC...

Page 15: ...time of purchase The screen automatically turns off after 10 minutes 2 of inactivity The computer automatically enters sleep 3 after 20 minutes of inactivity 2 Windows XP 15 minutes 3 Refer to Referen...

Page 16: ...the battery information so that you can use the battery pack in the optimum condition to obtain longer operation time To access the Important Tips Double click on the desktop z Alternatively click St...

Page 17: ...irplane take the computer with you and never put it in your checked luggage When using the computer on airplane follow the airline s instructions z When carrying a spare battery put it in a plastic ba...

Page 18: ...ze To clean areas other than the LCD panel Wipe with a soft dry cloth such as gauze When using detergent dip a soft cloth in water diluted detergent and wring it thoroughly CAUTION z Do not use benzen...

Page 19: ...e factory default After reinstallation you can cre ate a new partition For how to create a new partition refer to To change the partition structure page 15 z Reinstall to the System and OS partitions...

Page 20: ...ride 7 Press Enter The computer will restart 8 Click Reinstall Windows and click Next The License Agreement screen appears 9 Click Yes I agree to the provisions above and wish to continue and click Ne...

Page 21: ...computer leave it in an envi ronment of 5 C 41 F or higher temperature for about an hour and then turn on the power once more Cannot turn on the computer The computer does not resume from sleep standb...

Page 22: ...rt Control Panel Clock Language and Region Date and Time Click start Control Panel Date Time Language and Regional Options Date and Time z If the problem persists the internal clock battery may need t...

Page 23: ...password and press Enter press and hold F8 Entering Password Even after entering the password password input screen is displayed again z The computer may be in ten key mode If the NumLk indicator lig...

Page 24: ...startup is complete during Setup Utility etc z When the Command Prompt is set to Full Screen by pressing Alt Enter the picture is displayed on one of the screens only When the window display is resto...

Page 25: ...object to the emergency hole z A pin of 1 3 mm in diameter is recommended to remove a disc using the emergency hole A When the diameter of the pin is smaller than this insert the pin slightly downwar...

Page 26: ...on with your transfer of the single Product which was accompanied by the Programs to such other party At the time of such a transfer you must also transfer all copies whether in printed or machine rea...

Page 27: ...s Logiciels Vous ne pouvez ni modifier ni tenter de modifier les Logiciels E Vous ne pouvez c der les Logiciels et en octroyer la licence une autre partie qu en rapport avec votre cession du Produit u...

Page 28: ...W 24X Max Writing 10 zDVD RAM 8 5X Max zDVD R 8X Max zDVD R DL 6X Max zDVD RW 6X Max z R 8X Max z R DL 6X Max z RW 4X Max zHigh Speed RW 8X Max zCD R 24X Max zCD RW 4X zHigh Speed CD RW 10X zUltra Spe...

Page 29: ...arging Time 31 Approx 2 hours Power Consumption 32 Approx 30 W 33 Approx 100 W maximum when recharging in the ON state Physical Dimensions W D H including the carrying handle 340 mm 281 mm 46 55 mm 13...

Page 30: ...d LAN 17 Only for model with modem 18 Only for model with TPM For information on TPM refer to the Installation Manual of TrustedPlatform Module TPM by the following procedure Click Start and input c u...

Page 31: ...When using in low temperature environment startup may become slow or battery operation time may become short The computer consumes power when the hard disk is warm ing up during startup Therefore if...

Page 32: ...ing only modem replacement or modem installation related issues All modems must be approved by the wireless carrier prior to use Any use or attempted use of a wireless modem not approved and activated...

Page 33: ...ic Failures which result from alteration accident misuse introduction of liquid or other foreign matter into the unit abuse neglect installation maladjustment of consumer controls improper maintenance...

Page 34: ...a Inc Computer Products Marketing 5770 Ambler Drive Missis sauga Ontario L4W 2T3 within the warranty period together with a copy of your purchase receipt and an explanation of the sus pected defect PC...

Page 35: ...keting produits informatiques 5770 Ambler Drive Mississauga Ontario L4W 2T3 dans les soixante 60 jours suivant la date d achat original Joignez votre envoi une pi ce justificative de votre achat et un...

Page 36: ...r Drive Mississauga Ontario L4W 2T3 Outline of the International ENERGY STAR Office Equipment Program The international ENERGY STAR Office Equipment Program is an international program that promotes e...

Reviews: