background image

14

Getting Star

ted

Run the Reference Manual

1

Turn your computer on

2

Select [Reference Manual] in [Start] - [Programs] - [Panasonic]
- [On-Line Manuals]

(The display may be changed without notification.)
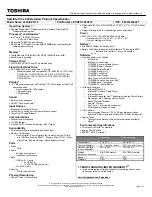
Zoom-in

The Reference Manual can be accessed on your computer.  When a printer is connected, the
Reference Manual can also be printed.
This manual explains functions for you to make greater use of the computer, such as how to add
peripheral devices, how the Setup Utility works and other useful information.

Hand tool

To move around
the current page.

Display the page

Go forward or backward a
page, or to the beginning or
end of a document.

Cancel or correct an operation

Change the display size

Perform a “Find” operation

Display of
the manual

Table of Content (Items)

By clicking an item, the cor-
responding page will be dis-
played at 100%.

Movable splitter bar

This bar can be dragged,
for example, to the right
to enlarge the display of
the Table of Contents.

Change the display size

You can choose to magnify/de-magnify the display.

Page indicator

A desired page can be displayed by inputting the page
number after clicking here.

Illustrations may be difficult to view depending on the magnification.  If this is the case,
we recommend that the display be magnified.
When the taskbar is hidden at the bottom portion of Acrobat

®

 Reader, set the maximum

display window size.
If a printer is connected, we recommend printing pages.  The illustrations and display
samples may not print with a high quality.

Exit

Reference Manual

NOTE

When the Reference Manual is started up for the first time, the License Agreement will
be displayed. After reading the agreement, select [Accept] to access the Reference Manual.

When the Reference Manual is run for the first time, an error message may appear if the
Reference Manual is run using a method that differs from the above explanation.  If an error
message appears, press [OK].

NOTE

Summary of Contents for CF-37 Series

Page 1: ...d on your computer Please refer to page 14 on how to access the Reference Manual 95 Reference Manual Read Me First Key Combination LED Indicators Touch Pad Advanced Reference Manual Suspend Hibernatio...

Page 2: ...d Windows are registered trademarks of Microsoft Corporation of the United States and or other coun tries Intel is a registered trademarks of Intel Corporation Celeron is a trademark of Intel Corporat...

Page 3: ...equipment This equipment is designed to be connected to the telephone network or premises wiring using a compatible modular jack which is Part 68 compliant See Installation Instructions for de tails...

Page 4: ...alence Numbers of all the devices does not exceed 5 REN See bottom of the computer RESTRICTIONS CONCERNANT LE RACCORDEMENT DE MAT RIEL AVIS L tiquette d Industrie Canada identifie le mat riel homologu...

Page 5: ...umbatterie Dieser Computer enth lt eine Lithiumbatterie zur Sicherung von Datum und Uhrzeit der eingebauten Uhr sowie anderer Systemdaten im Speicher bei einer Unterbrechung der Hauptstromversorgung D...

Page 6: ...t Do not throw the battery pack into a fire or expose it to excessive heat Do Not Disassemble Do not insert sharp objects into the battery pack expose it to bumps or shocks deform disas semble or modi...

Page 7: ...on Properly shut Windows down to avoid problems Start Shut Down Save all valuable data to disks Backing up data to disks will limit damage should trouble occur to your computer or should you inadvert...

Page 8: ...py disk drive etc may become inop erable Do not carry your computer when it is ON Remove all cables before transporting your computer We recommend preparing a fully charged battery and optional charge...

Page 9: ...95 System Pack 1 Operating Instructions 1 Battery Pack 1 AC Adapter 1 AC Cord 1 CF VZSU14 2 Read the LIMITED USE LICENSE AGREEMENT page 22 Before removing the seal covering the power switch please re...

Page 10: ...ted to the direct triggering of a selection like key NOTE Ctrl Power Switch This excludes a pointing device connected to the USB port e g a USB mouse 4Connect your computer to a power outlet CAUTION H...

Page 11: ...13 Touchscreen NOTE 6 Input the correct date time and time zone and press Close You can also complete these settings at a later time 7 Follow the on screen instructions You can complete these settings...

Page 12: ...imedia Pocket 1 Insert the SuperDisk Drive Pack in the multimedia pocket and turn the computer on 2 3 Set a floppy disk and make sure it is not in the write protected state then select Start Programs...

Page 13: ...y using a dry soft cloth such as gauze or a soft cloth first applied with detergent diluted with water and then thoroughly wrung Do not use benzene or thinner or disinfectant type alcohol The touch pa...

Page 14: ...bar can be dragged for example to the right to enlarge the display of the Table of Contents Change the display size You can choose to magnify de magnify the display Page indicator A desired page can b...

Page 15: ...the computer is powered off you must wait at least ten seconds before powering it on again When the CPU temperature rises the computer may not power on to prevent the CPU from overheating Should this...

Page 16: ...operation when the touch pad or the touchscreen is used or a key is pressed We recommend using a key that will not result in an input from the keyboard such as Shift System Devices in Start Settings C...

Page 17: ...Setup to reconfigure the system 0251 System CMOS checksum bad Default configuration used System CMOS has been corrupted or modified incorrectly perhaps by an application program that changes data sto...

Page 18: ...sted nnnn kB System RAM Passed Where nnnn is the amount of system RAM in kilobytes successfully tested Operating System not found Operating system cannot be located on either drive A or drive C Enter...

Page 19: ...the date and time through Date Time in Start Settings Control Panel When the computer is connected to a Local Area Network LAN please confirm the date and time of the server If you continue to experi...

Page 20: ...sumed In this case connect the external dis play Has the computer been set to the power saving mode To resume operation of your computer from ECO mode press any key To save power your computer may hav...

Page 21: ...the ECO mode the computer to the LCD is automatically cut In this case perform the touch pad operation 7 Make a selection from the menu To restore all contents of the hard disk to factory default inc...

Page 22: ...ed documentation available to any third party by time sharing or otherwise without the prior written consent of MEI D You may not copy or reproduce or permit to be copied or reproduced the Programs or...

Page 23: ...ouvez assembler en sens inverse compiler en sens inverse ni retracer les Logiciels ni aucune de leurs copies de fa on lectronique ou m canique en tout ou en partie Vous ne pouvez utiliser copier modif...

Page 24: ...or ampli fier equipped speakers Audio output from the internal speaker is disabled when headphones or external speakers are connected Headphone Jack Battery Indicator POWER Indicator LED Indicator In...

Page 25: ...rox 5 5 h 3 Power Off Approx 2 5 h 3 Clock Battery Coin type lithium battery 3 0 V Operating Time Approx 7 years AC Adapter 4 Input 100 V 240 V AC 50 Hz 60 Hz Output 15 6 V DC 3 85 A Power Consumption...

Page 26: ...e free from defects in materials and workmanship under normal use for a period of sixty 60 days from the date of delivery thereof to you as evidenced by your purchase receipt This is the only warranty...

Page 27: ...denced by your purchase receipt for your Panasonic Computer product THIS IS THE ONLY WARRANTY THAT PCI MAKES RESPECTING THE SOFTWARE MEDIA PCI does not warrant the software Please refer to the softwar...

Page 28: ...tes energy saving through the use of computers and other office equipment The program backs the development and dissemination of products with functions that effectively reduce energy consumption It i...

Reviews: