background image

16

3.

Connect the camera to the power outlet.

4.

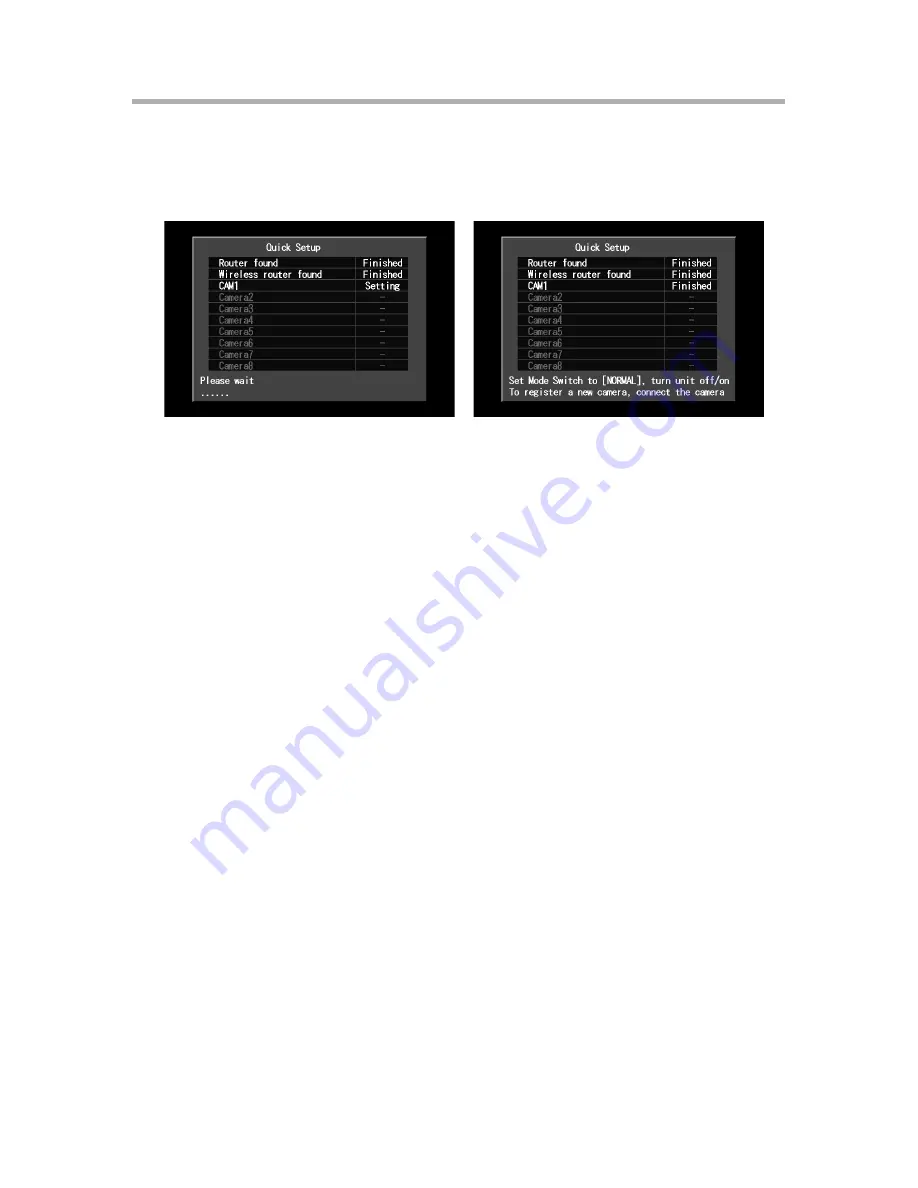
Wait while the Quick Setup utility restarts the camera, then configures and 
registers the camera.

When the camera has been configured and registered, "Finished" is 
displayed next to the camera name ("CAM1") and the buzzer sounds.

5.

To register another camera, connect the camera to one of the LAN jacks of 
the BL-WV10A or the BB-HGW700A, then turn the camera on by connecting 
it to the power outlet.

6.

When you have finished registering all cameras, set the BL-WV10A's mode 
switch to [NORMAL], disconnect the DC cord from the rear of the unit, 
reconnect the DC cord, then continue from “Viewing Camera Images” on 
page 17. If images can be viewed from all cameras, disconnect devices as 
necessary and place them where you plan to use them.

Summary of Contents for BL-WV10A

Page 1: ... 800 332 5368 BL WV10A AC adaptor AC cord Ethernet cable Part no PQLV202Y Cord length 3 m 10 ft Part no PSJA1069Z Length 1 8 m 5 ft 11 in Part no PQJA10138Z Cat 5 straight cable Length 1 m 3 ft 3 in Video cable Stand Remote control Batteries 2 AA size Part no PSJP01R02Z Length 1 5 m 5 ft Part no PSYLWV10N Part no PSWEWV10A Part no R6DW 2ST Setup Guide this manual Operating Instructions Warranty Se...

Page 2: ...onic AC adaptor and AC cord 9 The AC adaptor must remain connected at all times It is normal for the adaptor to feel warm during use 10 To prevent the risk of fire or electrical shock do not expose this product to rain or any type of moisture 11 Do not touch the product or the AC adaptor and AC cord during lightning storms 12 Unplug this product when unused for a long period of time 13 Refer all s...

Page 3: ...less communication interference and instability do not use this product near the following devices Wireless transmitters radio transmitters cellular transmitters etc Wireless devices which operate at 2 4 GHz security equipment POS systems cordless telephones etc Microwave ovens 2 Wireless communication range and quality may be affected if the following types of objects are located between or near ...

Page 4: ...ras are not supported by the BL WV10A KX HCM8 KX HCM10 KX HCM230 KX HCM250 KX HCM270 KX HCM280 For the latest firmware visit http panasonic co jp pcc products en netwkcam Setup Overview 1 Insert the batteries in the remote control 2 Connect the BL WV10A to the power outlet and to the TV 3 Use the BL WV10A s Basic Setup utility to configure the BL WV10A 4 Connect the cameras and an optional BB HGW7...

Page 5: ...to select on screen items The RETURN button is used to return to the previous menu The ENTER button is used to select a menu item or parameter When using the remote control with the BL WV10A make sure you aim the remote control toward the unit s remote control sensor Insert the batteries positioning the and poles as indicated While pulling the cover toward you lift it up Align the cover and press ...

Page 6: ... pages listed below Connecting cameras directly to the BL WV10A To connect cameras directly to the BL WV10A see page 8 Connecting cameras using an optional BB HGW700A Camera Control Unit To connect a BB HGW700A see page 12 Note Only 1 BB HGW700A can be connected to the BL WV10A wirelessly BL WV10A TV Internet BB HGW700A BL WV10A TV PC ...

Page 7: ...ter see Connecting Cameras Using a Router on page 42 of the Operating Instructions Note The only wireless router that can be used with the BL WV10A is the Panasonic BB HGW700A All other routers will require a wired connection Internet Router BL WV10A TV PC ...

Page 8: ...er outlet 5 Turn on the BL WV10A by connecting the DC cord to the unit The startup screen appears on the TV screen 6 Use an Ethernet cable to connect the camera to one of the LAN jacks on the BL WV10A If connecting a BL C30A set the camera s mode switch to WIRED 7 Connect the camera to the power outlet Rear panel of BL WV10A To TV Video cable included AC adaptor included AC cord included DC plug E...

Page 9: ...ations these parameters do not need to be changed For information regarding Basic Setup settings see Setting the User Name and Password on page 34 of the Operating Instructions 1 Use the navigator keys to select Finished then press ENTER 2 When the dialog is displayed select Yes then press ENTER to start Quick Setup The BL WV10A restarts ...

Page 10: ...he Quick Setup utility scans for network and wireless settings When the BL WV10A has been configured Finished is displayed and the buzzer sounds With this connection setup it is normal for no router or wireless router to be found 2 Wait while the Quick Setup utility restarts the camera then configures and registers the camera When the camera has been configured and registered Finished is displayed...

Page 11: ... BL WV10A then turn the camera on by connecting it to the power outlet 4 When you have finished registering all cameras set the BL WV10A s mode switch to NORMAL disconnect the DC cord from the rear of the unit reconnect the DC cord then continue from Viewing Camera Images on page 17 ...

Page 12: ...onnect the DC cord to the AC adaptor and to the power outlet 5 Turn on the BL WV10A by connecting the DC cord to the unit The startup screen appears on the TV screen 6 Use an Ethernet cable to connect the BB HGW700A to one of the LAN jacks on the BL WV10A 7 Connect the BB HGW700A to the power outlet Ethernet cable Rear panel of BB HGW700A To power outlet Rear panel of BL WV10A To TV Video cable in...

Page 13: ...structions 1 Select Camera Settings then press ENTER 2 Use the navigator keys to select Admin User Name then press ENTER 3 Enter the administrator user name 6 or more characters and or digits the press STOP to save the setting For instructions on entering characters see Entering Characters with the Remote Control on page 19 4 Select Admin Password then press ENTER 5 Enter an administrator password...

Page 14: ...14 7 When the dialog is displayed select Yes then press ENTER to start Quick Setup Make sure 2 minutes have passed since you turned on the BB HGW700A The BL WV10A restarts ...

Page 15: ...fter the unit restarts wait while the Quick Setup utility scans for network and wireless settings When the BL WV10A and BB HGW700A have been configured Finished is displayed and the buzzer sounds 2 Use an Ethernet cable to connect the camera to one of the LAN jacks on the BL WV10A or to one of the LAN jacks on the BB HGW700A Ethernet cable LAN jacks Rear panel of BL WV10A Rear panel of BB HGW700A ...

Page 16: ... another camera connect the camera to one of the LAN jacks of the BL WV10A or the BB HGW700A then turn the camera on by connecting it to the power outlet 6 When you have finished registering all cameras set the BL WV10A s mode switch to NORMAL disconnect the DC cord from the rear of the unit reconnect the DC cord then continue from Viewing Camera Images on page 17 If images can be viewed from all ...

Page 17: ...NORMAL and turn on the BL WV10A The startup screen will appear If the Date and Time screen appears set the date and time then press ENTER The camera image should then appear While camera images you can aim the camera by panning and tilting the lens using the navigator keys Pressing DISPLAY repeatedly displays different camera and image information Pressing ENTER aims the camera at the camera s Hom...

Page 18: ...d in wired mode make sure the camera s switch is set to WIRED If the camera is a BL C30A being used wirelessly make sure the camera s switch is set to WIRELESS If the wireless signal from a wireless camera is too weak motion images may become disrupted Confirm the strength of the signal by pressing DISPLAY while viewing the camera Refer to the information on page 3 and relocate the camera if the s...

Page 19: ...es and passwords etc Use the navigator keys to select the desired character then press ENTER to copy the text to the text field in the upper left part of the screen You can erase characters beginning with the last entered character by pressing 1 When you have finished press STOP to use the entered characters You will return to the previous screen automatically ...

Page 20: ... property of their respective owners 1 Raise the antenna 2 Align the first and last slot as shown an insert the BL WV10A into the stand Antenna First slot KK0505CH0 PSQX3750ZA Printed in Japan 2005 Panasonic Communications Co Ltd All Rights Reserved Copyright This material is copyrighted by Panasonic Communications Co Ltd and may be reproduced for internal use only All other reproduction in whole ...

Reviews: